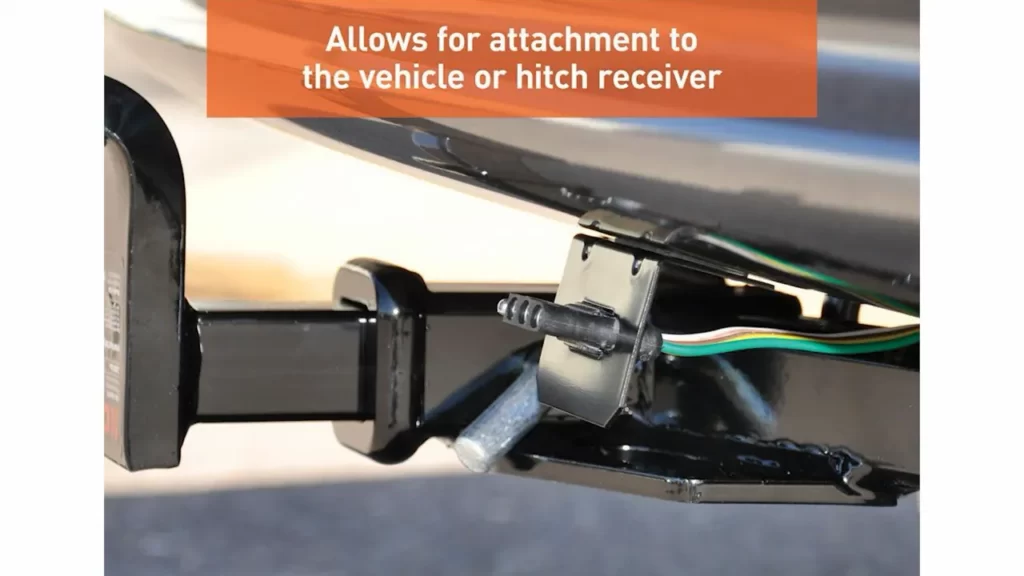
To install a wiring harness for a trailer hitch, follow these steps: locate the vehicle’s wiring harness, connect the corresponding wires in the harness to the trailer’s wiring, secure the connections with zip ties or electrical tape, and test all the lights and signals for proper functionality. Planning to tow a trailer requires the proper installation of a wiring harness for a trailer hitch to ensure all the lights and signals work correctly.
By following a few simple steps, you can easily connect your vehicle’s wiring to the trailer’s electrical system. This guide will walk you through the process, allowing you to secure the connections and test the lights for efficient and safe towing.
So, let’s dive right in and learn how to install a wiring harness for a trailer hitch.
What Is A Wiring Harness For A Trailer Hitch And Why Is It Important?
**What is a wiring harness for a trailer hitch and why is it important?** **Definition and function of a wiring harness for a trailer hitch** A wiring harness for a trailer hitch is a set of electrical cables and connectors that enable the communication between the vehicle and the trailer. It serves as an intermediary, allowing the electrical signals generated by the vehicle’s electrical system to power and control various components of the trailer, such as its lights, brakes, and turn signals. The wiring harness consists of multiple wires that are color-coded and arranged in a specific configuration. These wires connect to the corresponding electrical components on both the vehicle and the trailer, ensuring a seamless flow of electricity and allowing for proper synchronization between the two. **Importance of having a wiring harness for a trailer hitch** Having a wiring harness for your trailer hitch is vitally important for several reasons. Let’s explore the key reasons why you should consider installing a wiring harness before towing your trailer: 1. **Safety**: A wiring harness ensures that your trailer’s lights, brakes, and turn signals work effectively and are synchronized with your vehicle. This not only keeps you visible to other drivers on the road but also allows them to anticipate your actions, reducing the risk of accidents. 2. **Compliance with regulations**: Many jurisdictions have specific regulations and requirements regarding trailer lighting and electrical connections. By installing a wiring harness, you ensure that your setup complies with these regulations, avoiding potential fines and penalties. 3. **Convenience**: Using a wiring harness simplifies the process of connecting and disconnecting your trailer. With a properly installed harness, you can quickly and effortlessly establish a secure electrical connection between your vehicle and trailer, saving you time and hassle. 4. **Protection for your vehicle’s electrical system**: Without a wiring harness, the electrical demands of your trailer can overload and damage the electrical system of your vehicle. A harness acts as a safeguard, preventing any potential damage and ensuring the longevity and reliability of your vehicle’s electrical components. To sum up, a wiring harness for a trailer hitch is an essential component for safe and efficient towing. It enables proper communication between your vehicle and trailer, ensuring that all electrical connections are secure, synchronized, and compliant with regulations. By investing in a wiring harness, you not only protect your vehicle’s electrical system but also enhance your safety and convenience on the road.
Different Types Of Wiring Harnesses For Trailer Hitch
Overview of different wiring harness options available in the market
When it comes to installing a wiring harness for your trailer hitch, it’s important to understand the different options available in the market. A wiring harness is an essential component that allows your trailer’s lights to work in sync with your vehicle’s electrical system. By choosing the right wiring harness, you can ensure a smooth and hassle-free towing experience.
Pros and cons of each type of wiring harness
There are multiple types of wiring harnesses to choose from, each with its own set of pros and cons. Let’s take a closer look at some of the most common options:
Standard wiring harness
A standard wiring harness is the most basic option available. It typically consists of a 4-pin connector that provides power to the trailer’s taillights, brake lights, and turn signals. This type of harness is suitable for small trailers and is relatively easy to install. However, it may not be sufficient for larger trailers that require additional electrical connections.
Modular wiring harness
A modular wiring harness offers more versatility compared to a standard harness. It usually comes with a 4-pin connector, but it also enables you to add on extra connectors for various trailer functions such as electric brakes, reverse lights, and auxiliary power. The modular design makes it easy to customize the wiring harness according to your trailer’s specific requirements. However, keep in mind that additional connectors may require more complex installation.
Vehicle-specific wiring harness
If you’re looking for a seamless integration between your vehicle and trailer, a vehicle-specific wiring harness is your best bet. This type of harness is specifically designed to fit your vehicle’s make and model, ensuring a perfect match. Vehicle-specific wiring harnesses often come with a plug-and-play installation, minimizing the need for complicated wiring modifications. However, they may be more expensive compared to standard or modular harnesses.
Choosing the right wiring harness for your trailer hitch
Choosing the right wiring harness for your trailer hitch depends on various factors such as the size of your trailer, the number of electrical functions required, and your budget. Consider the following pointers to make an informed decision:
- Assess your trailer’s electrical needs: Determine the specific electrical functions your trailer requires, such as electric brakes or reverse lights.
- Evaluate your towing frequency: If you tow frequently, a more durable and reliable wiring harness may be a better investment.
- Consider your installation skills: If you have limited experience with electrical work, a plug-and-play harness or professional installation may be the right choice.
- Research customer reviews: Read reviews and testimonials from other trailer owners to get an idea of the performance and reliability of different wiring harness options.
- Consult with experts: If you’re unsure about which wiring harness to choose, consult with professionals or experienced trailer owners who can provide valuable insights.
By carefully considering these factors, you can select the ideal wiring harness for your trailer hitch, ensuring a hassle-free towing experience and peace of mind on the road.
Gathering The Necessary Tools And Materials
Before you begin installing a wiring harness for your trailer hitch, it is important to gather all the tools and materials you will need. Having everything readily available will make the installation process smoother and more efficient. Here is a handy list of tools and some tips for selecting the right materials to get you started.
List of tools required for the installation process:
Installing a wiring harness may require the use of various tools. Here is a list of some essential tools you will need:
- Wire cutters
- Wire strippers
- Electrical tape
- Heat shrink tubing
- Screwdriver set
- Pliers
- Socket set
- Drill and drill bits
- Electrical tester
Ensure you have all these tools before you begin the installation process. Having the right tools will allow you to work efficiently and minimize any potential issues that may arise during the installation.
Tips for selecting the right materials:
Choosing the right materials for your wiring harness is crucial to ensure a safe and reliable electrical connection between your vehicle and trailer. Here are a few tips to help you select the right materials:
- Opt for high-quality wires: Invest in wires that are specifically designed for trailer hitch applications. These wires are usually color-coded for easy identification and have a durable insulation to withstand harsh weather conditions.
- Consider the length: Measure the distance between your vehicle’s electrical system and the trailer hitch connection point. This will help you determine the required length of wires needed for the installation.
- Choose the appropriate connectors: Look for connectors that are compatible with your vehicle’s electrical system and the trailer’s wiring harness. It is important to ensure a proper fit to avoid any loose connections or potential electrical issues.
- Use quality electrical tape and heat shrink tubing: These materials are essential for insulating and protecting the wire connections. Make sure to use high-quality electrical tape and heat shrink tubing to prevent any moisture or corrosion from affecting the connection.
By following these tips, you can select the right materials for your wiring harness installation, ensuring a reliable and long-lasting connection between your vehicle and trailer.
Gathering the necessary tools and materials for installing a wiring harness is an important step to successfully complete the installation process. Having the right tools and quality materials will make the task easier and ensure a safe and secure connection. Once you have everything ready, you can move on to the next steps of the installation process, bringing you one step closer to enjoying the convenience and functionality of your trailer hitch.
Preparation And Safety Precautions
Safety measures to take before starting the installation
Before you begin installing a wiring harness for your trailer hitch, it is crucial to prioritize safety. Taking adequate safety measures ensures that you can work on the installation with peace of mind and minimize the risk of accidents or mishaps. Here are a few essential safety precautions to keep in mind:
- Read the manufacturer’s instructions: Start by carefully reading through the instructions provided by the manufacturer. Pay close attention to any specific safety guidelines or warnings mentioned.
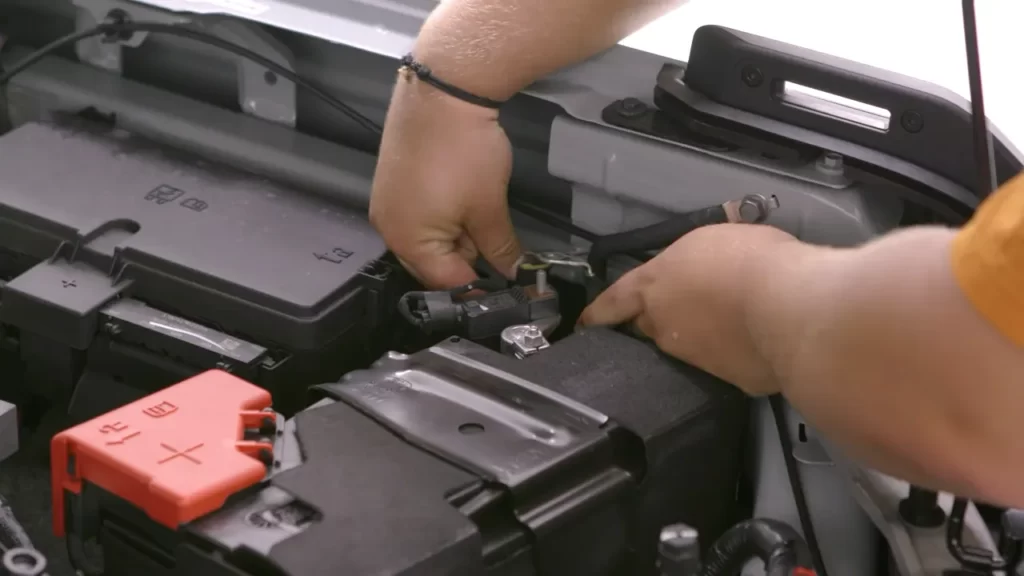
- Locate and disconnect the vehicle’s battery: Before handling any electrical components, it is important to disconnect the vehicle’s battery. This precaution helps prevent any accidental short circuits or electrical shocks during the installation process.
- Wear appropriate protective gear: Safety goggles and gloves are essential items to wear during the installation. They will safeguard your eyes from any flying debris or particles and protect your hands while handling wires and connectors.
- Ensure the vehicle is parked on a stable surface: Choose a flat and stable surface to park your vehicle before starting the installation. This will provide stability and reduce the chances of accidents due to vehicle movement.
- Use proper tools: Make sure you have the necessary tools readily available before you begin the installation. Using the appropriate tools not only makes the process smoother but also minimizes the risk of injuries caused by improper or makeshift tools.
Preparing the vehicle for the wiring harness installation
Preparing your vehicle for the installation of a wiring harness is a crucial step to ensure a successful and efficient installation process. To make the preparation easier, consider the following:
- Inspect the vehicle’s existing wiring: Start by examining the vehicle’s existing wiring to determine if any repairs or replacements are necessary. This step helps identify any potential issues that need to be addressed before installing the new wiring harness.
- Clean the workspace: Before starting the installation, clear out any clutter or debris from the workspace, both inside and around the vehicle. A clean workspace allows for better maneuverability and reduces the risk of accidents.
- Identify connection points: Locate the appropriate connection points in your vehicle where the wiring harness will be installed. These connection points may vary depending on the make and model of your vehicle, so consult the manufacturer’s instructions or user manual for guidance.
- Prepare the necessary tools and materials: Gather all the tools and materials required for the installation, based on the instructions provided by the manufacturer. This may include wire connectors, electrical tape, wire cutters, and crimping tools, among others.
- Plan the routing of the wiring harness: Before you begin the actual installation, plan the routing of the wiring harness to ensure it follows a logical and secure path. This step helps prevent potential damage to the wiring and ensures a clean and professional-looking installation.
By taking the necessary safety precautions and adequately preparing your vehicle, you can ensure a smooth and efficient installation process for your trailer hitch wiring harness. Following these steps will help you complete the installation successfully and enjoy your trailer hitch with peace of mind.
Locating And Accessing The Vehicle’S Wiring System
Before installing a wiring harness for your trailer hitch, it is crucial to identify and locate the vehicle’s wiring system. This will ensure a smooth installation process and prevent any potential damage to the vehicle or the hitch. Here’s how you can do it:
Identifying the vehicle’s wiring system
The first step is to find out where the vehicle’s wiring system is located. The exact location can vary depending on the make and model of your vehicle, but typically, the wiring system can be found either underneath the vehicle or inside the trunk.
To locate the wiring system underneath the vehicle, you can follow these steps:
- Ensure that the vehicle is parked on a flat and level surface.
- Put on safety goggles to protect your eyes from any debris or dirt.
- Get underneath the vehicle using a jack or lift.
- Inspect the underside of the vehicle, specifically looking for a group of wires that are neatly bundled together.
If you are unable to locate the wiring system underneath the vehicle, you can try finding it inside the trunk. Here’s how:
- Open the trunk of your vehicle and remove any items that may obstruct your view.
- Look at the sides of the trunk, near the taillights, for a wiring harness or a connector.
- If you see a wiring harness or connector, that is likely the vehicle’s wiring system.
Locating the specific wires for the trailer hitch
Once you have identified the vehicle’s wiring system, the next step is to locate the specific wires for the trailer hitch. These wires will be responsible for powering the lights and brakes on your trailer. To find them, you can follow these steps:
- Refer to the owner’s manual of your vehicle to identify the color-coding of the wires.
- Locate the wires that correspond to the functions required for your trailer, such as brake lights, turn signals, and taillights.
- Carefully inspect the wires to ensure they are in good condition and free from any damage or corrosion.
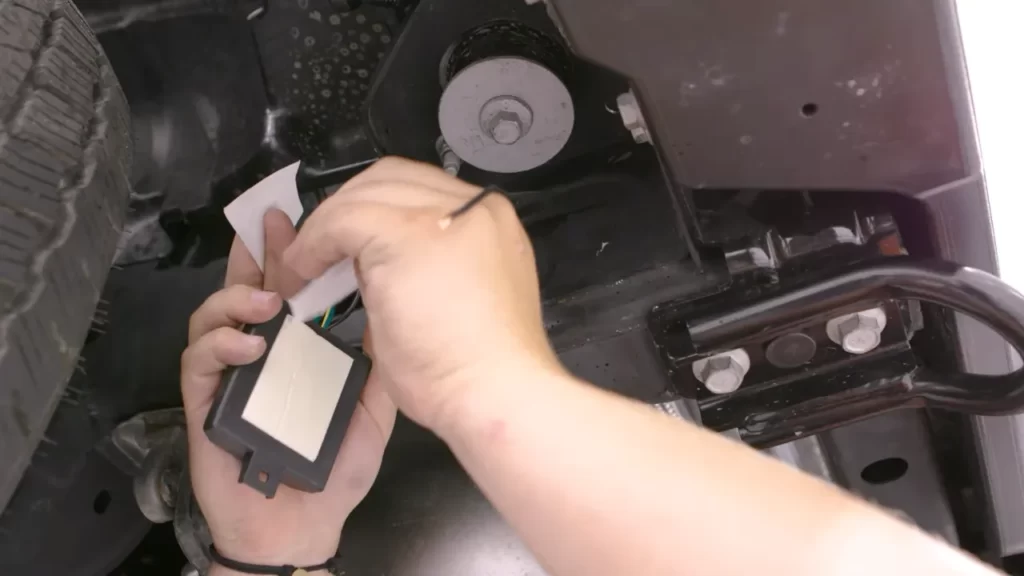
It is important to note that some vehicles may require the installation of a separate wiring converter to convert the signals from the vehicle’s wiring system to be compatible with the trailer hitch. This converter can typically be installed between the vehicle’s wiring system and the trailer hitch.
By following these steps and locating the vehicle’s wiring system and the specific wires for the trailer hitch, you can ensure a successful and hassle-free installation of your wiring harness. Remember to always consult the vehicle’s manual for specific instructions and guidelines before proceeding with any installation.
Connecting The Wiring Harness
When it comes to installing a wiring harness for a trailer hitch, connecting it properly to your vehicle’s wiring system is crucial. This step is essential to ensure the safe and reliable operation of your trailer’s lights and other electrical components. Here are step-by-step instructions for connecting the wiring harness to your vehicle’s wiring system, as well as tips on properly securing and protecting the wiring connections.
Step-by-step instructions for connecting the wiring harness to
the vehicle’s wiring system
Follow these steps to connect the wiring harness to your vehicle’s wiring system:
- Start by locating the wiring connector on your vehicle. This connector is usually found near the rear bumper or inside the trunk.
- Once you’ve located the wiring connector, carefully remove the protective cap, if present.
- Next, take the wiring harness for the trailer hitch and identify the corresponding connector end.
- Gently insert the connector end of the wiring harness into the vehicle’s wiring connector. Ensure that the connectors are properly aligned before pushing them together.
- Once the connectors are aligned, firmly push them together until they lock into place. You may hear a clicking sound when they are properly connected.
Properly securing and protecting the wiring connections
After connecting the wiring harness to the vehicle’s wiring system, it’s important to secure and protect the wiring connections to prevent any potential damage or accidents. Here are some tips:
- Use zip ties or electrical tape to secure the wiring harness along existing wiring or vehicle components. This will help prevent the harness from sagging or getting caught on any moving parts.
- Avoid running the wiring harness near any hot or moving parts of the vehicle, as excessive heat or friction can damage the wires.
- If necessary, use a wire loom or conduit to protect the wiring harness from the elements, such as rain or road debris. This will prolong the lifespan of the harness and ensure reliable operation.
- Regularly inspect the wiring connections for any signs of wear or damage. If you notice any frayed wires, loose connectors, or corrosion, take immediate action to repair or replace the affected components.
By following these step-by-step instructions for connecting the wiring harness to your vehicle’s wiring system and properly securing and protecting the wiring connections, you can ensure a safe and hassle-free towing experience. Taking the time to install the wiring harness correctly will provide peace of mind and help you avoid any electrical issues while on the road.
Testing The Wiring Harness
Conducting a thorough test to ensure the wiring harness is properly installed
After successfully installing the wiring harness for your trailer hitch, it is crucial to conduct a thorough test to ensure that everything is functioning properly. This step is essential as it helps prevent any potential issues or malfunctions when you are on the road. In this section, we will guide you through the process of testing the wiring harness, including troubleshooting common issues and how to fix them.
Troubleshooting common issues and how to fix them
Damaged or loose connections
One of the most common issues you may encounter is damaged or loose connections. It is important to visually inspect all the connections and ensure they are secure and properly attached. Loose connections can result in intermittent operation or even complete failure of the wiring harness. If you find any loose connections, tighten them using appropriate tools. Be careful not to overtighten, as this may damage the wires or connectors. If you notice any damaged connections, they will need to be repaired or replaced. Damaged connections can lead to electrical shorts, which can be dangerous and may cause melting or burning of the wires.
Incorrect wiring installation
Another common issue is incorrect wiring installation, which can result in improper functionality of the wiring harness. To troubleshoot this issue, you can refer to the wiring diagram provided by the harness manufacturer. Compare the wiring diagram to your actual installation and ensure that all the wires are connected to their respective terminals correctly. Incorrectly connected wires can lead to malfunctioning lights or brakes on the trailer. If you find any discrepancies between the wiring diagram and your installation, make the necessary adjustments by reconnecting the wires as indicated in the diagram. Always double-check the connections to ensure accuracy before continuing with the final testing.
Fuse problems
A blown fuse can also cause issues with the wiring harness. Check the fuse that is associated with the trailer’s electrical components. If you find a blown fuse, replace it with a new one of the same rating. It is recommended to keep spare fuses in your vehicle for emergency situations.
Testing for proper functionality
Now that you have addressed any potential issues, it is time to test the functionality of the wiring harness. To do this, connect your vehicle to the trailer and turn on the hazard lights, brake lights, and turn signals. Verify that all lights on the trailer are working correctly and in sync with your vehicle’s lights. Additionally, make sure to check the trailer’s brakes. Apply the brakes in your vehicle and observe if the trailer’s brakes engage as well. If everything is operating as expected, your wiring harness installation has been successful. By conducting a thorough test and troubleshooting any common issues, you can ensure that your wiring harness for the trailer hitch is properly installed. This will provide you with peace of mind and a safe towing experience on the road. Remember to perform regular maintenance checks and address any issues promptly to maintain optimal functionality of your wiring harness.
Common Problems That May Arise With A Wiring Harness
Installing a wiring harness for a trailer hitch is a crucial step in ensuring the proper functioning of your trailer’s electrical components. However, just like any other mechanical system, wiring harnesses can encounter issues over time. In this section, we will highlight some of the common problems that may arise with a wiring harness and discuss the potential causes of these issues.
Identifying common issues with the wiring harness
When it comes to troubleshooting wiring harness problems, it is important to be able to identify the common issues that may occur. By knowing what to look for, you can swiftly diagnose and resolve any wiring problems before they become major headaches during your trailer hitch installation.
Here are some of the most prevalent problems you might come across:
- Poor or no electrical signal transmission
- Flickering or dim trailer lights
- Inoperable brake lights or turn signals
- Corrosion or damage to the wiring
- Exposed wires or loose connections
Understanding the potential causes of these problems
Now that we have identified the common issues with the wiring harness, it is crucial to understand what might be causing these problems to occur. By understanding the potential causes, you can take the necessary steps to resolve these issues effectively and ensure a smooth installation process.
Here are some of the potential causes of the aforementioned problems:
| Potential Causes | Solution |
|---|---|
| Poor or no electrical signal transmission | Check for faulty connectors or loose wiring connections. Replace any damaged components. |
| Flickering or dim trailer lights | Inspect the grounding connection and wiring. Ensure the wiring is securely connected and intact. |
| Inoperable brake lights or turn signals | Confirm that the correct wiring harness is installed and compatible with your vehicle and trailer. Check the fuse and replace if necessary. |
| Corrosion or damage to the wiring | Thoroughly inspect the wiring for any signs of corrosion or physical damage. Replace any compromised sections. |
| Exposed wires or loose connections | Securely fasten and insulate any loose connections or exposed wires. Use wire connectors and electrical tape for proper insulation. |
By being aware of these potential causes and taking the necessary steps to address them, you can resolve common wiring harness problems and ensure a reliable and safe trailer hitch installation.
In conclusion, identifying common issues with the wiring harness and understanding their potential causes is crucial for a successful trailer hitch installation. By familiarizing yourself with these problems and knowing how to troubleshoot them, you can tackle any wiring issues confidently and enjoy a hassle-free towing experience.
Troubleshooting Steps
Step-by-step guide to troubleshooting the wiring harness
Installing a wiring harness for your trailer hitch is essential to ensure proper connectivity and functionality of your trailer’s lights and brakes. However, even with careful installation, issues may arise, and troubleshooting becomes necessary. To help you resolve any problems you encounter, here is a step-by-step guide to troubleshooting the wiring harness for your trailer hitch:
- Check the connections: Start by inspecting the connections between the wiring harness and the vehicle’s electrical system. Make sure all the connections are secure and free from corrosion. Loose connections can result in intermittent or no power supply to the trailer lights.
- Test the power supply: Use a multimeter or a circuit tester to check if there is a proper power supply reaching the wiring harness. Connect the tester to the power source and verify if it registers a voltage reading. Lack of power could indicate a blown fuse or a faulty wiring connection.
- Inspect the wiring harness: Carefully examine the entire length of the wiring harness for any signs of damage, such as frayed or exposed wires. Additionally, ensure that the wires are securely fastened and not tangled or pinched anywhere along their route. Damaged or improperly routed wires can hinder the proper functioning of the trailer lights and brakes.
- Test the trailer lights: Connect your trailer to the vehicle and turn on the lights. Go through each light individually, including the brake lights, turn signals, and tail lights, to confirm if they are working properly. If any light is not functioning, check the corresponding wiring and connections for any faults.
- Check the vehicle’s compatibility: Confirm that your vehicle’s electrical system is compatible with the wiring harness and the trailer’s requirements. Some vehicles may require additional adapters or modules to ensure seamless integration. Check your vehicle’s owner’s manual or consult a professional if needed.
- Consult the troubleshooting guide: If you have followed the above steps and are still experiencing issues, refer to the troubleshooting guide provided with the wiring harness. The guide will offer specific solutions and recommendations based on the brand and model of the wiring harness you are using.
Tips for resolving common issues
While troubleshooting the wiring harness for your trailer hitch, you may encounter certain common issues. Here are a few tips to help you resolve them:
- Ensure proper grounding: A missing or faulty ground connection can lead to various electrical problems. Make sure that the ground wire is securely connected to a clean metal surface on your vehicle’s frame.
- Use dielectric grease: Apply dielectric grease to the electrical connections to protect them from moisture and corrosion. This can help maintain the integrity of the connections and prevent future issues.
- Verify bulb compatibility: Check that the bulbs you are using in the trailer lights match the recommended specifications in the wiring harness instructions. Using incompatible bulbs can cause erratic behavior and flickering lights.
- Inspect the fuse: If you suspect a blown fuse, locate the fuse box in your vehicle and check the corresponding fuse for the trailer lights. Replace any blown fuses with the appropriate rating to restore power.
- Seek professional assistance: If you are unable to identify or resolve the issue, it may be best to consult a professional. They have the expertise and tools to diagnose and fix wiring harness problems correctly.
By following these troubleshooting steps and implementing the tips provided, you can overcome common issues that may arise during the installation of your trailer hitch wiring harness. Ensure a safe and efficient towing experience by addressing any wiring problems promptly.
Regular Maintenance And Care For The Wiring Harness
Regular maintenance and care for the wiring harness is crucial to ensuring its longevity and optimal performance. By following some best practices, cleaning and inspecting the harness regularly, you can detect potential issues early on and take necessary steps to prevent any further damage or malfunction. In this section, we will discuss these best practices, as well as provide tips on how to clean and inspect the harness for potential issues. So, let’s dive in!
Best practices for ensuring the longevity of the wiring harness
To ensure the longevity of your trailer hitch wiring harness, it’s important to follow these best practices:
- Secure the wiring harness properly: When installing the harness, make sure that it is securely fastened and tightly fitted. Loose or improperly secured wiring harness can lead to unnecessary strain and wear, causing potential damage.
- Protect the harness from elements: Exposure to the elements can cause corrosion and deterioration of the wiring harness. It is crucial to protect the harness from rain, snow, and extreme temperatures by using weatherproofing materials such as electrical tape or heat shrink tubing.
- Avoid overloading the harness: Every wiring harness has a maximum load capacity. Overloading the harness with excessive electrical current can cause overheating and damage to the wires. Make sure to check the load capacity of the harness and never exceed it.
- Avoid twisting or kinking the wires: Twisting or kinking the wires can weaken the internal conductor and affect the conductivity and overall performance of the harness. Always handle the wires with care to prevent any unnecessary strain.
- Regularly check for loose connections: Loose connections can lead to intermittent functioning of the harness and potential electrical hazards. Check all the connections and ensure they are tight and secure.
Cleaning and inspecting the harness for potential issues
Regular cleaning and inspection of the wiring harness can help identify potential issues before they become major problems. Here are some steps you can take to clean and inspect the harness:
- Start by visually inspecting the entire length of the harness for any signs of wear, damage, or frayed wires. If you notice any issues, it’s important to address them immediately by repairing or replacing the affected sections.
- Use a clean cloth or soft brush to remove any dirt, dust, or debris that may have accumulated on the harness. Be gentle while cleaning to avoid damaging the wires or connectors.
- Check all the connectors for signs of corrosion or rust. If you notice any, carefully clean the connectors using a suitable electrical contact cleaner and a soft cloth.
- After cleaning, thoroughly dry the harness to prevent moisture buildup, which can lead to corrosion. You can use compressed air or simply let it air dry.
- Once the harness is dry, perform a functionality test by connecting it to a power source. Check all the lights, signals, and brakes to ensure they are functioning properly.
By following these best practices and regularly cleaning and inspecting the wiring harness for potential issues, you can ensure its longevity and keep your trailer hitch functioning smoothly. Remember, a well-maintained harness not only enhances your safety but also helps avoid costly repairs down the line.
Frequently Asked Questions Of How To Install Wiring Harness For Trailer Hitch
Can You Install A Trailer Wiring Harness?
Yes, you can install a trailer wiring harness. It is a straightforward process that allows you to connect your trailer’s lights and brakes to your vehicle. By following the provided instructions, you can easily install a trailer wiring harness and ensure the proper functionality of your trailer’s electrical system.
Do You Need A Wiring Harness For Hitch?
Yes, a wiring harness is necessary for a hitch. It connects the electrical system of your vehicle to the trailer’s lights, enabling proper functioning.
How Long Does It Take To Install A Hitch And Wiring Harness?
The installation of a hitch and wiring harness typically takes around 1-2 hours.
Is It Hard To Wire A Hitch?
Wiring a hitch isn’t difficult. It can be done easily and quickly with the right tools and instructions. Just follow the steps carefully, and you’ll have your hitch wired in no time.
Conclusion
Installing a wiring harness for a trailer hitch is an essential task for safe and convenient towing. By following the step-by-step guide mentioned in this blog post, you can easily perform the installation process. Remember to choose the right wiring harness for your vehicle, gather the necessary tools, and carefully connect the wires to ensure a reliable and efficient electrical connection.
With proper installation, you can enjoy a hassle-free towing experience and ensure the safety of your trailer and other road users.