To install a motorcycle chain, first, remove the old chain by loosening the master link, then install the new chain by aligning the connecting link and tightening the master link. Installing a motorcycle chain involves removing the old chain and installing a new one to ensure smooth and efficient power transmission between the engine and the rear wheel of the motorcycle.
Whether you are replacing a worn-out chain or upgrading to a better one, understanding how to install a motorcycle chain correctly is essential for maintaining the performance and longevity of your bike. By following a few simple steps, you can easily install a motorcycle chain and get back on the road in no time.
We will guide you through the process of installing a motorcycle chain, so let’s get started.
Preparing For The Installation
In order to ensure a smooth and successful installation of your motorcycle chain, it is important to properly prepare beforehand. This includes gathering the necessary tools and materials, as well as taking the appropriate safety precautions. By following these steps, you can ensure that your motorcycle chain installation goes off without a hitch.
Tools and Materials Needed
Before you begin the installation process, make sure you have the following tools and materials on hand:
- A motorcycle stand or paddock stand
- A socket wrench with the correct sized socket
- A torque wrench
- A chain tool or breaker
- New chain and master link
- Lubricant for the chain
- A cloth or rag for cleaning
Having these tools and materials readily available will save you time and frustration during the installation process. You won’t have to stop midway through to search for something you need, allowing you to stay focused and complete the task more efficiently.
Safety Precautions to Take
When working on any motorcycle maintenance task, it is important to prioritize safety. Here are some safety precautions you should take when installing your motorcycle chain:
- Make sure the motorcycle is on a level surface and securely supported by a stand to prevent it from falling over.
- Wear appropriate safety gear, including gloves and eye protection, to protect yourself from potential injuries.
- Ensure the motorcycle engine is turned off and the key is removed from the ignition.
- Allow the motorcycle to cool down before starting the installation to avoid burns from hot surfaces.
- Double-check that you have the correct chain size and type before beginning the installation.
- Read the manufacturer’s instructions or consult the motorcycle’s manual for any specific safety precautions or recommendations.
By taking these safety precautions, you can greatly reduce the risk of accidents or injuries during the installation process. Your well-being is of utmost importance, so don’t overlook these safety measures.
Removing The Old Chain
When it comes to maintaining your motorcycle, one crucial aspect is the chain. Over time, the chain can wear out and become loose, affecting the performance and safety of your ride. In this blog post, we will guide you through the process of installing a new motorcycle chain, starting with removing the old one. Follow these steps to ensure a smooth and efficient removal process.
<h3>Securing the motorcycle</h3>
Before you start removing the old chain, it is important to secure your motorcycle properly. This will prevent any accidental movement and keep you safe throughout the process. Ensure that your bike is on a stable surface and in a position where it won’t tip over. You may also want to consider using a motorcycle stand or wheel chock for added stability.
<h3>Loosening the rear axle nut</h3>
To remove the old chain, you will need to loosen the rear axle nut first. This nut secures the rear wheel in place and plays a crucial role in the chain removal process. Using a suitable wrench or socket, carefully loosen the rear axle nut in a counterclockwise direction. Make sure to keep the nut in a safe place as you will need it for reinstalling the new chain later.
<h3>Removing the master link</h3>
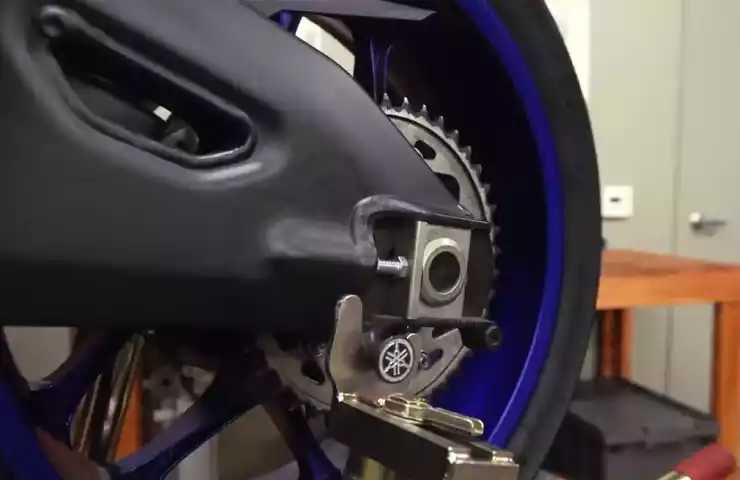
In order to separate the old chain, locate the master link. This link is designed to be easily disconnected and is typically identifiable by its different appearance. To remove the master link, you may need a pair of pliers or a chain tool. Follow the manufacturer’s instructions to disengage the master link, ensuring not to lose any small retaining parts that may be present.
<h3>Taking off the old chain</h3>
With the rear axle nut loosened and the master link removed, you can now take off the old chain. Slowly and carefully slide the chain off the sprockets and around the rear wheel. Ensure that the chain doesn’t scrape against any other components, potentially causing damage. Once the chain is completely off, inspect it for any signs of excessive wear or damage, which may require further attention or replacement.
Removing the old chain is a crucial step when it comes to installing a new motorcycle chain. By following these steps and ensuring that you have properly secured your motorcycle, loosened the rear axle nut, removed the master link, and taken off the old chain, you are now ready to install a fresh and well-functioning chain. Stay tuned for our next blog post on how to install a new motorcycle chain!
Measuring And Adjusting The New Chain
When it comes to installing a new motorcycle chain, one of the most crucial steps is measuring and adjusting the chain to ensure optimal performance and longevity. Properly adjusting the chain tension is essential, as it impacts not only the smoothness of your ride but also the overall safety of your motorcycle. In this article, we will guide you through the process of measuring and adjusting the new chain, step by step.
Determining the Correct Length
The first step in measuring and adjusting the new motorcycle chain is to determine the correct length for your specific bike. To do this, you will need to consult your motorcycle’s manual or contact the manufacturer for the recommended chain length. It’s important to note that different motorcycles may require different chain lengths, so be sure to double-check the specifications for your make and model.
Once you have the correct chain length, you can proceed with the installation process. Start by removing the old chain from your motorcycle. Use a chain breaker tool to break the old chain, and carefully remove it from the sprockets.
Adjusting the Chain Tension
After removing the old chain, it’s time to adjust the chain tension on your motorcycle. This step ensures that the new chain is properly aligned and not too loose or too tight. Follow these steps to adjust the chain tension:
- Position your motorcycle on a level surface and engage the rear wheel stand to elevate the rear wheel.
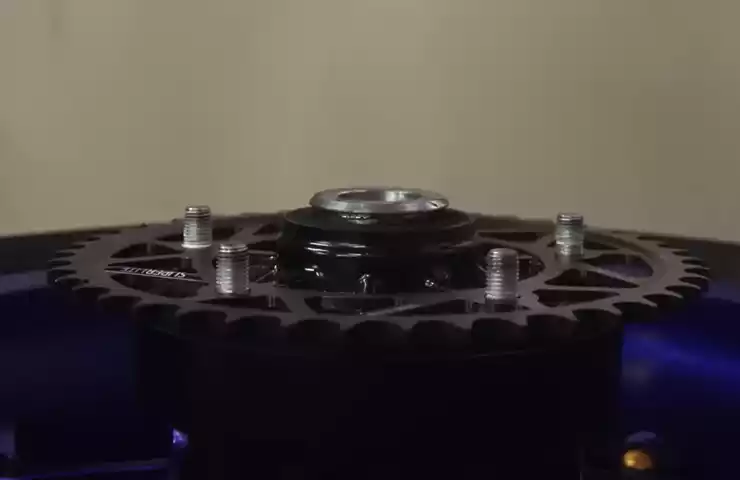
- Locate the chain adjusters on the swingarm, usually found on both sides of the wheel.
- Loosen the lock nuts on the chain adjusters but do not remove them completely.
- Turn the adjuster bolts clockwise or counterclockwise, depending on whether you need to tighten or loosen the chain tension.
- Refer to your motorcycle’s manual for the specific amount of chain sag recommended. Chain sag refers to the vertical distance the chain moves up and down in the middle of the chain span.
- Use a measuring tape or ruler to measure the chain sag. Adjust the chain tension by turning the adjuster bolts until the recommended chain sag is achieved.
- Tighten the lock nuts on the chain adjusters to secure the chain tension in place.
Remember to check the chain tension after riding a few kilometers to allow the new chain to settle in. If necessary, make additional adjustments to ensure proper tension and alignment.
By carefully measuring and adjusting the new chain, you can ensure optimal performance, reliability, and safety for your motorcycle. Remember to consult your motorcycle’s manual for specific instructions and recommendations for your make and model. Follow these steps diligently, and enjoy a smoother and more enjoyable riding experience with your newly installed motorcycle chain.
Installing The New Chain
Once you have removed the old chain from your motorcycle, it’s time to install the new chain. This crucial step ensures optimal performance and longevity for your motorcycle. In this section, we will guide you through the process of placing the new chain on the sprockets, connecting the chain ends, attaching the master link, and checking the chain tension.
Placing the new chain on the sprockets
The first step in installing a new chain is to carefully position it on the sprockets. Begin by aligning the chain on the rear sprocket, making sure it sits snugly in the teeth. Then, carefully thread the chain around the front sprocket, ensuring it engages properly. Take your time with this step to ensure the chain is properly seated on both sprockets.
Connecting the chain ends
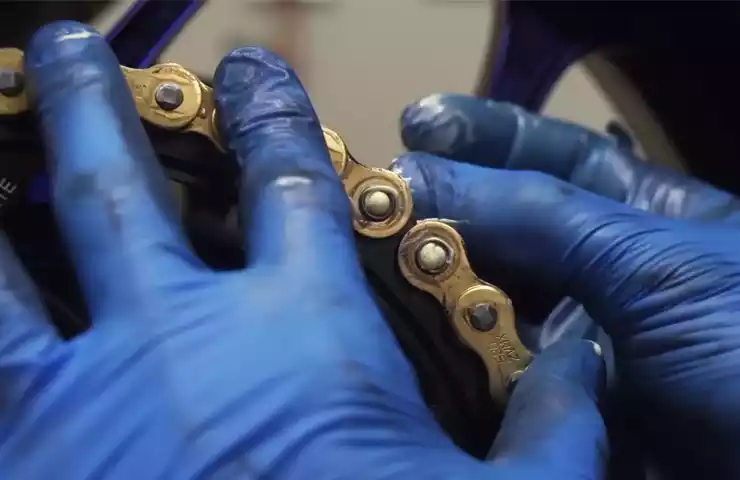
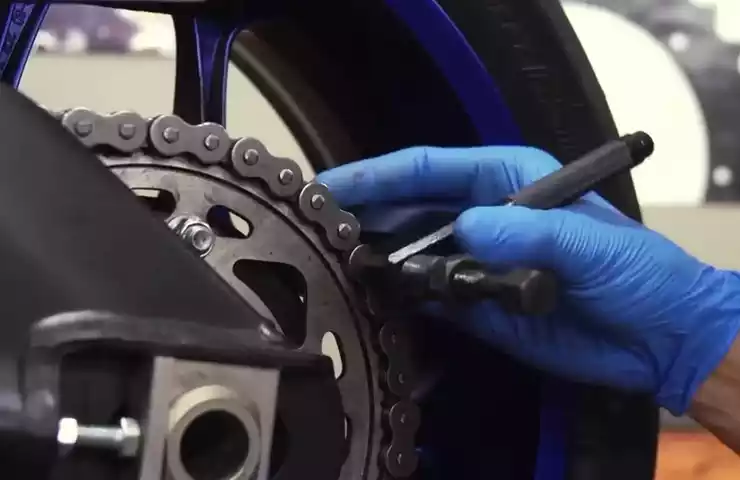
Once the chain is properly positioned on the sprockets, it’s time to connect the chain ends. To do this, you will need a chain breaker tool. Align the ends of the chain and insert the breaker tool between the links. Apply gentle pressure to push the pin through the chain, connecting the two ends. Make sure the pin is fully inserted and flush with the chain links. This step may require some effort, so take your time and be patient.
Attaching the master link
Once the chain ends are connected, it’s time to attach the master link. The master link is a specialized link that allows for easy installation and removal of the chain. To attach the master link, simply slide it into place between the two ends of the chain. Make sure it engages securely with the adjacent links on both sides. Then, use pliers or a clip installation tool to secure the clip that holds the master link in place. Ensure the clip is properly installed, as a loose clip can lead to chain failure.
Checking the chain tension
After the new chain is installed, it’s important to check the chain tension. Improper chain tension can lead to premature wear and reduced performance. To check the tension, locate the adjustment points on your motorcycle’s swingarm. Use a suitable tool to adjust the tension according to your motorcycle’s specifications. Aim for a tension that allows for about 20-30mm of vertical movement in the middle of the chain when applying light pressure with your finger. Remember to check the tension again after the first few rides, as the chain may settle and require further adjustment.
By following these steps to install the new chain on your motorcycle, you can ensure optimal performance and longevity. Remember to take your time, be patient, and double-check your work at each stage. Maintaining a properly installed chain is essential for a smooth and safe riding experience.
Maintaining And Caring For The Motorcycle Chain
Proper maintenance and care of your motorcycle chain are crucial for optimal performance and longevity. The motorcycle chain is responsible for transferring power from the engine to the rear wheel, making it an essential component of your bike’s drivetrain. Regular maintenance not only ensures smooth and efficient power transmission but also prevents premature wear and damage. In this section, we will explore three key aspects of chain maintenance – lubricating the chain, inspecting for wear and damage, and establishing a regular maintenance schedule. Let’s dive in!
Lubricating the Chain
Regular lubrication of your motorcycle chain is vital for reducing friction, preventing rust, and extending its lifespan. A properly lubricated chain ensures smooth power transfer and decreases the likelihood of chain-related issues. Here are the steps to follow when lubricating your motorcycle chain:
- **Clean the chain**: Before applying lubricant, it is crucial to remove dirt, grime, and old lube from the chain. Use a chain cleaning brush or a soft cloth soaked in a mild degreaser to clean the chain thoroughly.
- **Apply the lubricant**: Once the chain is clean and dry, apply a high-quality motorcycle chain lubricant. **Ensure that you apply the lubricant evenly and only on the inner side of the chain**. Use a spray or drip bottle to ensure that the lubricant reaches all the necessary areas.
- **Allow the lubricant to penetrate**: After applying the lubricant, allow it to penetrate the chain for several minutes. This ensures that the lubricant reaches all the crucial areas and provides the necessary protection.
- **Remove excess lubricant**: Wipe off any excess lubricant from the chain using a clean cloth. Excess lubricant can attract dirt and debris, leading to chain wear and decreased performance.
Inspecting for Wear and Damage
Regular inspection of your motorcycle chain is essential to catch any signs of wear, damage, or misalignment early on. A damaged or worn chain can compromise your bike’s performance and even pose a safety risk. Follow these steps to inspect your motorcycle chain:
- **Check for tension**: Ensure that the chain has the correct tension. It should have a slight amount of slack but not be too loose or too tight. Refer to your bike’s owner manual for the specific tension requirements.
- **Look for signs of wear**: Examine the chain for any signs of wear, such as elongation, stiff links, or excessive rust. Pay special attention to the area where the chain wraps around the sprockets.
- **Inspect chain sprockets**: Check the chain sprockets for wear or damage. Worn sprockets can accelerate chain wear and affect the overall drivetrain performance.
- **Evaluate chain alignment**: Ensure that the chain is properly aligned with the sprockets. Misalignment can cause excessive wear and affect the smoothness of power transfer from the engine to the rear wheel.
Regular Chain Maintenance Schedule
Establishing a regular maintenance schedule is crucial for the well-being of your motorcycle chain. While the frequency of maintenance may vary depending on your riding conditions, it is recommended to follow a general guideline. Here’s a basic maintenance schedule for your motorcycle chain:
| Maintenance Task | Frequency |
|---|---|
| Lubrication | Every 300-500 miles (or sooner if chain appears dry) |
| Inspection | Every 500-1000 miles |
| Tension Adjustment | Every 1000 miles (or as needed) |
**Following this maintenance schedule will help ensure that your motorcycle chain remains in optimal condition, providing you with a smooth and reliable riding experience.**
By paying attention to regular lubrication, thorough inspection, and adhering to a maintenance schedule, you can help extend the life of your motorcycle chain and maintain the performance of your bike. Taking care of this essential component will not only benefit your motorcycle but also enhance your safety on the road. Keep your chain in top condition, and enjoy the open road with confidence!
Troubleshooting Common Issues
Chain skipping or slipping
One common issue that motorcycle riders may encounter with their chain is skipping or slipping. This can be not only frustrating but also dangerous if not addressed promptly. When your chain is skipping or slipping, it can cause your bike to lose power and control, compromising your safety on the road.
Here are a few troubleshooting steps to help you resolve this issue:
- Check the tension: Begin by checking the tension of your motorcycle chain. A loose chain can lead to slipping or skipping. Refer to your motorcycle’s manual to determine the correct tension measurement and adjust accordingly.
- Inspect the sprockets: Worn or damaged sprockets can also contribute to chain skipping or slipping. Take a closer look at the sprockets for any signs of wear, missing teeth, or damage. If needed, replace them to ensure a proper connection with the chain.
- Lubricate the chain: Lack of lubrication can also be a cause of chain skipping or slipping. Make sure to lubricate your chain regularly using a suitable chain lubricant. It will not only reduce friction but also enhance the overall performance of your motorcycle chain.
Excessive chain noise
Excessive chain noise can be a nuisance for riders and may indicate an underlying issue that needs attention. Constantly hearing loud or unusual noises originating from your motorcycle chain can be a sign of potential problems.
Here are a few troubleshooting steps to help reduce excessive chain noise:
- Clean the chain: Start by thoroughly cleaning your motorcycle chain to remove any grime or debris that may be causing noise. Use a chain cleaner and a soft brush to ensure all the dirt is effectively removed. Rinse with water and pat dry before applying lubricant.
- Check for misalignment: Misaligned chain and sprockets can contribute to excessive noise. Inspect the alignment carefully and make any necessary adjustments. Ensure the chain and sprockets are properly aligned to minimize noise and maintain optimal performance.
- Replace worn-out components: If your motorcycle chain or sprockets are heavily worn or damaged, they may be the main culprits behind the excessive noise. It is important to replace them with new ones to eliminate the noise and ensure a smooth ride.
Uneven wear on the chain
Uneven wear on the motorcycle chain is a problem that many riders may encounter over time. This can lead to reduced performance and even potential safety hazards on the road. It is essential to address this issue promptly to maintain the longevity of your chain.
Here are a few troubleshooting steps to help resolve uneven wear on your motorcycle chain:
- Clean and lubricate the chain: Regular cleaning and lubrication play a significant role in preventing uneven wear on the chain. Make sure to keep the chain clean, removing any dirt or debris that might accelerate wear and tear. Apply a suitable chain lubricant to minimize friction.
- Check the tension: Improper tension can contribute to uneven wear on the chain. Check the tension using the recommended measurement in your motorcycle’s manual. Adjust as necessary to ensure the chain is neither too tight nor too loose.
- Replace worn-out components: If uneven wear is significant and persistent, it may be time to replace the chain, sprockets, or both. Worn-out components can lead to uneven pressure, resulting in uneven wear. Replace these components to ensure a balanced and properly functioning chain system.
Frequently Asked Questions On How To Install Motorcycle Chain
Is It Hard To Change Motorcycle Chain?
Changing a motorcycle chain isn’t difficult. Follow proper instructions for smooth removal and installation.
Which Way Does A Motorcycle Chain Go?
The motorcycle chain goes round and connects the front sprocket on the engine to the rear sprocket on the wheel.
How Do You Line Up A Motorcycle Chain?
To line up a motorcycle chain, follow these steps: 1. Loosen the axle nut and adjust the chain tension using the adjusters. 2. Ensure the chain is parallel to the frame by measuring the distance between the chain and swingarm.
3. Rotate the rear wheel to check chain alignment. 4. Tighten the axle nut and recheck chain tension and alignment. 5. Lubricate the chain regularly to maintain its performance and longevity.
How Do You Install A Rivet Master Link On A Motorcycle Chain?
To install a rivet master link on a motorcycle chain, follow these steps: 1. Place the chain around the sprockets. 2. Align the ends of the chain and insert the rivet link through both ends. 3. Use a chain tool to press the rivet pins until they fit tightly.
4. Ensure the link moves freely. Done!
Conclusion
Installing a motorcycle chain may seem daunting at first, but with the right tools and steps, it can be a straightforward process. By regularly checking the tension, lubricating, and cleaning the chain, you can extend its lifespan and ensure smooth riding.
Remember to refer back to this guide whenever you need a refresher on chain installation. Happy riding!