Installing an ignition cylinder involves a few simple steps: disconnect the battery, remove the steering wheel column cover, disconnect the electrical connectors, remove the ignition switch, and finally, install the new ignition cylinder. Proper installation ensures the smooth functioning of the vehicle’s ignition system.
Ignition cylinders are a vital component of a vehicle’s starting system, and when they malfunction, it becomes necessary to replace them. We will provide a step-by-step guide on how to install an ignition cylinder in a clear and concise manner, enabling readers to successfully complete the task themselves.
So, let’s dive into the process of installing an ignition cylinder in your vehicle.
Essential Tools
Properly replacing your ignition cylinder requires the use of specific tools. Having these essential tools on hand before you begin will help ensure a smooth installation process. Here are the must-have tools:
Screwdriver
A screwdriver is an essential tool for removing screws and securing the new ignition cylinder in place. Make sure to use the appropriate size and type of screwdriver for your specific vehicle make and model. A slotted or Phillips screwdriver may be required depending on the type of screws used.
Pliers
Pliers are handy for a variety of tasks during the ignition cylinder installation process. They can be used to grip and remove crimp connectors, remove wires from the old ignition cylinder, or hold components in place while you work. Consider having both needle-nose and regular pliers on hand to tackle different situations effectively.
Wrench
A wrench is essential for loosening and tightening various nuts and bolts involved in the ignition cylinder replacement. The size of the wrench will depend on the specific fasteners used in your vehicle. Always ensure you have the correct size wrench to avoid damaging the fasteners or surrounding components.
Ignition Cylinder Replacement Kit
An ignition cylinder replacement kit typically includes the necessary parts and components needed for a successful installation. This kit may include an ignition lock cylinder, key set, and any additional accessories or hardware required. It’s essential to purchase a high-quality replacement kit specific to your vehicle’s make and model to ensure proper function and fit.
By having these essential tools ready, you’ll be well-prepared to tackle the installation of your new ignition cylinder. Gather these tools before beginning the process to save time and frustration along the way.
Optional Tools
Lubricating spray
One of the optional tools you may consider using when installing an ignition cylinder is a lubricating spray. This can be extremely helpful in ensuring smooth operation of the cylinder and preventing any potential sticking or jamming.
By applying a lubricating spray, you can reduce friction between the cylinder and its surrounding components, allowing for easy rotation and engagement of the ignition switch. This can also help extend the lifespan of the ignition cylinder by preventing excessive wear and tear.
It is important to select a high-quality lubricating spray that is specifically designed for automotive use. Look for a product that is suitable for ignition cylinders and has good reviews from other users.
Electric drill with drill bits
Another optional tool that can come in handy during ignition cylinder installation is an electric drill with drill bits. While not necessarily required for all installations, an electric drill can be used to remove screws or bolts that are securing the old ignition cylinder in place.
Before using an electric drill, make sure to wear appropriate safety gear and follow the manufacturer’s instructions for operation. Choose the correct size drill bit that matches the screws or bolts you need to remove. This will ensure a proper fit and minimize the risk of damaging the surrounding components.
If you are unsure about using an electric drill, it is best to consult a professional or seek guidance from an experienced individual who has knowledge in ignition cylinder installation.
Preparing For Installation
Before you can install an ignition cylinder, you need to properly prepare for the installation process. This involves a few essential steps such as disconnecting the battery, removing the steering column shroud, and locating the ignition cylinder. By following these steps, you’ll ensure a smooth and successful installation.
Disconnect the battery
To begin, it’s crucial to disconnect the battery to prevent any electrical mishaps during the installation process. You can do this by locating the battery within your vehicle’s engine compartment and loosening the negative (black) terminal with a wrench. Remember to remove the negative cable first to break the electrical connection and minimize the risk of electric shock.
Remove the steering column shroud
Once the battery is disconnected, the next step is to remove the steering column shroud. This shroud is typically made of plastic and covers the steering column and ignition cylinder. Look for screws or bolts securing the shroud in place and use the appropriate tools, such as a screwdriver or wrench, to remove them. Once the screws or bolts are removed, gently remove the shroud from the steering column, exposing the ignition cylinder.
Locate the ignition cylinder
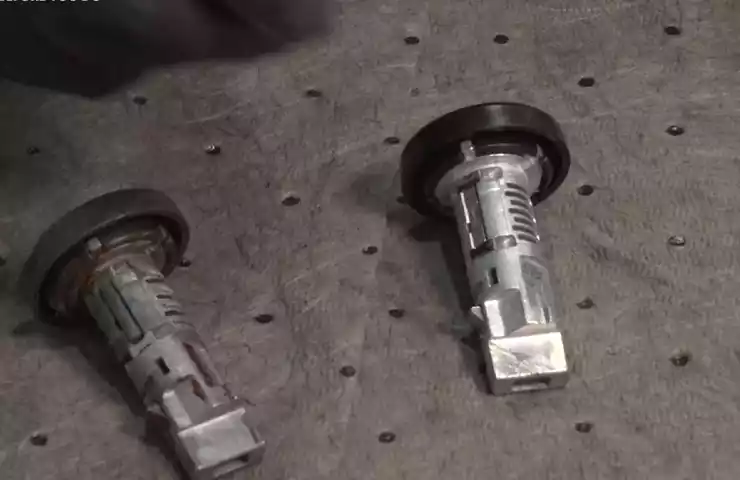
Now that the steering column shroud is removed, you can locate the ignition cylinder. The ignition cylinder is a key component of your vehicle’s ignition system and is responsible for starting the engine. Look for a cylindrical-shaped mechanism usually positioned near the steering wheel. It may have wires or electrical connectors attached to it. Take note of its position and any additional components connected to the ignition cylinder, as you’ll need to reconnect them after installation.
Removing The Old Ignition Cylinder
Remove the retaining screw
Before you can remove the old ignition cylinder, you will first need to locate and remove the retaining screw. This screw can usually be found on the side or underside of the steering column. Use a screwdriver to carefully remove the screw. Be sure to place it in a safe location so that you don’t lose it during the installation process.
Extract the ignition cylinder
Once the retaining screw has been removed, you can proceed to extract the ignition cylinder from the steering column. To do this, you will need to insert the key into the ignition and turn it to the accessory position. This will enable you to push in the release pin, which is usually located near the base of the ignition cylinder.
Using a small tool, such as a paperclip or nail, push the release pin in and gently pull the ignition cylinder towards you. You may need to wiggle it slightly to loosen it from its housing. Take care not to apply too much force, as this could cause damage to the surrounding components.
Disconnect wiring harnesses
With the ignition cylinder extracted, you can now proceed to disconnect the wiring harnesses that are attached to it. These harnesses typically consist of a series of small connectors that can be easily removed.
Start by examining the wiring harnesses and identifying any tabs or clips that need to be released. Once you have located these, use your fingers or a small tool to gently disengage them. Pull the connectors apart, making sure to do so with a steady hand to avoid any damage.
As you disconnect each wiring harness, take note of their positions and orientations. This will make it easier when it comes time to install the new ignition cylinder. You may find it helpful to take pictures or make a diagram to reference later.
Once all the wiring harnesses have been disconnected, you are now ready to install the new ignition cylinder. But before you do, take a moment to ensure that all the necessary tools and materials are within reach.
Installing The New Ignition Cylinder
Installing a new ignition cylinder in your vehicle can be a challenging task, but with the right guidance, you can do it successfully. In this section, we will guide you through the process of installing the new ignition cylinder step by step. By following these instructions carefully, you can replace the old cylinder with a new one and ensure that your vehicle starts smoothly every time.
Align the new ignition cylinder
Before you can install the new ignition cylinder, you need to make sure it is aligned properly. Start by inserting the key into the cylinder and turning it to the “ON” position. This will align the cylinder pins with the ignition switch inside the steering column. Keep the key in this position throughout the installation process to maintain alignment.
Secure the cylinder with retaining screw
Once the new ignition cylinder is aligned, you can secure it in place using a retaining screw. This screw helps to keep the cylinder firmly attached to the steering column and prevents it from coming loose during operation. Locate the retaining screw hole on the cylinder housing and carefully insert the screw. Use a screwdriver to tighten it securely but be cautious not to over-tighten, as it may damage the cylinder or the steering column.

Reconnect wiring harnesses
To complete the installation of the new ignition cylinder, you need to reconnect the wiring harnesses. These harnesses connect the cylinder to the electrical system of your vehicle and allow it to communicate with the ignition switch. Take your time to ensure that each harness is properly connected, matching the correct connectors. You can refer to the wiring diagram or the markings on the wires to ensure proper connection. Once all wiring harnesses are connected, double-check them to ensure a secure and reliable connection.
By following these steps, you can successfully install a new ignition cylinder in your vehicle. Remember to align the cylinder, secure it with a retaining screw, and reconnect the wiring harnesses to ensure proper functionality. Make sure to test the ignition after installation to verify that everything is working correctly. Now you can enjoy peace of mind knowing that your vehicle’s ignition cylinder has been replaced properly.
Testing The Ignition Cylinder
In order to ensure that the ignition cylinder is functioning properly after installation, you will need to perform a few simple tests. These tests will help you identify any issues with the cylinder and ensure that it is working smoothly. Here is a step-by-step guide to testing the ignition cylinder:
Reconnect the battery
Before you begin testing the ignition cylinder, it is important to reconnect the battery. This will provide the necessary power for the tests and ensure accurate results. To reconnect the battery, follow these steps:
- Locate the battery under the hood or in the trunk of your vehicle.
- Identify the positive and negative terminals of the battery.
- Using a wrench or pliers, loosen the nut on the negative terminal.
- Remove the negative cable from the terminal.
- Repeat the same process for the positive terminal.
- After a few seconds, reconnect the positive cable to the positive terminal.
- Tighten the nut on the positive terminal using a wrench or pliers.
- Repeat the same process for the negative terminal.
Check the ignition cylinder functionality
Once the battery is reconnected, you can begin testing the ignition cylinder. Here’s how to check its functionality:
- Insert the key into the ignition cylinder and turn it to the “ACC” position.
- Observe if the accessories such as the radio and lights are working. This indicates that the ignition cylinder is receiving power.
- Next, turn the key to the “ON” position. Listen for any unusual noises or grinding sounds. A smooth and quiet operation indicates a properly functioning ignition cylinder.
- Finally, turn the key to the “START” position. The engine should start smoothly and without any hesitations. If there are any difficulties in starting the engine or if it fails to start, it may be a sign of a faulty ignition cylinder.
By carefully following these steps, you can effectively test the ignition cylinder and ensure that it is in proper working condition. If you encounter any issues during the testing process, it is recommended to consult a professional for further assistance.
Misalignment Of Ignition Cylinder
Adjusting the Cylinder Position
One of the common issues that can arise during the installation of an ignition cylinder is misalignment. When the cylinder is not properly aligned, it can cause difficulties in inserting the key or turning it in the ignition. Fortunately, adjusting the cylinder position is a relatively simple process that can be done with a few basic tools.
Before you begin, it’s important to ensure that the vehicle’s battery is disconnected to prevent any accidental activation. Start by removing the steering column cover to gain access to the ignition cylinder. Use a screwdriver or a socket wrench, depending on the type of screws holding the cover in place.
Once the cover is removed, take a look at the ignition cylinder and check for any visible misalignment. If the cylinder appears to be off-center or crooked, it will need to be adjusted.
Ensuring Proper Fitment
To adjust the cylinder position, locate the mounting bracket that holds the cylinder in place. Loosen the screws or bolts that secure the bracket. This will allow you to shift the position of the cylinder slightly.
Tip: It can be helpful to have an assistant turn the key in the ignition while you observe the cylinder and make adjustments. This will help you determine the correct position for optimal fitment.
Important: Be careful not to over-tighten the screws or bolts when re-securing the mounting bracket, as this can lead to further misalignment. Use a torque wrench or follow the manufacturer’s instructions for the recommended torque specifications.
After adjusting the cylinder position, try inserting the key and turning it to ensure proper fitment. If the key moves smoothly and without any resistance, the cylinder is likely in the correct position.
Pro Tip: If you’re having trouble determining the correct position for the cylinder, consult the vehicle’s service manual or contact a professional automotive locksmith for guidance.
With the cylinder properly aligned and secure, you can now replace the steering column cover. Use the screwdriver or socket wrench to tighten the screws or bolts, ensuring that the cover is snug but not over-tightened.
In conclusion, misalignment of the ignition cylinder can cause issues with key insertion and turning. By adjusting the cylinder position and ensuring proper fitment, you can resolve this problem and restore smooth operation of your vehicle’s ignition system.
Difficulty In Removing The Old Cylinder
Removing the old ignition cylinder may prove to be a challenging task for many individuals. Whether it’s due to rust, debris, or simply the cylinder being stuck in place, dealing with a stubborn old cylinder can be frustrating. However, with the right technique and a little bit of patience, you can successfully overcome this hurdle and proceed with the installation process.
Lubrication Techniques
One effective way to alleviate the difficulty in removing the old ignition cylinder is by utilizing proper lubrication techniques. Lubricating the cylinder will help loosen any rust or debris that may be causing it to stick. To accomplish this, follow these steps:
- Begin by applying a generous amount of penetrating oil to the keyhole. This oil is specifically designed to seep through tight spaces and break down rust and corrosion.
- Allow the penetrating oil to sit for a few minutes, giving it enough time to penetrate and work its magic.
- Next, insert the key into the ignition cylinder and gently turn it back and forth. This motion will help distribute the lubricant throughout the cylinder and aid in loosening any stubborn components.
- If necessary, repeat the process of applying penetrating oil and gently turning the key until you feel a noticeable improvement in the cylinder’s movement.
- Once the cylinder starts to loosen up, carefully remove the key and proceed with the extraction process.
Using Pliers or a Wrench for Extraction
If the lubrication technique alone does not provide sufficient assistance in removing the old ignition cylinder, you may need to employ a little extra force. Using pliers or a wrench can aid in the extraction process. Here’s how:
- Grasp the ignition cylinder firmly with a pair of pliers or a wrench.
- Apply steady pressure in a counterclockwise direction, carefully turning the cylinder to release it from its housing.
- Be cautious not to exert excessive force, as this could damage the cylinder or surrounding components.
- If the cylinder still refuses to budge, consider using a gentle tapping motion with the pliers or wrench to help loosen it further.
- Continue attempting to extract the cylinder in a patient and methodical manner.
By following these lubrication and extraction techniques, you can overcome the difficulties associated with removing the old ignition cylinder. Remember to exercise patience and caution throughout the process to ensure a successful and hassle-free installation.
Wiring Connection Problems
Wiring Connection Problems
When it comes to installing an ignition cylinder, one of the most common issues that DIYers may encounter is wiring connection problems. These problems can lead to various electrical malfunctions, including starting issues and loss of power. To avoid such problems and ensure a smooth installation, it is important to pay attention and double-check all the wiring connections. In this section, we will discuss two important aspects of wiring connection problems: checking for loose connections and properly attaching wiring harnesses.
Checking for loose connections
Before proceeding with the ignition cylinder installation, it is crucial to inspect all the wiring connections for any signs of looseness. Loose connections can disrupt the flow of electrical current, leading to failure of the ignition system. To check for loose connections:
- Inspect the ignition cylinder wiring harness and ensure that all connectors are securely fastened. Look for any loose or detached wires.
- If you find any loose connections, tighten them using the appropriate tools, such as a screwdriver or pliers.
- Make sure to test the connections by gently tugging on the wires. If they come loose easily, further adjustments or replacements may be necessary.
Properly attaching wiring harnesses
In addition to checking for loose connections, it is essential to properly attach the wiring harnesses during the ignition cylinder installation. This ensures that the electrical system functions correctly and prevents any potential issues down the line. Follow these steps to properly attach the wiring harnesses:
- Identify the correct wiring harnesses for your specific ignition cylinder model. Refer to the manufacturer’s instructions or consult a reliable automotive guide if needed.
- Align the wiring harnesses with their corresponding connectors on the ignition cylinder. Ensure that the pins or terminals match correctly.
- Press the harnesses firmly into the connectors until you hear a click or feel a secure connection.
- Gently tug on the harnesses to verify that they are firmly attached and won’t come loose during normal operation.
By following these steps and paying attention to the wiring connections, you can avoid potential wiring connection problems during the installation of an ignition cylinder. Properly securing the connections and eliminating any loose or faulty wiring will help ensure smooth functioning of the ignition system and minimize the risk of electrical malfunctions.
Disconnecting The Battery
Before starting the process of installing an ignition cylinder, it is crucial to disconnect the battery to ensure safety. This step is important to avoid electrical shocks and prevent damage to the vehicle’s electrical system.
Avoiding electrical shocks
To avoid any potential electrical shocks during the ignition cylinder installation, it is essential to disconnect the battery. This precautionary measure will help minimize the risk of accidentally coming into contact with live wires and getting an electrical shock. Not only could an electrical shock cause harm to the individual performing the installation, but it could also cause damage to the vehicle’s delicate electrical components. Therefore, it is highly recommended to follow the steps below to safely disconnect the battery:
- Park the vehicle in a safe and well-ventilated area.
- Locate the battery in the engine compartment.
- Identify the negative (-) terminal of the battery.
- Using a suitable tool, usually a wrench or a socket set, loosen the nut securing the negative terminal.
- Remove the negative cable from the battery terminal, ensuring it does not come into contact with any other metal surfaces.
- Secure the disconnected negative cable away from the battery terminal, preventing accidental reconnection.
By following these steps, you can effectively minimize the risk of electrical shocks, ensuring a safe environment for the ignition cylinder installation.
Preventing damage to the vehicle’s electrical system
In addition to avoiding electrical shocks, disconnecting the battery also helps prevent potential damage to the vehicle’s electrical system. When working with the ignition cylinder, it is crucial to ensure that no power is flowing through the system. This is because any accidental contact between live wires and sensitive electrical components could lead to short circuits or irreversible damage. To prevent such issues and safeguard the electrical system, it is advisable to disconnect the battery using the steps outlined above. Taking this precautionary measure will minimize the risk of damaging any electrical components, providing a smooth and trouble-free installation process.
Remember, safety always comes first when dealing with electrical systems, and disconnecting the battery before installing the ignition cylinder is an essential step to ensure a successful, damage-free installation.
Proper Handling Of Tools
When installing an ignition cylinder, it is essential to understand the proper handling of tools. By using tools correctly and safely, you can prevent injuries and ensure a successful installation. By following these guidelines, you can complete the task efficiently and effectively.
Using Tools Correctly and Safely
Properly using tools is crucial for the successful installation of an ignition cylinder. Ensure that you have the necessary tools for the job, including a screwdriver, pliers, and possibly a wrench. Before beginning, verify that all tools are in good condition, without any damage or defects.
When using a screwdriver, choose the appropriate size and type for your specific ignition cylinder. This will prevent any damage to the screws or the surrounding area. Make sure the screwdriver’s tip is in good condition and securely fits into the screw head. This will allow for a firm grip and optimal control during the installation process.
Similarly, when using pliers, select the right type for the task at hand. Whether you need needle-nose pliers or slip-joint pliers, ensure that they are the correct size and have a comfortable grip. This will provide the necessary leverage and control as you work on removing or adjusting components.
Preventing Injuries
Safety should be a priority when handling tools during the installation of an ignition cylinder. Here are some essential tips to prevent injuries:
- Always wear proper safety gear, including goggles and gloves, to protect your eyes and hands from any potential hazards.
- Keep your work area clean and organized, reducing the risk of tripping or stumbling over tools or other objects.
- Use tools for their intended purpose and avoid using damaged tools that may lead to accidents.
- Avoid rushing the installation process and take your time to ensure proper alignment and tightness of components.
- Never force a tool, as this can result in slipping, causing injury to yourself or damage to the ignition cylinder.
By following these safety precautions, you can minimize the risk of accidents and injuries during the installation process.
In conclusion, the proper handling of tools is vital when installing an ignition cylinder. By using tools correctly and safely, you can prevent injuries and ensure a successful installation. Remember to select the right tools and maintain them in good condition. Take your time, follow safety precautions, and avoid forcing tools. By doing so, you can complete the installation process efficiently and without any mishaps.
Frequently Asked Questions On How To Install Ignition Cylinder?
Can You Replace Ignition Cylinder Yourself?
Yes, you can replace the ignition cylinder yourself. It is possible to do it without professional help, but make sure to follow proper instructions and use the right tools for the job.
Does A New Ignition Cylinder Have To Be Programmed?
Yes, a new ignition cylinder needs to be programmed.
How Do You Change An Ignition Lock Cylinder?
To change an ignition lock cylinder, follow these steps: 1. Disconnect the negative battery cable. 2. Remove the steering wheel and column covers. 3. Disconnect the ignition switch wiring harness. 4. Remove the ignition lock cylinder by using a key or a special tool to release it.
5. Replace with a new ignition lock cylinder and reassemble the components in reverse order.
How Long Does It Take To Replace Ignition Lock Cylinder?
Replacing an ignition lock cylinder typically takes around one to two hours. The process involves removing the steering column covers, disconnecting the battery, removing the old cylinder, and installing a new one. It’s best to consult a professional locksmith or mechanic for an accurate estimation based on your specific vehicle model.
Conclusion
Installing an ignition cylinder might seem like a daunting task, but with the right knowledge and the proper steps, it can be done easily. By following the step-by-step instructions provided in this blog post, you can successfully install your ignition cylinder and ensure the smooth functioning of your vehicle’s ignition system.
Remember to be cautious and patient throughout the process, and always consult a professional if needed. Happy installing!