To install handlebar tape, first remove the old tape and clean the handlebars. Then, starting at one end, tightly wrap the tape around the handlebars, overlapping slightly as you go along.
Finally, secure the end of the tape with electrical or finishing tape. Handlebar tape installation is a simple and effective way to improve grip, reduce vibration, and enhance the overall appearance of your bike. Whether you’re a professional cyclist or a casual rider, having a well-wrapped handlebar tape is essential for a comfortable and enjoyable cycling experience.
We will provide you with a step-by-step guide on how to install handlebar tape, ensuring that you have a secure and well-wrapped handlebar in no time. So, let’s get started and transform your bike’s handlebars with a fresh and snug tape installation.
Choosing The Right Handlebar Tape
When it comes to cycling, one of the most important factors in ensuring a comfortable and enjoyable ride is having the right handlebar tape. The handlebar tape not only provides cushioning and grip but also adds a touch of style to your bike. Therefore, selecting the appropriate handlebar tape is crucial. Here are some factors to consider when choosing the right handlebar tape:
Factors to consider when selecting handlebar tape
1. Material: Handlebar tape is available in various materials, including cork, foam, rubber, and synthetic options. Each material offers different levels of durability, cushioning, and moisture-wicking properties. Consider your riding style, weather conditions, and personal preferences when selecting the material.
2. Thickness: The thickness of the handlebar tape affects the level of cushioning and vibration absorption. Thick tape provides more comfort, particularly for longer rides, while thin tape offers a more direct feel of the handlebars. Determine the level of cushioning you require and choose accordingly.
3. Grip: Grip is a crucial aspect when it comes to cycling. Some handlebar tapes have a tacky texture to ensure a firm grip, even in wet conditions. Consider your riding conditions and the amount of grip you prefer.
4. Color and Style: Handlebar tape comes in a wide range of colors and styles, allowing you to personalize your bike. Choose a tape that matches your bike’s aesthetics and reflects your personality.
Different types of handlebar tape options available in the market
Here are some of the popular handlebar tape options available in the market:
| Tape Type | Material | Features |
|---|---|---|
| Cork tape | Cork with a thin layer of gel | Good cushioning, moisture absorption, and vibration dampening |
| Foam tape | Polyurethane foam | Lightweight, comfortable, and easy to clean |
| Rubber tape | Rubber or silicone | Excellent grip and durability |
| Gel tape | Gel with a synthetic outer layer | Superior cushioning and shock absorption |
| Leather tape | Natural leather | Luxurious look and feel, excellent durability |
Each type of tape offers its unique benefits, so choose the one that best suits your riding style and preferences.
By considering these factors and exploring the different handlebar tape options available, you can ensure that you choose the right tape for your bike. Remember, the right handlebar tape not only enhances your comfort and grip, but also adds a touch of personalized style to your beloved bike.
Preparing The Bicycle And Handlebars
Before you start installing new handlebar tape, it is important to properly prepare your bicycle and handlebars. This will ensure a smooth and successful installation, as well as a comfortable and secure grip when riding. The following steps will guide you through the process of cleaning the handlebars and removing the old tape, as well as ensuring the handlebars are free from any residue.
Cleaning the handlebars
The first step in preparing your handlebars is to thoroughly clean them. This will help remove any dirt, grease, or residue that may have accumulated over time. We recommend using a mild dish soap, warm water, and a soft sponge or cloth to gently scrub the handlebars.
Here’s a step-by-step guide to cleaning your handlebars:
- Prepare a mixture of warm water and mild dish soap in a bucket or sink.
- Dampen a soft sponge or cloth in the soapy water.
- Gently scrub the handlebars, paying attention to any particularly dirty or greasy areas.
- Rinse the handlebars thoroughly with clean water.
- Dry the handlebars with a clean towel or let them air dry.
Removing the old tape
After the handlebars are clean, it’s time to remove the old handlebar tape. Over time, handlebar tape can become worn, torn, or dirty, and it’s important to replace it to maintain a comfortable and secure grip. Removing the old tape will also make it easier to install the new tape.
Follow these steps to remove the old handlebar tape:
- Locate the end of the handlebar tape, usually near the brake levers.
- Peel back a small section of the tape to expose the adhesive underneath.
- Using a pair of scissors or a knife, carefully cut through the adhesive, ensuring not to damage the handlebars.
- Continue peeling back the tape, cutting through the adhesive as needed, until the entire length of tape is removed.
- Once all the tape is removed, use a clean cloth or sponge to wipe away any residue or adhesive left on the handlebars.
By following these steps to clean the handlebars and remove the old tape, you’ll be well on your way to a successful handlebar tape installation. Next, we’ll cover the steps to ensure the handlebars are free from any residue.
Wrapping The Handlebar Tape

One of the essential steps in installing handlebar tape is wrapping it around the handlebars properly. This not only enhances the overall appearance of your bike but also ensures a comfortable grip while riding. In this section, we will discuss the step-by-step process of wrapping handlebar tape to achieve a professional and sleek finish.
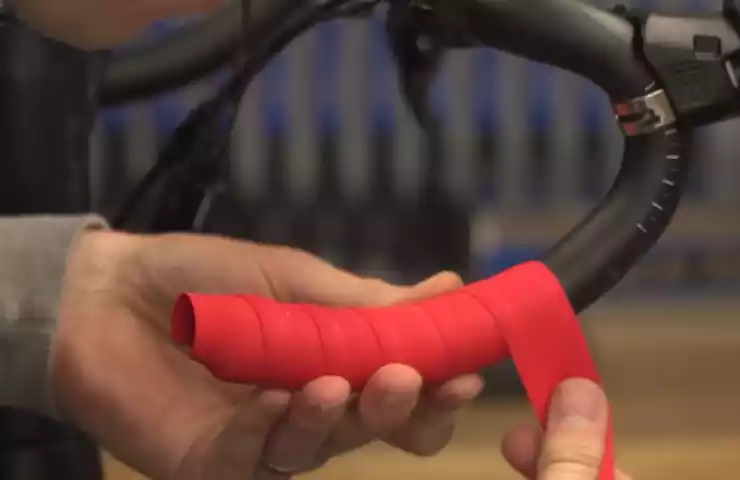
Starting the wrapping process from the handlebar end
Begin by unwinding the handlebar tape, ensuring that the sticky side faces outward. Start at the end of the handlebar, leaving a small flap hanging down to secure the tape later. Place the tape at an angle so that it covers the inner part of the handlebar.
Maintaining even tension and minimizing overlap
As you proceed, make sure to maintain an even tension on the tape. This will ensure that it is secure and doesn’t unravel over time. Avoid wrapping the tape too tightly, as it may cause discomfort during long rides. Additionally, try to minimize overlap as much as possible. This will create a smooth and seamless look.
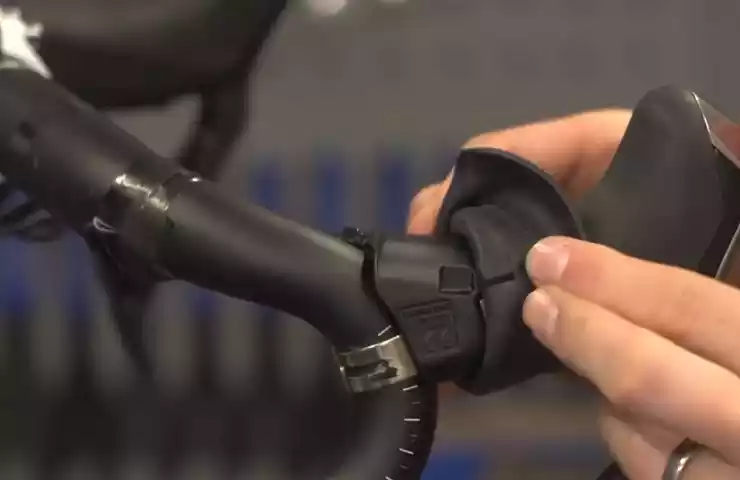
Wrapping around the brake levers and shifters
When you reach the brake levers and shifters, it’s important to wrap the handlebar tape around them neatly. This will provide extra cushioning and improve your grip while operating these controls. Gently stretch the tape as you wrap it around the levers and shifters, ensuring that it’s evenly distributed.
Securing the tape at the end for a neat finish
Once you have wrapped the tape all the way to the other end of the handlebar, it’s time to secure it for a neat finish. Trim any excess tape, leaving about an inch to fold over the end. Use electrical tape or a bar plug to hold the folded end in place. Make sure it’s secured tightly to prevent any unraveling.
By following these steps, you can wrap your handlebar tape like a pro. Remember to take your time and pay attention to detail for the best results. Take pride in the final outcome and enjoy the improved grip and style that a well-wrapped handlebar provides for your bike.
Enhancing Grip And Comfort
Installing handlebar tape is not only about aesthetics but also about improving your grip and comfort while riding. A proper handlebar tape can make a significant difference in your overall riding experience. Let’s explore some techniques to enhance grip and comfort.
Adding extra layers or gel pads for improved cushioning
One way to enhance comfort is by adding extra layers or gel pads underneath the handlebar tape. This provides additional cushioning, reducing fatigue and vibrations that can be transferred to your hands and wrists during rides. These gel pads are specially designed to absorb shocks and impact, giving you a smoother and more comfortable cycling experience.
If you opt for this method, make sure to purchase gel pads or extra tape specifically designed for handlebars. They come in different thicknesses, allowing you to choose the level of cushioning that suits your personal preferences. To install them, simply wrap the gel pads around the handlebars before adding the handlebar tape.
Using double-sided tape or adhesive to prevent slipping
A handlebar tape that slips can be irritating and unsafe. To prevent this issue, you can use double-sided tape or adhesive during the installation process. These adhesive strips provide extra grip, ensuring that the handlebar tape stays securely in place even during intense rides or in wet conditions.
When using double-sided tape, apply it to the handlebars before wrapping the handlebar tape. This will create a strong bond between the handlebar and the tape, minimizing any chance of slipping or movement. Additionally, double-sided tape can also help to absorb vibrations, further enhancing your comfort.
Customizing the tape for ergonomic support
Every rider has a unique hand shape and riding style, which is why customization is essential for achieving maximum comfort. By customizing the handlebar tape, you can ensure that it provides optimal ergonomic support for your hands and wrists.
Start by playing around with different wrapping techniques to find the one that suits you best. Experiment with the angle, tension, and overlap of the tape to achieve the desired level of cushioning and grip. You can also consider using different types of handlebar tape, such as cork or foam, which offer varying levels of comfort and shock absorption.
Remember to take breaks during the wrapping process to test the fit and make any necessary adjustments. This way, you can fine-tune the tape to perfectly conform to your grip and riding preferences.
Installing handlebar tape with a focus on enhancing grip and comfort is a worthwhile investment in your cycling experience. By adding extra layers or gel pads, using double-sided tape or adhesive, and customizing the tape for ergonomic support, you can ensure a comfortable and secure grip every time you hit the road.
Tips And Tricks For A Professional Finish

When it comes to installing handlebar tape, achieving a professional finish not only enhances the look of your bike but also ensures a comfortable and durable grip. To help you achieve that sleek and polished result, we’ve compiled a list of tips and tricks that will elevate your handlebar tape installation to the next level.
Mitigating potential issues like wrinkles or loose ends
Installing handlebar tape can sometimes be tricky, and wrinkles or loose ends can detract from the overall appearance and comfort. To avoid these issues, follow these handy tips:
- Start at the end of the handlebars and tightly wrap the tape around the bar, slightly overlapping each layer.
- Apply consistent tension as you wrap the tape, ensuring a snug and secure fit.
- Smooth out any wrinkles or creases as you go, pressing down gently with your fingers or palm.
- If you encounter any loose ends, secure them in place with adhesive tape or electrical tape.
Achieving a sleek and durable look
Once you’ve wrapped the handlebar tape in a smooth and wrinkle-free manner, it’s time to focus on achieving a sleek and durable finish. Consider the following tips:
- Trim any excess tape at the end to ensure a neat appearance.
- Secure the end of the tape with adhesive tape or electrical tape to prevent it from unraveling.
- For added durability, consider applying a thin layer of clear nail polish or handlebar tape-specific adhesive along the edges of the tape.
- Smooth out any rough edges or uneven areas by pressing them down firmly.
Adding finishing touches like bar plugs
No handlebar tape installation is complete without the finishing touches. Pay attention to the minor details to truly achieve a professional finish:
- Insert bar plugs at the end of the handlebars to prevent the tape from unraveling and to provide a clean and polished look.
- Ensure the bar plugs are firmly in place by pushing them in until they sit snugly against the tape.
- If necessary, use a small amount of adhesive or electrical tape to secure the bar plugs.
By following these tips and tricks, you can install handlebar tape with confidence, resulting in a professional finish that not only looks great but also enhances your riding experience.
Frequently Asked Questions Of How To Install Handlebar Tape
How Do You Put Tape On Handlebars?
To put tape on handlebars, start by cleaning the handlebars and removing any existing tape. Then, starting at one end, wrap the tape tightly around the handlebars, overlapping slightly as you go. Make sure to cover the entire handlebar and finish by securing the end of the tape with electrical tape or bar end plugs.
Does Bar Tape Direction Matter?
Yes, the direction of bar tape does matter. It should be wrapped in the opposite direction of your hand’s rotation to prevent it from unraveling.
Do You Put Bar Tape On The Inside Or Outside?
Bar tape is typically put on the outside of handlebars.
Which Way Do You Wrap Handlebar Tape?
Wrap handlebar tape starting from the end of the handlebars and working towards the stem. Overlap each wrap by about half the width of the tape. Keep the tape pulled tight and smooth out any wrinkles. Secure the end of the tape with tape or a finishing plug.
Repeat for the other side.
Conclusion
To sum up, installing handlebar tape is a relatively simple process that can greatly enhance your cycling experience. By following the steps outlined in this guide, you can ensure a secure and comfortable grip on your handlebars. Remember to choose a tape that suits your preferences and needs, and take your time to wrap it properly.
So go ahead, give your bike a fresh look and enjoy a comfortable ride with your newly installed handlebar tape.