To install daytime running lights inside headlights, follow these simple steps: Remove the headlight assembly, connect the DRL kit to the headlight circuit, secure the DRL module in a suitable location, and reassemble the headlight. Enhance your vehicle’s safety and visibility by adding daytime running lights to the headlights.
These lights are designed to automatically turn on whenever the engine is running, providing increased visibility for other drivers on the road. In this guide, we will walk you through the installation process, ensuring a quick and hassle-free experience. So let’s get started and give your car a safety boost with daytime running lights inside the headlights.
Why Install Daytime Running Lights (Drls) Inside Headlights?
Installing daytime running lights (DRLs) inside your vehicle’s headlights comes with a series of benefits. Not only do they improve visibility and safety on the road but they also enhance the overall appearance of your vehicle. Let’s dive into each of these advantages in detail, and discover why you should consider installing DRLs inside headlights.
Improve Visibility and Safety on the Road
When it comes to driving, visibility plays a vital role in ensuring safety on the road. Daytime running lights are designed to increase visibility during daylight hours, making your vehicle more noticeable to other drivers. By installing DRLs inside your headlights, you provide an additional source of light that helps to distinguish your vehicle from its surroundings.
DRLs also have the advantage of illuminating the road ahead, especially in low-light conditions such as fog, rain, or dusk. This extra brightness not only enhances your own visibility but also makes it easier for other drivers to spot your vehicle. This increased visibility greatly reduces the risk of accidents, making your journey safer for both you and other road users.
Enhance the Overall Appearance of Your Vehicle
In addition to the safety benefits, installing DRLs inside your headlights can give your vehicle a sleek and modern look. These lights add a decorative element to your vehicle’s front end, instantly upgrading its appearance. Whether you have a classic car or a contemporary model, DRLs inside headlights provide an eye-catching feature that sets your vehicle apart from the rest.
Moreover, DRLs inside headlights can be customized to match your personal style and preferences. From different colors to various designs, you have the freedom to choose DRLs that complement the overall look of your vehicle. Whether you want a subtle and elegant touch or a bold and striking statement, DRLs inside headlights offer a versatile way to enhance the aesthetics of your vehicle.
In conclusion, the installation of daytime running lights (DRLs) inside your vehicle’s headlights offers several advantages. Not only do they improve visibility and safety on the road, but they also enhance the overall appearance of your vehicle. Taking this step not only ensures a safer driving experience but also adds a touch of style and individuality to your vehicle, making it stand out from the crowd.
Planning Your Drl Installation
Before diving into the installation process of daytime running lights (DRLs) inside your headlights, it’s crucial to plan your installation to ensure a smooth and hassle-free experience. Adequate planning not only saves you time but also guarantees optimal performance and compatibility with your vehicle’s electrical system. In this section, we will cover two essential aspects of planning your DRL installation: researching and choosing the right type of DRLs and understanding the wiring requirements and compatibility with your vehicle’s electrical system.
Research and Choose the Right Type of DRLs
When it comes to selecting the perfect DRLs for your vehicle, conducting thorough research is key. Not all DRLs are created equal, and different types cater to varying preferences and requirements. Here are a few points to keep in mind during your research:
- Size and Shape: Consider the size and shape of the DRLs that would complement your vehicle’s headlights and overall aesthetics. Look for options that seamlessly blend with the existing design.
- LED or Halogen: Decide whether you want LED or halogen DRLs. LED DRLs offer superior brightness, energy efficiency, and durability, while halogen DRLs tend to be more affordable.
- Brightness and Visibility: Assess the brightness and visibility of different DRL options by reading customer reviews and checking the lumen output. Brighter DRLs enhance safety by making your vehicle more noticeable on the road.
- Compliance with Local Regulations: Familiarize yourself with the regulations in your area regarding the use of DRLs. Ensure the DRLs you choose comply with these regulations to avoid any legal issues.
Understand the Wiring Requirements and Compatibility
An important aspect of your DRL installation is understanding the wiring requirements and ensuring compatibility with your vehicle’s electrical system. Follow these steps to ensure a smooth installation:
- Consult Your Vehicle’s Manual: Refer to your vehicle’s manual to understand the electrical system, fuse box locations, and wiring diagrams. This information will guide you through the installation process and help you make appropriate connections.
- Check Voltage and Current Ratings: Identify the voltage and current ratings required for your DRLs. This information can typically be found on the product packaging or manufacturer’s website. Ensure that your vehicle’s electrical system can handle the DRLs without causing any damage.
- Consider Compatibility: Look for DRLs that are compatible with your vehicle’s electrical system. Check the connector type and compatibility requirements specified by the manufacturer to ensure a seamless integration.
- Choose the Right Wiring Method: Decide whether you want to tap into the existing wiring harness or use a separate wiring kit. Tapping into the existing wiring harness may be simpler but ensure it doesn’t interfere with other electrical components.
By carefully researching and choosing the right type of DRLs and understanding the wiring requirements and compatibility, you are setting yourself up for a successful DRL installation. Plan ahead, gather the necessary information, and make informed decisions to enjoy the benefits of enhanced visibility and safety provided by your new daytime running lights.
Gathering The Necessary Tools And Materials
Before you can begin installing daytime running lights (DRLs) inside your headlights, it’s important to gather all the necessary tools and materials. By having everything ready, you’ll be able to easily and efficiently complete the installation process without any delays. In this section, we’ll provide you with a list of the tools and materials you’ll need to successfully install DRLs inside your headlights.
List of tools needed for the installation
Here is a list of tools you’ll need for installing DRLs inside your headlights:
| Tool | Description |
| Screwdriver set | A set of different-sized screwdrivers to remove any screws holding the headlights in place |
| Trim removal tool | A tool specifically designed for safely removing trim pieces without scratching or damaging them |
| Wire strippers | Used to strip the insulation off wires for proper connection |
| Pliers | Useful for holding and bending wires during the installation process |
| Tape measure | To ensure precise measurements for the wiring harness |
List of materials required
Here is a list of materials you’ll need for the installation:
- DRLs: Daytime running lights that are compatible with your vehicle model
- Wiring harness: This helps connect the DRLs to your vehicle’s electrical system
- Connectors: Various connectors will be needed to attach the DRLs to the wiring harness and secure the connections
- Electrical tape: This is used to insulate the electrical connections and protect them from moisture and corrosion
- Zip ties: These can be used to organize and secure the wiring during the installation
Ensuring that you have all the necessary tools and materials beforehand will make the installation process smoother and more efficient. By having everything ready, you’ll be able to complete the installation of DRLs inside your headlights in no time.
Preparing For The Installation
Before beginning the installation process for your daytime running lights inside your headlights, there are a few important steps you need to take to ensure smooth and safe execution. This section will guide you through the necessary preparations, covering two critical aspects: ensuring the vehicle is parked in a safe and well-lit area and disconnecting the battery for safety.
Ensuring the vehicle is parked in a safe and well-lit area
First and foremost, it is crucial to park your vehicle in a safe and well-lit area before starting the installation process. This will not only provide you with sufficient space to work on your headlights but also ensure your safety and the safety of others. Here are a few tips to help you find the perfect spot:
- Look for a flat and level surface: Find a location where your vehicle will be stable and secure, preventing any accidental movement during the installation process.
- Choose an area away from traffic: Select a spot that is away from busy roads or high foot traffic areas to minimize distractions and potential hazards.
- Consider the lighting conditions: Opt for a well-lit area, either during the day or in a well-lit garage, to enhance visibility and make the installation process easier.
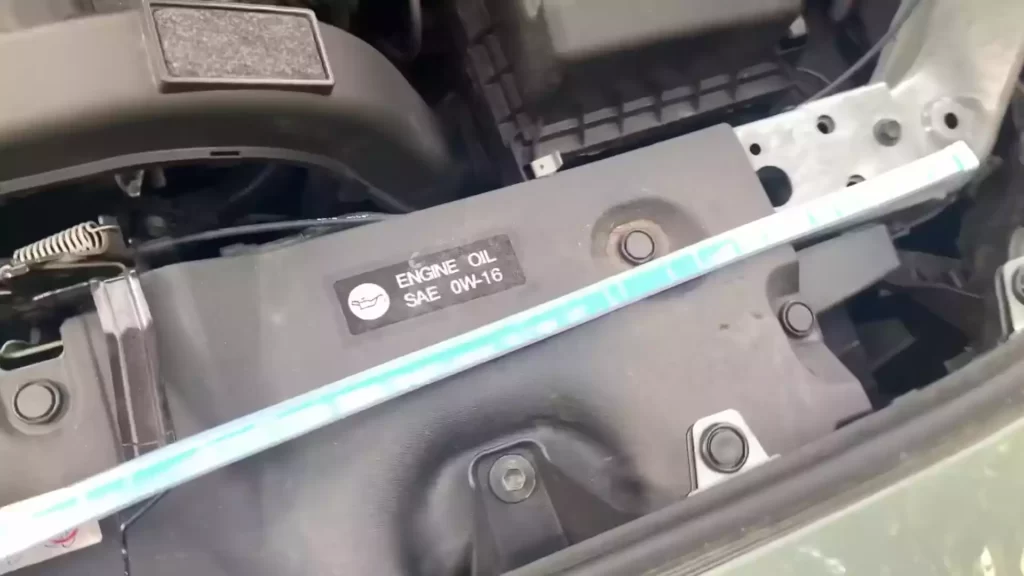
Disconnecting the battery for safety
Prior to working on your vehicle’s electrical components, such as installing daytime running lights, it is essential to disconnect the battery. This step will help prevent any accidental electrical shocks and ensure your safety throughout the installation. Here’s how you can do it:
- Open the hood of your vehicle and locate the battery.
- Use a wrench or socket set to loosen and remove the negative terminal (usually labeled with a “-” symbol).
- Carefully store the terminal away from the battery to prevent accidental reconnection.
- Double-check that the battery is completely disconnected by attempting to turn on the headlights or any other electrical component to ensure there is no power running through.
By taking these precautions and disconnecting the battery, you will minimize the risk of electrical accidents and be able to work on your daytime running light installation with peace of mind.
Removing The Headlights
Removing the headlights is an essential step when installing daytime running lights inside headlights. This process needs to be executed carefully to prevent any damage to your vehicle. In this step-by-step guide, we will walk you through the process of removing the headlights seamlessly.
Step 1: Gather the necessary tools
Before you begin removing the headlights, it’s important to make sure you have all the necessary tools. Here are the items you will need:
- Socket wrench
- Screwdriver set
- Tape or protective covering
Step 2: Locate the screws and fasteners
Begin by locating the screws and fasteners that secure the headlight assembly to your vehicle. These are typically found on the top or sides of the headlight.
Step 3: Remove the screws and fasteners
Using the appropriate screwdriver or socket wrench, carefully loosen and remove the screws and fasteners. Be sure to keep track of these small pieces and set them aside in a safe place.
Step 4: Disconnect the wiring harness
Once the screws and fasteners are removed, gently disconnect the wiring harness from the back of the headlight assembly. Take care not to pull or yank on the wires as this could cause damage.
Step 5: Remove the headlight assembly
With the screws, fasteners, and wiring harness disconnected, you can now carefully remove the headlight assembly from its housing. Be mindful of any additional clips or connectors that may be holding the assembly in place.
Step 6: Secure the headlight assembly

Once the headlight assembly is removed, it’s important to secure it in a safe and clean area. You may want to use tape or a protective covering to prevent any scratches or damage.
With the headlights successfully removed, you are now ready to move on to the next step of installing daytime running lights inside headlights. If you are uncertain about any part of the process, it’s recommended to consult your vehicle’s manual or seek professional assistance.
Installing The Daytime Running Lights Inside The Headlights
Daytime running lights (DRLs) are an essential safety feature that can greatly improve visibility on the road, especially during daytime hours. While many vehicles come equipped with DRLs, some older models may not have this feature. Luckily, you can easily install DRLs inside the headlights to enhance your safety on the road. In this guide, we will walk you through the process of installing DRLs inside the headlights, step by step.
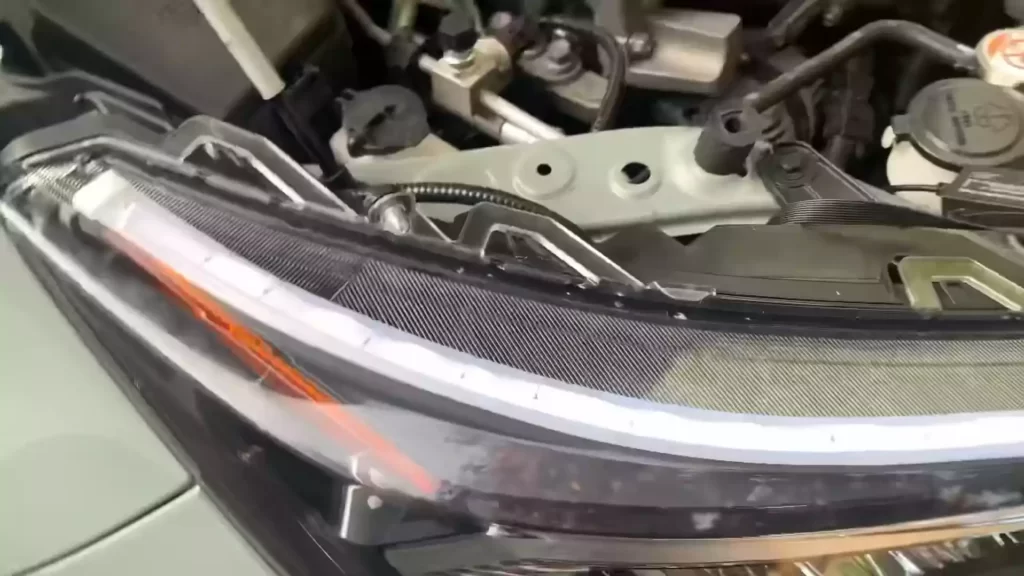
Understanding the internal structure of the headlights
Before diving into the installation process, it is important to have a basic understanding of the internal structure of the headlights. Headlights consist of a housing, a reflector, a bulb socket, and a lens. The housing houses all the components of the headlight assembly, while the reflector helps to direct and amplify the light emitted by the bulb. The bulb socket holds the bulb securely in place, and the lens protects the bulb and allows light to pass through. Keeping this in mind, let’s proceed to the next step.
Mounting the DRLs securely inside the headlight housing
To ensure a secure installation of the DRLs inside the headlight housing, follow these steps:
- 1. Begin by carefully removing the headlight assembly from your vehicle. Refer to the vehicle’s user manual or online resources for specific instructions on how to remove the headlights.
- 2. Once the headlight assembly is removed, locate a suitable spot inside the housing to mount the DRLs. Look for an area that won’t obstruct the regular functionality of the headlights and provides a clear path for the light emitted by the DRLs.
- 3. Clean the chosen spot inside the headlight housing to ensure proper adhesion of the DRLs. Wipe away any dust, dirt, or debris using a clean cloth.
- 4. Carefully position the DRLs inside the housing, making sure they are aligned properly and don’t interfere with any other components. Consider using double-sided tape or adhesive to secure the DRLs in place.
- 5. Once the DRLs are securely mounted, reconnect the headlight assembly to your vehicle following the reverse order of removal. Make sure to connect any wiring or cables associated with the DRLs correctly.
- 6. Test the functionality of the newly installed DRLs by turning on your vehicle’s headlights. Ensure they illuminate properly and remain steady while the vehicle is running.
By following these steps, you can successfully install DRLs inside your vehicle’s headlights. Not only will this enhance the safety of your vehicle, but it will also give it a stylish and modern look on the road. Always remember to refer to your vehicle’s user manual or seek professional assistance if you encounter any difficulties during the installation process. Stay safe and enjoy your enhanced visibility with the newly installed DRLs.
Wiring The Drls To The Vehicle’S Electrical System
Once you have selected the appropriate daytime running lights (DRLs) for your vehicle, the next step is to wire them to the vehicle’s electrical system. This process involves identifying the appropriate power source and wiring connections, as well as using a wiring harness for a clean and professional installation.
Identifying the appropriate power source and wiring connections
The first step in wiring your DRLs is to identify the appropriate power source in your vehicle. This can typically be found by consulting your vehicle’s wiring diagram or by using a test light to locate a 12V power source that is only active when the ignition is on. Once you have identified the power source, you will need to tap into it using a Scotchlok connector or by soldering the wires together.
To ensure a secure connection, strip back a small portion of the insulation from the power source wire and the DRL wire using wire strippers. Insert both wires into the Scotchlok connector and close it securely, ensuring that the metal teeth within the connector bite into the wires for a solid connection. If you prefer soldering, twist the exposed wire ends together and apply heat using a soldering iron, then cover the soldered connection with heat shrink tubing for added protection.
Using a wiring harness for a clean and professional installation
Using a wiring harness is highly recommended when installing DRLs. A wiring harness provides a clean and organized way to connect your DRLs to the vehicle’s electrical system. It typically includes pre-wired connectors and relays that simplify the installation process and ensure a professional result.
To install the DRLs using a wiring harness, start by connecting the harness to the power source you have identified. Follow the manufacturer’s instructions to properly connect the wires, ensuring that each wire is securely crimped or soldered into place. Once all connections have been made, use zip ties or adhesive mounts to secure the wiring harness along the existing wiring in your vehicle. This will help keep the wires neat and prevent them from coming loose or getting tangled.
Furthermore, it is important to check the polarity of the wiring connections before you install the DRLs inside the headlights. Most DRLs have polarity-specific wires, with a positive (+) wire and a negative (-) wire. Ensuring that the wires are connected correctly will prevent any issues with the DRLs functioning properly.
In conclusion, wiring your DRLs to the vehicle’s electrical system requires identifying the appropriate power source and making secure wiring connections. Additionally, using a wiring harness can simplify the installation process and provide a cleaner, more professional result. By following these steps, you can enjoy the enhanced visibility and safety that Daytime Running Lights provide on the road.
Connecting The Drls To The Headlights
Properly routing the wires to ensure a neat and tidy appearance
When it comes to installing daytime running lights (DRLs) inside your headlights, one crucial step is properly routing the wires to ensure a neat and tidy appearance. Not only does this improve the overall aesthetics of your vehicle, but it also helps to protect the wires from damage and ensure optimal functionality. To achieve this, follow these steps:
Step 1: Plan the wire routing path
First, plan the path that you want the wires to take from the DRLs to the headlights. Consider the existing wiring harnesses and any obstacles that might be in the way. You want to choose a route that minimizes the risk of the wires getting pinched or tangled.
Step 2: Secure the wires with zip ties
Once you have determined the ideal wire routing path, use zip ties to secure the wires in place. Be mindful of maintaining enough slack to accommodate any necessary adjustments or movement of the headlights.
Step 3: Hide the wires along existing wiring harnesses
To achieve a clean look, hide the DRL wires along existing wiring harnesses or other components in the engine bay. This not only conceals the wires but also helps to protect them from potential damage caused by heat or other elements. If necessary, use adhesive-backed cable clips or loom to hold the wires securely in place. These accessories can be easily attached to various surfaces within the engine bay, ensuring that the wires remain organized and tidy.
Making the necessary connections between the DRLs and
headlights
Now that you have properly routed the wires for your daytime running lights (DRLs), it’s time to make the necessary connections between the DRLs and the headlights. Follow these steps to ensure a successful installation:
Step 1: Determine the type of connection
Before making any connections, determine the type of connection required for your specific DRL and headlight setup. Some DRLs may come with plug-and-play connectors, while others may require splicing into the existing headlight wiring.
Step 2: Identify the corresponding wires
Identify the corresponding wires for the DRLs and the headlights. Refer to the manufacturer’s instructions or consult a wiring diagram for your vehicle to ensure accuracy.
Step 3: Make the necessary connections
If your DRLs have plug-and-play connectors, simply match the connectors to the corresponding ones on the headlight assembly. Ensure that each connection is secure and properly seated. In the case of splicing into the existing wiring, use proper electrical connectors such as T-taps or soldering to create reliable connections. Remember to insulate the connections with electrical tape or heat shrink tubing to protect them from any potential shorts or damage.
Step 4: Test the functionality
Once all the connections are made, test the functionality of your DRLs. Turn on the ignition and see if the lights illuminate as desired. Check that they turn on and off automatically with the vehicle’s ignition and headlights. By following these steps and making the necessary connections between the DRLs and the headlights, you can confidently install daytime running lights inside your headlights. Remember to take your time, double-check all connections, and ensure that everything is secure before enjoying the enhanced visibility and safety offered by DRLs.
Testing And Adjusting The Drls
Testing the functionality of the DRLs before finalizing the installation
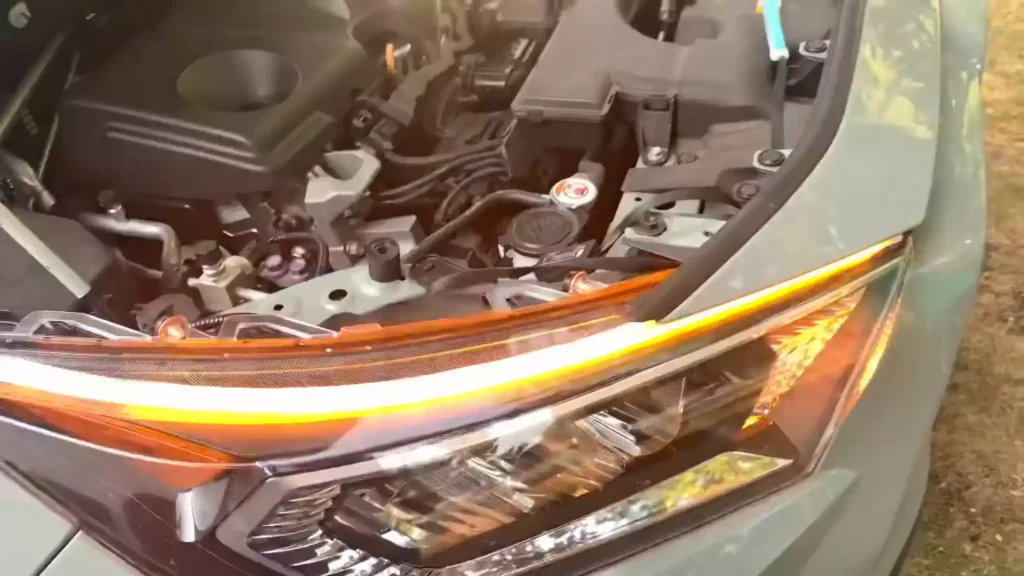
Before completing the installation of your new daytime running lights (DRLs), it is crucial to test their functionality. This step ensures that the lights are working properly and will provide the visibility and safety that you desire. Follow these steps to check the functionality of the DRLs:
- Turn on the vehicle’s ignition and switch on the headlights. The DRLs should automatically come on.
- Observe each DRL carefully to ensure it is emitting a strong beam of light. If the lights appear dim or flickering, there may be wiring or connection issues that need to be addressed.
- Check that all the lights are functioning simultaneously. Each DRL should turn on and off together to create a uniform look.
- If your vehicle has an automatic headlight sensor, test whether the DRLs turn off when the headlights are manually switched on. This feature ensures that the DRLs only operate during daytime hours.
- If any problems are detected during testing, refer to the manufacturer’s instructions or consult a professional to troubleshoot and resolve the issue.
Adjusting the positioning and angle of the DRLs for optimal visibility and aesthetics
Once you have confirmed the functionality of the DRLs, the next step is to adjust their positioning and angle for optimal visibility and aesthetics on your vehicle. Follow these guidelines to ensure your DRLs are well-positioned:
- Mount the DRLs securely inside the headlights, ensuring they align with the vehicle’s design and contours.
- Check that the lights are positioned in a manner that does not obstruct the headlights, turn signals, or any other important elements of your vehicle’s exterior.
- To optimize visibility, aim the DRLs slightly downwards. This downward angle helps prevent glare to other drivers while ensuring the lights illuminate the road effectively.
- Consider the overall aesthetics of your vehicle when adjusting the positioning of the DRLs. Aim for symmetry, ensuring that the lights are evenly placed on both sides.
Remember, finding the right positioning and angle for your DRLs may require some trial and error. Take the time to step back and assess the appearance and effectiveness of the lights from different angles. Once you are satisfied with the positioning, secure the DRLs firmly in place, double-check all connections, and retest their functionality. Adjusting and fine-tuning this aspect of your DRL installation will guarantee an enhanced driving experience and promote road safety.
Securing And Reinstalling The Headlights
Installing daytime running lights inside headlights involves not only connecting the wiring and positioning the lights correctly, but also ensuring that the headlights are securely installed back in place. Properly securing the headlights is essential to ensure their stability and functionality. In this section, we will discuss the steps to secure and reinstall the headlights after the daytime running lights have been installed.
1. Properly securing the headlights back into place
Once the daytime running lights have been installed inside your headlights, it’s time to put the headlights back into their original positions. Follow these steps to ensure the headlights are securely fastened:
- Hold the headlight assembly steady and align it with the mounting bracket.
- Securely tighten the bolts that hold the headlight assembly in place using a wrench or screwdriver. Ensure that each bolt is tightened firmly but not over-tightened, as it may cause damage to the assembly.
- Double-check the alignment of the headlights to make sure they are properly positioned and facing forward.
2. Ensuring all connections are secure and tidy
Before finalizing the installation, it’s crucial to ensure that all connections related to the headlights and the daytime running lights are secure and tidy. Follow these steps:
- Inspect the wiring connections for any loose or disconnected wires. If any wires are loose, reattach them securely using appropriate connectors.
- Organize the wiring neatly to prevent any tangling or interference with other components in the vehicle.
- Check all electrical connections to ensure that they are properly seated and free from dirt or debris.
By taking these steps, you can ensure that the connections are secure and the wiring is organized, minimizing the risk of any electrical issues or malfunctions.
With the headlights securely reinstalled and all connections tidy, you have successfully completed the installation of daytime running lights inside your headlights. Take a moment to test the lights to confirm their proper functionality before hitting the road. Enjoy enhanced visibility and safety with your newly installed daytime running lights!
Finalizing The Installation
Now that you have successfully connected the daytime running lights (DRLs) inside your headlights, it’s time to wrap up the installation process. This final step ensures that everything is properly set up and functioning as desired. Let’s dive into the last few tasks to complete.
Double-checking all wiring connections and making any necessary adjustments
To ensure a seamless and efficient operation of your newly installed DRLs, it’s crucial to double-check all the wiring connections. Take a few moments to go through each connection point and inspect it closely. Look out for any loose or disconnected wires that might impact the performance of your DRLs.
If you come across any issues, gently secure the connections and tighten any loose screws. It’s important to address these concerns promptly to avoid any potential electrical problems down the line. By taking the time to verify the wiring connections now, you can enjoy a hassle-free experience with your DRLs in the future.
Reconnecting the vehicle’s battery and testing the DRLs one last time
With the wiring connections confirmed and adjusted if needed, the next step is to reconnect your vehicle’s battery. Carefully reattach the battery’s positive and negative terminals, ensuring they are secure and in the correct positions. This step completes the electrical circuit and allows your DRLs to draw power.
Once the battery is reconnected, it’s time for the final test. Turn on your vehicle’s ignition and switch on the headlights. Observe each DRL closely to see if they illuminate as intended. Check for any flickering, dimness, or irregularities. If all the lights are functioning properly, congratulations! You’ve successfully installed and finalized your daytime running lights!
Frequently Asked Questions For How To Install Daytime Running Lights Inside Headlights
Where Do You Wire Daytime Running Lights?
Daytime running lights are typically wired to the vehicle’s electrical system. They can be connected to the low-beam headlights or fog lights, depending on the specific wiring instructions provided by the manufacturer or the installation guide.
Do Daytime Running Lights Stay On With Headlights?
Yes, daytime running lights remain on when headlights are turned on.
How Do You Make Drl Work With Led Headlights?
To make DRL work with LED headlights, ensure that the DRL circuit and wiring are compatible with the LED headlights. Install resistors or a DRL module to prevent flickering or error codes. Some vehicles may also require an additional relay harness.
Check the manufacturer’s instructions for specific guidance.
What Is The Daytime Running Light In The Headlights?
Daytime running lights (DRLs) are lights in the headlights that automatically switch on when the car is running during the day. They improve visibility for other drivers, enhancing safety and making your vehicle more easily noticeable on the road.
Conclusion
To sum up, installing daytime running lights inside headlights is a simple yet effective way to enhance safety on the road. With the step-by-step guide provided in this blog post, anyone can successfully complete this task. By following the instructions and taking necessary precautions, you can enjoy increased visibility and ensure that your vehicle is seen by other drivers.
Upgrade your headlights today and drive with confidence knowing that you have taken an important step towards a safer journey.