To install a clutch and pressure plate, first disconnect the negative battery cable, remove the transmission, detach the old clutch, align the new clutch and pressure plate, and torque the bolts to the manufacturer’s specifications. Installing a clutch and pressure plate involves a few important steps to ensure proper functionality and performance.
This guide will walk you through the process of disconnecting the negative battery cable, removing the transmission, detaching the old clutch, aligning the new clutch and pressure plate, and torquing the bolts to the manufacturer’s specifications. By following these steps, you can successfully install a new clutch and pressure plate in your vehicle.
Choosing The Right Clutch And Pressure Plate
When it comes to installing a clutch and pressure plate in your vehicle, choosing the right components is crucial for optimal performance. The clutch and pressure plate work together to transfer power from the engine to the drivetrain, allowing you to shift gears smoothly. In this section, we will discuss the factors to consider when selecting a clutch and pressure plate, as well as understanding the compatibility between the two.
Factors to consider when selecting a clutch and pressure plate
Several factors should be taken into account when choosing a clutch and pressure plate for your vehicle:
1. Vehicle’s power and torque rating
The first factor to consider is the power and torque rating of your vehicle. Clutches and pressure plates are designed to handle specific power and torque levels. Choosing components that are too weak for your vehicle’s power output can result in premature wear and slippage, while choosing ones that are too strong may make shifting gears difficult and cause unnecessary strain on the drivetrain.
2. Driving style and intended use
Another crucial factor is your driving style and the intended use of the vehicle. Are you a spirited driver who enjoys aggressive acceleration and high-performance driving? Or do you use your vehicle for daily commuting and occasional trips? Your driving style and vehicle’s usage will determine the type of clutch and pressure plate you should choose. For instance, a heavy-duty clutch with a higher clamp load might be suitable for high-performance driving, while a softer clutch might be more appropriate for daily commuting.
3. Transmission type
The type of transmission in your vehicle also plays a role in selecting the right clutch and pressure plate. Automatic transmissions have different torque converter systems, and as such, require different types of clutches. Manual transmissions, on the other hand, can have various clutch configurations, such as single disk, multi-disk, or dual-clutch systems. Ensuring compatibility between the clutch and pressure plate with the transmission is crucial for smooth and efficient operation.
Understanding the compatibility between clutch and pressure plate
In addition to considering the factors discussed above, it is essential to understand the compatibility between the clutch and pressure plate. These components need to work together seamlessly for optimal performance. Here are a few points to keep in mind:
- Ensure that the clutch and pressure plate are designed to fit your specific make and model of vehicle.
- Check the size and spline count of the clutch disc, as it needs to match the pressure plate.
- Consider the material and construction of both the clutch disc and pressure plate. Different materials offer varying levels of durability, heat resistance, and engagement characteristics.
By ensuring compatibility between the clutch and pressure plate, you can maximize the performance and longevity of your vehicle’s drivetrain. It is recommended to consult with a professional mechanic or refer to the manufacturer’s guidelines when selecting the clutch and pressure plate for your specific vehicle model.
Steps To Prepare For The Installation Process
Before you dive into the installation of a clutch and pressure plate, it is crucial to prepare for the process properly. Taking the time to gather all the necessary tools and equipment and ensuring a clean and safe working environment will not only make the installation smoother but also help to prevent any unwanted mishaps.
Gathering the necessary tools and equipment
Having the right tools at hand is essential to ensure a successful clutch and pressure plate installation. Here are the key tools and equipment you’ll need:
| Tools | Equipment |
|---|---|
| Socket setWrenchesTorque wrenchScrewdriversClutch alignment toolJack standsHydraulic jack | Safety gogglesNitrile glovesProtective clothingClean ragsBrake cleanerLubricating grease |
Ensuring a clean and safe working environment
Creating a clean and safe working environment is crucial when installing a clutch and pressure plate. Here are some steps to ensure a suitable environment:
- Clean the work area: Before you begin, remove any debris, tools, or other obstructions from the work area. This will minimize the risk of tripping or damaging components during the installation.
- Secure the vehicle: Make sure the vehicle is parked on a flat surface and engage the parking brake. For extra safety, use jack stands to support the vehicle while working underneath.
- Wear appropriate safety gear: Prioritize your safety by wearing safety goggles to protect your eyes from any debris, nitrile gloves to shield your hands, and protective clothing to prevent any skin contact with harmful substances.
- Clean the clutch components: Use a brake cleaner and clean rags to remove any oil, grease, or contaminants from the clutch components. This will ensure proper engagement and prolong the life of the new clutch and pressure plate.
- Apply lubricating grease: Apply a thin layer of lubricating grease to the input shaft splines and the release bearing guide tube. This will aid in smooth operation and prevent binding.
By following these steps to prepare for the installation process, you’ll be well-equipped and ready to begin installing your new clutch and pressure plate. Taking the time to gather the necessary tools, ensuring a clean environment, and wearing appropriate safety gear will set you up for a successful installation without any avoidable setbacks.
Step-By-Step Guide On Installing Clutch And Pressure Plate
If you’re experiencing clutch slippage or difficulty shifting gears, it may be time to replace your clutch and pressure plate. While this task may seem daunting, with the right tools and a step-by-step guide, you can successfully install a new clutch and pressure plate. In this article, we will walk you through the installation process, from removing the transmission to reassembling it after installing the new components.
Removing the transmission
The first step in installing a new clutch and pressure plate is to remove the transmission from your vehicle. Before you begin, make sure to securely lift your vehicle and place it on jack stands for safety. Here’s how you can remove the transmission:
- Drain the transmission fluid by loosening the drain plug and collecting the fluid in a pan below.
- Disconnect the battery to prevent any electrical mishaps during the process.
- Remove the gear linkage or shift cables, ensuring you mark and label them for reassembly.
- Disconnect the driveshaft from the transmission.
- Disconnect any electrical connections, sensors, and hydraulic lines attached to the transmission.
- Support the transmission with a jack and remove the transmission mount bolts.
- Finally, with caution, lower the transmission using the jack.
Disassembling and inspecting the clutch and pressure plate components
Once the transmission is safely removed, you will need to disassemble and inspect the clutch and pressure plate components. Follow these steps:
- Locate and remove the bolts that secure the pressure plate to the flywheel.
- Gently lift the pressure plate away from the flywheel, exposing the clutch disc.
- Inspect the clutch disc for any signs of wear, such as excessive friction material or damage. Replace the disc if necessary.
- Inspect the pressure plate for any signs of warping, cracking, or wear on the diaphragm spring. Replace the pressure plate if needed.
- Inspect the flywheel for any damage or wear. Resurface or replace the flywheel if required.
Installing the clutch and pressure plate
Now that you’ve inspected the clutch and pressure plate components, it’s time to install the new ones. Carefully follow these steps:
- Align the new clutch disc with the input shaft and insert it into the flywheel.
- Using an alignment tool, ensure that the clutch disc is properly centered.
- Place the pressure plate over the clutch disc and align the bolt holes with those on the flywheel.
- Hand-thread the pressure plate bolts, ensuring they are evenly distributed.
- Tighten the pressure plate bolts in a star or criss-cross pattern using a torque wrench, following the specifications provided by the manufacturer.
Reassembling the transmission
With the clutch and pressure plate successfully installed, it’s time to reassemble the transmission. Here’s what you need to do:
- Align the transmission input shaft with the clutch disc and carefully guide the transmission back into position.
- Reconnect the transmission mount bolts and remove the jack supporting the transmission.
- Reattach the driveshaft, electrical connections, sensors, hydraulic lines, gear linkage or shift cables.
- Reconnect the battery and fill the transmission with the appropriate fluid.
With the transmission reassembled, you can now enjoy smooth shifting and improved performance with your newly installed clutch and pressure plate. Remember to test your vehicle in a safe area to ensure everything is functioning properly before hitting the road.
Removing The Transmission
In order to install a new clutch and pressure plate, you will first need to remove the transmission from your vehicle. This process may seem complex, but by following a few simple steps, you can successfully remove the transmission and prepare it for your clutch replacement.
Disconnecting the battery and draining the transmission fluid
The first step in removing the transmission is to disconnect the battery to ensure your safety during the process. Removing the negative terminal of the battery will prevent any electrical accidents while working on the transmission.
Once the battery is disconnected, you will need to drain the transmission fluid before proceeding further. This will prevent any leakage or spills during the removal process. Locate the transmission drain plug, usually located at the bottom of the transmission, and use a wrench to remove it. Allow the fluid to completely drain into a suitable container before proceeding.
Removing the driveshaft and starter motor
Next, you will need to remove the driveshaft to gain access to the transmission. Start by locating the driveshaft bolts and loosening them with a wrench or socket. Once the bolts are loose, carefully slide the driveshaft out of the transmission and set it aside.
After removing the driveshaft, you will need to remove the starter motor. Locate the starter motor, typically on the side of the transmission, and remove the mounting bolts with a socket wrench. Once the bolts are removed, carefully disconnect any electrical connections and set the starter motor aside.
Taking out the transmission bolts and separating it from the engine
With the driveshaft and starter motor removed, it’s time to remove the transmission bolts. Refer to your vehicle’s service manual to locate the transmission bolts, as their placement may vary depending on the make and model of your vehicle.
Using a socket wrench or impact gun, loosen and remove each of the transmission bolts. It is important to keep track of the bolts and their respective locations, as they may be different lengths.
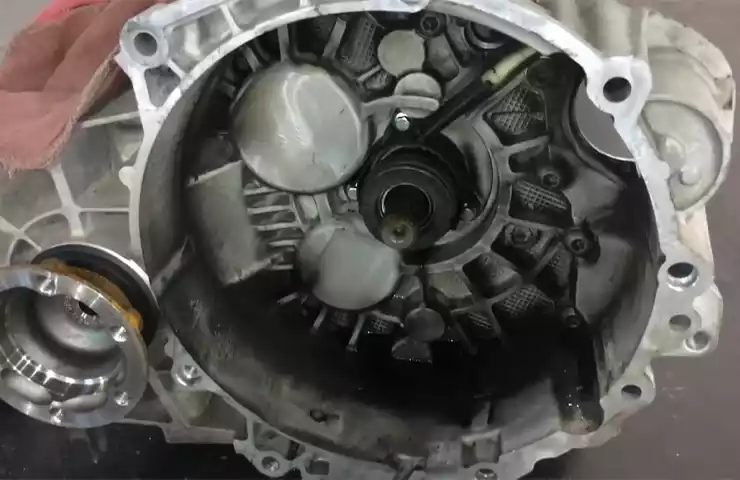
Once all the transmission bolts are removed, you will need to carefully separate the transmission from the engine. Gently wiggle the transmission while pulling it away from the engine until it comes loose. Be cautious not to damage any surrounding components or wiring during this process.
With the transmission successfully separated from the engine, you have completed the first step in installing a new clutch and pressure plate. You are now ready to proceed with the clutch replacement process.
Disassembling And Inspecting The Clutch And Pressure Plate Components
Before installing a new clutch and pressure plate, it is crucial to disassemble the old components and thoroughly inspect them for any wear or damage. This step ensures optimal performance and longevity of your vehicle’s clutch system. In this section, we will walk you through the process of removing the clutch cover and disc, inspecting the clutch disc, pressure plate, and release bearing, and replacing any worn or damaged components.
Removing the clutch cover and disc
The first step in disassembling the clutch and pressure plate components is to remove the clutch cover and disc. Follow these steps to successfully remove the clutch cover and disc:
- Loosen the bolts securing the clutch cover to the flywheel in a diagonal pattern.
- Remove the bolts and carefully take off the clutch cover.
- Once the clutch cover is removed, you will have access to the clutch disc.
- Take note of the orientation of the clutch disc to ensure correct installation later on.
- Inspect the clutch disc for signs of wear, such as uneven thickness or excessive friction material loss.
Inspecting the clutch disc, pressure plate, and release bearing
After removing the clutch cover and disc, it’s time to inspect the clutch disc, pressure plate, and release bearing. Follow these steps to conduct a thorough inspection:
- Examine the clutch disc for any signs of damage, such as cracks, warping, or worn splines.
- Check the pressure plate for excessive wear, such as grooves or blue discoloration.
- Inspect the release bearing for any signs of wear, such as noise or rough movement.
- Measure the thickness of the clutch disc and compare it to the manufacturer’s specifications.
- Ensure the springs in the pressure plate are intact and properly tensioned.
Replacing any worn or damaged components
If you identify any worn or damaged components during the inspection, it is important to replace them before proceeding with the installation. Here are the steps to follow when replacing worn or damaged components:
- Identify the specific components that require replacement based on your inspection.
- Order the necessary replacement parts from a reputable supplier.
- Once you have the replacement parts, remove the old components and carefully install the new ones.
- Ensure each replacement component is correctly aligned and secured.
- Double-check the measurements and specifications of the new components.
By following these steps to disassemble and inspect the clutch and pressure plate components, you can ensure that your vehicle’s clutch system is in optimal condition. This thorough inspection process helps avoid potential issues and ensures a smooth and reliable clutch operation.
Installing The Clutch And Pressure Plate
Installing the clutch and pressure plate is an essential step when it comes to replacing or upgrading your clutch system. This process requires attention to detail and precision to ensure optimal performance. In this section, we will guide you through the steps involved in installing the clutch and pressure plate, from preparing the flywheel to tightening the pressure plate bolts.
Preparing the flywheel and securing it in place
Before installing the clutch and pressure plate, it is important to prepare the flywheel. Start by removing any residue or debris from the flywheel surface. This can be done using a clean cloth or a mild solvent. Ensure that the flywheel is dry and free from any oil or grease.
Next, align the dowel pins on the flywheel with the corresponding holes on the crankshaft flange. This will help ensure proper alignment of the clutch and pressure plate. Once aligned, carefully position the flywheel onto the crankshaft and secure it in place using the appropriate bolts.
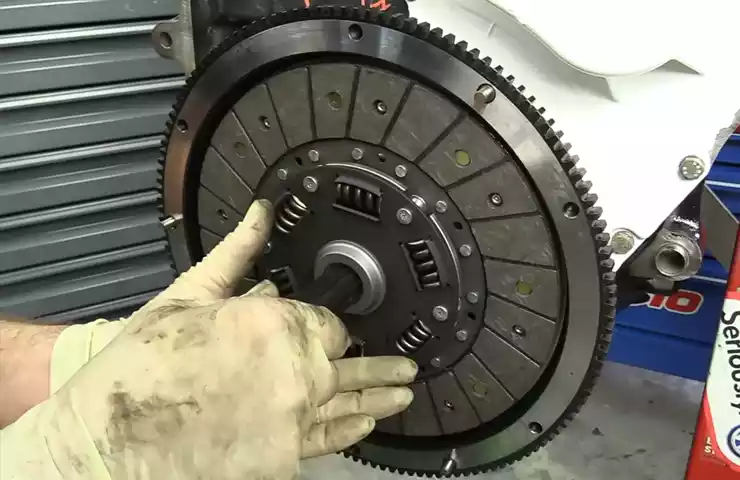
Aligning the clutch disc and pressure plate
Now that the flywheel is secure, it’s time to align the clutch disc and pressure plate. The clutch disc has a splined center hole that should slide onto the transmission input shaft smoothly. Ensure that the clutch disc is properly aligned with the flywheel by checking that the disc sits flush against the flywheel surface.
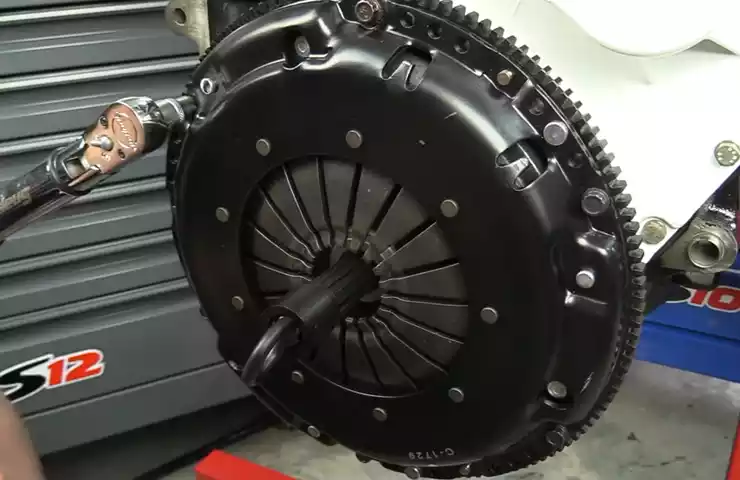
To align the pressure plate, locate the dowel pins on the flywheel and corresponding holes on the pressure plate. Carefully align the pressure plate with the dowel pins and ensure that the pressure plate is centered on the flywheel. Once aligned, apply even pressure to the pressure plate, making sure it is seated correctly against the clutch disc.
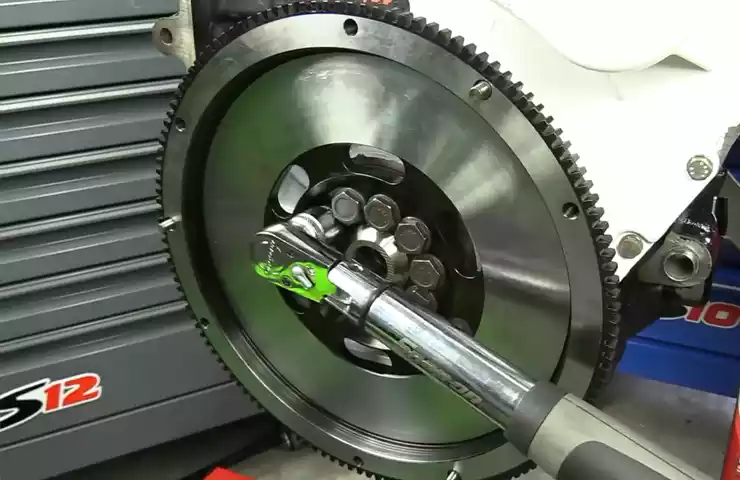
Tightening the pressure plate bolts to the specified torque
With the clutch disc and pressure plate aligned, it’s time to tighten the pressure plate bolts. Refer to the manufacturer’s specifications for the specified torque and sequence. Use a torque wrench to tighten the bolts gradually and evenly, alternating between bolts to ensure even pressure distribution.
Once all bolts are tightened to the specified torque, it’s important to double-check their tightness to guarantee a secure installation. A loose pressure plate can result in clutch slippage and reduced performance.
By diligently following these steps, you can successfully install the clutch and pressure plate, allowing your vehicle’s clutch system to perform optimally.
Reassembling The Transmission
Once you have successfully removed the old clutch and pressure plate, it’s time to reassemble the transmission. This crucial step ensures that all the components are aligned properly and securely connected. In this section, we will guide you through the process of aligning and reconnecting the transmission to the engine, reinstalling the driveshaft, starter motor, and other components, as well as refilling the transmission fluid and reconnecting the battery.
Aligning and reconnecting the transmission to the engine
Before proceeding with the reassembly, make sure that the transmission mounting bracket is clean and free from any debris or old gasket material. Apply a thin layer of gasket sealant to the mounting bracket to provide a secure seal.
Next, carefully align the transmission with the engine, ensuring that the input shaft is properly aligned with the clutch disc. Gently slide the transmission into place, making sure that it rests securely on the mounting bracket. Use a transmission jack or assistance from a partner to ensure a smooth and controlled installation.
Once the transmission is in position, reinsert and tighten the transmission mounting bolts. Make sure to torque them to the manufacturer’s specifications. This will ensure that the transmission is securely fastened to the engine, preventing any unnecessary movement or vibrations.
Reinstalling the driveshaft, starter motor, and other components
With the transmission properly aligned and connected, it’s time to reinstall the driveshaft. Carefully slide the driveshaft into position, making sure that it engages with the transmission output shaft and the differential. Secure it in place with the appropriate fasteners, tightening them to the recommended torque specification.
Next, reattach the starter motor to the transmission housing using the starter motor bolts. Make sure to secure them tightly, as loose bolts can cause damage to the starter and hinder its performance.
In addition to the driveshaft and starter motor, reattach any other components that were disconnected during the removal process. This may include sensors, wiring harnesses, brackets, or covers. Refer to your vehicle’s service manual for specific instructions on reinstalling these components.
Refilling the transmission fluid and reconnecting the battery
After completing the physical reassembly of the transmission, it’s important to refill the transmission fluid to the appropriate level. Locate the transmission fluid fill plug and remove it using the appropriate tool. Slowly add the recommended transmission fluid, checking the level with the dipstick until it reaches the correct mark.
Finally, reconnect the vehicle’s battery. Ensure that the positive and negative terminals are securely attached and tighten them accordingly. This will provide power to the necessary components and allow for a successful start-up of the vehicle.
By following these step-by-step instructions, you can confidently reassemble the transmission after installing a new clutch and pressure plate. Remember to refer to your vehicle’s service manual for any specific instructions or torque specifications. Take your time, be patient, and double-check your work to ensure a successful reassembly process.
Troubleshooting Common Issues
Installing a clutch and pressure plate can be a challenging task, but once done correctly, it ensures smooth and efficient shifting of gears. However, even after a successful installation, you might encounter a few common issues with your clutch and pressure plate. In this section, we will address these issues and provide you with troubleshooting solutions to help you get back on the road quickly.
Identifying and addressing clutch slipping problems
One of the most common problems you might face with your clutch is slipping. This happens when the clutch fails to grip tightly onto the flywheel, resulting in a loss of power transmission. To identify this issue, pay attention to the following symptoms:
- Engine revs up without a corresponding increase in vehicle speed
- Burning smell from the clutch
- Difficulty accelerating or maintaining speed
If you notice any of these signs, it’s crucial to address the issue promptly to prevent further damage. Here are a few troubleshooting steps you can take:
- Check clutch cable tension: Ensure that the clutch cable is properly tensioned. Adjust it if necessary using the adjustment nut near the clutch pedal.
- Inspect clutch hydraulic system: If your vehicle has a hydraulic clutch, check for any leaks or damage to the clutch master cylinder or slave cylinder. Replace any faulty components and bleed the system if required.
- Examine clutch disc and pressure plate: Remove the transmission to inspect the clutch disc and pressure plate for wear or damage. Replace them if necessary.
- Check clutch release bearing: Inspect the release bearing for excessive wear or damage. If needed, replace it to ensure proper clutch engagement.
- Proper clutch break-in period: Make sure to follow the manufacturer’s recommended break-in period for your new clutch. Improper break-in can lead to premature slipping.
Following these troubleshooting steps can help address clutch slipping issues and restore the proper functioning of your clutch and pressure plate.
Resolving clutch engagement or disengagement difficulties
Another common issue with clutch and pressure plate installations is difficulty in engaging or disengaging the clutch. If you find it hard to shift gears or experience grinding noises, you may be facing a clutch engagement or disengagement problem. Here are some troubleshooting steps to consider:
- Check clutch pedal adjustment: Ensure that the clutch pedal has the correct amount of free play. Adjust it if necessary according to the manufacturer’s specifications.
- Inspect clutch linkage: Examine the clutch linkage for any signs of wear, binding, or misalignment. Lubricate or replace any worn-out parts.
- Examine clutch master cylinder and slave cylinder: Check for leaks or damage in the hydraulic system. Replace any faulty components and bleed the system if needed.
- Verify clutch disc alignment: Remove the transmission and inspect the alignment of the clutch disc. Adjust or realign it if necessary.
- Inspect clutch fork and release bearing: Ensure that the clutch fork moves freely and is not binding. Also, check the release bearing for wear or damage and replace if needed.
By following these troubleshooting steps, you can resolve clutch engagement or disengagement difficulties and ensure smooth gear shifting.
Remember, proper installation and routine maintenance of your clutch and pressure plate are essential for its longevity and optimal performance. Regularly check for any signs of wear or damage and promptly address any issues that arise. By doing so, you’ll enjoy a smoother driving experience and avoid costly repairs in the long run.
Maintenance And Care Tips For Clutch And Pressure Plate
Proper maintenance and care of the clutch and pressure plate is essential for ensuring the smooth operation and longevity of your vehicle’s transmission system. By following a few simple steps and regularly checking certain components, you can extend the life of your clutch and pressure plate, avoiding costly repairs down the line.
Regularly Checking Clutch Pedal and Cable for Proper Adjustment
One of the key aspects of maintaining a healthy clutch and pressure plate is ensuring that the clutch pedal and cable are properly adjusted. Over time, the clutch pedal and cable may become misaligned or worn, leading to poor clutch engagement and slipping.
To avoid this, it is important to regularly inspect the clutch pedal and cable for proper adjustment. Here’s how you can do it:
- Start the engine and let it idle.
- Press the clutch pedal to the floor and release it slowly.
- Pay attention to the engagement point of the clutch – it should be about halfway through the pedal travel.
- If the engagement point feels too high or too low, it may indicate an improperly adjusted clutch pedal.
- Refer to your vehicle’s manual for specific instructions on how to adjust the clutch pedal and cable.
- Make the necessary adjustments to ensure the clutch pedal engages smoothly and at the right point.
Ensuring Proper Lubrication of Clutch Components
In addition to proper adjustment, lubrication plays a crucial role in maintaining the health of your clutch and pressure plate. Without adequate lubrication, friction between the clutch components can increase, leading to overheating and premature wear.
Here are some important lubrication tips to keep in mind:
- Check the clutch release bearing for proper lubrication regularly.
- If necessary, apply a thin coat of high-quality lithium-based grease to the release bearing.
- Ensure that the splines on the transmission input shaft and the clutch disc hub are properly lubricated.
- Use a specialized clutch spline lubricant recommended by your vehicle manufacturer.
- Avoid using excessive amounts of lubricant, as it can lead to clutch slippage.
By following these maintenance and care tips, you can significantly prolong the life of your clutch and pressure plate. Regularly checking the clutch pedal and cable for proper adjustment and ensuring proper lubrication of clutch components will not only improve the overall performance of your vehicle but also save you money in the long run.
Frequently Asked Questions On How To Install Clutch And Pressure Plate
How Long Does It Take To Replace A Clutch And Pressure Plate?
Replacing a clutch and pressure plate typically takes about 4 to 6 hours. However, the exact time may vary depending on the vehicle make, model, and the experience of the mechanic.
Is Replacing A Clutch Easy?
Replacing a clutch can be challenging. It requires a good understanding of the process and some mechanical knowledge. It’s recommended to seek professional help or an experienced mechanic to ensure a proper replacement.
Is Replacing A Clutch A Big Job?
Replacing a clutch is a significant job that requires technical expertise. It involves removing the transmission, replacing the clutch disc, pressure plate, and release bearing. Due to its complexity, it’s best to have it done by a professional mechanic.
How Much Is It To Replace Clutch And Pressure Plate?
The cost of replacing a clutch and pressure plate varies depending on the vehicle make and model. On average, the replacement cost can range from $500 to $1,200, including labor and parts. It is recommended to contact a professional mechanic for an accurate quote.
Conclusion
After following this step-by-step guide, you should now feel confident in your ability to install a clutch and pressure plate. Remember, taking the time to properly install these components is crucial for the performance and longevity of your vehicle. By understanding the process and following the necessary precautions, you can ensure a successful installation.
So, go ahead and give it a try! Good luck with your clutch and pressure plate installation!