Installing clips on Peloton shoes is a simple process. Here is a step-by-step guide to help you install clips on your Peloton shoes.
When installing clips on Peloton shoes, you need to ensure that you have the right tools, such as a screwdriver or an Allen wrench. Locate the designated clip holes on the bottom of your shoes and align them with the holes on the clip.
Insert the screws, making sure they are secure but not overly tight. Finally, double-check the tightness of the screws and make any necessary adjustments.
Choosing The Right Clips For Your Peloton Shoes
When it comes to getting the most out of your Peloton cycling experience, having the right clips for your shoes is essential. Clips play a crucial role in providing a secure connection between your shoes and the pedal, ensuring efficient power transfer and stability while you ride. In this post, we will guide you through the process of choosing the right clips for your Peloton shoes, from understanding the different types of clips to factors you should consider. We will also provide you with some recommended clips, so you can make an informed decision and enhance your cycling experience.
Understanding the Different Types of Clips
Before diving into the factors to consider when choosing clips for your Peloton shoes, let’s take a closer look at the different types of clips that are available:
- SPD Clips: SPD (Shimano Pedaling Dynamics) clips are a popular choice for indoor cycling enthusiasts. They are compatible with most cycling shoes and provide a secure connection to the pedals. SPD clips are known for their durability and ease of use.
- Delta Clips: Delta clips, also known as Look Delta or SPD-SL, are commonly used in road cycling. They offer a larger cleat surface area, which helps distribute the pressure evenly and improves power transfer. Delta clips provide a strong and stable connection and are suitable for riders who prefer a more rigid feel.
- Look Keo Clips: Look Keo clips are another popular choice among road cyclists. They feature a larger cleat surface area than SPD clips and provide excellent stability and power transfer. Look Keo clips are lightweight and offer adjustable tension, allowing riders to find their preferred level of engagement.
- Speedplay Zero Pedals: Speedplay Zero pedals are unique in their design and function. They offer a dual-sided entry system and a low stack height, making them suitable for riders looking for a fast and efficient clip-in experience. Speedplay Zero pedals also provide a wide range of adjustment, allowing riders to customize their float and cleat position.
Factors to Consider When Choosing Clips
When selecting clips for your Peloton shoes, it’s important to take into account the following factors:
- Compatibility: Ensure that the clips you choose are compatible with your Peloton shoes. Check the manufacturer’s specifications and guidelines to find the right match.
- Float: Consider the amount of float you prefer. Float refers to the degree of rotational movement allowed by the clips. Some riders prefer a greater range of float, while others prefer a more fixed position.
- Cleat Position: The position of the cleats on your shoes can affect your pedaling efficiency and comfort. Look for clips that offer adjustable cleat positions, allowing you to find the sweet spot for your riding style.
- Weight and Durability: If weight is a consideration for you, look for lightweight clips that won’t add unnecessary bulk to your shoes. Also, consider the durability of the clips, especially if you plan on using them frequently.
Recommended Clips for Peloton Shoes
Based on our research and customer reviews, here are some highly recommended clips for Peloton shoes:
| Clip Type | Key Features |
|---|---|
| SPD Clips | Durable, easy to use, compatible with most cycling shoes |
| Delta Clips | Excellent power transfer, stable connection, suitable for road cycling |
| Look Keo Clips | Lightweight, adjustable tension, wide cleat surface area |
| Speedplay Zero Pedals | Dual-sided entry, low stack height, customizable float and cleat position |
These clips have proven to be reliable and well-suited for Peloton cycling. However, it’s important to note that personal preference also plays a role in choosing the right clips. Take your riding style and preferences into consideration when making your final decision.
Now that you have a better understanding of the different types of clips, factors to consider, and some recommended options, you can confidently choose the right clips for your Peloton shoes. Enhance your cycling experience and maximize your performance with the perfect clip-pedal combination!
Preparing Your Shoes For Installation
Before you can start enjoying the benefits of using clips on your Peloton shoes, you need to properly prepare them for installation. This step-by-step guide will walk you through the process, ensuring that you’re ready to go in no time.
Removing the Existing Pedals
The first thing you need to do is remove the existing pedals from your Peloton shoes. This is a crucial step, as it allows you to start fresh with the installation of the new clips. By removing the existing pedals, you can ensure a clean and secure fit for your new clips.
Cleaning and Inspecting the Shoe
Once the pedals are removed, it’s important to thoroughly clean and inspect your shoes. This will help ensure that there is no debris or damage that could interfere with the installation process. Use a damp cloth to wipe down the surface of the shoe, paying close attention to any crevices or seams where dirt may accumulate.
Inspect the shoe for any signs of wear or damage. Look for loose stitching, worn-out soles, or any other issues that could affect the performance and longevity of your shoes. If you detect any problems, it may be best to address them before proceeding with the installation of the clips.
Tools You’ll Need for Installation
Before you can start installing the clips, make sure you have the following tools on hand:
| Tool | Description |
|---|---|
| Hex key or Allen wrench | This tool is essential for loosening and tightening the bolts on the clips. |
| Phillips screwdriver | You may need this tool to remove any screws or bolts that are holding the existing pedals in place. |
| Clean cloth | A cloth can be used to wipe down the shoes and ensure they are free from any dirt or debris. |
Having these tools readily available will ensure a smooth installation process and enable you to make any necessary adjustments as you go along.
Now that you have prepared your shoes by removing the existing pedals, cleaning and inspecting the shoe, and gathering the necessary tools, you are ready to move on to the next step – installing the clips on your Peloton shoes.
Step-By-Step Guide To Installing Clips On Peloton

Shoes
<h2>Step-by-Step Guide to Installing Clips on Peloton Shoes</h2> Peloton shoes are designed to enhance your cycling experience and provide optimal performance. One crucial step in setting up your Peloton bike is installing the clips onto your shoes. In this step-by-step guide, we will walk you through the process of positioning the clips, marking the mounting holes, drilling holes if necessary, attaching the clips to the shoes, and adjusting the position and alignment. <h3>Positioning the Clips on the Shoes</h3> To begin installing clips on your Peloton shoes, the first step is positioning the clips correctly. The clips should be placed on the sole of the shoe in a position that aligns with the ball of your foot. This ensures maximum power transfer during your cycling sessions, allowing you to pedal efficiently. Make sure the clips are centered and aligned with the shoe, providing a stable connection with the bike pedal. <h3>Marking the Mounting Holes</h3> Once you have positioned the clips correctly, the next step is marking the mounting holes on the shoe. This is essential as it guides you during the drilling process. Carefully mark the spots where the screws will be inserted, ensuring they are aligned with the holes on the clips. Take your time to ensure accuracy, as this will contribute to a secure and stable attachment of the clips to your Peloton shoes. <h3>Drilling Holes (if necessary)</h3> In some cases, you may need to drill holes on your Peloton shoes to attach the clips securely. If your shoes already have pre-drilled holes that match the clip’s mounting holes, you can skip this step. However, if there are no existing holes or they do not align correctly, use a power drill with the appropriate drill bit to create the necessary holes. Be cautious and apply gentle pressure to avoid damaging your shoes. Once the holes are drilled, it’s time to move on to the next step. <h3>Attaching the Clips to the Shoes</h3> Now that you have positioned the clips, marked the mounting holes, and drilled if necessary, it’s time to attach the clips to your Peloton shoes. Align the holes on the clips with the holes on the shoes, ensuring they match perfectly. Use the provided screws and a screwdriver to securely fasten the clips, making sure they are tight enough to prevent any movement during your cycling sessions. Double-check that each clip is firmly attached before moving on to the final step. <h3>Adjusting the Position and Alignment</h3> The last step to complete the installation process is adjusting the position and alignment of the clips on your Peloton shoes. This step ensures optimal comfort and efficiency during your rides. Once the clips are attached, tighten or loosen the screws as needed to achieve the desired position and alignment. Consider taking a test ride to ensure everything feels right before embarking on your full cycling journey. Following this step-by-step guide, you can confidently install clips on your Peloton shoes, enhancing your connection to the bike and overall cycling experience. Enjoy your rides and make the most out of your Peloton workouts.
Tips And Tricks For A Successful Installation
Tips and Tricks for a Successful Installation
Installing clips on your Peloton shoes is an essential step in ensuring a smooth and effective cycling experience. When done correctly, it not only provides you with a secure connection to your bike pedals but also allows for optimal power transfer and efficiency. In this section, we will cover some helpful tips and tricks to help you achieve a successful installation. Following these guidelines will ensure that your clips are properly aligned, tensioned, and tested for a hassle-free ride.
Ensuring Proper Cleat Alignment
Proper alignment of your cleats is crucial for an optimal cycling experience. Incorrect alignment can lead to discomfort, inefficient pedal strokes, and potential injury. To ensure proper cleat alignment:
- Start by placing your bike in a secure position, either on a trainer or against a wall, ensuring it won’t tip over during the installation process.
- Loosen the bolts on the bottom of your Peloton shoes.
- Position the cleats on the sole of your shoes, aligning them with the ball of your foot.
- Tighten the bolts in a crisscross pattern, gradually increasing the tension until they are secure. Be careful not to overtighten, as this can cause damage to the shoes.
- Check the alignment by standing on a level surface, ensuring that your feet are positioned naturally and comfortably over the pedals. Make any necessary adjustments until the alignment feels correct.
Setting the Correct Tension for Release
The tension on your clips determines how easy or difficult it is to release your feet from the pedals. Finding the right tension for your preference and riding style is important for both safety and comfort. To set the correct tension:
- Locate the tension adjustment screw on the clip mechanism, usually located on the backs of the pedals.
- Turn the screw clockwise to increase tension, or counterclockwise to decrease tension.
- Start with a lower tension setting if you are new to cycling or if you prefer an easier release.
- Gradually increase the tension as you become more comfortable and confident in your pedal stroke.
- Test the tension by engaging and disengaging the clips a few times, ensuring that the release is smooth and consistent.
Testing and Adjusting as Needed
After the initial installation and adjustment, it’s important to test your clips and make any necessary adjustments to ensure a seamless pedal stroke. Here are some tips:
- Take your Peloton bike for a short ride, starting with easy pedaling before gradually increasing your effort.
- Pay attention to any discomfort or abnormal sensations in your feet or legs.
- If you experience any issues, such as knee pain or difficulty achieving a smooth pedal stroke, consider adjusting the cleat position or tension.
- Continue testing and adjusting until you find the ideal alignment and tension for your needs.
- Remember that everyone’s body and riding style are unique, so what works for others may not work for you. Trust your instincts and make adjustments accordingly.
Conclusion
Properly installing clips on your Peloton shoes and fine-tuning their alignment and tension can greatly improve your indoor cycling experience. By following these tips and tricks, you’ll be able to achieve a secure and comfortable connection to your pedals, allowing you to maximize your performance and enjoy a smooth ride. Don’t be afraid to experiment and make adjustments as needed until you find the perfect setup that works for you.
Frequently Asked Questions (Faqs)
As you embark on your journey with Peloton, you may have some questions about installing clips on your cycling shoes. In this section, we’ll address the most commonly asked questions to ensure a smooth installation process.
Can I install clips on any type of cycling shoes?
Yes, you can install clips on most types of cycling shoes. However, it is important to note that not all shoes are compatible with all types of clips. Most Peloton bikes use “Look Delta” style cleats, so make sure your shoes are designed to accommodate these specific cleats. If you’re unsure, check the manufacturer’s website or consult the user manual that came with your shoes to confirm compatibility.
Do I need special tools for installation?
No, you do not need any special tools for installing the clips on your Peloton shoes. The installation process is straightforward and can be done using basic tools that are typically included with most cycling shoes. Generally, all you will need is a 4mm Allen wrench or a screwdriver to tighten the screws that secure the clips to the sole of your shoes. Remember to always follow the manufacturer’s instructions for proper installation to ensure a secure fit.
How do I maintain the clips and shoes after installation?
Once you have successfully installed the clips onto your Peloton shoes, it’s essential to maintain them to ensure optimal performance and longevity. Here are a few tips:
- Regularly check the screws and tighten if necessary. Vibrations during rides can sometimes cause the screws to loosen, so it’s a good idea to periodically inspect them and snug them up as needed.
- Keep the cleats clean and free from debris. Dirt and grime can affect the engagement and release of the clips, so wipe them down after each ride to remove any build-up.
- Replace worn-out cleats. Over time, the cleats may wear down, affecting the stability and engagement with the pedals. If you notice any signs of significant wear or difficulty clipping in and out, it’s time to replace the cleats.
- Store your shoes in a cool, dry place. Excessive heat and moisture can damage the clips and shoes, so it’s best to store them in a well-ventilated area away from direct sunlight.
By following these maintenance tips, you can ensure that your clips and Peloton shoes remain in top condition, providing you with a comfortable and secure ride every time.
Frequently Asked Questions For How To Install Clips On Peloton Shoes
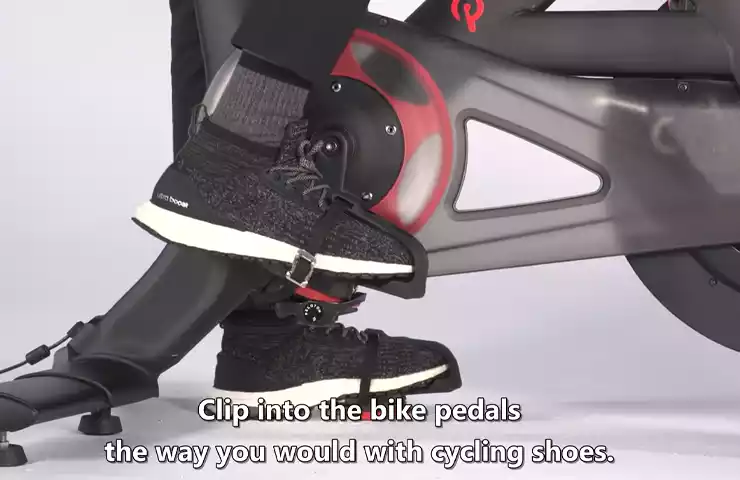
How Do You Attach Bike Clips To Shoes?
Attaching bike clips to shoes is simple. First, align the clip with the front of your shoe’s sole. Next, firmly press down until the clip attaches securely. Finally, repeat the process with the other shoe. Enjoy your ride with your shoes securely attached to the pedals!
How Do You Put On Delta Clips?
To put on Delta clips, follow these steps: 1. Locate the holes on the shoes or cleats. 2. Slide the front of the clip into the front hole, then push down with your heel to secure it. 3. Repeat the same process for the rear hole, sliding the clip in and pushing down.
4. Ensure the clips are securely attached before using your shoes or cleats.
How Do You Put Clips In Spin Shoes?
Put clips in spin shoes by inserting the cleat into the clip on the bottom of the shoe. Make sure it fits securely and aligns with the pedal. Take care not to overtighten the screws. Properly installed clips allow for efficient transfer of power during cycling workouts.
Do All Clip In Shoes Work With Peloton?
Most clip-in shoes are compatible with the Peloton bike, providing a secure connection for proper cycling.
Conclusion
To wrap it up, installing clips on your Peloton shoes is a simple process that can greatly enhance your cycling experience. By following the step-by-step guide outlined in this blog post, you’ll be able to securely attach your clips and enjoy a more efficient and effective workout.
Remember to always prioritize safety and ensure that your clips are properly aligned and tightened. Happy cycling!