To install car LED strip lights, first, clean the installation area and remove any adhesive backing. Then, carefully position the lights and firmly press them into place, making sure they are secure.
Installing car LED strip lights is a simple process that can enhance the appearance of your vehicle. These lights are a popular choice among car enthusiasts for their vibrant colors and versatility. Whether you want to add a touch of personalization or improve visibility during night drives, LED strip lights are a convenient and stylish option.
We will guide you through the step-by-step process of installing car LED strip lights, allowing you to customize your vehicle to your liking. So, let’s get started with the installation process and give your car a dazzling transformation.
What Are Led Strip Lights And Their Benefits?
Energy-efficient lighting option
Versatile and customizable to suit any car interior
Enhance visibility and aesthetics
If you’re looking to enhance your car’s interior ambiance and make a style statement, then LED strip lights are the perfect choice for you. LED strip lights, also known as light-emitting diode strip lights, provide a versatile and energy-efficient lighting option for your car. These sleek and compact lights offer a multitude of benefits, making them a popular choice among car enthusiasts.
Energy-efficient lighting option
LED strip lights are known for their energy efficiency, making them an excellent lighting option for car interiors. Unlike traditional incandescent bulbs, LED lights consume very little power and have a longer lifespan. This means that they won’t drain your car’s battery, making them perfect for extended drives or when temporarily parked.
Versatile and customizable to suit any car interior
One of the major advantages of LED strip lights is their versatility. These lights come in a variety of colors, allowing you to choose the perfect shade that matches your car’s interior or personal preference. Additionally, LED strip lights can be easily cut and reattached, making them customizable to suit any car interior’s shape and size. Whether you want to add a subtle glow or make a bold statement, LED strip lights can be arranged in different patterns and placements to achieve the desired effect.
Enhance visibility and aesthetics
LED strip lights not only enhance the aesthetics of your car’s interior but also improve visibility. The bright and uniform illumination provided by LED lights ensures that every corner of your car’s interior is well-lit, making it easier to find items and increasing overall safety. Whether you’re driving at night or in low-light conditions, LED strip lights provide a consistent and reliable source of illumination, creating an inviting and visually appealing environment within your car.
Different Types Of Led Strip Lights For Cars
LED strip lights are a popular choice among car enthusiasts for adding a stylish and vibrant touch to their vehicles. These flexible and compact lights can be easily installed in various parts of the car’s interior, providing a customized and eye-catching illumination. When it comes to LED strip lights for cars, there are different types to choose from, each offering unique features and benefits.
Single color LED strip lights
Single color LED strip lights are the simplest and most straightforward option for car owners who want to enhance the ambiance of their vehicle. These strip lights typically come in a single color, such as white, blue, red, or green, and offer a uniform lighting effect. They are often used to create a subtle and classy look inside the car, highlighting specific areas like the footwell, dashboard, or door panels.
RGB LED strip lights
RGB LED strip lights are a more versatile option that allows car owners to choose from a wide range of colors and create various lighting effects. RGB stands for red, green, and blue, the three primary colors that can be mixed to produce a virtually unlimited color palette. These strip lights usually come with a remote control that enables users to select their desired color, adjust the brightness, and even choose dynamic lighting effects like color fading or strobe mode. This type of LED strip lights brings a vibrant and dynamic atmosphere to the car’s interior, offering endless possibilities for customization.
Flexible LED strip lights
Flexible LED strip lights are designed to be easily bent and shaped to fit different parts of the car’s interior, allowing for a seamless and effortless installation. These strip lights are typically coated with a protective layer, making them resistant to moisture, dust, and vibrations. The flexibility of these lights makes them ideal for installing in challenging areas such as curved surfaces, corners, or tight spaces.
Furthermore, flexible LED strip lights can be cut to specific lengths, ensuring a perfect fit for each section of the car’s interior. This versatility allows car owners to get creative and explore various lighting possibilities, whether it’s highlighting specific areas or creating a uniform illumination throughout the vehicle.
In conclusion, when it comes to LED strip lights for cars, car owners have a variety of options to choose from. Single color LED strip lights offer a simple and classy look, while RGB LED strip lights bring a vibrant and dynamic atmosphere. Flexible LED strip lights provide versatility and convenience during installation. Each type of LED strip lights has its own advantages, allowing car enthusiasts to find the perfect lighting solution for their vehicles.
Gathering The Necessary Tools And Equipment
Before you begin the installation process for car LED strip lights, it is important to gather all the necessary tools and equipment. Having the right tools at hand will make the installation smooth and hassle-free.
LED strip lights kit
The first item you will need is an LED strip lights kit. This kit usually includes LED light strips, a control box, remote, and adhesive tape. Make sure you choose a kit that is suitable for your car’s interior and meets your desired lighting preferences. Quality is key when it comes to LED strip lights, so invest in a reliable and durable kit.
Wire stripper
A wire stripper is essential for this installation. It allows you to easily remove the insulation from the wires, enabling proper connections and ensuring a secure and functional setup. Ensure you have a high-quality wire stripper that can handle the gauge of the wires included in your LED strip lights kit.
Soldering iron
A soldering iron is a must-have tool for a professional-grade installation. While some LED strip lights kits come with connectors that eliminate the need for soldering, it is always good to have a soldering iron on hand in case you need to make any adjustments or repairs. A soldering iron with adjustable temperature settings will give you more control over the soldering process.
Electrical tape
Electrical tape plays a crucial role in ensuring a secure and insulated connection. It protects the wires from any potential damage, prevents short circuits, and keeps everything in place. Make sure you have enough electrical tape to cover all the connections properly.
With these essential tools and equipment, you are now ready to move on to the next steps of the car LED strip lights installation process. Keep them handy and organized to make the installation process efficient and enjoyable.
Creating A Plan And Design For Installation
Installing LED strip lights in your car can greatly enhance its appearance and create a unique atmosphere. However, before diving into the installation process, it is important to create a plan and design for the placement of the lights. This will ensure that the lights are installed in the desired areas and that they achieve the desired effect. In this section, we will explore the steps involved in creating a plan and design for the installation of car LED strip lights.
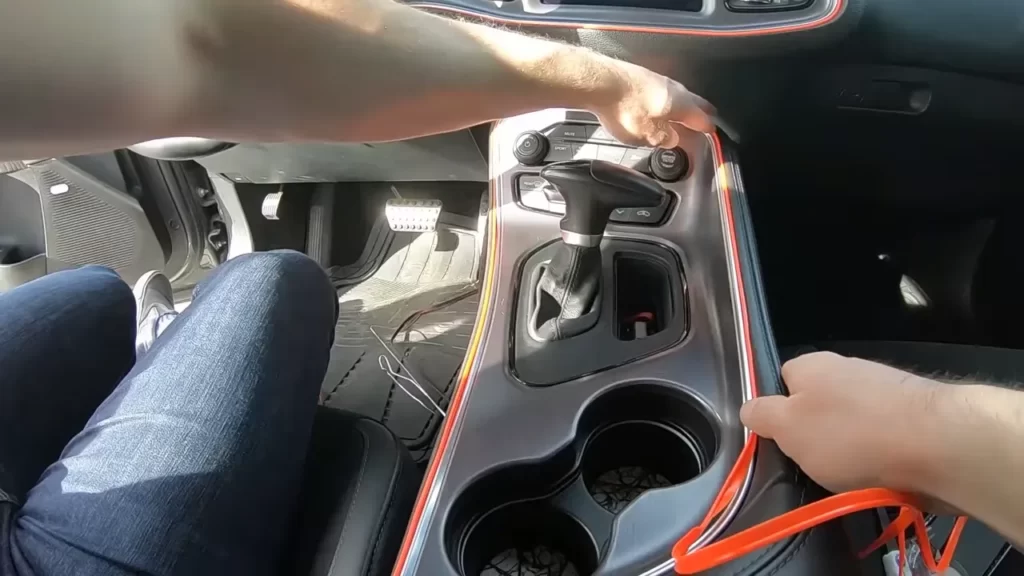
Deciding on the Placement of the LED Strip Lights
The first step in creating a plan for the installation of car LED strip lights is to decide on the placement of the lights. This will depend on your personal preferences and the overall look you want to achieve. Consider the following factors:
- The areas of the car where you want to install the LED strip lights. This could include the footwell, dash, doors, or even the trunk.
- The desired effect you want to create. Do you want a subtle and ambient glow, or do you want the lights to be more pronounced and eye-catching?
- The functionality of the lights. Are they purely for decorative purposes, or do you also want them to serve a practical function, such as providing additional lighting?
By considering these factors, you can determine the optimal placement for the LED strip lights in your car.
Measuring and Cutting the Strips to Fit the Desired Areas
Once you have decided on the placement of the LED strip lights, the next step is to measure and cut the strips to fit the desired areas. To do this, follow these steps:
- Start by measuring the length of the areas where you plan to install the LED strip lights. Use a measuring tape to ensure accuracy.
- Using sharp scissors or a cutting tool, cut the LED strip lights to the measured lengths.
- Take into account any curves or bends in the car’s interior where the lights will be installed, and cut the strips accordingly.
- Test fit the cut strips in the desired areas before proceeding with the installation. This will help ensure that they fit properly and that any adjustments can be made if necessary.
By measuring and cutting the LED strip lights to fit the desired areas, you can achieve a more professional and polished installation.
With a plan and design in place, the installation of car LED strip lights becomes a much smoother and more enjoyable process. Taking the time to decide on the placement of the lights and measuring and cutting the strips to fit the desired areas will ensure that you achieve the desired effect and make your car stand out.
Preparing The Car Interior For Installation
Preparing the car interior for installation is an essential step when it comes to installing LED strip lights. This step ensures that the lights are installed properly and will last for a long time. In this section, we will discuss two key aspects of preparing the car interior for installation: cleaning the surfaces where the strip lights will be installed and identifying the suitable power source for the lights.
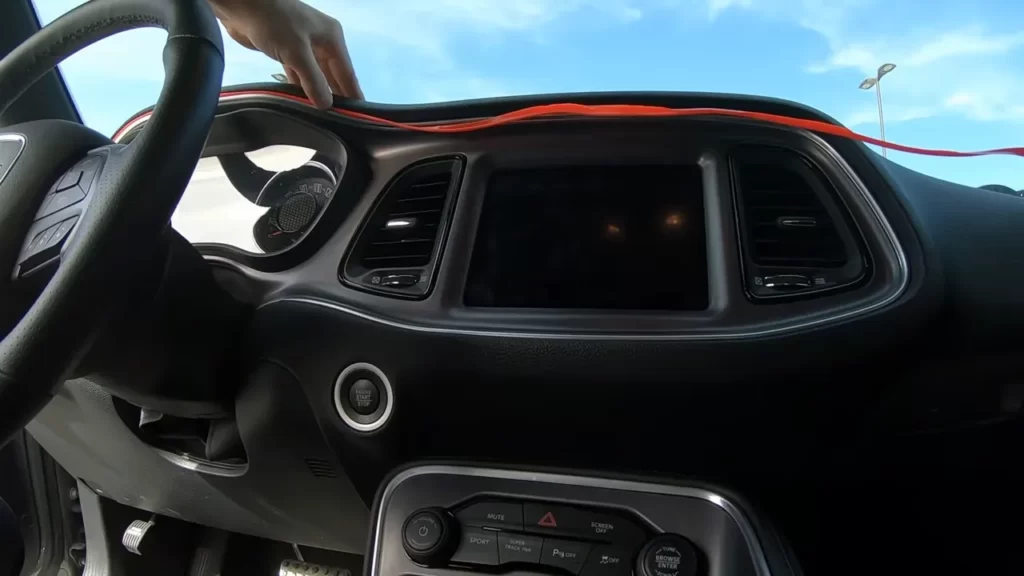
Cleaning the surfaces where the strip lights will be installed
Before installing the LED strip lights, it is crucial to clean the surfaces where the lights will be placed. This ensures that the adhesive on the back of the lights adheres properly and the lights stay in place.
To clean the surfaces, follow these steps:
- Gather the necessary cleaning supplies: a mild detergent, water, and a clean cloth.
- Start by mixing the mild detergent with water to create a soapy solution.
- Dip the cloth into the soapy solution and wring out any excess liquid.
- Gently wipe the surfaces where the strip lights will be installed, ensuring that any dust, dirt, or grease is removed.
- Allow the surfaces to dry completely before proceeding with the installation.
Identifying the suitable power source for the lights
Choosing the right power source for your car LED strip lights is vital to ensure proper functionality and prevent any electrical issues. Here’s how you can identify the suitable power source:
- Refer to your car’s manual to determine the appropriate voltage for connecting the LED strip lights. It is important to match the voltage requirements of the lights with the car’s electrical system.
- Locate the power source options within your car, such as the cigarette lighter socket or the fuse box.
- If using the cigarette lighter socket, ensure that it can handle the power load of the LED strip lights. If not, consider using the fuse box as an alternative power source.
- If opting for the fuse box, consult your car’s manual to find the right fuse that can handle the power requirements of the lights.
- Once you have identified the suitable power source, ensure that it is easily accessible and can be connected to the LED strip lights.
By properly preparing the car interior for installation, you set the foundation for a successful LED strip lights installation. Cleaning the surfaces and identifying the suitable power source not only ensures proper adhesion and functionality but also enhances the overall aesthetics of your car.
Wiring And Connecting The Led Strip Lights
Installing LED strip lights in your car can enhance its appearance and create a unique ambiance. While the installation process may seem daunting, wiring and connecting the LED strip lights is actually quite simple. In this section, we will guide you through the process, starting with determining the positive and negative terminals of the LED strip lights.
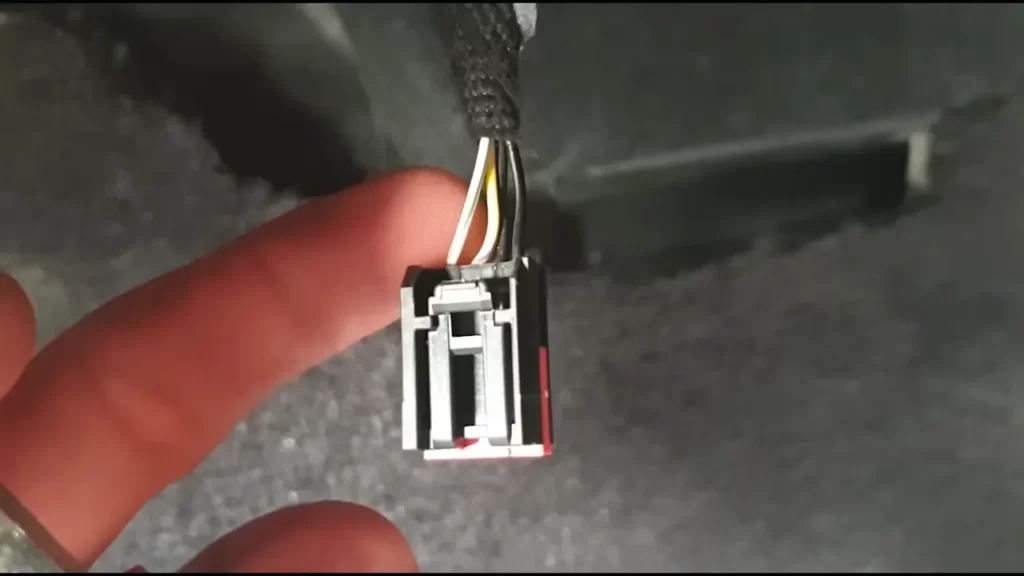
Determining the positive and negative terminals
Before connecting the LED strip lights to your car’s power supply, it is crucial to identify the positive and negative terminals of the lights. The positive terminal, usually marked with a “+” symbol, carries the current to the LED strip lights, while the negative terminal, usually marked with a “-” symbol, completes the circuit. Here’s how you can determine which wire is positive and which one is negative:
- Inspect the wires of the LED strip lights. They are typically color-coded, with red indicating a positive wire and black indicating a negative wire.
- If the wires are not color-coded, you can identify the positive wire by looking for a small arrow or “+” symbol imprinted on it. The negative wire may have a “-” symbol imprinted or no additional marking.
- Using a multimeter set to the resistance or continuity mode, touch the probes to the LED strip light wires. The positive wire should show a positive voltage reading, while the negative wire should show a negative or zero voltage reading.
Soldering the wires and connecting them to the car’s power supply
Once you have determined the positive and negative terminals of the LED strip lights, you can proceed to solder the wires and connect them to your car’s power supply. Follow these steps for a secure and reliable connection:
- Prepare the wires by stripping a small section of insulation off the ends using wire strippers. This will expose the bare conductive metal.
- If your car’s power supply has a 12-volt outlet or cigarette lighter, you can utilize an adapter with built-in connectors. Plug the adapter into the outlet and connect the wires from the LED strip lights to the corresponding positive and negative connectors.
- If you prefer a more permanent solution, you can hardwire the LED strip lights to your car’s power supply. Locate a suitable power source, such as the fuse box or a nearby wire with constant power.
- Solder the positive wire of the LED strip lights to the positive power source and the negative wire to the negative or ground connection. Ensure that the connections are secure and well-insulated to prevent any electrical mishaps.
Remember to test the LED strip lights after installation to ensure they are functioning properly. If you encounter any issues, double-check the connections and consult the instructions provided by the manufacturer.
With these steps, you can successfully wire and connect LED strip lights in your car. Enjoy the vibrant and customizable lighting that will set your vehicle apart from the rest!
Securing The Led Strip Lights
Once you have carefully installed and connected your car LED strip lights, the next step is securing them in place. This is important to ensure that the lights remain in position and do not come loose while you are driving. In this section, we will discuss two common methods of securing the LED strip lights: using adhesive or mounting clips.
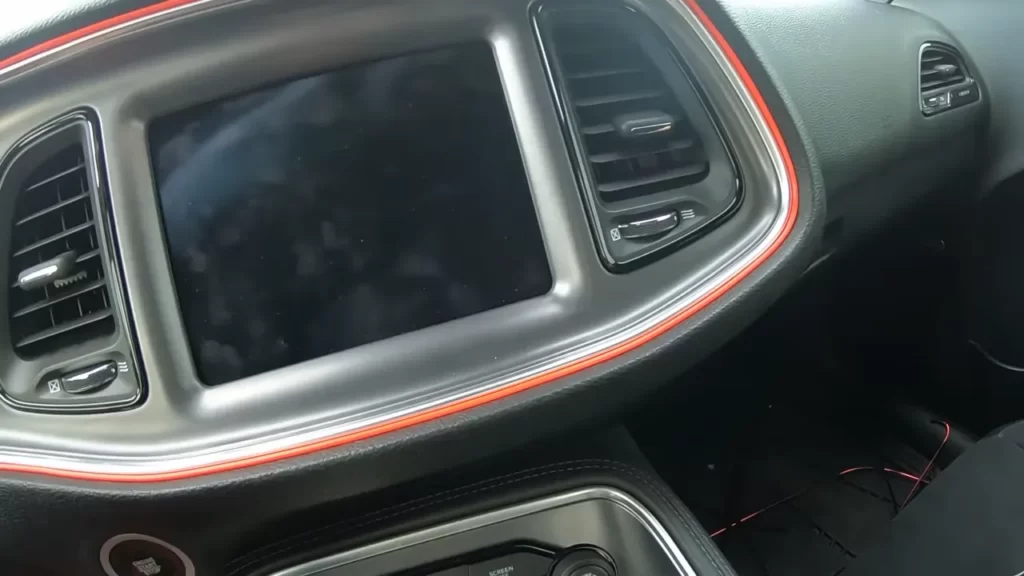
Using adhesive to attach the strips to the car’s interior
One of the most popular methods of securing LED strip lights is by using adhesive. Adhesive tapes are usually included with the light kit, and they provide a strong and reliable bond between the strip and the car’s interior surfaces. Here’s how you can use adhesive to attach the LED strip lights:
- Clean the surface: Before applying the adhesive, make sure the surface where you will be attaching the strip lights is clean and free from dirt, dust, and oils.
- Measure and cut: Measure the length of the area where you want to install the LED strip lights and cut the strip to the appropriate length.
- Peel off the backing: Carefully peel off the protective backing from the adhesive tape on the back of the LED strip.
- Attach the strip: Press the adhesive side of the LED strip firmly onto the desired surface, applying even pressure along the entire length to ensure a secure bond.
It’s important to note that some adhesive tapes may take a few hours to fully adhere to the surface. Therefore, it’s recommended to avoid placing any strain on the strip lights during this time to allow the adhesive to cure properly.
Using mounting clips to attach the strips to the car’s interior
If you prefer a more adjustable and removable method of securing your LED strip lights, mounting clips can be a great option. Mounting clips allow you to easily attach and detach the strips without leaving any residue behind. Here’s a simple step-by-step guide to using mounting clips:
- Measure and mark: Measure the length of the LED strip and mark the positions where you want to attach the mounting clips.
- Attach the clips: Using the appropriate tools, securely attach the mounting clips to the marked positions.
- Slide the strip: Gently slide the LED strip into the mounted clips, ensuring proper alignment and even spacing.
- Secure the strip: Once the strip is in place, make sure it is securely held by the mounting clips, allowing for easy removal or adjustment if needed.
Mounting clips provide a flexible and versatile way of securing LED strip lights, making it easier to reposition or remove the lights without damaging the car’s interior.
Whether you choose to use adhesive or mounting clips to secure your LED strip lights, ensuring proper alignment and even spacing is essential. This will not only enhance the aesthetics of the lights but also prevent any potential obstructions or distractions while driving.
Testing The Led Strip Lights
Before finalizing the installation of your car LED strip lights, it’s crucial to test their functionality. This step ensures that the lights are working properly and will provide you with the desired lighting effect once installed. In this section, we will cover the process of checking the functionality of the lights and adjusting their brightness and color settings if applicable.
Checking the functionality of the lights before finalizing the installation
When it comes to the installation of car LED strip lights, it’s essential to test each light strip to ensure they are functioning correctly. Testing the lights before installation allows you to identify any defects or malfunctions and make necessary adjustments or replacements.
To test the lights, follow these steps:
- Connect the LED strip lights to a power source, such as a car battery or a power supply unit.
- Ensure that the power source is capable of providing the necessary voltage and current for the LED strip lights.
- Turn on the power source and observe if all the LED lights on the strip illuminate.
- Inspect the entire strip, making sure there are no dead or flickering LEDs.
- If any LEDs are not working correctly, check the connections and soldering points to ensure they are secure.
- If the issue persists, consider replacing the defective LED strip with a new one.
Adjusting the brightness and color settings if applicable
Some car LED strip lights come with additional features, such as adjustable brightness and color settings. These settings allow you to customize the lighting according to your preferences, creating a personalized ambiance inside your car.
To adjust the brightness and color settings, refer to the manufacturer’s instructions. Typically, these settings can be adjusted using a remote control or a control module connected to the LED strip lights.
Here are some tips to effectively adjust the brightness and color settings:
- Start by placing the LED strip lights in your desired location inside the car.
- Turn on the lights and use the remote control or control module to access the brightness and color adjustment options.
- Experiment with different brightness levels to find the optimal lighting intensity.
- Explore the color options and choose the one that best complements your car’s interior or matches your personal style.
- Take your time to fine-tune the settings until you achieve the desired lighting effect.
By testing the functionality of the LED strip lights and adjusting the brightness and color settings if applicable, you can ensure a successful installation and enjoy a captivating lighting experience every time you step into your car.
Cleaning And Maintaining The Led Strip Lights
Proper cleaning and maintenance of your LED strip lights is essential to ensure their longevity and optimal performance. In this section, we will discuss two important aspects of cleaning and maintaining your LED strip lights: using a microfiber cloth to remove dust and debris, and avoiding exposure to excessive heat or moisture.
Using a Microfiber Cloth to Remove Dust and Debris
Dust and debris can accumulate on the surface of your LED strip lights over time, affecting their brightness and overall appearance. To keep them clean, follow these simple steps:
- Gently power off the LED strip lights and disconnect the power source.
- Take a clean, dry microfiber cloth and lightly wipe the surface of the LED strip lights.
- Make sure to reach all the nooks and corners, ensuring that no residue is left behind.
- If necessary, you can slightly dampen the cloth with water, but avoid using any harsh cleaning agents or solvents.
- Allow the LED strip lights to dry completely before reconnecting the power source.
Avoiding Exposure to Excessive Heat or Moisture
LED strip lights are sensitive to extreme temperatures and moisture, which can lead to damage and reduce their lifespan. To prevent this, take the following precautions:
- Avoid installing the LED strip lights in areas where they will be exposed to direct sunlight or in close proximity to heat-emitting appliances.
- Ensure proper ventilation to dissipate any heat generated by the LED strip lights.
- If using the LED strip lights outdoors, make sure they are protected against rain, snow, and other forms of moisture.
- Regularly inspect the area around the LED strip lights for any signs of water leakage or condensation.
- In case of any moisture buildup, immediately disconnect the power source and dry the affected area thoroughly before reconnecting.
By following these cleaning and maintenance practices, you can extend the lifespan of your LED strip lights and keep them looking their best. Regular cleaning and avoiding exposure to excessive heat or moisture will help maintain their brightness and ensure optimal performance for years to come.
Troubleshooting Common Issues With Led Strip Lights
Fixing loose connections or faulty wiring
If you’re experiencing issues with your LED strip lights, such as lights not turning on, flickering, or dimming, the problem could be due to loose connections or faulty wiring. Fortunately, fixing this problem is relatively simple. Here are a few steps you can take to troubleshoot and resolve loose connection or faulty wiring issues:
- First, ensure that the power supply is turned off and the LED strip lights are disconnected.
- Inspect the connections between the power supply, the control unit, and the LED strip lights. Look for any loose or disconnected wires.
- If you find any loose connections, use a pair of pliers or wire strippers to properly secure the wires. Make sure the wires are tightly twisted together and insulated with electrical tape.
- If the wiring is visibly damaged or frayed, you may need to replace the faulty section. Cut out the damaged portion and use wire connectors or soldering to join the new segment to the existing wiring.
Once you have addressed any loose connections or faulty wiring, reconnect the LED strip lights, and test to see if the issue is resolved. If the problem persists, continue troubleshooting with the following steps.
Addressing issues with the remote control or control unit
If your LED strip lights are not responding to the remote control or are not functioning properly, there may be an issue with the remote control or the control unit itself. Here are some steps you can take to troubleshoot and fix issues related to the remote control or control unit:
- Replace the batteries in the remote control. Ensure that the batteries are inserted correctly and that they have sufficient charge.
- Check the remote control’s infrared (IR) signal. Point the remote control directly at the control unit and press the buttons. Make sure there are no obstructions blocking the line of sight between the remote control and the control unit.
- If the remote control still doesn’t work, try resetting the control unit. Look for a small reset button on the control unit and press it using a pointed object, such as a paperclip.
- If none of the above steps resolve the issue, there may be a problem with the control unit itself. In this case, contact the manufacturer for further assistance or consider replacing the control unit.
By following these troubleshooting steps, you can quickly identify and resolve common issues with LED strip lights. Remember to always prioritize safety and consult the manufacturer’s instructions for specific guidance on troubleshooting and product maintenance.
Additional Customization Options For Led Strip Lights
Adding patterns or animations to the light display
One of the most exciting aspects of installing LED strip lights in your car is the ability to customize the light display to your heart’s content. By adding patterns or animations to the light display, you can create a truly eye-catching and unique look for your vehicle. Whether you want a pulsating pattern that syncs with your music or a mesmerizing animation that creates a captivating visual display, the possibilities are endless.
There are several ways you can achieve this level of customization. One option is to purchase LED strip lights that come with built-in patterns or animations. These lights are pre-programmed to create specific effects with just the push of a button. All you need to do is install them in your car and start enjoying the stunning light show.
Another option is to invest in a controller that allows you to create your own patterns or animations. These controllers often come with a wide range of customization options, allowing you to adjust the color, speed, and brightness of the lights to suit your preferences. With a bit of creativity and experimentation, you can design a light display that is truly one-of-a-kind.
Incorporating Bluetooth or smartphone controls for convenience
Imagine being able to control your car’s LED strip lights with just a few taps on your smartphone. With the help of Bluetooth or smartphone controls, this dream can become a reality. By incorporating these convenient features into your LED strip light setup, you can easily adjust the color, brightness, and pattern of the lights without ever having to leave your seat.
To make this possible, you will need to invest in LED strip lights that are compatible with Bluetooth or smartphone controls. These lights often come with their own dedicated mobile app, allowing you to connect your phone to the lights and control them wirelessly. From dimming the lights for a more relaxed ambiance to changing the color to match your mood, the ability to control your car’s LED strip lights with your smartphone provides endless possibilities for customization.
Not only does the incorporation of Bluetooth or smartphone controls make adjusting your LED strip lights more convenient, but it also opens up a whole new world of possibilities. Many of these mobile apps come with additional features such as music syncing or voice control, allowing you to create an even more immersive light show experience.
Frequently Asked Questions On How To Install Car Led Strip Lights
Can You Install Led Strips In A Car?
Yes, you can easily install LED strips in a car. It’s a simple process that helps enhance the interior or exterior lighting. Just follow the instructions provided with the LED strips and ensure a safe and secure installation. Enjoy the customized look and improved visibility with these versatile lighting options.
Where Do You Wire Led Lights In A Car?
Wire LED lights in a car by connecting them to the vehicle’s electrical system. Identify the power source and route the wires, ensuring they avoid any hot or moving parts. Then, connect the positive and negative wires to the corresponding terminals.
How Do You Install Led Strip Lights Step By Step?
To install LED strip lights, follow these steps: 1. Plan where to place the lights and measure the length needed. 2. Clean the surface and ensure it’s dry before applying the adhesive backing. 3. Peel off the backing and carefully stick the lights in place.
4. Connect the power supply and test the lights before securing all the connections. 5. Finally, use clips or fasteners to hold the lights in place if necessary. Installing LED strip lights involves planning, cleaning, sticking, connecting, and securing the lights.
Are Led Strip Lights Easy To Install?
LED strip lights are incredibly easy to install. With their simple peel-and-stick adhesive backing, you can easily attach them to any surface. No electrician is needed, making it a hassle-free process. Simply plug them in, and you’re good to go! Their flexibility allows for effortless installation in any space.
Conclusion
To summarize, installing car LED strip lights is a simple and exciting DIY project that can enhance the ambiance of your vehicle. By following a few easy steps and taking necessary safety precautions, you can transform your car’s interior into a vibrant and personalized space.
With the right tools and materials, you’ll be able to enjoy a stylish and eye-catching light display while on the road. So, go ahead and create the perfect atmosphere with car LED strip lights today!