To install car decals, clean the surface, peel off the backing, position the decal, and use a squeegee to remove any air bubbles. When installing car decals, following these steps ensures a clean and professional look for your vehicle customization.
Preparing For Installation
Preparing for Installation
Installing car decals is a popular choice for vehicle customization, allowing individuals to express their personality and style in a unique and eye-catching way. Before you begin the installation process, it is important to make sure you are well-prepared and equipped with the necessary tools and materials. In this section, we will cover why car decals are a popular choice, the different types of car decals available, and the tools and materials you will need for a successful installation.
Why car decals are a popular choice for vehicle customization
Car decals have become increasingly popular for vehicle customization due to their versatility and affordability. They offer a cost-effective way to personalize your car and make it stand out from the crowd. Car decals not only allow you to add a unique touch to your vehicle, but they can also serve as a form of self-expression and advertising. Whether you want to showcase your favorite sports team, promote your business, or simply add a touch of creativity to your car, car decals are a popular choice that can be easily customized to suit your preferences and style.
Understanding the different types of car decals available
When it comes to car decals, there are several different types to choose from, each with its own unique characteristics and benefits. It is important to understand the different types available so you can select the one that best suits your needs. The most common types of car decals include:
- Vinyl Decals: Vinyl decals are made from high-quality vinyl material that is durable and weather-resistant. They come in a wide range of colors, designs, and sizes, making them a popular choice for both personal and commercial vehicles.
- Magnetic Decals: Magnetic decals are designed to adhere to the metal surface of your vehicle without any adhesive. They can be easily removed and repositioned, making them a versatile option for individuals who want the flexibility to change their decals frequently.
- Clear Decals: Clear decals are a great option for individuals who want a subtle and seamless look. They are made from a transparent material that allows the color of your car to show through, giving the illusion that the decal is painted directly onto the vehicle.
Gathering the necessary tools and materials for installation
Before you begin the installation process, it is important to gather all the necessary tools and materials to ensure a smooth and successful installation. Here is a list of the essential items you will need:
| Tools | Materials |
|---|---|
| – Cleaning Solution – Squeegee – Measuring Tape – Masking Tape – Razor Blade or X-Acto Knife – Heat Gun or Hair Dryer | – Car Decal – Transfer Tape – Application Fluid or Water and Soap Solution |
Having these tools and materials on hand will help ensure a successful installation process, allowing you to achieve professional-looking results.
Cleaning And Preparing The Surface
The Importance of Starting with a Clean and Dry Surface
Before installing car decals, it is crucial to begin with a clean and dry surface. This step ensures optimal adhesion and a long-lasting finish for your decals. Keeping the surface free from dirt, dust, grime, and any existing wax or residue is essential for a successful installation process. Not only does a clean surface provide better adhesion, but it also prevents the decals from peeling off prematurely.
How to Properly Wash and Dry the Vehicle
To achieve a clean surface, you need to wash your vehicle thoroughly. Here are a few steps to follow:
- Park your vehicle in a shaded area to prevent the soapy water from drying too quickly.
- Use a hose to rinse off loose dirt and debris.
- Fill a bucket with water and add a mild automotive soap.
- Dip a sponge or soft cloth into the soapy water and gently scrub the vehicle, starting from the top and working your way down.
- Rinse off the soap with a hose, ensuring all suds are removed.
After washing, the next step is to dry the vehicle completely:
- Use a clean microfiber cloth or chamois to dry the surface.
- Avoid using abrasive materials that might scratch the paint.
- Ensure all areas, including crevices and corners, are thoroughly dried.
Techniques for Removing Any Existing Wax or Residue
If there is any existing wax, polish, or residue on the vehicle’s surface, it is crucial to remove it before applying the car decals. Here are some techniques you can use:
- Use a wax and grease remover or rubbing alcohol to remove wax or residue.
- Apply the remover to a clean cloth and gently rub the affected area in a circular motion.
- For stubborn residue, a plastic razor blade can be used carefully to avoid scratching the paint.
- After removing the wax or residue, clean the area again with soap and water to ensure it is thoroughly cleaned and ready for decal installation.
By following these cleaning and preparation steps, you will create an ideal surface for installing car decals. Remember, a clean and dry surface is the foundation for a successful and long-lasting decal application.
Applying The Decal
Choosing the ideal location on the vehicle for placement
When it comes to applying car decals, choosing the right location on your vehicle is crucial for both visibility and aesthetic appeal. Consider the design and shape of the decal, as well as the contours and dimensions of your vehicle. You want to find a flat and smooth surface that allows the decal to adhere properly without stretching or distorting the design. Additionally, think about the purpose of your decal. If it’s a promotional sticker, you may want to place it on the side or back window for maximum exposure. Alternatively, if it’s a decorative decal, you can get creative and place it on the hood, roof, or even the sides of your vehicle. Take your time to visualize different options and choose the ideal location that suits your preferences and intentions.
Measuring and positioning the decal accurately
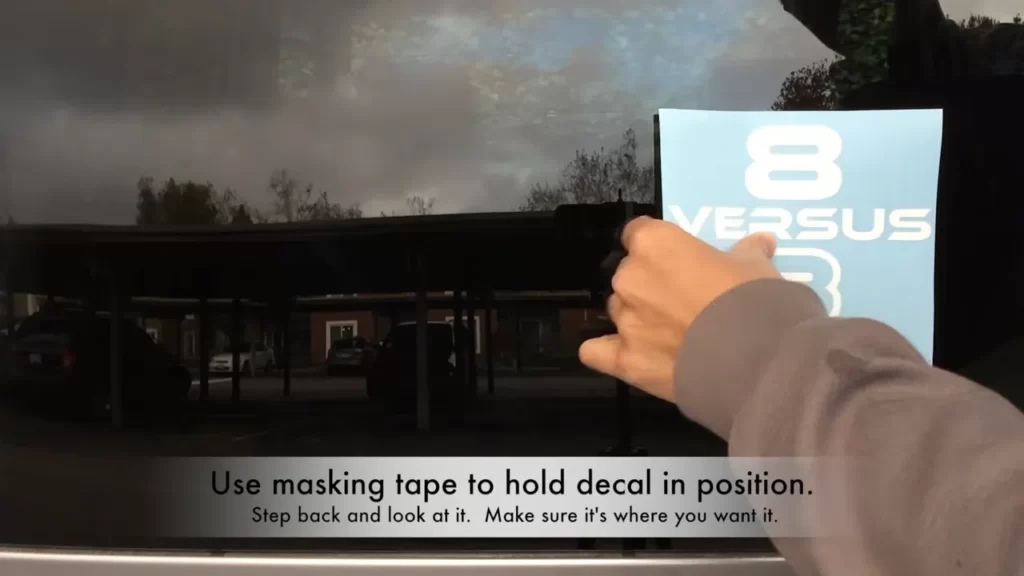
Once you have chosen the location for your car decal, it’s important to measure and position it accurately. Start by thoroughly cleaning the surface where you plan to apply the decal. Use a solution of warm water and mild detergent or rubbing alcohol to remove any dirt, dust, or grease that may hinder adhesion. After the surface is clean and dry, measure and mark the center point of your decal. Then, using masking tape or painter’s tape, create a horizontal or vertical reference line on the surface of your vehicle. Align the center point of the decal with this reference line to ensure proper positioning. Step back and check the alignment from different angles to confirm it is centered and aligned to your satisfaction.
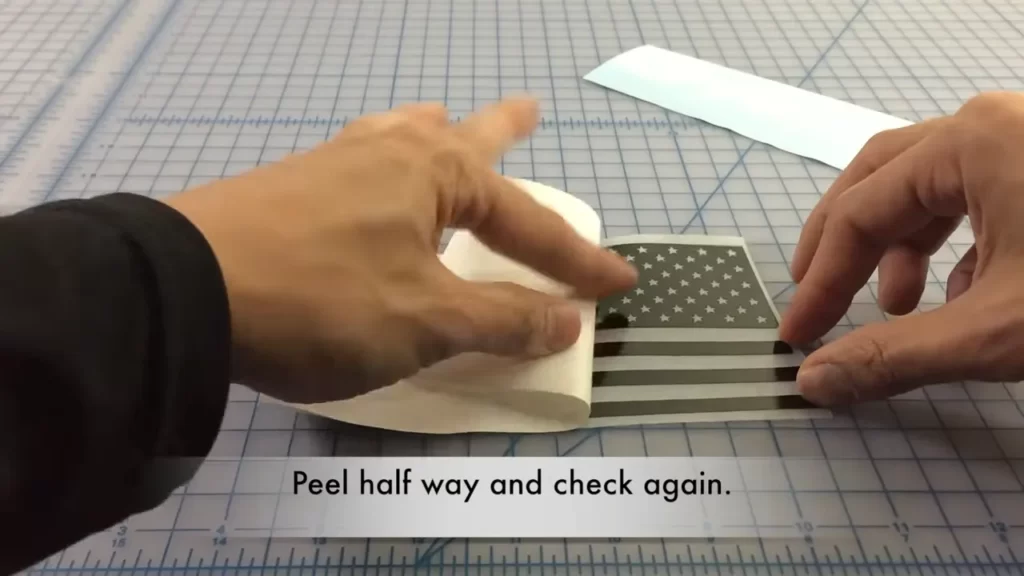
Tips for peeling off the backing paper without damaging the decal
Now comes the exciting part: applying the decal to your vehicle. However, it’s important to peel off the backing paper without damaging the decal. To do this, it’s helpful to follow a few tips. Start by ensuring your hands are clean and dry to avoid leaving fingerprints or smudges on the adhesive side of the decal. Next, locate the edge or corner of the backing paper and gently peel it back, making sure not to touch the adhesive side. If you encounter any resistance, use a sharp, pointed object, such as a craft knife or tweezers, to lift the edge of the backing paper gradually. Slowly work your way around the decal, continuing to peel off the backing paper until the entire adhesive side of the decal is exposed. Be patient and take your time to avoid any tears or creases in the decal. By following these guidelines and paying attention to details, you will be able to apply your car decal accurately and effectively. Remember to choose the ideal location on your vehicle, measure and position the decal carefully, and peel off the backing paper with precision. Taking these steps will ensure your car decal looks professional, stays in place, and makes a statement wherever you go. So go ahead and give your vehicle a personal touch with a custom decal that reflects your style and personality.
Smoothing And Securing The Decal
Installing car decals can be a fun and creative way to personalize your vehicle. Whether you want to show off your favorite sports team, promote your business, or simply add some flair to your ride, properly smoothing and securing the decal is crucial for a professional, long-lasting look. In this section, we will explore two important steps: smoothing out the decal using a squeegee or credit card and techniques for removing air bubbles or wrinkles. We will also discuss how to secure the decal to ensure it stays in place for years to come.
Using a squeegee or credit card to smooth out the decal
Once you have carefully applied the decal to your car’s surface, it’s time to smooth out any imperfections and ensure a seamless finish. One effective tool for this task is a squeegee. A squeegee is a soft, rubbery tool that helps distribute pressure evenly and pushes out any trapped air bubbles or wrinkles.
To use a squeegee properly, start from the center of the decal and work your way outward. Apply gentle pressure as you glide the squeegee over the decal, being careful not to damage the edges or corners. Proceed slowly and methodically, paying attention to any areas that may require extra smoothing.
If you don’t have a squeegee handy, don’t worry! A credit card can work just as well. Gently run the edge of the credit card over the decal, using the same outward motion as you would with a squeegee. The firmness of the credit card will help eliminate any air bubbles and ensure the decal adheres evenly to the car’s surface.
Techniques for removing any air bubbles or wrinkles
Despite your best efforts, air bubbles or wrinkles may still appear during the application process. Don’t panic! There are several techniques you can employ to get rid of them and achieve a flawless finish.
One method is by puncturing the air bubbles with a small pin or needle. Gently poke a tiny hole in the center of the bubble, then use your squeegee or credit card to smooth out the air towards the puncture. This will allow the trapped air to escape and the decal to lie flat.
Another technique involves using heat. Applying heat to the decal, either with a hairdryer or a heat gun on a low setting, can help soften the adhesive and allow you to manipulate the decal more easily. Use your squeegee or credit card to smooth out any wrinkles or bubbles as you apply the heat.
Securing the decal to ensure long-lasting adhesion
For the decal to stay in place and maintain its vibrant appearance over time, properly securing it is essential. Start by making sure the surface you are applying the decal to is clean and free of any dirt, wax, or debris that could interfere with adhesion.
One tried and true method is to apply a layer of clear coat or sealant over the decal. This additional layer acts as a protective barrier, preventing damage from UV rays, weather conditions, and regular wear and tear.
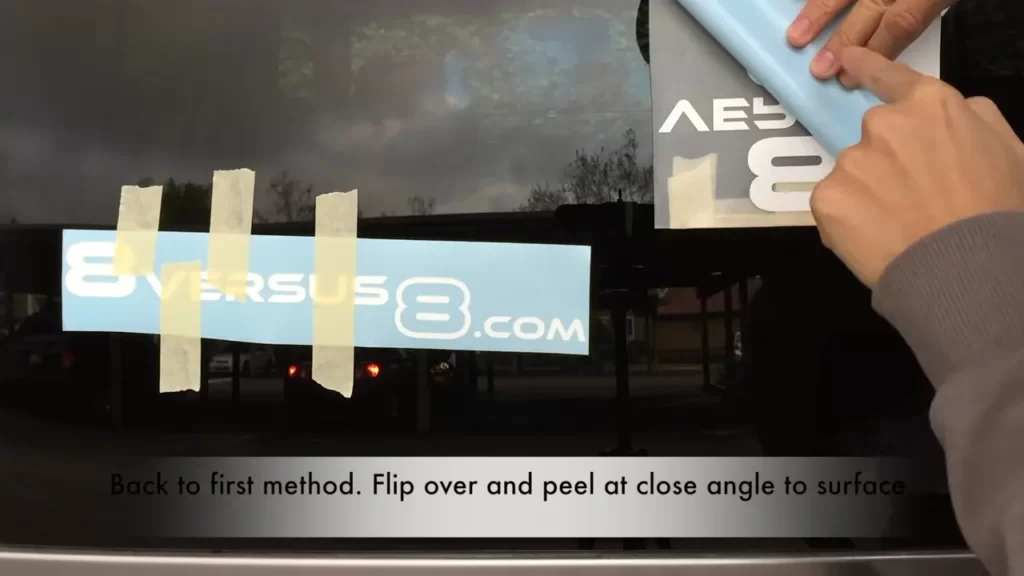
If your decal has multiple pieces or intricate designs, consider using a transfer tape or masking tape to hold the different parts together while applying the decal. This will help maintain the proper alignment and prevent pieces from shifting or overlapping unintentionally.
Finally, give the decal enough time to properly adhere before exposing it to extreme weather or washing your car. Follow the manufacturer’s instructions for curing time to ensure maximum adhesion and longevity.
By following these smoothing and securing techniques, you can be confident that your car decal not only looks great but also stands the test of time.
Additional Tips And Maintenance
Now that you have successfully installed your car decal, it’s important to take some additional steps to ensure its longevity and maintain its appearance. By following these tips, you can protect your decal from the elements and enjoy its vibrant look for years to come.
Applying a clear topcoat for added protection and durability
One effective way to enhance the durability of your car decal is by applying a clear topcoat. This additional layer acts as a protective barrier against UV rays, moisture, and other potential hazards that can damage the decal. To apply the topcoat:
- Ensure that the decal is clean and dry.
- Choose a high-quality clear topcoat specifically designed for outdoor use. Consult with the decal manufacturer or an expert at your local automotive store for recommendations.
- Follow the instructions provided with the topcoat product for the best results.
- Apply a thin and even layer of the topcoat over the entire decal. Use a soft-bristle brush or a foam applicator to achieve a smooth finish.
- Avoid applying too much topcoat, as it may cause the decal to peel or bubble.
- Allow the topcoat to dry according to the manufacturer’s instructions. This typically takes a few hours, but the specific drying time can vary depending on the product.
By applying a clear topcoat, you not only add an extra layer of protection to your car decal but also enhance its durability and resistance to fading, scratching, and peeling.

Proper care and maintenance to prolong the life of the decal
To maximize the lifespan of your car decal, it’s essential to practice proper care and maintenance. Follow these simple steps to keep your decal looking its best:
- Regularly wash your car and decal with a mild soap solution and water. Avoid using abrasive cleaners or scrub brushes, as they can scratch and damage the decal.
- When drying your car, use a soft, lint-free cloth or a microfiber towel to gently pat the decal dry. Avoid rubbing or wiping the decal vigorously, as this can cause it to peel or lift.
- Avoid exposing the decal to extreme temperatures for prolonged periods. If possible, park your car in a shaded area to protect the decal from excessive heat or cold.
- Do not use any wax or polish on the decal, as it can cause discoloration or damage. If you want to wax your car, carefully work around the decal and use a non-abrasive wax product.
- Inspect the decal periodically for any signs of damage, such as peeling edges or bubbles. If you notice any issues, address them promptly to prevent further damage.
By following these care and maintenance tips, you can extend the life of your car decal and keep it looking fresh and vibrant for a long time.
Potential challenges and how to troubleshoot common
installation issues
While installing car decals can be a straightforward process, you may encounter some challenges along the way. Here are some common issues that you may face and how to troubleshoot them:
- Air bubbles: If you notice air bubbles under the decal after installation, use a pin or a sharp needle to puncture the bubbles. Gently press on the decal to remove the trapped air and smooth it out.
- Difficult alignment: If you’re having trouble aligning the decal perfectly, try using masking tape to secure one end of the decal before peeling off the backing. This will allow you to make adjustments without worrying about the decal sticking prematurely.
- Peeling edges: If the edges of your decal start peeling up over time, gently press them back down with your fingers. If necessary, use a hairdryer on low heat to warm the adhesive slightly and help the edges adhere better.
Remember, practice patience and take your time during the installation process. If you encounter any issues, don’t hesitate to refer back to the installation instructions or seek guidance from the decal manufacturer.
Frequently Asked Questions Of How To Install Car Decals
How Do I Put A Decal On My Car?
To put a decal on your car, follow these simple steps: 1. Clean the surface of the car where you want to place the decal. 2. Peel off the backing paper from the decal. 3. Carefully align the decal on the car and press it firmly in place.
4. Smooth out any air bubbles or wrinkles using a credit card or squeegee. 5. Allow the decal to fully adhere before driving or washing your car.
Is It Better To Apply Decals Wet Or Dry?
It is better to apply decals wet as it allows for easier positioning and reduces the chance of air bubbles. Wet application also provides more time for adjustments before the decal adheres firmly.
Can You Put Car Decals On Yourself?
Yes, you can apply car decals by yourself. Just follow these steps: clean the surface, measure and position the decal, peel off backing paper, stick it carefully, smooth out any air bubbles or wrinkles, and let it dry.
Do You Need Transfer Tape For Car Decals?
Yes, transfer tape is necessary for car decals.
Conclusion
Installing car decals can be a fun and creative way to personalize your vehicle. With the right tools and proper techniques, you can achieve a professional-looking result. Remember to clean the surface, position the decal carefully, and use a squeegee to remove any air bubbles.
Whether you’re adding a small graphic or a full-body wrap, following these steps will ensure a successful installation. So go ahead and give your car a unique and customized look with the help of car decals!