To install caliper brakes on a bicycle, first, remove the old brake system by loosening the bolts attaching it to the frame and fork. Then, position the new caliper brakes correctly, ensuring that they align with the rims of the wheels.
Tighten the bolts securely to hold the brakes in place. Adjust the brake pads so they make proper contact with the rim when you squeeze the brake lever. Finally, test the brakes to ensure they are correctly installed and functioning well.
This process will ensure that your bike’s braking system is in optimal condition and ready for safe riding.
Gathering The Necessary Tools And Parts
Before you can start installing caliper brakes on your bicycle, you need to make sure you have all the necessary tools and parts. This step is crucial in ensuring a smooth and successful installation process. Here, we will outline the list of tools you will require as well as the list of parts needed for the installation.
List of tools required for the installation
Here are the essential tools you will need to gather:
- Adjustable wrench
- Allen wrench set
- Screwdriver set
- Cable cutter
- Torque wrench
- Grease or lubricant
- Pliers
These tools are essential for various tasks during the installation process, such as adjusting the brakes, tightening bolts, cutting cables, and ensuring proper torque.
List of parts needed for the installation
Here is a rundown of the necessary parts for installing caliper brakes on your bicycle:
| Part | Description |
|---|---|
| Caliper Brakes | The main component responsible for stopping the bicycle when the brakes are applied. |
| Brake Pads | The friction pads that come in contact with the wheel rim to slow down and stop the bicycle. |
| Brake Cables | These cables connect the brake levers to the caliper brakes and control the braking action. |
| Cable Housing | Protective casing for the brake cables, helping to prevent damage and ensure smooth operation. |
| Cable End Caps | These caps secure the ends of the brake cables, preventing fraying and maintaining cable integrity. |
| Bolts and Nuts | Various bolts and nuts are required for attaching the caliper brakes to the bicycle frame securely. |
Having all the necessary parts ready ensures a hassle-free installation and guarantees your brakes function optimally from the get-go.
Now that you have gathered the required tools and parts, you are ready to move on to the next step, which involves actually installing the caliper brakes on your bicycle.
Removing The Old Brakes
In this section, we will walk you through the step-by-step process of removing the old brakes from your bicycle. Removing the old brakes is an important part of any brake replacement or upgrade project. By following these simple steps, you will be able to remove the old brakes effectively and efficiently.
Tools required for removing the old brakes
If you are planning to remove the old brakes from your bicycle, it is essential to have the right tools handy. Here is a list of tools you will need:
- Allen wrench set
- Adjustable wrench
- Phillips head screwdriver
- Pliers
- A clean, dry cloth
Step-by-step process for removing the old brakes
Now that you have gathered all the necessary tools, let’s proceed with the step-by-step process of removing the old brakes:
- Start by loosening the bolt that connects the caliper brake to the brake mount using your adjustable wrench. Make sure to save this bolt, as you will need it for reinstallation later.
- Once the bolt is loosened, carefully slide the caliper brake off the brake mount. Be gentle to avoid damaging any other components.
- Next, locate the brake cable that connects to the caliper brake. Using your pliers, squeeze the brake cable end together and release it from the caliper brake. This will free the caliper brake from the cable.
- With the caliper brake now detached, you can remove the brake pads. Start by locating the retention pin or screw that holds the brake pads in place. Unscrew or remove the pin using the appropriate tool, then slide out the brake pads one at a time.
- If your old brake pads are worn out or damaged, this is a good time to replace them with new ones. Simply insert the new brake pads into the caliper brake and secure them with the retention pin or screw.
- Lastly, take a clean, dry cloth and wipe away any dirt or debris from the brake mount and caliper brake. This will ensure a clean surface for installing the new brakes.
We have now completed the process of removing the old brakes from your bicycle. By following these steps, you have successfully detached the caliper brakes and removed the brake pads. This prepares your bike for the installation of new brakes. In our next section, we will guide you through the process of installing caliper brakes on your bicycle. Stay tuned!
Choosing The Right Caliper Brakes
When it comes to enhancing the stopping power and overall performance of your bicycle, choosing the right caliper brakes is essential. With a wide range of options available in the market, it can be overwhelming to make a decision. However, by considering a few factors and understanding the different options, you can find the perfect caliper brakes that suit your needs and preferences.
Factors to Consider When Selecting Caliper Brakes
Before diving into specific caliper brake options, it’s important to understand the factors that should influence your decision-making process. Here are a few key factors to consider:
- Compatibility: Ensure that the caliper brakes you choose are compatible with your bicycle frame and fork. Different bikes may require specific mounting styles, such as center-mount, side-mount, or direct-mount caliper brakes.
- Braking Power: Assess the amount of stopping power you need, depending on your cycling style and terrain. Road cyclists, for example, may prioritize lightweight caliper brakes that offer quick and responsive stopping power.
- Material and Construction: Caliper brakes come in a variety of materials, including aluminum, steel, and carbon fiber. Consider the durability and weight of the brakes, as well as any specific features that contribute to their overall performance.
- Price: Set a budget for your caliper brakes, keeping in mind that higher-priced options may offer advanced features and superior performance. However, it’s essential to strike a balance between cost and quality.
Recommended Caliper Brake Options
Now that you have a better understanding of the factors to consider, let’s explore some recommended caliper brake options:
| Caliper Brake Model | Features | Price Range |
|---|---|---|
| Shimano Dura-Ace BR-9100 | Exceptional braking power, lightweight design, durable construction | $150-$200 |
| SRAM Force | Smooth and precise braking, easy installation, affordable price | $100-$150 |
| Campagnolo Record | Excellent stopping power, adjustable brake tension, sleek aesthetics | $200-$250 |
These are just a few examples of high-quality caliper brakes. Remember to research and read reviews to find the best option for your specific biking needs. Additionally, consult with a professional bike mechanic or knowledgeable staff at your local bicycle shop for personalized recommendations.
By carefully considering the aforementioned factors and exploring recommended caliper brake options, you can make an informed decision and enjoy optimal braking performance on your bicycle.
Positioning The Caliper Brakes
Properly positioning the caliper brakes on your bicycle is essential to ensure optimal brake performance and rider safety. The correct placement of the caliper brakes depends on various factors, including the type of bicycle, wheel size, and personal preference. In this section, we will discuss how to determine the correct placement of the caliper brakes and how to adjust their position for optimal brake performance.
Determining the correct placement of the caliper brakes
The first step in positioning the caliper brakes is determining the correct placement on the bicycle frame. This can be done by following these steps:
- Ensure that the bicycle is in an upright position, either on a bike stand or balanced on its wheels.
- Locate the mounting points on the bicycle frame specifically designed for caliper brakes. These mounting points are typically located on the front and rear forks.
- Measure the distance between the mounting points, ensuring that it matches the distance of the caliper brake arms.
- Align the caliper brake arms with the mounting points, making sure they are parallel to the wheel rim.
It is important to note that the position of the caliper brakes may vary depending on the specific frame design and brake model. Therefore, it is always recommended to consult the manufacturer’s instructions or seek professional guidance.
Adjusting the position for optimal brake performance
After determining the initial placement of the caliper brakes, it is crucial to fine-tune their position for optimal brake performance. Follow these steps to adjust the position of the caliper brakes:
- Loosen the mounting bolts securing the caliper brakes to the frame using an appropriate wrench.
- Apply the brakes to bring the brake pads in contact with the wheel rim.
- Check the alignment of the brake pads with the rim. The brake pads should make even contact with the rim surface when the brakes are engaged.
- Make any necessary adjustments by slightly loosening the caliper mounting bolts and manually aligning the brake pads with the rim.
- Tighten the mounting bolts firmly, ensuring that the caliper brakes remain in the adjusted position.
- Test the brakes to ensure they engage smoothly and provide adequate stopping power.
Remember to perform a test ride after adjusting the caliper brake position to ensure the brakes are properly aligned and functioning effectively. If you encounter any difficulties or uncertainties during the process, it is recommended to seek advice from a professional bike mechanic.
By following these steps for positioning and adjusting caliper brakes, you can optimize your bicycle’s braking performance, leading to a safer and more enjoyable riding experience.
Mounting The Caliper Brakes
Mounting the caliper brakes on your bicycle correctly is an important step to ensure smooth and efficient braking. Whether you are installing new brakes or replacing old ones, the process can be straightforward if you follow a step-by-step approach. In this section, we will guide you through the process of mounting caliper brakes on your bicycle, from ensuring proper alignment to secure attachment. Let’s get started!
Step-by-Step Process for Mounting the Caliper Brakes on the Bicycle
To mount the caliper brakes on your bicycle, follow these steps:
- First, locate the caliper brake mounting points on your bike frame. These are typically situated on the front and rear forks, just above the wheel.
- Next, attach the caliper brake using the provided bolts. Make sure the brake is positioned correctly, with the brake arms on either side of the wheel.
- Tighten the bolts securely, but be careful not to overtighten as it may damage the brake or the frame.
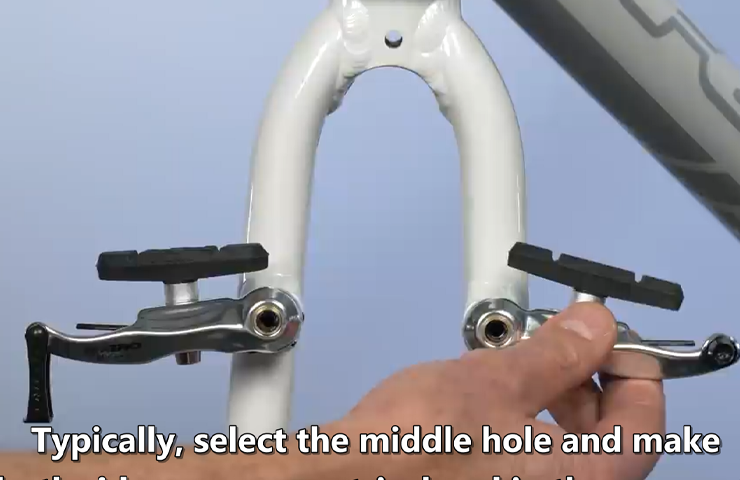
- Once the caliper brake is securely attached, check the alignment. The brake pads should make even contact with the rim of the wheel when the brake is engaged. Adjust the position of the brake arms if needed.
- With the brake pads properly aligned, check their distance from the rim. There should be a small gap between the brake pads and the rim when the brake is not engaged.
- If necessary, adjust the brake pad position to achieve the desired gap. This can be done by using the provided adjustment screws or washers.
- After ensuring proper alignment and gap, give the brake lever a gentle squeeze to test the brake’s engagement and release. The brake pads should engage smoothly and release completely when the lever is released.
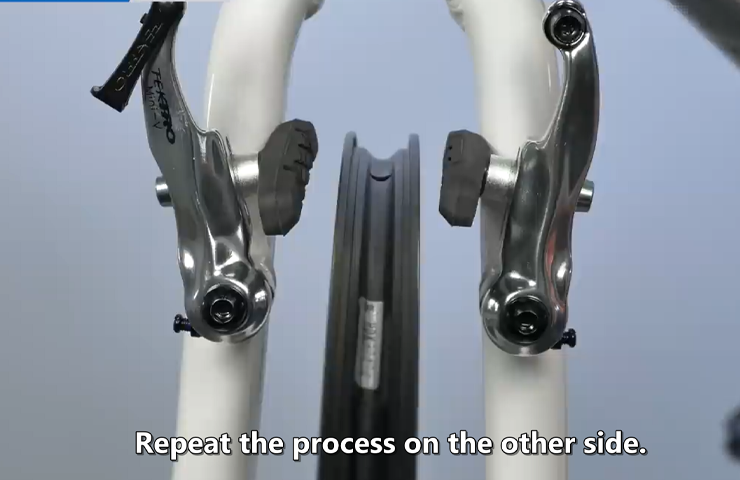
- Repeat the same steps for the other caliper brake.
By following this step-by-step process, you can mount the caliper brakes on your bicycle correctly and ensure optimal performance. Remember to double-check the alignment and secure attachment of the brakes before taking your bike for a ride. Enjoy a safe and enjoyable cycling experience with your newly installed caliper brakes!
Connecting The Brake Cables
Attaching the brake cables to the caliper brakes is an essential step in the installation process. This ensures that when you squeeze the brake levers, the caliper brakes engage and stop your bicycle effectively. Follow these detailed steps to connect the brake cables:
Tools required for connecting the brake cables to the caliper brakes
Before getting started, gather the necessary tools that will help you attach the brake cables. Here’s a list of the tools you’ll need:
| Tools |
|---|
| • Hex wrench set |
| • Cable cutters |
| • Needle-nose pliers |
Detailed steps for attaching the brake cables
- Step 1: Begin by identifying the brake caliper where you’ll be attaching the cables. This is usually located on both the front and rear forks of the bicycle frame.
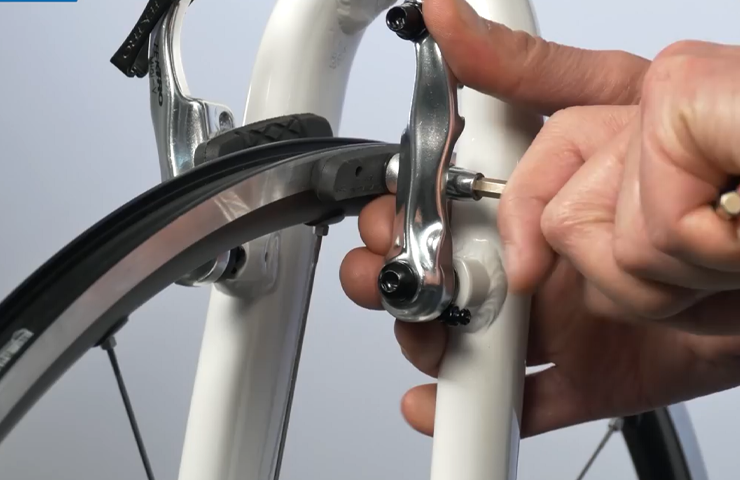
- Step 2: Take one end of the brake cable and insert it through the end of the caliper arm, ensuring it fits snugly.
- Step 3: Next, locate the cable anchor bolt on the caliper and use a hex wrench to loosen it slightly. This will allow you to secure the brake cable later.
- Step 4: Continuing with the cable, make sure it runs smoothly through any cable guides or stops on the bicycle frame. This ensures the cable is properly routed and will operate smoothly.
- Step 5: With the cable routed correctly, pull it tight and secure it in place. Use the needle-nose pliers to grip the cable just below the anchor bolt.
- Step 6: With the pliers holding the cable, tighten the anchor bolt with the hex wrench. Ensure it is secure but not overly tightened, as this may restrict the movement of the cable.
- Step 7: Repeat the previous steps to connect the brake cable to the other caliper on your bicycle.
Once you have successfully connected the brake cables to the caliper brakes, double-check the cable tension. There should not be excessive slack or excessive tightness. Proper tension will ensure optimal braking performance.
By following these steps and using the necessary tools, you can easily install caliper brakes on your bicycle and enhance its stopping power. Now you’re ready to hit the road with confidence in your braking system!
Adjusting The Brake Tension
When it comes to bicycle safety, having properly functioning brakes is absolutely essential. One crucial aspect of brake maintenance is ensuring that the brake tension is adjusted correctly. Brake tension refers to the amount of force required to engage the brakes and bring the bicycle to a stop. Having the right brake tension is important for both the effectiveness and the safety of your bicycle’s caliper brakes. In this section, we will discuss the importance of brake tension and provide you with a step-by-step process for adjusting it.
Understanding brake tension and its importance
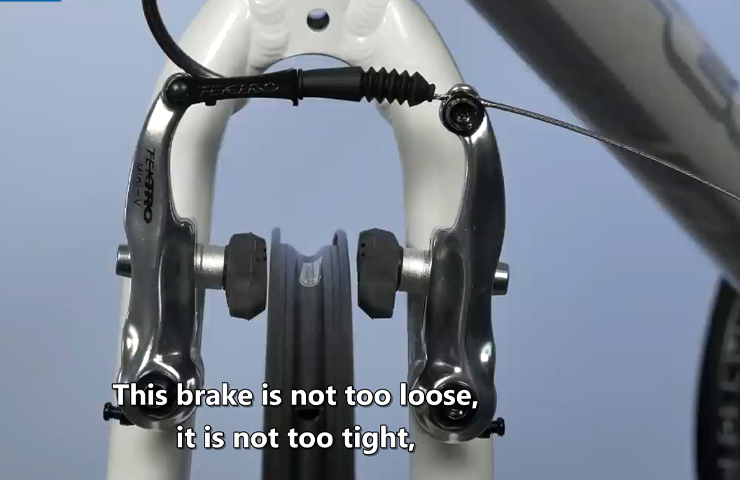
Brake tension plays a key role in how quickly and effectively your caliper brakes can bring your bicycle to a stop. If the tension is too loose, it will take longer for the brakes to engage, resulting in a longer stopping distance and potentially hazardous situations. Conversely, if the tension is too tight, the brakes may engage too quickly and abruptly, causing the wheels to lock up and skid. Striking the right balance is vital for optimum brake performance and rider safety.
Step-by-step process for adjusting the brake tension
- Start by identifying the brake assembly. This usually consists of two brake pads attached to the caliper and positioned on either side of the wheel rim.
- Locate the brake tension adjustment screw or barrel adjuster. This is typically situated on the caliper itself or on the brake lever. The adjustment screw allows you to fine-tune the tension in the brake cable.
- Begin by turning the adjustment screw counterclockwise to loosen the tension. This will allow the brake pads to move further away from the wheel rim.
- Mount your bicycle on a or elevate the tire off the ground so that you can easily rotate the wheel. This step will make it easier to observe the adjustments as you make them.
- Squeeze the brake lever to engage the brakes and observe the position of the brake pads in relation to the wheel rim. Ideally, the brake pads should be positioned close enough to the rim that they make contact with it without rubbing. If the pads do not make contact or if they rub against the rim, adjust the tension accordingly.
- To increase the tension, turn the adjustment screw clockwise. This will pull the brake pads closer to the rim. Conversely, to decrease the tension, turn the adjustment screw counterclockwise, allowing the brake pads to move away from the rim.
- Make small adjustments at a time, testing the brakes after each adjustment to ensure they engage and release smoothly without any dragging or excessive play.
- Continue fine-tuning the tension until you achieve the desired feel and responsiveness from your brakes.
- Once you are satisfied with the brake tension, tighten any locknuts or screws that secure the adjustment screw in place to prevent it from shifting unintentionally.
Congratulations! You have successfully adjusted the brake tension on your bicycle’s caliper brakes. Remember to regularly check the tension and make any necessary adjustments to ensure your brakes are in top working condition. Properly adjusted brake tension will not only enhance your ride, but it will also keep you safe on the road or trail.
Checking Brake Pad Alignment
One of the most important steps in installing caliper brakes on a bicycle is ensuring the proper alignment of the brake pads. Proper alignment is crucial to ensure optimal braking performance and to prevent any potential safety hazards. In this section, we will explore how to identify the correct brake pad alignment and the adjustments required for optimal brake pad contact.
Identifying Proper Brake Pad Alignment
Before making any adjustments, it is essential to identify the proper alignment of the brake pads. The brake pads should make even contact with the rim of the bicycle wheel when the brakes are engaged. To check the alignment, follow these steps:
- 1. Squeeze the brake lever firmly to engage the brakes.
- 2. Observe the alignment of the brake pads.
If the brake pads are not making even contact with the rim, you may notice one of the following scenarios:
- The brake pads are too high and are touching the tire.
- The brake pads are too low and are not making sufficient contact with the rim.
- The brake pads are not centered and are touching the sidewalls of the tire.
Adjustments Required for Optimal Brake Pad Contact
Once you have identified any misalignments, adjustments must be made to ensure optimal brake pad contact. Here are some guidelines for the most common alignment issues:
1. Brake pads too high:
If the brake pads are touching the tire, they need to be lowered. Use an Allen wrench to loosen the brake pad fixing bolt. Gently press the brake pads down until they are at a proper distance from the tire. Then, tighten the brake pad fixing bolt to secure the adjustment.
2. Brake pads too low:
If the brake pads are not making sufficient contact with the rim, they need to be raised. Loosen the brake pad fixing bolt and gently lift the brake pads until they are at the correct height. Retighten the brake pad fixing bolt to secure the adjustment.
3. Brake pads not centered:
If the brake pads are touching the sidewalls of the tire, they need to be centered. Locate the brake pad adjusting bolt on either side of the caliper. Use an Allen wrench to adjust the bolt on one side until the brake pads are centered and make even contact with the rim. Repeat this process on the other side if necessary.
Remember to test the brakes after making any adjustments to ensure they are functioning correctly. Proper brake pad alignment is essential for maintaining control and ensuring your safety while riding. By following these steps, you can install caliper brakes on your bicycle with confidence.
Testing The Brake Performance
Once you have successfully installed caliper brakes on your bicycle, it is crucial to test their performance before taking your bike out on the road. Testing the brake performance helps ensure your safety and allows you to make any necessary adjustments or troubleshoot common issues before your ride.
Recommended methods for testing the brakes
1. Visual inspection: Start by visually inspecting the caliper brakes and ensure that they are properly aligned and centered on the rim of the bicycle wheel. Look for any signs of misalignment or rubbing against the tire.
2. Squeezing the brake levers: With your bike secured, gently squeeze the brake levers to check the responsiveness of the caliper brakes. The levers should provide a firm and consistent resistance, without feeling spongy or loose.
3. Performing slow stops: Take your bicycle for a test ride in a safe and open area. Gradually increase your speed and then apply the brakes slowly to test their stopping power. Pay attention to how quickly your bike comes to a stop and if the brakes provide smooth and even pressure on both wheels.
4. Emergency stops: Once you’ve tested slow stops, it’s essential to assess the caliper brakes’ performance during an emergency stop situation. Ride at a higher speed and then apply the brakes firmly to simulate an emergency stop. Make sure the brake pads engage quickly and bring your bike to a controlled stop without any skidding or loss of control.
Troubleshooting common issues with the caliper brakes
If you encounter any issues with your caliper brakes during testing, here are some common problems and troubleshooting steps:
1. Brake pad alignment: If your brakes feel uneven or produce a scraping noise, the brake pads may be misaligned. Adjust the pad position by loosening the mounting bolt, adjusting the angle, and then tightening the bolt.
2. Caliper centering: If you notice your caliper brakes rubbing against the rim or tire, they may not be centered properly. Loosen the mounting bolt and center the caliper by gently squeezing the brake lever and retighten the bolt.
3. Inadequate stopping power: If your brake performance is weak and it takes longer to stop, check the brake pads for wear. Worn-out or hardened brake pads should be replaced to restore the braking power.
4. Brake lever adjustment: If the brake lever feels loose or requires excessive effort to engage the brakes, you may need to adjust the cable tension. Refer to your bicycle’s user manual for specific instructions on adjusting the brake lever tension.
By following these recommended testing methods and troubleshooting steps, you can ensure the optimal performance of your caliper brakes. Regularly inspecting and maintaining your caliper brakes will help you stay safe while enjoying your rides on your bicycle.
Cleaning And Lubricating The Brakes
Importance of Regular Brake Maintenance
Regular brake maintenance is crucial for the overall performance and safety of your bicycle. The braking system is a vital component that ensures you can stop effectively and maneuver your bike without any issues. Over time, dirt, dust, and road grime can accumulate on the brake calipers, affecting their efficiency. By cleaning and lubricating your brake calipers, you can ensure optimal functioning and prolong the lifespan of your brakes.
Recommended Cleaning and Lubrication Techniques
To properly clean and lubricate your brakes, follow these steps:
- Start by removing the wheel from the bike frame. This will provide easier access to the brake calipers.
- Using a soft bristle brush or an old toothbrush, gently scrub away any dirt, debris, or residue from the caliper arms, brake pads, and brake housing. This will help restore smooth movement and prevent any potential squeaking or sticking.
- Next, wipe down the brake calipers with a clean, dry cloth to remove any remaining dirt particles.
- Inspect the brake pads for wear. If they are significantly worn down or damaged, it may be time to replace them. If they still have life left, you can proceed with the cleaning process.
- Apply a small amount of a bicycle-specific brake cleaner or degreaser to a clean cloth. Gently wipe the caliper arms, brake pads, and other brake components to remove any stubborn grease or grime.
- Once the brakes are clean, it’s time to lubricate the necessary parts. Be sure to use a bike-specific lubricant, such as a silicone-based or Teflon-based lubricant, to avoid damaging the brake components.
- Apply a thin layer of lubricant to the brake caliper arms, ensuring it reaches all moving parts. This will help reduce friction and ensure smooth operation.
- Reinstall the wheel on the bike frame and test the brakes to ensure proper functionality. If there is any unusual noise, rubbing, or resistance, make adjustments as necessary.
Remember, cleaning and lubricating your brake calipers should be done regularly, especially if you ride in dirty or wet conditions. This simple maintenance routine will help keep your brakes in top shape and provide you with reliable stopping power on every ride.
Inspecting And Replacing Brake Pads
Inspecting and replacing brake pads is a critical aspect of maintaining your bicycle’s caliper brakes. Over time, brake pads can wear out or become damaged, affecting their performance and compromising your safety. By following a few simple steps, you can easily inspect and replace worn-out brake pads to ensure your bicycle stops smoothly and efficiently.
Steps for Inspecting Brake Pads for Wear and Damage
Regularly inspecting your brake pads is crucial to catch any signs of wear or damage before they become a safety hazard. Here’s a step-by-step guide to help you inspect your brake pads effectively:
- Step 1: Visual Examination
- Step 2: Thickness Check
- Step 3: Brake Pad Alignment
- Step 4: Pad-to-Rim/Pad-to-Rotor Clearance Check
- Step 5: Brake Pad Material Condition
Guidelines for Replacing Worn-Out Brake Pads
When it comes to replacing worn-out brake pads, it’s crucial to follow the correct procedure to ensure optimal braking performance. Here are some guidelines to help you replace your brake pads smoothly:
- Guideline 1: Gather the Necessary Tools
- Guideline 2: Loosen the Brake Cable
- Guideline 3: Remove the Old Brake Pads
- Guideline 4: Install the New Brake Pads
- Guideline 5: Adjust Brake Pad Alignment and Clearance
- Guideline 6: Reattach the Brake Cable
By following these steps and guidelines, you can easily inspect and replace worn-out brake pads on your bicycle’s caliper brakes. Regular inspection and timely replacement of brake pads will not only enhance your braking experience but also ensure your safety on the road or trail. Remember to prioritize safety and attention to detail when performing any maintenance tasks on your bicycle.
Regular Brake Maintenance Schedule
Regular brake maintenance is crucial for ensuring the safety and performance of your bicycle. By following a recommended maintenance schedule, you can keep your caliper brakes in top condition, preventing potential accidents and prolonging the lifespan of your braking system. In this section, we will discuss the recommended frequency for checking and maintaining caliper brakes, as well as share some valuable tips for keeping your brakes in excellent shape.
Recommended frequency for checking and maintaining caliper brakes
It is important to regularly inspect and maintain your caliper brakes to ensure they are functioning properly. Here are some guidelines on how often you should check and perform maintenance tasks on your brake system: 1. Visual inspection: Conduct a visual inspection of your caliper brakes before every ride. Look for any signs of wear, damage, or misalignment. Pay close attention to brake pads, cables, and the caliper itself. If you notice any issues, address them before hitting the road. 2. Brake pad wear: Check the wear of your brake pads every 500 kilometers or sooner if you notice a decrease in braking performance. Inspect the thickness of the brake pads and replace them if they are worn down to a thickness of 1-2 millimeters. Worn brake pads can compromise your ability to stop efficiently. 3. Brake cable tension: Adjust the brake cable tension as needed, which can vary based on cable stretch and other factors. Check the cable tension every 1000 kilometers or if you notice that your brakes feel loose or sluggish. A well-tensioned brake cable is essential for responsive braking. 4. Caliper alignment: Verify that the caliper is properly aligned with the rim on both sides. This alignment ensures even brake pad wear and optimal braking performance. Check the caliper alignment at least once every 2000 kilometers or whenever you remove or adjust your wheels.
Tips for keeping the brakes in top condition
To ensure that your caliper brakes are always in top condition, keep the following tips in mind: 1. Clean your brakes regularly: Dirt, grime, and debris can accumulate on your brake pads and rims, compromising the braking performance. Clean your brakes regularly using a mild soap and water solution, ensuring that no residue is left behind. This will not only improve braking power but also prevent premature wear on your pads. 2. Apply suitable lubrication: Use a lightweight lubricant on the pivot points of the caliper brakes to prevent them from sticking or seizing up. Be cautious not to get any lubricant on the brake pads or rims, as this can impair braking performance. 3. Avoid overheating: Excessive braking can cause the caliper brakes to overheat, leading to a decrease in effectiveness. When descending steep hills or braking for extended periods, alternate between the front and rear brakes to prevent overheating. This will help maintain consistent and reliable braking performance. 4. Monitor your brake pad wear: Regularly check the wear of your brake pads and replace them when necessary. Riding with worn brake pads not only compromises your stopping power but can also cause damage to your rims. Always replace both front and rear brake pads at the same time for uniform braking performance. 5. Seek professional assistance: If you are unsure about any aspect of brake maintenance or if you notice any persistent issues, it is best to seek the help of a professional bicycle mechanic. They can perform a thorough inspection, diagnose any underlying problems, and ensure that your brakes are functioning optimally. By adhering to a regular brake maintenance schedule and implementing these tips, you can keep your caliper brakes in excellent condition, guaranteeing your safety and enjoyment while riding your bicycle. Remember, well-maintained brakes provide the confidence and control you need on the road or trail.
Frequently Asked Questions For How To Install Caliper Brakes On Bicycle
How Do You Install Bike Brake Calipers?
To install bike brake calipers: 1. Remove old calipers by unscrewing bolts. 2. Align new calipers with brake mounts on frame. 3. Tighten bolts to secure calipers in place. 4. Attach brake cables to calipers. 5. Adjust caliper position for proper alignment with brake pads.
Are Calipers Easy To Install?
Calipers are easy to install. Simply follow the provided instructions and use basic tools. Once installed, they will accurately measure distances for various applications.
How Are Brake Calipers Attached?
Brake calipers are attached to the wheel assembly using bolts or slide pins. The caliper is positioned over the rotor and secured with mounting hardware. This ensures proper alignment and allows the caliper to squeeze the brake pads against the rotor when the brakes are engaged.
How Do You Fix A Bike Caliper Brake?
To fix a bike caliper brake, follow these steps: 1. Loosen the nut holding the brake cable. 2. Align the brake pads with the wheel rim. 3. Tighten the nut and test the brake for proper function. 4. Adjust the tension of the brake cable if necessary.
5. Test the brake again to ensure it is working correctly.
Conclusion
Installing caliper brakes on your bicycle doesn’t have to be a daunting task. With these simple steps, you’ll be able to master the process in no time. By following the guidelines outlined in this blog post, you can ensure a smooth installation that will improve your bike’s braking performance and safety.
Remember to regularly check and maintain your brakes to ensure optimal functionality. Happy cycling!