To install brake pads and rotors, follow these steps: 1. Jack up the car and remove the wheels.
Factors To Consider When Selecting Brake Pads And Rotors
When it comes to vehicle safety, one of the critical components to pay attention to is the braking system. If you’re a DIY enthusiast looking to install new brake pads and rotors, it’s essential to understand the various factors that should influence your decision. From pad material and performance levels to rotor material and design, as well as compatibility with your vehicle make and model, considering these factors will help ensure optimal braking performance while driving. Let’s delve deeper into each of these factors:
Pad Material and Performance Levels
When selecting brake pads, the material they are made of plays a significant role in their performance and longevity. There are several types of brake pad materials available, each with its unique characteristics:
- Ceramic brake pads: These are known for their durability, low noise, and minimal dust output. Ceramic pads also provide excellent braking performance under normal driving conditions.
- Semi-metallic brake pads: These pads are composed of a combination of metal fibers and other materials. They offer improved heat dissipation and are suitable for heavy-duty applications such as towing or hauling.
- Organic brake pads: Made from non-metallic materials such as rubber, glass, and resins, organic pads are softer, quieter, and gentler on the rotors. However, they tend to wear out faster and can produce more dust.
Additionally, considering the performance level you desire is crucial. Brake pads are available in varying performance levels, ranging from standard to high-performance options. High-performance pads can offer improved stopping power and better heat dissipation, making them ideal for sportier driving or track use.
Rotor Material and Design
The material and design of the rotors are equally important in the overall braking system. Common rotor materials include:
- Cast iron: This is the most affordable and widely used rotor material. Cast iron rotors offer good heat dissipation and durability for everyday driving.
- Carbon fiber: These rotors are lightweight and provide excellent heat resistance. They are often found in high-performance and racing applications but can be costly.
- Vented or slotted design: Some rotors feature ventilation or slots that help dissipate heat, reduce brake fade, and improve overall braking performance. Consider the design that best suits your driving needs.
Compatibility with Vehicle Make and Model
Lastly, ensuring that the brake pads and rotors you select are compatible with your specific vehicle make and model is essential for a proper fit and optimal performance. Different vehicles have varying brake system requirements, so it’s crucial to consult your vehicle’s manufacturer guidelines or speak with an automotive expert to determine the correct brake components for your vehicle.
By considering these factors – pad material and performance levels, rotor material and design, and compatibility with your vehicle make and model – you can make informed decisions when selecting brake pads and rotors that will provide reliable and effective braking performance for your vehicle.
Essential Tools For Brake Pad And Rotor Installation
When it comes to installing brake pads and rotors, having the right tools is essential for a smooth and successful installation. From lifting your vehicle to tightening bolts, each tool plays a crucial role in ensuring your brakes are in top-notch condition. In this guide, we’ll take a look at the must-have tools for any DIY brake pad and rotor installation. Let’s dive in!
Jack and Jack Stands
To begin the process, you’ll need a jack to safely lift your vehicle off the ground, allowing you to access the wheels and brakes. A good-quality hydraulic jack is recommended for its stability and ease of use. Additionally, jack stands are essential for keeping your vehicle securely elevated while you work on the brakes. This combination ensures your safety and provides a stable working platform.
Socket Set and Wrenches
A comprehensive set of sockets and wrenches is necessary for removing the caliper bolts and various other components during the brake installation process. Make sure you have both metric and standard sizes to accommodate different bolt sizes. A set with a ratchet handle will make the job easier as it allows for quick and efficient tightening and loosening of bolts.
C-Clamp or Brake Caliper Compression Tool
When it comes to replacing the brake pads, a C-clamp or brake caliper compression tool is a must-have. These tools are used to compress the brake caliper piston, allowing enough clearance for the new brake pads to fit. The C-clamp is a popular and affordable option, while the brake caliper compression tool provides a more professional and convenient alternative.
Brake Cleaner and Lubricant
Before installing the new brake pads, it’s crucial to clean the brake caliper and rotor surfaces to remove any dirt, grime, or brake dust that can affect performance. A high-quality brake cleaner helps in eliminating these contaminants, ensuring optimal braking. Additionally, brake lubricant should be applied to the caliper slide pins to reduce friction and ensure smooth movement.
Gloves and Safety Glasses
Your safety should always be a top priority when working on your vehicle’s brakes. Gloves protect your hands from dirt, grease, and potential injuries, while safety glasses shield your eyes from any debris. Wearing these protective accessories keeps you safe from potential hazards and allows you to focus on the task at hand.
In conclusion, having the right tools for brake pad and rotor installation is crucial for a successful and efficient process. With a jack and jack stands, socket set and wrenches, a C-clamp or brake caliper compression tool, brake cleaner and lubricant, as well as gloves and safety glasses, you’ll have everything you need to install your brake pads and rotors with confidence!
Safely Jacking Up And Securing The Vehicle
Locating and Using the Proper Jack Points
Before you can safely jack up your vehicle, it’s crucial to know where the proper jack points are located. These jack points are specifically designed to support the weight of the vehicle and prevent any damage. Refer to your vehicle’s owner’s manual to find the exact locations of the jack points. Typically, they can be found underneath the car’s frame or on reinforced areas of the vehicle’s undercarriage.
Once you have located the jack points, make sure the area around them is clear of any debris or obstacles. Position the jack in such a way that it is aligned with the jack point. Place the jack pad or a rubber pad on the jack saddle to provide extra protection for the vehicle’s body.
Placing Jack Stands for Added Security
Jacking up your vehicle alone is not enough to ensure safety. It is essential to use jack stands to provide additional support and stability. Jack stands are sturdy metal stands that can hold the weight of your vehicle securely. Never rely solely on a jack to support the vehicle while you work underneath.
When placing the jack stands, be sure to position them in a stable and secure manner. Carefully lower the vehicle onto the stands, ensuring that they are aligned with the appropriate support points. Double-check that the stands are securely in place and that the weight of the vehicle is evenly distributed.
Removing the Wheels
Now that your vehicle is safely jacked up and supported by jack stands, it’s time to remove the wheels. Start by loosening the lug nuts with a lug wrench but do not remove them completely just yet. It is best to loosen the lug nuts while the wheels are still in contact with the ground to provide stability.
After loosening the lug nuts, use a hydraulic jack to slightly lift the vehicle off the jack stands. Once the vehicle is off the stands, remove the lug nuts completely and carefully slide the wheel off the hub. Place the removed wheels aside in a safe location, away from any potential hazards or obstructions.
Remember, safety should always be your top priority when working on your vehicle. By following these steps and taking the necessary precautions, you can safely jack up and secure your vehicle before proceeding with the installation of brake pads and rotors.
Removing The Brake Caliper And Pads
Removing the brake caliper and pads is an essential step when installing new brake pads and rotors. It allows you to inspect the condition of the brake caliper and ensure that it is functioning properly. This guide will walk you through the process, starting with loosening and removing the caliper mounting bolts, followed by sliding off the brake caliper and pads, and lastly, inspecting the brake caliper for any signs of damage or wear.
Loosening and Removing the Caliper Mounting Bolts
The first step in removing the brake caliper and pads is to loosen and remove the caliper mounting bolts. These bolts secure the caliper to the caliper bracket and need to be removed in order to slide off the caliper later on.
Here’s how you can do it:
- Locate the caliper mounting bolts on the backside of the caliper.
- Using a suitable socket or wrench, loosen and remove the bolts. It’s important to note that different vehicles may have different bolt sizes, so make sure to use the correct size tool.
- Once the bolts are completely loosened, carefully pull them out and set them aside. Make sure to keep them in a safe place where they won’t get lost.
Sliding Off the Brake Caliper and Pads

After removing the caliper mounting bolts, you can now proceed to slide off the brake caliper and pads. This step allows you to access the brake rotor and replace the old pads with new ones.
Follow these steps to slide off the brake caliper and pads:
- Gently wiggle the brake caliper back and forth to loosen it from the caliper bracket. You may need to use a bit of force, but be careful not to damage any surrounding components.
- Once the caliper is loose, carefully slide it off the brake rotor, keeping in mind that the pads are still attached to the caliper.
- Take note of the position of the brake pads and how they are installed. This will help you later when installing the new pads.
Inspecting the Brake Caliper for Damage or Wear
Now that the brake caliper and pads are removed, it’s a good time to inspect the caliper for any signs of damage or wear. This step allows you to identify any issues with the caliper and determine if it needs to be replaced or repaired.
Here are a few things to check when inspecting the brake caliper:
- Examine the caliper for any visible signs of damage, such as cracks or leaks.
- Check the caliper pistons to ensure they are moving freely without any binding or sticking.
- Inspect the brake pad wear indicators to see if the pads were worn evenly. Uneven wear may indicate a problem with the caliper or other brake components.
If you notice any issues during the inspection, it’s recommended to consult a professional mechanic to determine the best course of action.
By following these steps and inspecting the brake caliper, you can ensure a successful brake pad and rotor installation. Remember to handle all components with care and take necessary precautions to maintain proper brake performance and safety.
Removing The Brake Rotor
Removing the brake rotor is an essential step in the process of installing new brake pads. Whether you are replacing worn-out pads or looking to upgrade your braking system, removing the old rotor is crucial to ensure proper installation. In this article, we will guide you through the steps of removing the brake rotor, checking for retaining screws or clips, properly removing the rotor, and inspecting the rotor for warping or damage.
Checking for Retaining Screws or Clips
Before removing the brake rotor, it is important to check for any retaining screws or clips that may be holding it in place. These screws or clips are commonly found on older vehicles or in specific brake systems. If your vehicle has retaining screws or clips, it is crucial to remove them before proceeding with the removal of the rotor.
Properly Removing the Rotor
To properly remove the brake rotor, follow these steps:
- Loosen the lug nuts on the corresponding wheel, but do not remove them completely. This will allow for easier removal of the rotor later on.
- Lift the vehicle using an appropriate jack and secure it with jack stands. Safety should always be your top priority when working underneath a vehicle.
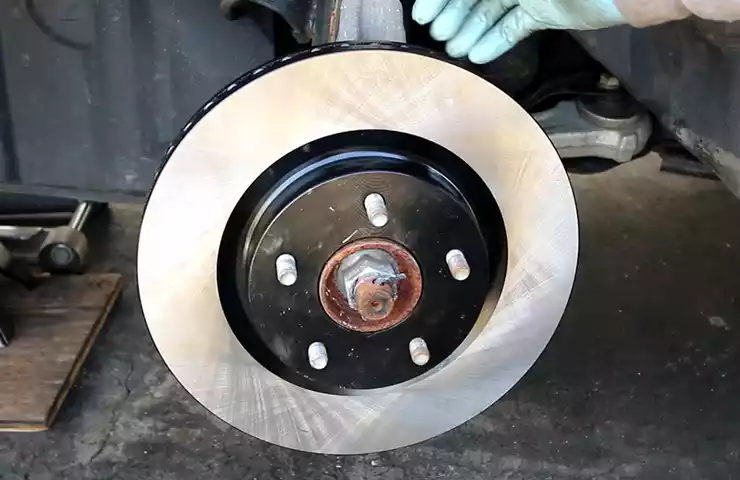
- Remove the lug nuts and take off the wheel, exposing the brake rotor.
- Inspect the rotor for any signs of excessive wear, damage, or warping. If the rotor needs to be replaced, it is advisable to replace the matching pair on the other side for optimal braking performance.
- If the rotor is in good condition and does not need replacement, proceed to remove it by unbolting the caliper bracket, ensuring to support the caliper to prevent any strain on the brake hose.
- Carefully remove the caliper bracket, exposing the rotor.
- Inspect the rotor mounting surface for any debris or rust buildup. Clean it thoroughly before installing the new rotor.
- Detach the rotor from the wheel hub assembly by tapping it lightly with a rubber mallet or using a rotor removal tool if necessary.
Inspecting the Rotor for Warping or Damage
Once the brake rotor is removed, it is important to closely inspect it for any signs of warping or damage. Warped rotors can lead to uneven braking and vibrations, compromising the effectiveness of your braking system. Take the time to carefully examine the rotor for any cracks, excessive wear, or uneven surfaces. If any abnormalities are found, it is recommended to replace the rotor promptly to ensure optimal braking performance.
By following these steps, you can effectively remove the brake rotor and prepare for the installation of new brake pads. Remember to always prioritize safety and attention to detail throughout the process. Stay tuned for our upcoming blog post on installing new brake pads to complete your brake system maintenance.
Preparing The Brake Caliper And Rotor
When it comes to installing brake pads and rotors, one of the essential steps is preparing the brake caliper and rotor surface. This ensures optimal performance and longevity of your braking system. In this section, we will cover two important steps: cleaning the brake caliper and rotor surface and applying lubricant to the caliper slides.
Cleaning the Brake Caliper and Rotor Surface
Before installing new brake pads and rotors, it is crucial to clean the brake caliper and rotor surface to remove dirt, grime, and any residue. This will provide a clean and smooth surface for the new components to seat properly. Follow these steps to clean the brake caliper and rotor:
- Start by removing the wheel to gain access to the brake caliper and rotor.
- Use a brake cleaner spray to thoroughly spray the brake caliper and rotor surfaces.
- With a clean cloth or rag, wipe away any dirt, debris, and brake dust from the surfaces.
- Make sure to pay extra attention to the contact areas between the brake caliper and rotor.
- Inspect the surfaces for any signs of damage or excessive wear. If you notice any issues, it may be necessary to replace the brake caliper or rotor.
Applying Lubricant to the Caliper Slides
After cleaning the brake caliper and rotor surface, the next step is to apply lubricant to the caliper slides. This helps ensure smooth movement of the caliper and prevents any sticking or binding. Follow these steps to apply lubricant to the caliper slides:
- Clean and remove any dirt or debris from the caliper slides using a clean cloth.
- Apply a thin layer of high-temperature brake lubricant to the caliper slides. This will help reduce friction and allow the caliper to move freely.
- Make sure to apply the lubricant evenly and avoid excess buildup.
- Gently slide the caliper back and forth to distribute the lubricant evenly.
- Repeat the lubrication process for any other caliper slides present.
Installing The New Brake Rotor
Installing the new brake rotor is a crucial step in ensuring the proper functioning of your vehicle’s braking system. It’s important to ensure that the rotor is aligned properly, provides a snug fit, and has adequate clearance. Additionally, tightening any retaining screws or clips is necessary to secure the rotor in place. In this section, we will discuss the steps involved in installing the new brake rotor to help you complete this task with confidence.
Properly Aligning and Securing the Rotor
When it comes to aligning the brake rotor, it’s important to check for any signs of misalignment or warping. This can be done visually by inspecting the rotor’s surface for any irregularities. Additionally, you can use a dial indicator to measure the runout, which should be within the manufacturer’s specifications.
To secure the rotor in place, start by inserting the new rotor onto the wheel hub. Ensure that the rotor is aligned with the bolt holes on the hub. Use a lug nut or a wheel stud to hold the rotor in position temporarily.
Ensuring a Snug Fit and Adequate Clearance
Once the rotor is aligned properly, you need to ensure a snug fit. This can be achieved by tightening the lug nuts or wheel studs gradually and evenly in a star pattern. This will help to distribute the force and prevent any warping or damage to the rotor. Use a torque wrench to tighten the lug nuts or wheel studs to the manufacturer’s recommended torque specification. Ensure that the rotor is centered on the hub and flush against the mounting surface.
In addition to a snug fit, it’s important to have adequate clearance between the rotor and other components such as the brake caliper or suspension parts. Make sure there is no interference or rubbing between these components when the wheel is installed.
Tightening Any Retaining Screws or Clips
Some brake rotors come with retaining screws or clips that need to be tightened to secure the rotor in place. These screws or clips are typically located on the face of the rotor and may require a screwdriver or a ratchet to tighten. Refer to the manufacturer’s instructions or service manual for the correct torque specification and tightening sequence.
In conclusion, installing the new brake rotor requires proper alignment, a snug fit, adequate clearance, and tightening any retaining screws or clips. By following these steps, you can ensure the safe and effective operation of your vehicle’s braking system.
Installing The New Brake Pads And Caliper
Now that you have successfully removed the old brake pads and caliper, it’s time to install the new components. This step is crucial in ensuring the proper functioning of your brakes and the safety of your vehicle. Follow these simple steps to get the job done right.
Positioning the Brake Pads and Caliper onto the Rotor
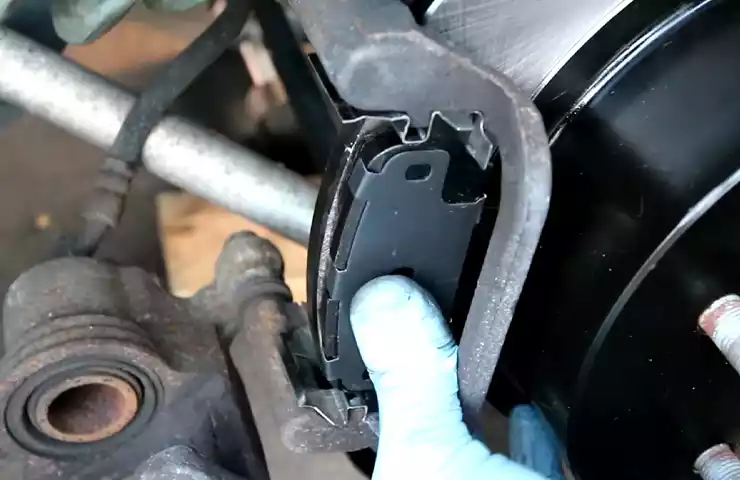
Start by placing the new brake pads onto the caliper bracket. Ensure that the pads are positioned correctly and align with the rotor surface. This step is essential to ensure even pressure distribution and prevent uneven wear of the brake pads.
Once the pads are properly positioned, carefully slide the caliper over the pads. Make sure the caliper fits snugly onto the bracket and that the guide pins align correctly. If the caliper doesn’t slide on smoothly, check for any obstructions or debris that may be hindering the installation.
Compressing the Brake Caliper Piston
Before proceeding further, it is important to compress the brake caliper piston. This step is necessary to make room for the new brake pads. To do this, place a C-clamp or a brake caliper compression tool onto the caliper piston and slowly apply pressure until the piston is fully compressed. Take caution not to damage the piston or the brake hose while compressing.
Once the piston is fully compressed, double-check the position of the brake pads and caliper, ensuring that everything is aligned correctly.
Reinstalling and Tightening Caliper Mounting Bolts
Now it’s time to reinstall the caliper onto the brake rotor. Carefully align the caliper with the rotor and slide it into place. Make sure that the mounting bolts align with the holes on the bracket. Once aligned, hand-tighten the mounting bolts to secure the caliper in place.
After hand-tightening, use a torque wrench to tighten the mounting bolts to the manufacturer’s specifications. This will ensure that the caliper is properly secured and prevent any loosening during operation.
Take a moment to double-check all the components, ensuring that the brake pads are positioned correctly, the caliper is securely attached, and there are no obstructions or alignment issues. This step is crucial for a smooth and safe braking performance.
With the new brake pads and caliper installed, you are one step closer to having a fully functioning braking system. The next step is to bleed the brake lines and test your brakes to ensure everything is working correctly.
Ensuring Proper Operation And Performance
Lowering the Vehicle
Once you have successfully installed new brake pads and rotors, the next step in ensuring proper operation and performance is to lower the vehicle. This is a vital step as it allows the suspension to settle into its normal position and ensures that the brake components are aligned correctly. Lowering the vehicle also allows you to assess if there are any issues such as brake dragging or caliper misalignment.
To lower the vehicle, carefully remove the jack stands one at a time, following the reverse order in which they were placed. Slowly lower the jack until the vehicle rests firmly on the ground. Be sure to remove the jack and chocks from beneath the vehicle before proceeding. It is important to handle this step with caution to avoid any accidents or damage to the vehicle.
Testing Brake Pedal Feel
Once the vehicle is lowered, it is crucial to test the brake pedal feel to ensure everything is functioning properly. A spongy or unresponsive brake pedal can indicate air in the brake lines or other issues that need to be addressed. Follow these steps to test the brake pedal feel:
- Start the vehicle and allow it to run for a few minutes to build up brake pressure.
- Press and release the brake pedal several times to check for any abnormalities.
- After a few presses, apply steady pressure to the brake pedal and hold it for around 10 seconds. The pedal should not sink lower, and there should be a firm feel.
- Release the brake pedal and check if it returns to its original position quickly and smoothly.
If you notice any issues during this test, such as a spongy pedal or the pedal sinking lower, it is essential to address them promptly. These issues could be indicative of air in the brake lines, improper brake bleeding, or other underlying problems. In such cases, it is recommended to consult with a professional mechanic to ensure your brakes are in optimal working condition.
Checking for Any Unusual Noises or Vibrations
In addition to testing the brake pedal feel, it is equally important to check for any unusual noises or vibrations when applying the brakes. As you drive the vehicle at a slow speed, pay close attention to the following:
- Listen for any squealing, grinding, or metallic noises when you brake. These can indicate worn brake pads, damaged rotors, or other brake system issues.
- Observe for any vibrations or pulsations in the steering wheel or brake pedal. These can suggest warped rotors or improper installation.
If you notice any of these signs, it is crucial to address them promptly. Ignoring them can lead to further damage and compromise your safety on the road. In such cases, it is recommended to have your vehicle inspected by a qualified technician who can diagnose the issue and perform any necessary repairs or adjustments. Remember, maintaining a well-functioning braking system is crucial for the safety and performance of your vehicle.
Bedding In The Brake Pads And Rotors
Bedding In the Brake Pads and Rotors Now that you have successfully installed new brake pads and rotors on your vehicle, it’s important to bed them in properly. Bedding in the brake pads and rotors helps to transfer a thin layer of material evenly across the rotor surface, ensuring optimal braking performance and preventing issues such as brake fade. In this section, we will discuss three key steps for properly bedding in your brake pads and rotors: gradually increasing brake pressure and speed, performing controlled braking cycles to transfer material, and allowing sufficient cooling periods between braking cycles.
Gradually Increasing Brake Pressure and Speed
To effectively bed in your new brake pads and rotors, it is crucial to gradually increase the brake pressure and speed during the initial stages. Begin by driving your vehicle at a moderate speed and lightly applying the brakes to allow the pads to make initial contact with the rotors. Over the course of several stops, gradually increase the brake pressure and speed, ensuring you do not come to a complete stop during this process. This gradually increases the temperature and pressure on the brake pads and rotors, promoting the transfer of material and creating a smooth, even surface for optimal performance.
Performing Controlled Braking Cycles to Transfer Material
Performing controlled braking cycles is an essential step in properly bedding in your brake pads and rotors. Find a safe and open stretch of road or an empty parking lot to perform this step. Start by accelerating your vehicle to a moderate speed, around 40-50 mph, and then apply the brakes firmly but smoothly to bring your vehicle to a controlled and gradual stop. Repeat this process several times in order to transfer a layer of material from the brake pads to the rotors. Be sure to avoid excessive braking, as this can lead to overheating and potential damage.
Allowing Sufficient Cooling Periods between Braking Cycles
During the bedding-in process, it is crucial to allow sufficient cooling periods between braking cycles. This helps prevent the brake pads and rotors from overheating and ensures optimal performance and longevity. After each controlled braking cycle, continue driving your vehicle for a short distance without applying the brakes. This allows the heat to dissipate and the components to cool down. As a general rule of thumb, aim for at least a 5-minute cooling period between each braking cycle. Patience during this step will help ensure that the brake pads and rotors are properly bedded in and ready for regular use. In conclusion, properly bedding in your new brake pads and rotors is essential for optimal braking performance. By gradually increasing brake pressure and speed, performing controlled braking cycles, and allowing sufficient cooling periods between each cycle, you can ensure that your brake system operates smoothly and efficiently. Take the time to follow these steps to help your new brake pads and rotors reach their full potential and provide you with safe and reliable braking on the road.
Regular Inspection And Maintenance
Regular inspection and maintenance of your brake pads and rotors are crucial to ensure the safety and performance of your vehicle. By checking the brake pad thickness and wear, inspecting the caliper, rotor, and brake lines, and monitoring the brake fluid level and quality, you can identify any issues early on and take the necessary steps to address them. In this section, we will discuss these essential steps in detail to help you maintain optimal braking efficiency.
Checking Brake Pad Thickness and Wear
One of the first things you should do when inspecting your brake pads is to check their thickness and wear. The thickness of the brake pad is an important indicator of its remaining life. Use a ruler or a brake pad wear indicator tool to measure the thickness. If the pad thickness is below the manufacturer’s recommended minimum thickness, it’s time to replace them.
Furthermore, pay attention to the wear patterns on the brake pads. Uneven wear can indicate problems with the caliper or rotor, which may need further inspection or repair. Also, look out for any signs of excessive glazing, cracking, or contamination, as these indicate a need for replacement.
Inspecting the Caliper, Rotor, and Brake Lines
In addition to checking the brake pads, it is important to inspect the caliper, rotor, and brake lines regularly. Start by examining the caliper for any signs of leakage or damage. Ensure that the caliper is securely mounted and functioning correctly.
Inspect the rotor for any signs of warping, grooves, or uneven wear. Warped rotors can cause vibration and uneven braking, affecting the performance of your brakes. If you notice any of these issues, it may be time to replace the rotors.
Check the brake lines for signs of wear or damage, such as cracks or leaks. Damaged brake lines can cause a loss of brake fluid pressure, leading to decreased braking performance. If you notice any issues with the brake lines, it is important to have them repaired or replaced by a qualified technician.
Monitoring Brake Fluid Level and Quality
The brake fluid plays a critical role in the braking system, and its level and quality should be monitored regularly. Locate the brake fluid reservoir and check the level against the recommended level indicated on the reservoir itself.
| Level | Meaning |
|---|---|
| Between Min and Max | Optimal level |
| Below Min | Add brake fluid |
| Above Max | Have the brake fluid system inspected |
Also, check the condition of the brake fluid. It should be clear and free from any contamination. If you notice any discoloration, cloudiness, or particles in the brake fluid, it may be time to flush and replace it.
Regular inspection and maintenance of your brake pads, rotors, calipers, brake lines, and brake fluid are vital for safe and efficient braking. By following these steps, you can ensure that your braking system is in optimal condition, giving you peace of mind on the road.
Signs Of Brake System Issues And When To Seek Professional Help
When it comes to maintaining your vehicle’s safety, the brake system plays an integral role. The brake pads and rotors are critical components that ensure your car comes to a safe stop when needed. However, over time, brake system issues can occur, resulting in decreased performance and potential safety hazards.
Squeaking, Grinding, or Squealing Noises
One of the most common signs of brake system issues is the presence of squeaking, grinding, or squealing noises. If you notice these sounds when applying the brakes, it indicates that the brake pads are worn out. Over time, brake pads become thin and lose their effectiveness, causing metal-to-metal contact between the pads and rotors. This contact creates the unpleasant noises that signal the need for immediate attention.
Brake Warning Light Illumination
Another clear indication of brake system issues is when the brake warning light on your dashboard illuminates. This warning light is designed to alert you to potential problems within the brake system. It can indicate issues such as low brake fluid levels, ABS system malfunctions, or worn brake pads. Ignoring this warning light can lead to further damage to your brake system and jeopardize your safety on the road.
Poor Brake Performance or Longer Stopping Distances
If you notice that your car’s braking performance has diminished or the stopping distances have increased, it’s time to seek professional help. Poor brake performance can be attributed to various issues, such as worn brake pads, damaged rotors, or air in the brake lines. Regardless of the cause, prolonged stopping distances can significantly impact your ability to react promptly in emergency situations and can put you and others at risk.
If you experience any of the signs mentioned above, it’s important to address them promptly to ensure the safety of yourself and others on the road. While some brake issues can be resolved through DIY maintenance, it’s always wise to consult a professional mechanic for a comprehensive inspection and repairs if necessary. Remember, maintaining a well-functioning brake system is essential for a smooth and safe driving experience.
Frequently Asked Questions Of How To Install Brake Pads And Rotors
Is It Easy To Install Brake Pads And Rotors?
Installing brake pads and rotors is a straightforward process that can be easily done. It does not require professional expertise and can be completed by following simple instructions. You can save time and money by installing them yourself.
How Do You Install New Brake Pads And Rotors?
To install new brake pads and rotors, first, elevate your vehicle and remove the wheels. Detach the caliper, then the old brake pads. Inspect and clean the rotors, then install the new pads. Reattach the caliper and tighten all bolts.
Finally, replace the wheels and lower the vehicle.
Can I Replace Pads And Rotors Myself?
Yes, you can replace pads and rotors yourself. Just make sure to follow proper guidelines for safety. Being cautious and adhering to the necessary steps will help you successfully complete the task.
What Is The Correct Way To Install Brake Pads?
To correctly install brake pads, follow these steps: 1. Jack up the vehicle and secure it with jack stands. 2. Remove the wheel and locate the brake caliper. 3. Use a C-clamp to compress the brake caliper piston. 4. Take off the old brake pads and install the new ones.
5. Reinstall the caliper, put the wheel back on, and lower the vehicle. Remember, safety is important, so always consult your vehicle’s manual or seek professional help if needed.
Conclusion
To sum it all up, installing brake pads and rotors requires careful attention to detail and a basic understanding of the process. By following the steps outlined in this guide, you can successfully replace these crucial components and ensure optimal braking performance for your vehicle.
Remember to prioritize safety, take your time, and consult a professional if needed. Happy repairing!