To install a bike stem, first, remove the old stem by loosening the faceplate bolts and sliding it off the steerer tube. Then, align the new stem with the handlebars and steerer tube, and tighten the bolts to the recommended torque setting.
Looking for a simple way to install a bike stem? Here’s a quick guide to get you started. The stem is an essential component that connects the handlebars to the steerer tube on your bike’s fork. Whether you’re replacing an old stem or upgrading to a new one, the installation process is straightforward.
We’ll walk you through the step-by-step process of installing a bike stem safely and accurately. By following these instructions, you’ll be able to complete the installation in no time and get back on your bike. So, let’s dive in and learn how to install a bike stem.
Choosing The Right Bike Stem
When it comes to installing a bike stem, choosing the right one is crucial. The bike stem plays a significant role in determining your riding experience, comfort, and overall performance. Taking the time to select the perfect stem for your bike will ensure that you are able to ride comfortably and with confidence. In this section, we will discuss the factors you should consider when choosing a bike stem, as well as the importance of correct stem length and angle.
Factors to consider when choosing a bike stem
There are several factors that you need to take into account when choosing a bike stem. These factors will not only affect your riding experience but also impact your body’s posture and potential discomfort. Consider the following aspects:
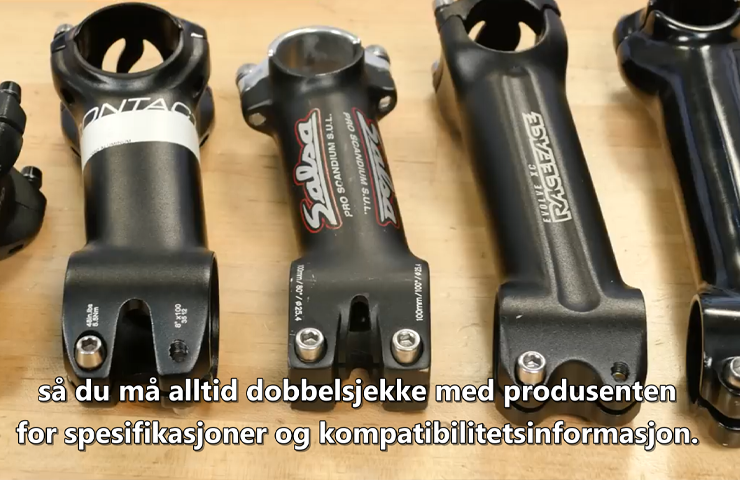
- Handlebar Compatibility: Ensure that the stem you choose is compatible with the handlebars of your bike. Different handlebars require different stem types and sizes, so be sure to check the specifications.
- Material: Bike stems are made from various materials, such as aluminum, carbon fiber, and steel. Each material has its own benefits and drawbacks, so choose one that suits your riding style and preferences.
- Weight: The weight of the bike stem can affect the overall weight of your bike. If you are a competitive rider or weight-conscious, opt for a lightweight stem.
- Rider’s Body Type: Consider your own body type and riding style. Different stem lengths, angles, and rises will suit different body positions and riding preferences.
Importance of correct stem length and angle
The correct stem length and angle are essential for achieving optimal riding position and comfort. Incorrect stem length or angle can lead to discomfort, pain, and even injuries. Here’s why it’s important:
- Posture and Body Alignment: The stem length and angle determine your riding posture and body alignment while on the bike. A stem that is too short or too long can cause strain on your back, neck, and shoulders, affecting your comfort and reducing your performance.
- Handling and Control: A stem with the correct length and angle ensures better handling and control of your bike. It allows you to maneuver the bike more easily and respond quickly to changes in terrain or traffic.
- Power Transfer: The right stem length and angle optimize power transfer from your body to the bike. This means that you will be able to generate more power efficiently, resulting in a smoother and more efficient ride.
Therefore, when choosing a bike stem, pay close attention to the factors mentioned above, as well as the correct length and angle. It is recommended to consult with a professional or knowledgeable bike shop to ensure the best fit for your bike and riding style.
Tools And Materials Needed
Installing a bike stem requires a few essential tools and materials to ensure a successful and secure installation process. By having these items prepared in advance, you can save time and ensure that you have everything you need right at your fingertips. Let’s take a look at the list of tools required for bike stem installation and the necessary materials for the installation process.
List of tools required for bike stem installation
Before diving into the installation process, make sure you have the following tools in your toolbox:
- Allen wrench set: These hexagonal-shaped wrenches come in various sizes and are crucial for loosening and tightening bolts.
- Torque wrench: A torque wrench helps you precisely tighten bolts to the recommended torque specifications, ensuring proper fastening without overtightening.
- Adjustable wrench: This versatile tool allows you to grip and turn objects of different sizes, making it useful for various components during the installation process.
- Screwdriver set: Having a set of screwdrivers with different types and sizes of heads is handy for loosening or tightening screws.
- Workstand: While not mandatory, a workstand helps elevate your bike, providing better access to the stem and simplifying the installation process.
- Grease: Applying grease to the stem bolts and other contact surfaces can enhance longevity and prevent unwanted creaking noises.
Necessary materials for the installation process
In addition to the tools mentioned above, you will also need the following materials:
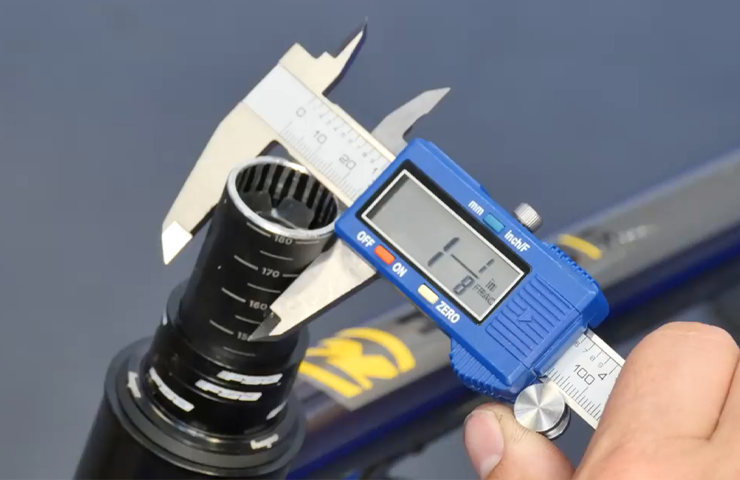
- Bike stem: Ensure you have the appropriate stem that fits your bike’s steerer tube diameter and handlebar clamp diameter.
- Carbon fiber assembly paste: If your bike’s stem is made of carbon material, using assembly paste between the stem and steerer tube provides extra grip and prevents slippage.
- Handlebars: Make sure you have the correct handlebars for your intended riding style and preferences.
- Replacement bolts: Depending on the condition of your old bolts or if you’re switching to a different stem, having suitable replacement bolts on hand is advisable.
- Cable ties: Cable ties can help manage your brake and gear cables during the installation process, keeping them neat and out of the way.
Once you have gathered all the necessary tools and materials, you’re ready to start the bike stem installation process. Remember to follow the manufacturer’s instructions and take your time to ensure a secure and properly aligned stem. Happy riding!
Removing The Old Stem
Before installing a new bike stem, you’ll need to remove the old one. This process may seem intimidating, but with the right steps and precautions, it can be straightforward and stress-free. In this section, we’ll guide you through the step-by-step process of removing the old stem and provide essential precautions to ensure a smooth transition. Grab your tools and let’s get started!
Step-by-step process to remove the old stem
To remove the old stem from your bike, follow these simple steps:
- Begin by loosening the stem cap bolt, which is usually located at the top of the bike’s steerer tube. Use an Allen wrench to turn the bolt counterclockwise. This step will relieve pressure on your headset bearings and make it easier to remove the stem.
- Next, loosen the stem bolts that secure the stem to the steerer tube. The number of bolts may vary depending on your bike’s stem design, but most stems have either two or four bolts. Use an appropriate-sized Allen wrench to loosen each bolt in a diagonal pattern for even pressure release.
- Once the stem bolts are loose, wiggle the stem gently to loosen it from the steerer tube. If it’s still stuck, you can tap it lightly with a rubber mallet or a block of wood to help loosen it further. Avoid using excessive force, as this can damage the bike’s components.
- After successfully removing the stem, take a moment to inspect the fork and steerer tube for any dirt, dust, or debris. Use a clean cloth or a soft brush to wipe away any particles that could affect the performance of your new stem.
Precautions to take during the removal process
While removing the old stem, it’s crucial to take some precautions to avoid any potential mishaps or damage. Here are some precautions to consider:
- Make sure your bike is properly supported and stable before beginning the removal process. It’s recommended to use a bike stand or have someone assist you in holding the bike steady.
- Before loosening any bolts or applying force, double-check that you have the correct tools for the job. Using the wrong tools can result in stripped bolts or damaged components.
- As you loosen the stem and bolts, pay attention to the parts and their order of assembly. Taking a quick photo or drawing a diagram can be helpful when reassembling the bike later.
- Avoid using excessive force when removing the stem. If it feels stubborn or stuck, try gently tapping it with a rubber mallet or a block of wood to loosen it. Remember, patience and gentle pressure go a long way.
- Once the stem is off, be mindful of the exposed steerer tube. Take care not to force the bike or put any weight on the tube to avoid damage. It’s recommended to cover the tube with a protective cap until you’re ready to install the new stem.
By following these precautions and step-by-step instructions, you’ll be able to remove the old bike stem safely and efficiently. With the old stem out of the way, you’ll soon be ready to install your brand new stem and enhance your cycling experience.
Preparing The Handlebars
Preparing the handlebars is an essential step when installing a bike stem. Proper preparation ensures that the handlebars are adjusted to the right height and aligned correctly, guaranteeing a comfortable and safe riding experience. In this section, we will guide you through the process of adjusting the handlebar height and ensuring proper alignment.
Adjusting Handlebar Height for Proper Installation
Before installing the bike stem, it’s crucial to adjust the handlebar height to ensure optimal comfort and control. Here’s a step-by-step guide to help you get it right:
- Locate the adjustable stem bolt on top of the bike stem. This bolt is responsible for controlling the angle and height of the handlebars.
- Loosen the stem bolt using an Allen wrench or an appropriate tool. Make sure not to remove the bolt completely.
- Position yourself in a comfortable and natural riding posture, ensuring your back is straight and your arms are relaxed.
- While maintaining this posture, adjust the handlebars’ height by tightening or loosening the stem bolt. Gradually raise or lower the handlebars until they are at a level that feels comfortable for your riding style.
- Once you’ve found the ideal height, retighten the stem bolt to secure the handlebars in place. Ensure it’s tightened firmly but not overly tight.
- Test the handlebar height by gripping the handlebars in your preferred riding position. You should feel comfortable and have good control over your bike.
Ensuring Handlebars are Aligned Correctly
Proper alignment of the handlebars is essential for maintaining control and stability while riding. Follow these steps to ensure correct alignment:
- Stand in front of your bike and align yourself with the front wheel.
- Hold the handlebars firmly with both hands and check if they are parallel to the front wheel. They should be symmetrical and evenly spaced.
- If they are misaligned, adjust the angle by loosening the stem bolt slightly. Gently twist the handlebars until they align with the front wheel.
- Once the handlebars are aligned properly, tighten the stem bolt to secure them in place.
- Give the handlebars a gentle sideways tug to double-check their tightness. They should not move or rotate.
- Finally, test the alignment by hopping on your bike and taking a short ride. The handlebars should feel stable and responsive.
By following these steps, you can prepare your handlebars for proper installation of the bike stem. Remember to always prioritize your comfort and safety when adjusting the height and alignment of your handlebars.
Installing The Bike Stem
Installing the Bike Stem
Installing a new bike stem is a relatively simple process that can greatly improve your comfort and control while riding. Whether you’re looking to change the stem for aesthetic purposes or to achieve a different riding position, following the correct installation steps is crucial. In this guide, we’ll provide you with step-by-step instructions for installing the new stem, as well as proper torquing techniques for the stem bolts to ensure a secure fit.
Step-by-step instructions for installing the new stem
- Gather the tools: Before beginning the installation, make sure you have all the necessary tools at hand. You’ll typically need an Allen wrench set, a torque wrench, and possibly a spacer or shim depending on your bike’s specific requirements.
- Remove the old stem: Start by loosening the faceplate bolts that secure the handlebars to the stem and remove the handlebars from the old stem. Next, using the appropriate Allen wrench, loosen the stem bolts that attach the stem to the steerer tube. Once the bolts are loosened, you should be able to slide the old stem off the steerer tube.
- Prepare the new stem: Clean the steerer tube and inspect it for any signs of damage or wear. If necessary, apply a thin layer of grease to the steerer tube to facilitate installation. Additionally, check the new stem for any manufacturer’s instructions or recommendations regarding spacers or shims.
- Attach the new stem: Align the stem with the steerer tube and slide it into place. Make sure the stem is oriented correctly, with the handlebar clamp facing the front of the bike. Once aligned, tighten the stem bolts evenly using the appropriate torque wrench, adhering to the manufacturer’s recommended torque specifications.
- Reattach the handlebars: Place the handlebars into the stem’s handlebar clamp and align them to your desired position. Tighten the faceplate bolts on the stem evenly to secure the handlebars. Ensure that the handlebars are straight and aligned with the front wheel before continuing.
- Check the alignment and tightness: Take a moment to double-check the alignment of the stem, handlebars, and front wheel. Also, ensure that all bolts are tightened properly and torqued to the recommended specifications. Make any necessary adjustments to achieve the desired riding position.
Proper torquing techniques for the stem bolts
To ensure a secure fit and prevent damage, it’s essential to use proper torquing techniques when tightening the stem bolts. Here are some tips:
- Use a torque wrench: A torque wrench allows you to apply the correct amount of force to the stem bolts. Refer to the manufacturer’s specifications for the recommended torque value.
- Tighten bolts evenly: When tightening the stem bolts, alternate between bolts to ensure even pressure distribution. This helps prevent any stress concentration on one particular bolt.
- Avoid over-tightening: While it’s important to achieve the recommended torque, be careful not to over-tighten the bolts, as this can damage the stem or steerer tube. Use the torque wrench to apply the specified torque and double-check the tightness to confirm.
- Regularly check for tightness: After the initial installation, it’s a good practice to periodically check the stem bolts for tightness. This is especially important during the first few rides, as components may settle or shift slightly.
By following these step-by-step instructions and employing proper torquing techniques, you can install a new bike stem safely and effectively. Enjoy your improved riding experience, whether it’s a more comfortable position or improved control on the road or trails!
Adjusting The Bike Stem

Adjusting the Bike Stem When it comes to installing a bike stem, one of the most crucial steps is adjusting it to ensure a proper fit and optimal comfort. The bike stem plays a significant role in determining the rider’s posture and overall riding experience. In this section, we will discuss how to make final adjustments to the bike stem to ensure a perfect fit for your riding style. We will also cover fine-tuning the stem angle and height to enhance your comfort on the bike.
Final adjustments to ensure proper fit and comfort
To ensure a proper fit and optimum comfort, it’s important to make a few final adjustments to the bike stem. Follow these steps: 1. Tighten the stem bolts: Start by tightening the stem bolts evenly and securely. This will prevent any unwanted movements and ensure stability while riding. 2. Align the stem: Make sure the stem is aligned with the front wheel. Look down from above and check that the stem is centered over the front wheel hub. This will help maintain proper balance and control. 3. Check handlebar positioning: Adjust the handlebars to a comfortable position, considering your riding style and personal preferences. Experiment with different angles and heights to find the sweet spot that works best for you.
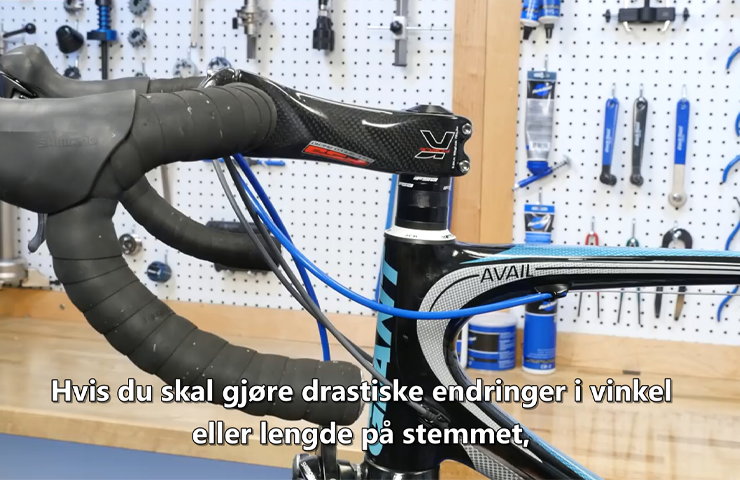
Fine-tuning the stem angle and height
Fine-tuning the stem angle and height is crucial to enhance your riding experience. Here’s how you can do it: 1. Adjusting the stem angle: Loosen the stem bolts slightly and adjust the stem to your desired angle. Some riders prefer a more upright position, while others may prefer a more aerodynamic position with a slight downward angle. Ensure that the stem is tightened securely after adjusting the angle. 2. Setting the stem height: Depending on your riding style and comfort level, you can also adjust the stem height. Loosen the stem bolts and raise or lower the stem to your desired height. Be cautious not to exceed the maximum height limit marked on the stem. Thoroughly tighten the stem bolts once you’ve found your desired height. Remember, a well-adjusted bike stem will result in improved handling, control, and rider comfort. Take the time to fine-tune your stem to achieve the perfect fit for an enjoyable riding experience.
Checking And Testing
Steps to ensure the stem is securely installed
Properly checking and testing the installation of your bike stem is crucial for both safety and optimal performance. By following these steps, you can ensure that your stem is securely installed:
- Step 1: Gather the necessary tools
- Step 2: Align the stem
- Step 3: Apply grease
- Step 4: Tighten the stem bolts
- Step 5: Torque the stem bolts
- Step 6: Double-check the alignment
Testing the bike for stability and adjustments needed
Once the stem is securely installed, it’s important to test the bike for stability and make any necessary adjustments. Follow these steps to ensure your bike is properly set up:
- Check the handlebar alignment
- Test for stability
- Check for proper stem tightness
- Make additional adjustments if necessary
By following these steps and thoroughly checking and testing your bike’s stem installation, you can ensure a safe and secure riding experience. Remember, proper installation is key to enjoying your bike to its fullest potential.
Troubleshooting Common Issues
Even with careful installation, there can be occasional issues that arise when installing a bike stem. Here are some common problems that may occur during the installation process and the solutions for troubleshooting them:
<h3>Common problems that may arise during the installation process</h3>
When installing a bike stem, there are a few common problems that you might encounter. These issues can include:
- Tight fit or difficulty aligning the stem with the handlebar
- Stripped or rounded out bolts
- Uneven tightening or slipping of the stem
<h3>Solutions and troubleshooting tips for each issue</h3>
<h3>Tight fit or difficulty aligning the stem with the handlebar</h3>
A tight fit or difficulty aligning the stem with the handlebar can make the installation process frustrating. Here are a few troubleshooting tips to solve this issue:
- Make sure the stem and handlebar are compatible in terms of diameter and clamp size.
- Apply a small amount of lubricant to the stem and handlebar to ease the fitting process.
- Loosen the bolts slightly before attempting to align the stem and handlebar.
<h3>Stripped or rounded out bolts</h3>
When the bolts used to secure the stem become stripped or rounded out, it can make it nearly impossible to properly install or remove the stem. Here’s what you can do in such a situation:
| Issue | Solution |
|---|---|
| The bolt head is stripped | Use a bolt extractor tool to remove the stripped bolt before replacing it with a new one. |
| The threads are stripped | Consider using a thread-repair kit to restore the threads or consult a bike mechanic for assistance. |
<h3>Uneven tightening or slipping of the stem</h3>
If the stem is unevenly tightened or slips during use, it can affect the bike’s stability and steering. Follow these troubleshooting steps to address this issue:
- Ensure that the stem is aligned properly with the front wheel and the handlebars.
- Use a torque wrench to tighten the stem bolts to the manufacturer’s recommended torque setting.
- Consider using a carbon assembly paste on the stem and handlebar interface to prevent slipping.
By troubleshooting and solving these common issues, you can successfully install a bike stem and enjoy a smooth ride.
Maintaining And Caring For The Bike Stem
Proper maintenance and care of your bike stem are essential for ensuring its optimal performance and longevity. By following a few simple tips and recommended cleaning practices, you can keep your bike stem in top shape and avoid any potential issues down the road.
1. Tips for maintaining the stem for optimal performance
To maximize the lifespan and functionality of your bike stem, consider the following maintenance tips:
- Regular inspection: Perform routine checks of your bike stem to ensure there are no signs of wear or damage. Look for any cracks, dents, or loose bolts that could affect its stability and performance.
- Tighten bolts: Periodically check and tighten the bolts that secure your bike stem. This will help prevent any unwanted movement or loosening during rides.
- Ensure proper alignment: Make sure your bike stem is properly aligned with your bike’s handlebars. Adjust the stem if necessary to ensure a comfortable and ergonomic riding position.
- Replace worn parts: If you notice any signs of wear or damage to your bike stem, such as worn-out bushings or bearings, it’s important to replace them promptly. This will prevent further damage and maintain the stem’s performance.
2. Recommended care and cleaning practices
Regular cleaning and maintenance will help keep your bike stem looking good and functioning smoothly. Here are some recommended care practices:
- Wipe down after rides: After each ride, use a clean cloth or sponge to wipe down your bike stem, removing any dirt, grime, or sweat that may have accumulated.
- Avoid harsh chemicals: When cleaning your bike stem, avoid using harsh chemicals or solvents that could damage the stem’s finish or components. Instead, use a mild soap and water solution.
- Gently scrub: For stubborn dirt or grease, gently scrub the affected areas with a soft brush or sponge. Be careful not to apply excessive force that could scratch or damage the stem.
- Dry thoroughly: After cleaning, make sure to dry your bike stem thoroughly to prevent any moisture from causing corrosion. Use a clean towel or air dry it before storing your bike.
- Apply lubrication: Depending on the type of bike stem you have, it may require lubrication to maintain smooth operation. Consult your bike’s manufacturer or a bike mechanic to determine the appropriate lubrication and application method.
With these maintenance tips and care practices, you can ensure that your bike stem remains in optimal condition, providing you with a safe and enjoyable cycling experience. Remember to regularly inspect and clean your stem, as well as address any issues promptly to avoid further damage. By taking care of your bike stem, you’ll maximize its lifespan and enjoy smooth rides for years to come.
Frequently Asked Questions For How To Install Bike Stem
How Do You Put A Bike Stem On A Bike?
To put a bike stem on a bike, follow these steps: 1. Loosen the bolts on the stem cap. 2. Align the stem with the front wheel. 3. Tighten the bolts evenly. 4. Secure the handlebars onto the stem. 5.
Test for proper alignment and tighten any loose bolts.
What Does The Bike Stem Attach To?
The bike stem attaches to the handlebars and the fork steerer tube, connecting them securely together for steering control.
How Do You Install A Mountain Bike Stem?
To install a mountain bike stem, follow these steps: 1. Remove the old stem using an Allen wrench. 2. Align the new stem with the fork steerer tube and tighten the bolts. 3. Adjust the stem to your desired position.
4. Check that it is aligned with the front wheel. 5. Double-check the tightness of the bolts.
How Do You Install Stem And Handlebars?
To install stem and handlebars, follow these steps: 1. Align the stem with the fork steerer and tighten the stem bolts. 2. Insert the handlebars into the stem and adjust the position. 3. Make sure the handlebars are straight and level.
4. Tighten the clamp bolts on both sides of the stem. 5. Double check for secure installation and make any necessary adjustments. Done!
Conclusion
Installing a bike stem may seem daunting at first, but with the right tools and steps, it can be a simple task. By following this guide, you can confidently install your bike stem and enjoy a secure and comfortable riding experience.
Remember to double-check your work and adjust as needed. With practice, you’ll become a pro at bike stem installation in no time. So, get ready to hit the road with confidence and ride like a champ!