To install a bike headset, first, remove the old headset using a headset press tool. Then, lubricate the bearings and press the new headset into place using the same tool, making sure it is properly aligned.
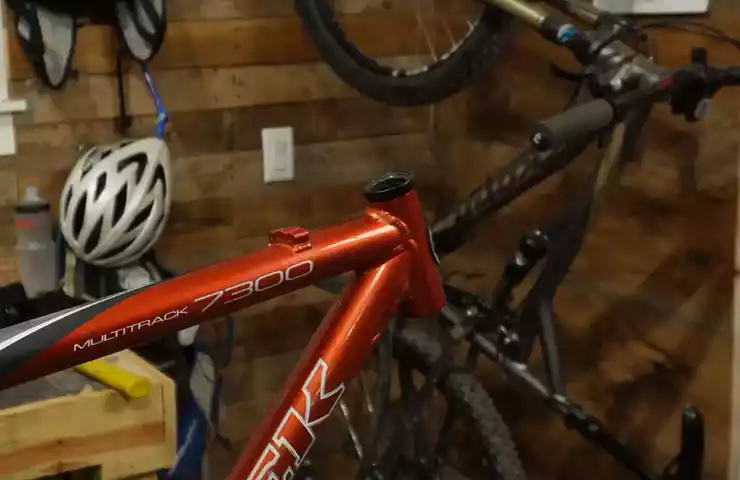
Installing a bike headset is an essential skill that every cyclist should know. Whether you’re replacing a worn-out headset or upgrading to a new one, getting it installed correctly is crucial for optimal bike performance and safety. In this guide, we will walk you through the step-by-step process of installing a bike headset.
From removing the old headset to pressing the new one into place, we will cover everything you need to know to get the job done right. So let’s dive in and learn how to install a bike headset like a pro.
Choosing The Right Bike Headset
When it comes to installing a bike headset, choosing the right one is essential for optimal performance and a smooth riding experience. A bike headset serves as a crucial component that connects the fork and the frame, allowing for steering control and stability. With various options available in the market, it’s important to consider a few key factors to ensure you select the right bike headset for your needs.
Factors to consider when selecting a bike headset
Before diving into the installation process, it’s crucial to take into account several factors when choosing the right bike headset. These factors will help ensure compatibility with your bike and provide the desired performance. Here are some key factors to consider:
- Type of headset: There are two main types of bike headsets: threaded and threadless. Threaded headsets have a threaded steerer tube and are commonly found in older bikes. Threadless headsets, on the other hand, have a smooth steerer tube and are more commonly used in modern bikes.
- Headset size: Headsets come in different sizes, and it’s crucial to choose one that matches the specifications of your bike. The sizes are usually measured in inches and can vary between 1 inch, 1 1/8 inches, and 1 1/4 inches. Ensure you carefully measure the existing headset or consult your bike’s manual for the appropriate size.
- Compatibility: It’s important to ensure that the chosen headset is compatible with your bike’s frame and fork. Check the specifications of both your frame and fork to find out the required headset type and size. Improper compatibility may result in a loose or tight fit, compromising the overall performance and safety of your bike.
- Material: Headsets are typically made from aluminum, steel, or carbon fiber. Each material has its own benefits and considerations. Aluminum is lightweight and durable, steel is known for its strength and durability, while carbon fiber offers excellent vibration damping properties. Consider your riding style and preferences when selecting the appropriate material.
- Sealing: If you frequently ride in wet or muddy conditions, it’s worth considering a headset with effective sealing. Sealed bearings and integrated seals help prevent water and debris from entering the headset, extending its lifespan and reducing the need for maintenance.
How to determine the compatibility of a headset with your bike
Determining the compatibility of a headset with your bike is crucial to ensure a proper fit and functionality. Here’s a step-by-step guide to help you determine the compatibility:
- Identify the headset type: First, you need to identify whether your bike uses a threaded or threadless headset. This can usually be determined by examining the steerer tube of your fork.
- Measure the headset size: Measure the diameter of the steering column to determine the headset size needed. This can be done using a caliper or a ruler. Ensure to measure the outer diameter for threadless headsets and the inner diameter for threaded headsets.
- Check the bike’s specifications: Consult your bike’s manual or contact the manufacturer to confirm the required headset type and size for your specific bike model. This information is usually listed in the technical specifications section of the manual.
- Consult a professional: If you’re not confident in identifying the compatibility requirements yourself, it’s recommended to consult a professional bike mechanic. They can accurately assess your bike’s headset needs and guide you in selecting the right one.
By considering these factors and following the compatibility determination process, you’ll be well-equipped to choose the right bike headset for your needs. A properly selected and installed headset will ensure smooth steering, enhanced stability, and overall improved riding experience.
Tools And Equipment Needed
When it comes to installing a bike headset, having the right tools and equipment is of utmost importance. Not only will it make the installation process easier and more efficient, but it will also ensure that the headset is installed correctly, leading to improved performance and safety while riding your bike. Let’s take a look at the list of tools and equipment required for installing a bike headset and discover why having the right tools for the job is crucial.
List of tools and equipment required for installing a bike headset
To install a bike headset, you’ll need the following tools and equipment:
- 1. Bike stand: A bike stand will hold your bike securely while you work on it, providing stability and ease of access to the headset area.
- 2. Headset press: This tool is used to press the headset cups into the frame, ensuring a proper fit. It is important to use a headset press that matches the specific dimensions of your bike headset.
- 3. Headset crown race tool: This tool is used to install the crown race onto the fork, which is an essential part of the headset assembly. It ensures a snug fit and proper alignment.
- 4. Grease: Applying grease to the headset cups, bearing races, and other contact points reduces friction and helps prevent corrosion. It is important to use a high-quality bicycle-specific grease.
- 5. Adjustable wrench: An adjustable wrench will be needed to tighten and loosen the various nuts and bolts involved in the headset installation process.
- 6. Allen wrenches or hex keys: These wrenches are essential for loosening and tightening bolts that secure the stem, handlebars, and other components of the headset.
Importance of having the right tools for the job
Having the right tools for the job is essential when it comes to installing a bike headset. Proper tools ensure a smooth and hassle-free installation process, without the risk of damaging your bike or its components. Using the wrong tools or attempting to makeshift can lead to improper installation, which can compromise the performance and safety of your bike. Additionally, using the correct tools allows for precise adjustments and torque specifications, ensuring that everything is tightened to the appropriate level. Investing in the necessary tools and equipment not only saves time and effort but also enhances the overall quality and longevity of your bike’s headset.
Step-By-Step Guide To Installing A Bike Headset
Installing a bike headset may seem like a daunting task, but with the right tools and a step-by-step guide, you can easily tackle this project yourself. In this guide, we will walk you through each stage of the installation process, from preparing the bike to testing the headset for smooth operation. So, let’s get started!
Preparing the bike for headset installation
Before diving into the installation, it’s important to prepare your bike properly. Begin by removing the front wheel and any attachments that may obstruct your access to the headset area. Additionally, make sure you have the necessary tools such as a headset press tool, grease, and a set of Allen wrenches handy.
Removing the old headset if necessary
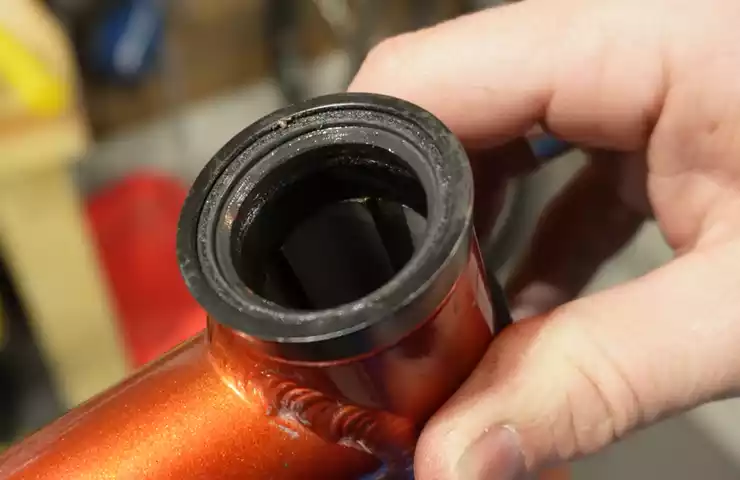
If you are replacing an old headset, you’ll need to remove it first. Begin by loosening the stem bolts and removing the handlebars and stem from the fork steerer tube. Next, locate the crown race at the bottom of the fork and use a crown race removal tool or a long screwdriver to gently tap it off. Finally, undo the headset lockring and slide the old headset cups out of the frame.
Cleaning the frame surfaces
With the old headset removed, it’s essential to clean the frame surfaces to ensure a secure fit for the new headset. Use a clean cloth and some degreaser to remove any dirt, grease, or residue from both the inside and outside of the head tube. A clean surface will help prevent any creaking noises and ensure a smooth installation process.
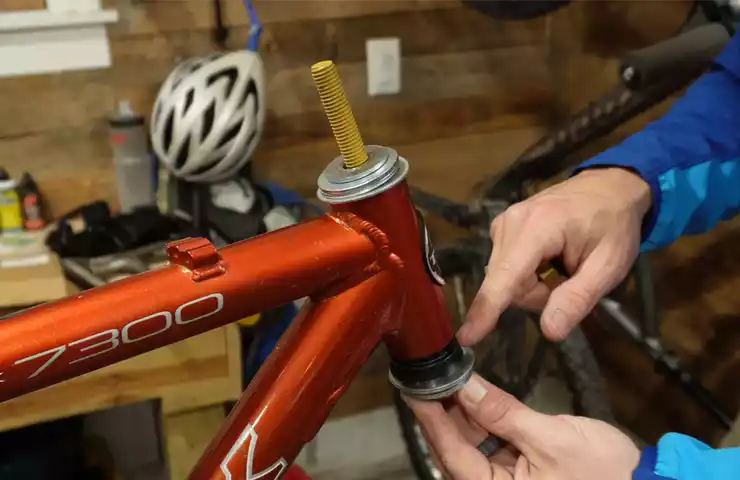
Installing the lower headset cup
With the frame surfaces cleaned, it’s time to install the lower headset cup. Apply a thin layer of grease to the inside of the head tube and press the cup into place using a headset press tool. Ensure that the cup is fully seated and aligned properly with the fork steerer tube.
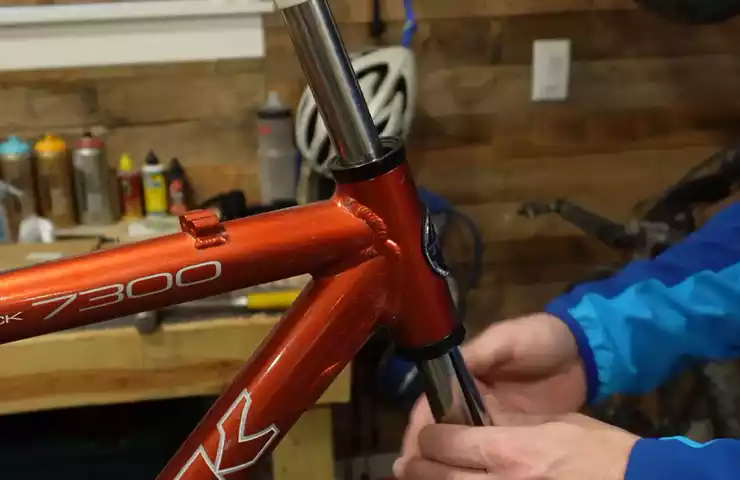
Inserting the fork steerer tube
Once the lower headset cup is in place, insert the fork steerer tube into the head tube. Make sure the steerer tube is properly aligned and flush with the lower headset cup. Use the headset press tool to press the steerer tube all the way into the head tube until it stops.
Installing the upper headset cup
Now it’s time to install the upper headset cup. Apply grease to the inside of the head tube and press the cup into place using the headset press tool. Again, ensure that the cup is fully seated and aligned correctly with the fork steerer tube.
Adjusting the headset preload
With both headset cups in place, it’s crucial to adjust the headset preload. This step ensures proper bearing tension for smooth and responsive steering. Use an Allen wrench to tighten the headset’s top cap, but be careful not to overtighten. Check for any play or resistance in the headset by rocking the bike back and forth. Adjust the headset preload until it feels smooth and there is no play or binding.
Installing the stem and handlebars
Once the headset preload is properly adjusted, it’s time to install the stem and handlebars. Align the stem with the fork steerer tube and tighten the stem bolts using an Allen wrench. Make sure the stem is secure and doesn’t move when you try to twist it.
Testing the headset for smooth operation
Finally, it’s essential to test the headset for smooth operation before hitting the road. Stand in front of the bike and hold onto the front brake while rocking the handlebars back and forth. The headset should move smoothly without any binding or resistance. If you detect any issues, revisit the headset preload adjustment step and make necessary adjustments.
By following this step-by-step guide, you can confidently install a bike headset and ensure optimal performance and a smooth riding experience.
Troubleshooting And Common Issues
Installing a bike headset can sometimes be challenging, especially for those who are new to bike maintenance. However, with some basic knowledge and troubleshooting skills, you can overcome common problems that may arise during the installation process. In this section, we will identify and help you resolve these common issues.
Identifying and resolving common problems during headset
installation
While installing a bike headset, you might encounter a few common problems that can affect the overall performance of your bike. It’s important to identify and address these issues promptly to ensure a smooth and stable ride. Below are some of the most common problems you might face and how to resolve them:
1. Loose headset:
A loose headset can result in unstable steering and can be hazardous while riding. To detect a loose headset, grip the front brake and rock the bike back and forth. If you feel any movement or hear clicking sounds, it indicates a loose headset. To fix this problem, follow these steps:
- Tighten the top cap bolt on the headset with the help of a wrench. This will remove any play between the headset and the stem.
- If the problem persists, loosen the stem bolts that secure it to the fork steerer tube. Align the handlebars straight and retighten the stem bolts to the recommended torque.
2. Tight headset:
A headset that is too tight can bind the bearings, resulting in rough steering and potential damage to the headset components. If you notice difficulty in turning the handlebars or if they don’t return smoothly to the center position, you may have a tight headset. Follow these steps to resolve the issue:
- Loosen the top cap bolt slightly to relieve pressure on the headset bearings.
- Check if the bearings spin freely by turning the fork and handlebars. If there is still stiffness, consider loosening the stem bolts slightly until the bearings move smoothly.
- Retighten the top cap bolt to the recommended torque value to ensure proper headset preload.
Tips for dealing with difficult or stuck components
During the installation process, you might encounter components that are difficult to remove or stuck in place. Here are some valuable tips to help you deal with such situations:
1. Stuck fork crown race:
In some cases, the fork crown race can be challenging to remove. To loosen it, try tapping it gently with a rubber mallet around its circumference until it becomes loose. Alternatively, you can use a crown race removal tool specifically designed for this purpose.
2. Difficult headset cup installation:
If you’re having trouble installing the headset cups, consider using a headset cup press tool. This tool will evenly distribute force and ensure the cups are pressed in straight without causing damage to the components.
3. Stubborn star nut installation:
When installing a star nut, resistance may occur, making it challenging to insert it into the steerer tube. Applying a small amount of grease on the star nut threads can help in reducing friction and ease the installation process.
By following these troubleshooting tips and dealing with difficult components appropriately, you can successfully install a bike headset and ensure optimal performance for your ride. Remember to always refer to the manufacturer’s instructions and use the right tools for a safe and effective installation process.
Maintenance And Care Tips For Bike Headset
Maintenance and care are crucial aspects of bike headset longevity and overall performance. Proper maintenance not only ensures a smooth riding experience but also prolongs the lifespan of your bike headset. In this section, we will discuss some essential tips for maintaining and caring for your bike headset. By following these guidelines, you can prevent unnecessary wear and tear, improve performance, and avoid potential incidents on the road.
Regular Cleaning and Lubrication of Headset Components
Regular cleaning and lubrication of the headset components are essential to keep your bike running smoothly. Dirt, dust, and grime can accumulate in the headset, causing friction and hampering the steering. To clean the headset, follow these steps:
- Remove the front wheel and secure the bike.
- Use a clean cloth or a soft brush to remove any external dirt or debris.
- Inspect the headset cups, bearings, and crown race for any signs of damage or excessive wear.
- Use a mild degreaser or soapy water solution to clean the headset components thoroughly.
- Rinse with clean water and dry all the parts completely before reassembling.
Once the headset is clean, it’s vital to lubricate the bearings and other moving parts. Apply a small amount of bicycle-specific grease or lubricant to the bearings and contact surfaces for smooth operation.
How to Check for Wear and Tear in the Headset
Regularly checking for wear and tear in the headset is essential to identify any potential issues before they become major problems. Here’s a simple step-by-step process to check your headset for wear:
| Steps to Check for Wear and Tear | |
|---|---|
| Step 1: | Grasp the front brake lever and rock the bike back and forth. Pay attention to any unusual noises, clicking sounds, or rough movements. |
| Step 2: | Check for any visible signs of corrosion, pitting, or wear on the headset cups and the steerer tube. |
| Step 3: | Examine the headset bearings for any play or looseness. You can do this by holding the fork and applying gentle pressure in different directions. |
| Step 4: | If you notice any excessive movement, noise, or damage, it may be time to replace the headset components. |
Regularly performing these checks can help you identify any issues with your headset and take appropriate action before they worsen.
Signs that Indicate a Headset May Need to be Replaced
While regular maintenance can extend the life of your headset, there may come a time when replacement is necessary. Keep an eye out for the following signs, as they may indicate that your headset needs to be replaced:
- Excessive play or looseness in the headset
- Clicking, grinding, or rough movements during steering
- Visible signs of wear, pitting, or corrosion on the headset components
- Inability to properly adjust or tighten the headset
- Frequent headset issues despite regular cleaning and maintenance
If you notice any of these signs, it’s best to consult a professional bike mechanic who can help you determine the extent of the problem and recommend appropriate replacement options.
Maintaining and caring for your bike headset is crucial for its performance and safety. With regular cleaning, lubrication, and periodic checks for wear and tear, you can ensure that your headset operates smoothly and lasts for years to come.
Frequently Asked Questions For How To Install Bike Headset
Can I Install A Headset Without A Press?
Yes, you can install a headset without a press.
How Do You Install A Road Bike Headset?
To install a road bike headset: 1. Remove the old headset by loosening the top cap and removing the fork. 2. Clean the head tube and fork steerer tube. 3. Apply grease to the bearings and press them into the head tube.
4. Slide the fork into the head tube and secure it with the top cap. 5. Adjust the headset tension and tighten the stem bolts.
How Do I Install A New Headset On My Mountain Bike?
To install a new headset on your mountain bike, follow these steps: 1. Remove the old headset by loosening the stem and handlebar. 2. Clean the head tube and fork steerer tube. 3. Install the new headset by inserting the lower bearing and crown race onto the fork steerer tube.
4. Tighten the headset using a headset press or mallet. 5. Reinstall the stem and handlebar, ensuring they are secure.
How Do You Put A Threadless Headset On A Bike?
To install a threadless headset on your bike, follow these steps: 1. Remove the old headset 2. Insert the bottom bearing into the head tube 3. Slide the fork into the head tube 4. Install the top bearing and compression ring 5.
Tighten the headset cap to secure everything in place.
Conclusion
To sum up, the installation of a bike headset may seem daunting at first, but with the right tools and a careful approach, it can be easily accomplished. By following the step-by-step instructions outlined in this blog post, you can ensure a secure and efficient installation process.
Remember to take your time, double-check all measurements and alignments, and seek professional help if needed. With proper maintenance, your bike headset will provide you with years of smooth and enjoyable rides. So, gear up, get ready, and embark on your next biking adventure with confidence!