To install bike fenders, align the fenders with the bike frame and secure them in place using screws and brackets. Bike fenders are essential accessories for any cyclist, providing protection from mud, water, and other road debris during wet weather conditions.
Installing fenders on your bike is a relatively simple process, requiring just a few tools and a bit of time. In this guide, we will take you through the steps to install bike fenders to ensure a secure and reliable attachment.
By following these instructions, you can enjoy a cleaner and more comfortable ride, without the worry of getting splashed or dirty. So, let’s get started with the installation process of bike fenders.
Why Bike Fenders Are Essential For All-Weather Cycling
Riding your bike is a fantastic way to stay active and enjoy the great outdoors. But what happens when you encounter less than ideal weather conditions? Cycling in the rain, mud, or snow can be challenging, and without proper protection, it can turn into a messy and uncomfortable experience. This is where bike fenders come into play. Installing bike fenders on your bicycle can greatly enhance your all-weather cycling experience, keeping you and your bike clean, dry, and rust-free. In this article, we will explore three key reasons why bike fenders are essential for all-weather cycling.
Protect yourself from mud and water splashes
Biking in wet conditions without fenders can result in unpleasant splashes of mud, water, and debris shooting up from your tires and onto your clothing, face, and back. Not only is this uncomfortable, but it can also obscure your vision and affect your ability to ride safely. Installing bike fenders can prevent these splashes from occurring, keeping you dry and clean throughout your ride.
Keep your bike and components clean and rust-free
When riding through wet or muddy terrain, dirt and grime can quickly accumulate on your bicycle frame, wheels, and components. This not only affects the appearance of your bike but can also lead to premature wear and tear, as well as rust formation. By installing bike fenders, you create a barrier that shields your bike from the elements, preventing dirt and water from reaching crucial parts of your bicycle. This can help prolong the lifespan of your bike and reduce the frequency of maintenance and repairs.
Improve visibility on the road
Another important benefit of bike fenders is their ability to improve visibility on the road. During inclement weather conditions, visibility can be significantly reduced, making it harder for motorists and other cyclists to see you. Bike fenders, especially those with reflective elements, can increase your visibility by reflecting light back to its source. This added visibility can greatly enhance safety while riding, reducing the risk of accidents.
Overall, installing bike fenders is a wise choice for all-weather cycling. Not only do they protect you from splashes, keep your bike clean and rust-free, and improve visibility on the road, but they also enhance your overall cycling experience. So, don’t let the weather deter you from enjoying your rides. Invest in bike fenders and embrace all-weather cycling with confidence and comfort!
Tools And Materials Needed
This blog post will provide you with a step-by-step guide on how to install bike fenders. One of the most essential factors for a smooth and enjoyable ride is to have the right tools and materials for the job. In this section, we will outline the necessary tools and materials you’ll need to install your bike fenders effortlessly. Let’s jump right in!
Fender Set
To start with the installation process, you will need to purchase a suitable fender set. Make sure to choose one that is compatible with your bike’s tire size and frame design. Fender sets usually include front and rear fenders along with the necessary hardware.
Allen Wrench Set

An Allen wrench set is an essential tool for bike maintenance and installation. These wrenches come in various sizes and are used to tighten or loosen bolts and screws. Make sure you have a set that includes different sizes to accommodate the various bolts on your bike fender.
Screwdriver
Another vital tool you’ll need is a screwdriver. You’ll often find screws of different sizes on bike fenders, and having a screwdriver with multiple interchangeable tips will help you tackle any screw type you encounter during the installation process.
Pliers
Pliers are handy tools that can be used for various tasks, including bike fender installation. They are particularly useful for gripping and holding small nuts and bolts in place while you tighten them with other tools. Make sure to have a pair of pliers readily available to assist you during the installation process.
Marker or Pencil
Having a marker or pencil on hand can be helpful when marking the areas on your bike frame where the fenders will be attached. These markings will act as a guide, ensuring that you position the fenders correctly.
By ensuring you have all these tools and materials ready before starting the installation process, you’ll be adequately prepared to tackle the task efficiently. So gather your fender set, Allen wrench set, screwdriver, pliers, and a marker or pencil, and let’s move on to the next step of installing your bike fenders!
Preparing Your Bike
Before you begin the process of installing bike fenders, it is important to properly prepare your bike. This involves removing any existing fenders or accessories, cleaning the mounting points for the new fenders, and checking compatibility and fit of the new fender set. Let’s break down each of these steps:
Remove any existing fenders or accessories
If your bike already has fenders or other accessories attached, you will need to remove them before installing the new fenders. This will ensure a clean workspace and prevent any interference with the installation process. Here’s how you can do it:
- First, locate the screws or bolts that are holding the existing fenders or accessories in place.
- Using an appropriate tool, such as a screwdriver or wrench, carefully loosen and remove the screws or bolts.
- Once all the screws or bolts have been removed, gently lift the fenders or accessories off the bike, being mindful not to damage any other components.
- Set aside the removed fenders or accessories in a safe place for future use or disposal.
Clean the mounting points for the new fenders
Now that you have removed the old fenders or accessories, it’s time to clean the mounting points where the new fenders will be attached. This will ensure a secure and stable installation. Follow these steps:
- Using a clean cloth or sponge, wipe away any dirt, debris, or rust from the mounting points.
- If necessary, use a mild detergent or bike-specific cleaner to remove stubborn dirt or grime.
- Rinse the mounting points with water and dry them thoroughly.
- Inspect the mounting points to ensure they are free of any obstructions or damage that could affect the installation process.
Check compatibility and fit of the new fender set

Before proceeding with the installation of the new fenders, it is important to check their compatibility and fit with your bike. This will help prevent any issues or complications during the installation process. Here’s what you should do:
- Refer to the manufacturer’s instructions or documentation to verify that the new fender set is compatible with your specific bike model and frame size.
- Inspect the fender set to ensure that all necessary mounting hardware and brackets are included.
- Hold the fender set up to your bike’s frame, paying close attention to how the fenders align with the tires and the clearance between the fenders and other components.
- Make any necessary adjustments to ensure proper fit, such as adjusting the position of the fender stays or brackets.
With these steps completed, your bike is now properly prepared for the installation of the new fenders. This careful preparation will ensure a smooth and successful installation process, resulting in both functional and visually appealing fenders for your bike.
Installing The Front Fender
Position the front fender over the front wheel
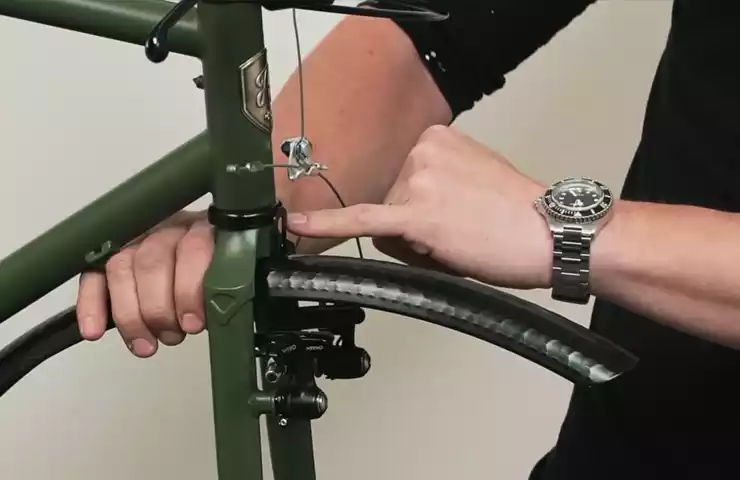
Installing the front fender is an essential step to ensure that your bike stays clean and protected from splashes of water and mud while riding. To begin the installation process, position the front fender over the front wheel of your bike. Make sure that it is centered and aligned properly to provide maximum coverage and protection.
Align the fender with the center of the tire
Once you have positioned the front fender, it’s crucial to align it with the center of the tire. This ensures that the fender does not interfere with the rotation of the wheel and maintains a balanced appearance. Maintaining proper alignment also helps enhance the effectiveness of the fender in protecting you and your bike from dirt and debris.
Attach the fender using the provided hardware
After aligning the fender with the center of the tire, it’s time to attach it securely using the provided hardware. Most front fenders come with bolts, nuts, and brackets that need to be attached to specific points on the bike’s frame. Follow the manufacturer’s instructions to determine the appropriate attachment points and use the provided hardware to secure the fender in place. Ensuring a tight and secure fit prevents any rattling or movement while riding.
Adjust the fender’s position for adequate clearance and coverage
Once the fender is attached, it’s important to adjust its position to ensure adequate clearance and coverage. The fender should provide enough room for the tire to rotate freely without any interference. Check for any signs of rubbing or contact between the fender and the tire throughout the rotation. Additionally, make sure that the fender extends low enough to effectively protect you and your bike from road spray and debris. Take the time to adjust and fine-tune the fender’s position until you achieve the desired clearance and coverage.By following these steps, you will be able to successfully install the front fender on your bike. Proper installation and alignment of the fender not only enhance the aesthetics of your bike but also serve as a key accessory for a cleaner and more enjoyable ride.
Installing The Rear Fender
Installing a rear fender on your bike is an important step to ensure a clean and dry ride, especially during wet weather conditions. The rear fender helps prevent mud, water, and debris from splashing onto your back and ruining your clothes. Additionally, it helps protect the moving parts of your bike, such as the chain and gears, from getting clogged with dirt, increasing their longevity. In this section, we will guide you through the process of installing the rear fender.
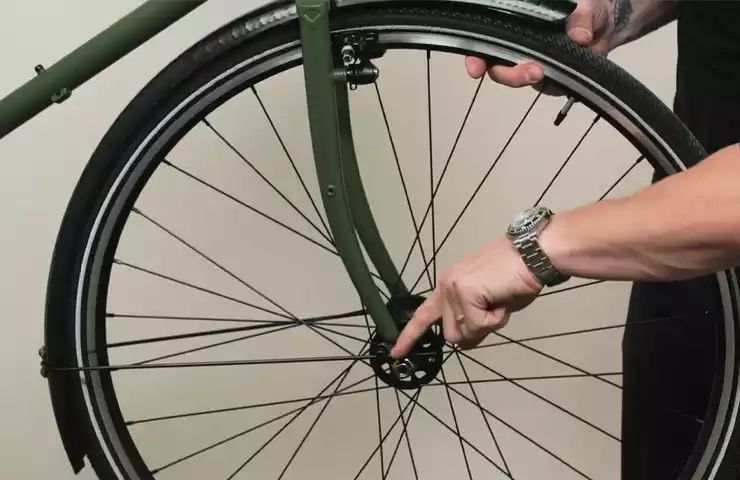
Position the rear fender over the rear wheel
The first step in installing the rear fender is to position it over the rear wheel. Ensure that the fender is aligned parallel to the ground and that it extends a few inches below the bottom bracket of your bike frame. This positioning will provide optimal coverage and protection against splashes and debris.
Align the fender with the center of the tire
Next, align the fender with the center of the tire to ensure balanced coverage. This step is crucial to prevent the fender from rubbing against the tire while riding, which could lead to unnecessary friction and potential damage to the fender or the tire. Take your time to adjust the fender until it is perfectly aligned with the tire’s center.
Attach the fender using the provided hardware
Once the fender is properly positioned and aligned, it’s time to attach it to your bike using the provided hardware. Refer to the manufacturer’s instructions to determine the appropriate screws, nuts, or brackets required for your specific fender model. Use a wrench or screwdriver to secure the hardware tightly, ensuring a secure and stable attachment.
Adjust the fender’s position for adequate clearance and coverage
After attaching the fender, it’s important to adjust its position to ensure adequate clearance and coverage. Check that there is enough space between the fender and the tire to prevent any interference or rubbing while riding. Additionally, adjust the fender’s position to ensure that it covers a significant portion of the rear wheel, extending beyond the tire’s width to effectively shield you from road debris and splashes. Take into consideration the type and width of your bike’s tires when making these adjustments.
Adjusting Fender Placement And Clearance
When installing bike fenders, ensuring correct placement and clearance is crucial. This not only prevents interference with the wheel but also provides adequate protection against the elements. In this section, we will guide you through the process of adjusting fender placement and clearance to achieve optimal performance. Let’s get started!
Check for Sufficient Tire Clearance, Especially for Larger Tires
Before finalizing the fender installation, it’s essential to check for sufficient tire clearance, especially if you have larger tires. Insufficient clearance can lead to rubbing, which not only affects your bike’s performance but also increases the risk of damage to the fender and tire. Follow these steps to ensure proper tire clearance:
- Spin the wheel and carefully inspect the area around the tire.
- Look for any signs of rubbing or contact between the tire and fender.
- If you notice any interference, adjust the fender position to increase clearance.
- Repeat the process until the tire moves freely without any rubbing against the fender.
Remember, maintaining adequate tire clearance is crucial for a smooth and safe ride. Don’t compromise on this aspect!
Ensure the Fender is Properly Aligned and Not Interfering with the Wheel
Aside from sufficient tire clearance, it’s also important to ensure that the fender itself is properly aligned and doesn’t interfere with the wheel. Misalignment or interference can lead to unnecessary drag, reduced performance, and potential accidents. Follow these steps to ensure proper alignment:
- Stand directly in front of the bike and observe the fender’s alignment with the wheel.
- Check that the fender is centered and evenly spaced on both sides of the tire.
- Ensure that there is no contact between the fender and the wheel while the bike is in motion.
- If misalignment or interference is detected, make the necessary adjustments using the provided hardware.
- Tighten or loosen the bolts to achieve proper alignment and eliminate any interference.
By ensuring the fender is properly aligned and doesn’t interfere with the wheel, you can enhance your bike’s performance and avoid potential issues on the road.
Make Adjustments as Necessary Using the Provided Hardware
Every fender installation typically comes with hardware for adjustment purposes. These hardware components enable you to make precise adjustments and achieve the desired fender placement and clearance. Follow these steps to make adjustments using the provided hardware:
- Refer to the instruction manual or the manufacturer’s guidelines for specific adjustment instructions.
- Identify the appropriate tools and hardware provided for adjustment.
- Loosen the necessary bolts or screws to allow for movement and adjustment.
- Make the required adjustments to align the fender and ensure proper tire clearance.
- Once the adjustments are made, tighten the bolts or screws securely to maintain the desired position.
Remember to follow the manufacturer’s instructions and use the provided hardware correctly to avoid any damage to the fender or other components.
By following these guidelines, you can effectively adjust the fender placement and clearance on your bike. This ensures optimal performance, proper protection against the elements, and a safer riding experience. Happy biking!
Fine-Tuning The Fender Installation
Once you have successfully installed your bike fenders, it’s important to fine-tune the installation to ensure they are secure and functioning correctly. Fine-tuning the fender installation involves double-checking all fender mounts and connections, securing any loose fittings or brackets, and ensuring all screws and bolts are tightened to the correct torque. Below, we will guide you through each step of this process to ensure a reliable and durable fender installation.
Double-check all fender mounts and connections
Before hitting the road with your newly-installed bike fenders, it’s crucial to double-check all the fender mounts and connections. Start by visually inspecting each mount and connection point, ensuring they are properly aligned and secure. Look out for any signs of misalignment or loose connections that may need to be addressed.
If you find any misaligned mounts or loose connections, take the necessary steps to correct them. This may involve adjusting the position of the fender, tightening the connection points, or replacing any damaged or worn-out components. By double-checking and correcting any issues with the fender mounts and connections, you can prevent potential problems down the road, such as fenders that become loose or detached during your ride.
Secure any loose fittings or brackets
Next, ensure all fittings and brackets are securely fastened to the bike frame. Inspect each fitting and bracket, looking for any signs of looseness or movement. If you identify any loose fittings or brackets, tighten them using the appropriate tools.
Depending on the specific design of your bike fenders, there may be different types of fittings and brackets to secure. This could include clamps, bolts, or screws. Refer to the manufacturer’s instructions or use your bike’s owner manual to identify the correct method for securing the fittings and brackets. Tighten them to the recommended torque to ensure they are securely attached to your bike frame.
Ensure all screws and bolts are tightened to the correct torque
Lastly, it is essential to ensure that all screws and bolts used in the fender installation are tightened to the correct torque. This will help prevent them from coming loose during your ride, providing a stable and secure fender system.
Using a torque wrench, carefully tighten each screw and bolt to the specified torque value provided by the manufacturer. If you do not have a torque wrench, you can use a standard wrench or Allen key, but be cautious not to overtighten and risk damaging any components.
By ensuring that all screws and bolts are tightened to the correct torque, you can have peace of mind knowing that your fenders are securely fastened and ready to withstand the rigors of your cycling adventures.
Now that you have fine-tuned your fender installation, you can confidently enjoy your rides, knowing that your bike is protected from road spray and debris. Remember to periodically check your fender mounts, brackets, and connections for any signs of wear or loosening, and make the necessary adjustments or replacements as needed. Safe cycling!
Tips For Maintaining Bike Fenders
Maintaining bike fenders is essential to ensure their longevity and optimal performance. By regularly cleaning and inspecting your fenders, you can prevent build-up, detect any damage or signs of wear, and make necessary adjustments. In this section, we will discuss some key tips for maintaining your bike fenders.
Regularly clean and wipe down the fenders to prevent build-up
To keep your bike fenders looking their best and functioning properly, it is important to clean them regularly. Dirt, mud, and debris can accumulate on the fenders, leading to clogs and reduced effectiveness. To clean your fenders:
- First, remove any large particles or clumps of dirt using a soft brush or cloth.
- Then, use a mild soap or bike-specific cleaner to scrub the fenders gently.
- Rinse thoroughly with water, ensuring that all soap residue is removed.
- Dry the fenders completely with a clean cloth to prevent water spots and rust formation.
Regular cleaning not only improves the appearance of your fenders but also helps maintain their functionality. By preventing build-up, you ensure that water and debris can flow freely, reducing the risk of damage or malfunction.
Inspect the fenders for any damage or signs of wear
Damage or wear on bike fenders can compromise their performance and effectiveness. Regular inspections allow you to identify any issues early on and take necessary action. Here’s how to inspect your fenders:
- Visually examine the fenders for any cracks, scratches, or deformities. Pay close attention to areas that are prone to stress, such as mounting brackets or connection points.
- Feel the fenders with your hands to detect any areas that may be brittle or weakened.
- Ensure that all attachment points are secure and tight.
- Check that the fenders are properly aligned and not rubbing against the tires or other components.
If you notice any damage or signs of wear, it is important to address them promptly. Repairs or replacements might be necessary to restore the functionality and effectiveness of your bike fenders.
Make necessary adjustments to maintain optimal performance
Adjustments to your bike fenders may be required over time to ensure they perform optimally. Some adjustments you might need to make include:
- Aligning the fenders to ensure they have adequate clearance from the tires.
- Tightening or loosening the mounting brackets, as needed, to ensure a secure fit.
- Adjusting the fender length to provide sufficient coverage and prevent splashes.
These adjustments can be made using the appropriate tools, such as wrenches or hex keys. By regularly checking and making necessary adjustments, you can maintain the optimal performance and functionality of your bike fenders.
Frequently Asked Questions For How To Install Bike Fenders
Can You Install Fenders On Any Bike?
Fenders can be installed on most bikes, providing protection from mud and water. However, compatibility may vary, so it’s important to check if your bike has proper mounting points and enough clearance for fenders. Consult your bike manufacturer’s guidelines or seek assistance from a professional bike mechanic for the best fit.
How Do You Attach A Front Fender To A Bike?
To attach a front fender to a bike, follow these steps: 1. Place the fender on the front wheel. 2. Align the mounting holes on the fender with the fork or frame holes. 3. Insert screws or bolts through the holes.
4. Tighten them securely to fasten the fender in place. 5. Ensure the fender is stable and doesn’t interfere with the wheel’s movement.
Are Bike Fenders Worth It?
Bike fenders are worth it as they protect you from splashes, mud, and debris, keeping you clean and dry during rides. They also prevent damage to your bike’s components and reduce maintenance. Enjoy your biking experience with added convenience and protection by using fenders.
Why Don T Bikes Have Fenders Anymore?
Bikes don’t have fenders anymore because they add weight and complexity, making it difficult for cyclists to maintain speed and maneuverability. Modern bikes are designed to be lightweight and streamlined for better performance.
Conclusion
Installing bike fenders is a simple and effective way to protect yourself and your bike from mud, water, and other debris. By following the step-by-step process outlined in this guide, you can ensure a proper installation that will enhance your cycling experience.
Remember to clean and maintain your fenders regularly to keep them functioning optimally. Now, you’re ready to hit the road with confidence and enjoy a clean, hassle-free ride. Happy cycling!