To install bike cleats, position the cleats on the bottom of your cycling shoes over the designated holes and screw them in securely. Installing bike cleats is an essential task for cyclists looking to optimize their riding performance and comfort.
Cleats, small metal or plastic clips that attach to the bottoms of cycling shoes, are crucial for connecting your feet to the pedals. Proper installation ensures the optimal power transfer and stability necessary for efficient pedaling. Whether you’re a seasoned cyclist or a beginner, it’s important to know the correct procedure for installing bike cleats to minimize the risk of discomfort or injury.
We will provide you with a concise guide on how to install bike cleats correctly. By following these steps, you can ensure a secure and efficient connection between your shoes and pedals, enhancing your cycling experience.
Choosing The Right Bike Cleats
When it comes to cycling, having the right bike cleats can greatly enhance your performance and overall riding experience. Bike cleats are essentially the small metal or plastic devices that attach to the bottom of your cycling shoes, allowing you to clip into your pedals. They provide a secure connection between your feet and the pedals, enabling you to generate power efficiently and maintain better control of your bike. However, with a variety of bike cleats available in the market, how do you choose the right ones for your needs? In this post, we will dive into the different types of bike cleats, factors to consider when choosing them, and how to find the right size.
Understanding the Different Types of Bike Cleats
Before diving into the specifics, it’s important to understand the various types of bike cleats available. Different cycling disciplines and pedal systems require different types of cleats to ensure optimal performance. Let’s take a closer look at three commonly used types:
| Type of Cleat | Description | Popular Cycling Disciplines |
|---|---|---|
| SPD-SL | The SPD-SL cleats are larger and offer a wider contact area, providing excellent stability and power transfer. They are commonly used for road cycling. | Road cycling |
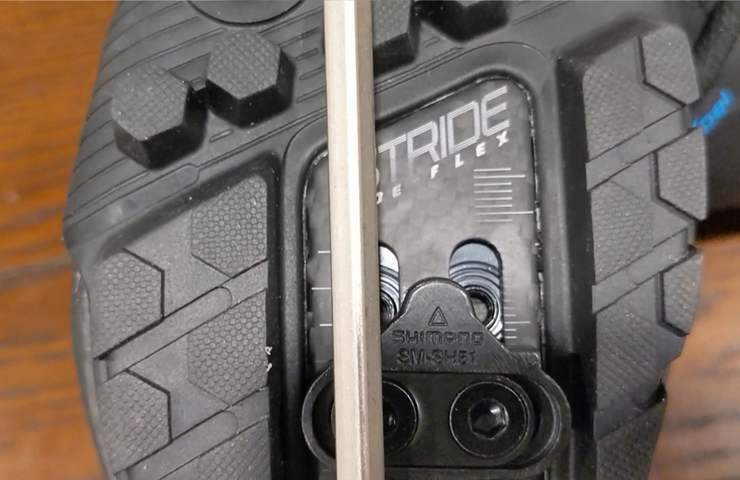
| SPD | The SPD cleats are smaller in size and have a two-bolt system, making them suitable for mountain biking, cycle touring, and some road cycling disciplines. | Mountain biking, cycle touring, some road cycling |
| Look Keo | The Look Keo cleats are known for their lightweight design and large contact area, providing optimal power transfer. They are commonly used for road cycling and can be found in both three-bolt and four-bolt systems. | Road cycling |
Factors to Consider When Choosing Bike Cleats
Now that you have a better understanding of the different types of bike cleats, it’s important to consider a few factors before making a final decision:
- Cycling discipline: Consider the type of cycling you primarily engage in. Different cleats are designed to accommodate specific disciplines, so choose accordingly.
- Compatibility: Check whether the cleats you’re interested in are compatible with your cycling shoes and pedal system. Some cleats are specific to certain brands or models.
- Float: Decide on the amount of float you prefer. Float refers to the degree of sideways rotation your feet can have while clipped in. Some cleats offer a fixed position, while others provide a certain amount of float to reduce joint stress.
- Cleat material: Consider the material the cleats are made of. Metal cleats tend to be more durable but can be noisy, while plastic cleats are quieter but may wear out more quickly.
How to Find the Right Size for Your Bike Cleats
Finding the right size for your bike cleats is crucial for a comfortable and secure fit. Here are the steps to determine the appropriate size:
- Check the manufacturer’s guidelines: Most cleat manufacturers provide size charts and instructions on how to measure your feet for the perfect fit. Make sure to refer to these guidelines.
- Consider arch height and foot width: Take into account your arch height and foot width, as some cleats come in different variations to accommodate varying foot shapes.
- Experiment and adjust: If you’re unsure about the size, consider purchasing cleats that offer adjustability. This will allow you to experiment with positioning and fine-tune the fit as needed.
By understanding the different types of bike cleats, considering the key factors, and finding the right size, you’ll be well on your way to choosing the perfect cleats for your cycling adventures. Remember, bike cleats play a crucial role in improving your cycling performance, so it’s worth taking the time to make an informed decision.
Preparing Your Cycling Shoes
Before installing bike cleats, it is important to properly prepare your cycling shoes. This entails cleaning and inspecting your shoes to ensure they are in good condition, determining the correct placement for the cleats, and marking the holes for screw placement.
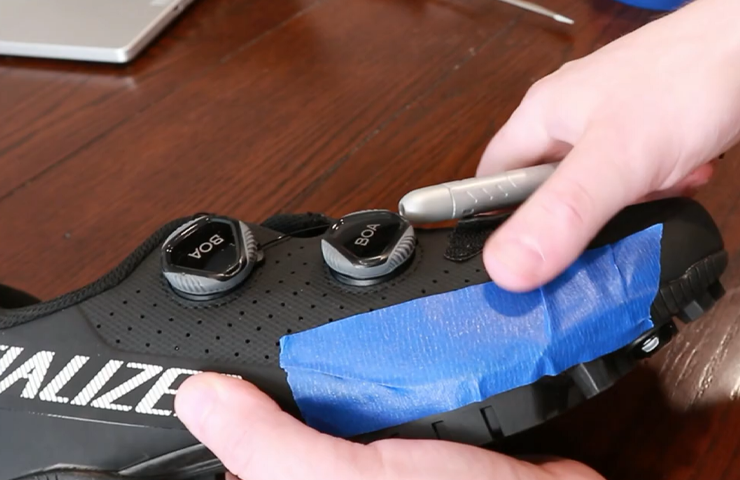
Cleaning and Inspecting Your Cycling Shoes
Start by giving your cycling shoes a thorough clean. Remove any dirt, dust, or debris from the surface using a soft brush. Make sure to pay extra attention to the areas where the cleats will be installed. This will help ensure a secure and accurate installation.
Once your shoes are clean, take a closer look at them to inspect for any damage or wear. Check the soles of your shoes for any significant signs of wear, cracks, or loose materials. It is crucial to have a sturdy sole to provide proper support and stability.
Additionally, inspect the threads or holes where the cleats will be screwed in. Ensure the threads are intact and there are no obstructions that can interfere with the installation. If you notice any issues or damage, it may be necessary to repair or replace your shoes before proceeding with the cleat installation.
Determining the Correct Placement for Cleats
The correct placement of your bike cleats is crucial for optimal performance and comfort. To determine the ideal placement, consider your personal preferences and riding style. Position the cleats in a location that allows for comfortable pedal stroke and efficient power transfer.
A common approach is to align the center of the cleat with the ball of your foot or the widest part of your foot. This positioning allows for a balanced distribution of pressure and can help prevent hot spots or discomfort during long rides.
Keep in mind that cleat placement can vary depending on individual factors such as foot anatomy and pedal stroke. Experiment with different positions and make adjustments as needed to find the most comfortable and efficient placement for your specific needs.
Marking the Holes for Screw Placement
After determining the desired cleat placement, it is time to mark the holes for screw placement. Use a marker or a pen to mark the holes based on the pattern provided by the cleats.
Place the cleats on the soles of your shoes according to the desired position. Use the holes in the cleats as a guide and mark the corresponding holes on the shoe sole. Make sure the marks are clear and easily visible.
It is essential to be precise and accurate when marking the holes to ensure a secure and stable attachment. Take your time and double-check the alignment before proceeding to the actual installation.
Once you have marked the holes, you are now ready to install the bike cleats onto your cycling shoes. Follow the manufacturer’s instructions for screwing the cleats securely into place, utilizing the marked holes for guidance.
Properly preparing your cycling shoes before installing bike cleats is an important step to ensure a successful and comfortable riding experience. By cleaning and inspecting your shoes, determining the correct cleat placement, and marking the holes for screw placement, you can set yourself up for optimal performance on the bike.
Installing The Bike Cleats
Installing bike cleats is an essential step to ensure a secure and efficient connection between your cycling shoes and the pedals. When done correctly, it can greatly enhance your riding experience and maximize power transfer. In this section, we will walk you through the process of installing bike cleats, from gathering the necessary tools and materials to aligning the cleats with the marks on your shoes and securing them with screws.
Gathering the Necessary Tools and Materials
Before you can begin installing bike cleats, it is important to gather all the necessary tools and materials. Having everything prepared beforehand will make the installation process smoother and more efficient. Here are the items you will need:
- Cycling shoes: Ensure that your cycling shoes are compatible with the specific type of cleats you are installing.
- Bike cleats: Choose the appropriate type of cleats for your pedals.
- Screws: Check if your cleats come with screws. If not, make sure to purchase the correct size and length.
- Hex key or screwdriver: Depending on the type of screws, you may need a hex key or a screwdriver to tighten them.
- Marker or tape: You will need a marker or tape to mark the position of the cleats on your shoes.
Aligning the Cleats with the Marks on Your Shoes
Once you have gathered all the necessary tools and materials, it’s time to align the bike cleats with the marks on your shoes. Proper alignment is crucial for achieving optimal pedal efficiency and preventing discomfort during your rides. Follow these steps:
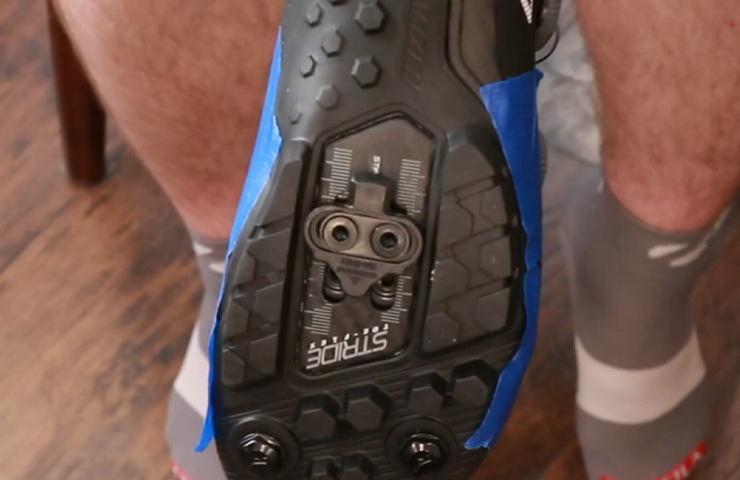
- Start by attaching the cleats to the soles of your cycling shoes, aligning them with the ball of your foot. This is usually marked by a small depression on the sole.
- If your shoes do not have pre-marked positions for cleat alignment, you can create your own reference points using a marker or tape. Position the cleats so that they align with the natural angle of your feet when pedaling.
- Ensure that both cleats are aligned symmetrically on the shoes for balanced foot positioning.
- Spend some time standing and walking around in your shoes with the cleats attached to ensure comfort and proper alignment.
Securing the Cleats with Screws
Now that the cleats are properly aligned with the marks on your shoes, it’s time to secure them in place with screws. Follow these steps:
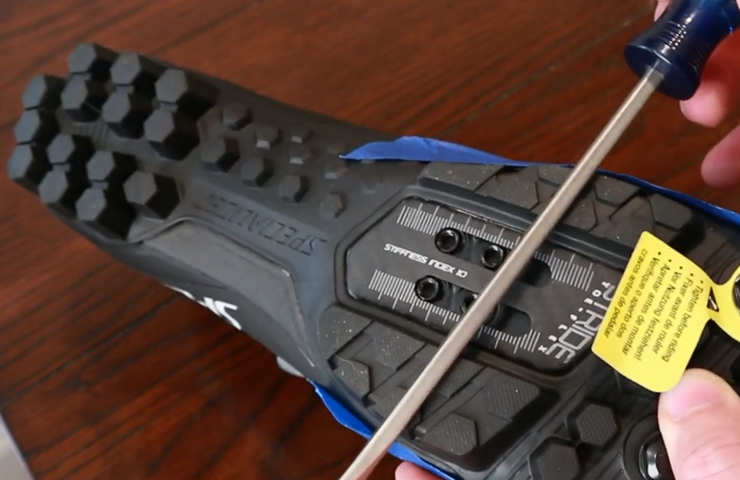
- Position the shoes on a stable surface, with the sole facing up.
- Insert the screws through the holes in the cleats and into the pre-drilled holes in the shoe sole.
- Using a hex key or screwdriver, tighten the screws until the cleats are securely fastened to the shoes. Be careful not to overtighten as it may damage the shoe sole or strip the screw threads.
- Check that both cleats are securely attached and there is no wobbling or movement. Adjust the tightness if necessary.
With the bike cleats successfully installed on your cycling shoes, you are now ready to enjoy the benefits of a solid connection between your feet and the pedals. Remember to regularly check the tightness of the screws and make any necessary adjustments to maintain optimal performance. Happy riding!
Adjusting And Fine-Tuning
Once you have installed your bike cleats, it’s time to make the necessary adjustments and fine-tuning to ensure a perfect fit. This step is crucial to maximize comfort and performance while riding. By testing the positioning, making adjustments, and fine-tuning the cleat angle, you’ll be able to optimize your cycling experience. Let’s dive into each of these aspects in detail.
Testing the Positioning: Clip-In and Clip-Out
Before making any adjustments, it’s important to test the positioning of your bike cleats. A proper cleat position allows for efficient power transfer and reduces the risk of discomfort or injury. To test the positioning, follow these steps:
- Clip-In: Start by mounting your bike and clipping into the pedals. Pay attention to how your feet naturally align with the pedals. Are they centered or slightly angled?
- Clip-Out: Next, practice unclipping your feet from the pedals. Ensure that the unclipping motion feels comfortable and smooth. If it requires excessive effort or feels awkward, you may need to adjust the cleat position.
Once you have completed the clip-in and clip-out test, you can move on to making adjustments based on your findings.
Making Adjustments to Achieve an Optimal Fit
If the positioning test highlighted any issues, you’ll need to make some adjustments to achieve an optimal fit. Here’s a step-by-step guide:
- Loosen the bolts: Start by loosening the bolts that secure the cleats to your cycling shoes. This will allow you to make adjustments without any constraints.
- Fore and aft adjustment: Begin by experimenting with the fore and aft position of the cleats. This involves moving them forward or backward along the slots provided. Pay attention to how it affects your pedaling efficiency and overall comfort.
- Side-to-side adjustment: Next, make small side-to-side adjustments to ensure your feet align with the natural angle of your knees. This will help prevent any stress or strain on your joints.
- Tighten the bolts: Once you are satisfied with the adjustments, securely tighten the bolts to firmly attach the cleats to your shoes. Make sure they are evenly tightened to avoid any imbalance.
After making these initial adjustments, it’s time to fine-tune the cleat angle for both comfort and performance.
Fine-tuning the Cleat Angle for Comfort and Performance
The angle of your bike cleats can significantly impact your riding experience. By fine-tuning the cleat angle, you can ensure optimal comfort and performance. Here’s how:
- Start with a neutral angle: Begin by setting the cleat angle to a neutral position. This means aligning the cleat parallel to the shoe’s midsole.
- Test and adjust: Take your bike for a short ride to test the cleat angle. Pay attention to how your feet feel during the pedal stroke. If you notice any discomfort or unnatural movement, make small adjustments to find the sweet spot.
- Gradual adjustments: Fine-tuning the cleat angle is a process of trial and error. Make small, gradual adjustments until you find the angle that offers maximum comfort and efficient power transfer.
Remember, the adjustment and fine-tuning process may require some patience and experimentation. Take the time to find the perfect cleat position and angle that suits your riding style and body mechanics. Once you establish the optimal fit, you’ll be ready to hit the road with confidence and enjoy the benefits of well-aligned bike cleats.
Maintaining Your Bike Cleats
Proper maintenance of your bike cleats is essential for optimal performance and longevity. By regularly cleaning and lubricating the cleats, checking and replacing worn-out cleats, and properly storing and handling them, you can ensure that your bike cleats are in top condition for every ride. In this section, we will discuss each of these aspects in detail.
Regularly Cleaning and Lubricating the Cleats
Cleaning and lubricating your bike cleats should be a part of your regular bike maintenance routine. Over time, dirt, grime, and debris can accumulate on the cleats, affecting their performance and potentially causing damage. To clean your cleats, follow these steps:
- Remove the cleats from your cycling shoes. Use a screwdriver or the appropriate tool to loosen and remove the bolts securing the cleats.
- Wipe off any visible dirt and debris from the cleats using a soft cloth or brush. Pay attention to the areas around the clip-in mechanism.
- For a more thorough clean, soak the cleats in warm soapy water for a few minutes, then scrub them gently with a brush to remove any stubborn dirt.
- Rinse the cleats with clean water to remove any soap residue.
- Dry the cleats thoroughly with a clean towel or let them air dry.
- Before reinstalling the cleats, apply a small amount of lubricant to the moving parts and contact surfaces. This will help ensure smooth engagement and disengagement.
- Finally, reattach the cleats to your cycling shoes, making sure to tighten the bolts securely.
By regularly cleaning and lubricating your bike cleats, you can prolong their lifespan and maintain their functionality.
Checking and Replacing Worn-out Cleats
As you rack up the miles on your bike, the cleats will experience wear and tear. It’s important to regularly check the condition of your cleats and replace them when they become worn-out. Here’s what you need to do:
- Inspect the cleats for signs of wear, such as excessive fraying, cracks, or loss of traction.
- If you notice any significant damage or if the cleats are worn beyond the manufacturer’s recommended limits, it’s time to replace them.
- Refer to the manufacturer’s guidelines or consult a bike mechanic to determine the correct type and model of cleats for your cycling shoes.
- When replacing the cleats, follow the same steps as mentioned earlier for removing and installing the cleats.
Regularly checking and replacing worn-out cleats is crucial for safety and optimal pedal performance. Ignoring worn cleats can lead to a decrease in power transfer and potentially cause accidents.
Proper Storage and Handling of Cleats
When you’re not using your bike cleats, it’s important to store them properly to prevent damage and ensure their longevity. Here are some tips for proper storage and handling:
- Keep your cleats in a clean, dry place away from excessive heat or moisture.
- Avoid storing them near sharp objects or other items that could cause damage.
- If you’re not using your cleats for an extended period, consider removing them from your cycling shoes and storing them separately.
- Keep the bolts and any other accessories related to the cleats in a secure container or bag, so they don’t get lost.
Following these storage and handling guidelines will help prolong the lifespan of your bike cleats and protect your investment.
Troubleshooting Common Installation Issues
Installing bike cleats is an essential step in optimizing your cycling performance. However, like any mechanical adjustment, it’s not always a seamless process. Whether you’re a beginner or an experienced rider, you may encounter some common installation issues with your bike cleats. In this section, we will discuss three common problems that cyclists often face – cleats feeling loose or unstable, difficulty clipping in and out, and squeaky cleats – along with their causes and solutions. By understanding these issues and their troubleshooting techniques, you’ll be able to ride comfortably and efficiently with properly installed bike cleats.
Cleats That Feel Loose or Unstable
If your bike cleats feel loose or unstable, it can significantly impact your cycling experience. This issue often arises due to improper installation or the wear and tear of cleat components over time. To address this problem:
- Remove your shoes and examine the cleat attachment points on the sole. Check for any signs of wear, such as loose screws or worn-out cleat holes.
- If the screws are loose, use a suitable hex wrench to tighten them. Ensure that they are firmly secured but not too tight, as overtightening can cause damage.
- If the cleat holes appear worn out, you may need to replace the cleat and possibly the shoe if the damage is extensive. Consult with a bike shop professional for guidance on replacing cleats and assessing shoe condition.
- After tightening the screws or replacing the cleat, test the stability of your bike cleats by clipping in and out while applying pressure. If the issue persists, seek professional assistance to ensure proper installation.
Difficulty Clipping In and Out
Difficulty clipping in and out of your bike pedals can be frustrating and impact your efficiency on the road. This problem may arise due to several factors, including cleat misalignment, pedal tension, or cleat position. Here’s how you can troubleshoot this issue:
- Start by ensuring that the cleats are properly aligned with the pedal entry mechanism. Refer to the manufacturer’s instructions or seek professional advice for the correct alignment.
- If the cleat alignment is correct, check the tension settings on your pedals. Adjust the tension according to your preference, but keep in mind that a lower tension setting can make clipping in and out easier.
- Consider adjusting the cleat position on the shoe. Experiment with small changes in the position, such as moving it forward or backward, to find the most comfortable and effective position for clipping in and out.
- If the issue persists, it may be worth consulting with a bike fitting specialist who can provide a more detailed analysis of your pedal stroke and cleat positioning.
Squeaky Cleats: Causes and Solutions
Squeaky cleats can be an annoying distraction during your rides. The most common cause of this issue is dirt or debris trapped between the cleat and the pedal surface. To resolve this problem:
- Remove the cleats from your shoes and inspect them for any dirt, grit, or debris. Use a soft brush or cloth to remove any particles that may have accumulated.
- Take a closer look at the pedal surfaces for any signs of wear or damage. If necessary, clean the pedals using a mild soapy solution and a soft brush.
- Apply a thin layer of lubricant or bike-specific grease to the pedal surfaces and the contact points of the cleats.
- Reinstall the cleats and ensure they are securely fastened.
If the squeaking persists afterward, it may be a sign of a more significant issue, and it’s advisable to consult a professional bike mechanic for further inspection and assistance.
Frequently Asked Questions Of How To Install Bike Cleats
How Do You Attach Bike Cleats?
To attach bike cleats, follow these steps: 1. Locate the cleat holes on the bottom of your cycling shoes. 2. Position the cleats over the holes and align them correctly. 3. Use a screwdriver to insert the screws through the holes and tighten them securely.
4. Double-check that the cleats are firmly attached before riding your bike.
What Is The Proper Position Of Cleats Attachment?
The proper position of cleats attachment is aligned with the ball of the foot. Ensure they are tight enough to provide stability but not so tight that they cause discomfort.
How Do I Install Spd Clips?
To install SPD clips, follow these steps: 1. Start by positioning the shoe cleat on the sole of your cycling shoe. 2. Use an Allen wrench to tighten the screws, ensuring the cleat is securely attached. 3. Align the cleat on the pedal, then press down to engage it.
4. Twist your foot to release the clip when you want to disengage. 5. Practice engaging and disengaging the clips before your first ride for convenience and safety.
How Do You Screw In Cleats?
To screw in cleats, follow these steps: 1. Position the cleat on your shoe sole. 2. Use a screwdriver or hex key to align the holes. 3. Insert the screws into the holes and tighten them securely. 4. Make sure the cleat is flush with the sole for proper functionality.
5. Repeat the process for all cleats.
Conclusion
Installing bike cleats may seem daunting at first, but with the right knowledge and tools, it can be a straightforward process. By following the steps outlined in this blog post, you can successfully install your bike cleats and enjoy a more efficient and comfortable riding experience.
Remember to adjust the cleat position to fit your riding style and make any necessary alignments. So, grab your tools and get ready to hit the road with confidence and ease! Happy riding!