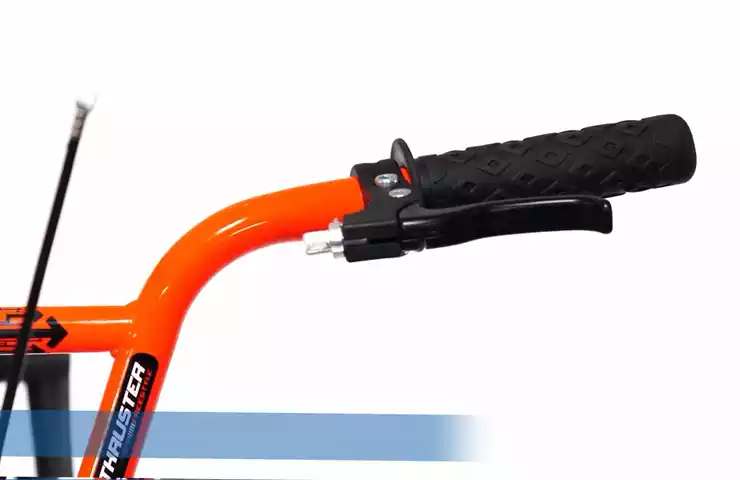
To install bike brake cables, begin by loosening the clamp bolt on the brake lever, then thread the cable through the lever and the cable housing. Intro: Learning how to install bike brake cables is an essential skill for any cyclist.
Proper installation ensures that the brakes function smoothly and effectively, reducing the risk of accidents. Whether you’re a beginner or an experienced rider, this step-by-step guide will walk you through the process, ensuring that you can confidently install brake cables on your bike.
With just a few basic tools and some patience, you’ll be able to replace or upgrade your brake cables in no time. So, let’s get started and make sure your bike’s braking system is at its best performance.
Gathering The Necessary Tools And Equipment
Before you begin the process of installing bike brake cables, it’s essential to gather all the tools and equipment you’ll need for the task. Having the right tools at hand will not only make the installation process smoother but also ensure that your brake cables are installed correctly and securely. In this section, we’ll outline the required tools and equipment you should have on hand to successfully install your bike brake cables.
Required Tools
To start, let’s take a look at the tools you’ll need for this installation:
- Hex wrench set: A set of hex wrenches will come in handy for removing and tightening bolts on your bike.
- Adjustable wrench: An adjustable wrench is necessary for adjusting the tension of your brake cables.
- Cable cutters: You’ll need cable cutters to trim the brake cables to the correct length.
- Cable housing cutter: This specialized tool is used to cut the cable housing cleanly and accurately.
- Pliers: Pliers will aid you in holding and manipulating various small components throughout the installation process.
- Needle-nose pliers: These narrow pliers are ideal for reaching into tight spaces and securing small cable ends.
- Lubricant: Applying lubricant to the brake cables ensures smooth operation and prevents rust and corrosion.
Required Equipment
In addition to the tools mentioned above, you’ll also need the following equipment:
- New brake cables: Choose brake cables that are compatible with your specific bike model and brake system. Ensure that the cables are the correct length for your bike.
- New cable housing: Replace the cable housing along with the brake cables to ensure optimal performance. Make sure the housing matches the diameter of your brake cables.
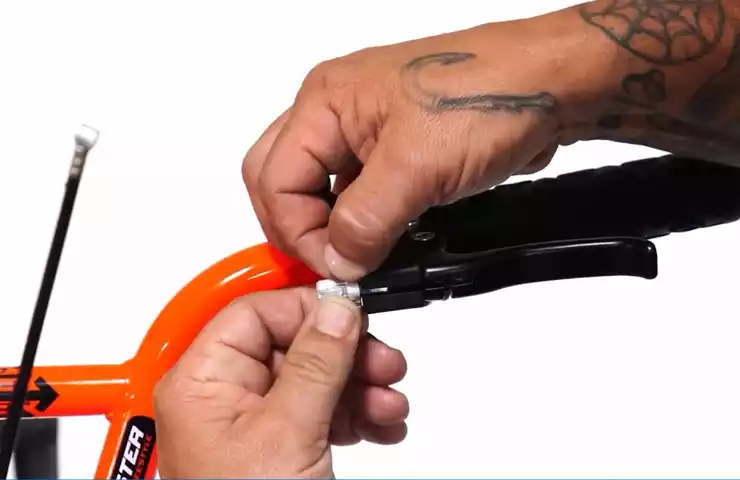
- Ferrules: Ferrules are small metal or plastic caps that fit onto the ends of the cable housing, providing a neat and secure finish.
- Cable end caps: These small metal or plastic caps are used to secure the ends of your brake cables and prevent fraying.
- Cable ties: Cable ties, also known as zip ties, are handy for securing the cables and housing in place.
By ensuring you have all the necessary tools and equipment gathered before starting the installation process, you’ll be well-prepared to complete the job smoothly. Now that you have everything you need, let’s move on to the next step: removing the old brake cables.
Preparing The Bike For Brake Cable Installation
Before installing new brake cables on your bike, it is important to properly prepare the bike and ensure that everything is in order. This will ensure a smooth and hassle-free brake cable installation process. In this section, we will walk you through the necessary steps to remove any existing brake cables and inspect the brake calipers and levers for any damage or wear.
Removing any existing brake cables
If your bike already has brake cables installed, the first step is to remove them. This will create a clean slate for the installation of the new brake cables. Follow these steps to remove the existing brake cables:
- Start by releasing the brake lever. This will provide slack in the cable, making it easier to remove.
- Locate the cable anchor bolt on the brake caliper and use an Allen wrench or a suitable tool to loosen it.
- Gently pull the cable out of the caliper, keeping an eye on how it is routed.
- Next, trace the cable to the brake lever and locate the anchor bolt. Loosen it to free the cable from the lever.
- Once the anchor bolt is loosened, you can fully remove the old brake cable from the bike.
Inspecting the brake calipers and levers for any damage or wear
After removing the old brake cables, it is essential to inspect the brake calipers and levers for any signs of damage or wear. This will ensure that the new brake cables function properly and provide reliable braking power. Here’s how to inspect the brake calipers and levers:
- Visually examine the brake calipers for any signs of corrosion, cracks, or other damage. If any issues are detected, it is recommended to replace the calipers before installing the new brake cables.
- Check the brake lever for any wear or damage. Make sure the lever moves smoothly and without resistance. If you notice any issues, consider replacing the lever before proceeding.
- Inspect the brake pads for wear. If the pads are worn down beyond a certain point, it is necessary to replace them for optimal braking performance.
- Ensure that all screws, bolts, and other fasteners on the calipers and levers are securely tightened.
By thoroughly inspecting the brake calipers and levers, you can catch any potential issues and address them before installing the new brake cables. This will help ensure safe and reliable braking on your bike.
Attaching The Brake Cables
Connecting the Brake Cables to the Brake Calipers
Once you have installed the bike brake cables through the frame and handlebars, the next step is to connect them to the brake calipers. This is a crucial part of the installation process, as it directly affects the braking performance of your bike.
To connect the brake cables to the brake calipers, follow these steps:
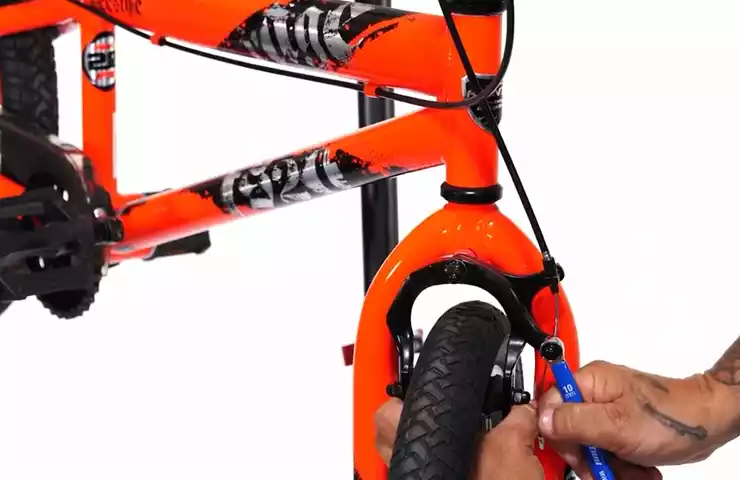
- Locate the brake caliper on your bike. It is usually positioned near the rim of the wheel.
- Identify the cable anchor bolt on the brake caliper. This bolt is used to secure the brake cable in place.
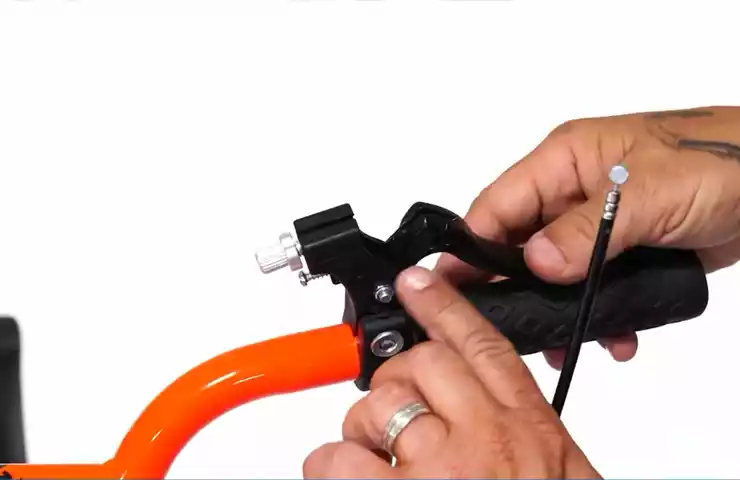
- Take the end of the brake cable with the barrel adjuster and insert it into the cable anchor bolt.
- Tighten the cable anchor bolt using a 5mm Allen wrench. Make sure it is securely fastened, but be careful not to overtighten which may cause damage to the brake caliper or cable.
Properly Tightening the Cable Anchor Bolts
The cable anchor bolts on the brake calipers play a crucial role in keeping the brake cables secured and ensuring optimal braking performance. It is essential to tighten them properly to prevent any cable slippage or brake failure.
To properly tighten the cable anchor bolts, follow these steps:
- Use a 5mm Allen wrench to tighten the cable anchor bolts.
- Start by loosening the cable anchor bolt until the cable can slide freely.
- Position the brake pads in alignment with the rim of the wheel.
- Pull the brake cable tight to remove any slack, and hold it in position.
- Tighten the cable anchor bolt while keeping tension on the cable. Ensure that the cable is securely fastened without any excess play.
- Double-check the tightness of the cable anchor bolt to ensure it is not too loose or too tight. Adjust if necessary.
Aligning the Brake Pads with the Rim for Optimal Braking Performance
Aligning the brake pads with the rim of the wheel is crucial for optimal braking performance. Misaligned brake pads may result in poor braking efficiency or uneven wear.
To align the brake pads with the rim for optimal braking performance, follow these steps:
- Check the position of the brake pads in relation to the rim. Ensure that they are parallel and making even contact with the rim’s braking surface.
- If the brake pads are misaligned, use a 5mm Allen wrench to loosen the bolt on the brake caliper holding the pads in place.
- Position the brake pads so that they are aligned with the rim. They should be centered and evenly spaced from both sides of the rim.
- Once aligned, tighten the bolt on the brake caliper to secure the brake pads in their new position. Ensure that it is tightened enough to prevent movement but not so tight that it restricts the brake pad’s ability to move when braking.
With the brake cables properly attached to the brake calipers and the brake pads aligned with the rim, you are now one step closer to enjoying smooth and efficient braking on your bike. Ensure that all bolts and connections are secure before taking your bike out for a test ride.
Adjusting The Brake Cable Tension
Adjusting the brake cable tension is a crucial step in the process of installing bike brake cables. Proper tension ensures optimal performance and reliable braking response. In this section, we will discuss how to set the correct tension for the brake cables and how to test the brake lever for proper braking response.
Setting the correct tension for the brake cables
Setting the correct tension for the brake cables is essential to ensure that the brakes engage and disengage smoothly and effectively. Here’s how you can do it:
- Locate the barrel adjuster: The barrel adjuster is a small cylindrical device usually found near the brake lever or caliper. It allows fine-tuning of the brake cable tension.
- Loosen the barrel adjuster: Turn the barrel adjuster counterclockwise to loosen the tension. This will create more slack in the brake cable.
- Pull the brake lever: With the barrel adjuster loosened, squeeze the brake lever to its fullest extent several times. This will help move the brake pads closer to the rim.
- Tighten the barrel adjuster: Once you’ve pulled the brake lever multiple times, tighten the barrel adjuster by turning it clockwise. This will increase the tension in the brake cable.
- Check the brake lever: With the barrel adjuster tightened, pull the brake lever and observe the brake pads. They should contact the rim firmly but not excessively. If the pads rub against the rim while the brake lever is released, loosen the barrel adjuster slightly. If there is excessive play before the brake pads make contact, tighten the barrel adjuster further.
Testing the brake lever for proper braking response
Once you’ve set the correct tension for the brake cables, it’s important to test the brake lever for proper braking response. Here are the steps you can follow:
- Confirm proper placement: Ensure that the brake lever is securely in place and properly aligned with your hand position on the handlebars.
- Squeeze the brake lever: Apply firm and controlled pressure on the brake lever. The brake pads should engage the rim smoothly and stop the wheel effectively.
- Listen for noise: While applying the brakes, listen for any unusual noises such as squeaking or grinding. These could indicate issues with the brake pads or brake caliper, and may require further adjustment or maintenance.
- Assess braking power: Pay attention to the braking power. The brake lever should offer a strong and consistent response, allowing you to slow down or stop the bike safely.
By following these steps to adjust the brake cable tension and testing the brake lever for proper braking response, you can ensure that your bike’s brakes perform optimally and provide reliable stopping power when you need it.
Testing And Fine-Tuning The Brakes
Testing the brakes to ensure they are functioning correctly
Once you have installed the bike brake cables, the next crucial step is to test and fine-tune the brakes. This will ensure that your brakes are functioning correctly and provide you with the necessary stopping power when you need it the most. Here is a step-by-step guide on how to test and fine-tune your bike brakes.
Making any necessary adjustments to the cable tension or brake pads
1. Start by testing your brakes in a safe and controlled environment, such as an open parking lot or a quiet street. 2. Begin by squeezing the brake levers to ensure that they engage the brakes smoothly. You should feel a firm resistance when applying the brakes. 3. Check the distance between the brake lever and the handlebar. Ideally, there should be around 1-2 centimeters of space. If there is too much space or the levers come too close to the handlebar, you may need to adjust the cable tension. 4. To adjust the cable tension, locate the barrel adjuster on the brake caliper or the brake lever. Turning it clockwise will tighten the cable, while turning it counterclockwise will loosen it. Make small adjustments and test the brakes after each adjustment to achieve the desired tension. 5. Once the cable tension is adjusted, check the brake pads. Ensure that they are properly aligned with the rim of the wheel. Adjust them if necessary to ensure they make even contact with the rim when the brakes are applied. 6. Examine the brake pads for wear. If they are worn down to the indicator line or beyond, it is time to replace them. Worn brake pads can significantly reduce braking performance and should be replaced immediately. 7. Lastly, take your bike for a test ride to ensure that the brakes are working as intended. Start with gentle brake applications and gradually increase the force to test their effectiveness and stopping power. Pay attention to any abnormal noises, vibrations, or inconsistencies in the braking performance. By properly testing and fine-tuning your bike brakes, you can ensure that they are operating at their best. This will not only improve the safety of your rides but also enhance your overall cycling experience. Remember to regularly check and maintain your brakes to keep them in optimal condition and enjoy worry-free and confident rides.
Troubleshooting Common Brake Cable Installation Issues
Installing bike brake cables is a crucial step in maintaining proper braking performance. However, you may encounter some common issues during the installation process. In this section, we will discuss how to identify and resolve issues such as cable slippage or excessive brake noise.
Identifying and Resolving Cable Slippage
Cable slippage can occur when the brake cable moves out of position, leading to subpar braking performance. To address this issue, follow these steps:
- Ensure that the brake cable is properly seated in the brake lever and brake caliper. Check for any signs of looseness or misalignment.
- Tighten the cable tension using the barrel adjuster located on the brake lever or caliper. This will help take up any slack in the cable.
- If the cable continues to slip, you may need to readjust the position of the brake caliper. Loosen the mounting bolts, align the caliper with the brake rotor, and tighten the bolts back up.
- Test the brakes to ensure that the cable no longer slips. Squeeze the brake lever and make sure the brakes engage smoothly without any slippage or delay.
Resolving Excessive Brake Noise
Noisy brakes can be a nuisance and may indicate issues with the brake cable installation. Follow these steps to address excessive brake noise:
- Inspect the brake cable housing for any signs of wear or damage. Replace the housing if necessary to eliminate potential sources of noise.
- Apply a small amount of lubricant to the brake cable where it passes through the housing. This can help reduce friction and noise.
- Check the brake pads for proper alignment and wear. Misaligned or worn brake pads can cause squealing or scraping noises. Adjust or replace them as needed.
- Ensure that the brake caliper is properly aligned with the rotor. Misalignment can lead to uneven contact and noise. Use the mounting bolts to adjust the caliper position if necessary.
- Test the brakes after making adjustments to check if the noise has been resolved. Squeeze the brake lever and listen for any abnormal sounds. The brakes should engage smoothly and quietly.
By following these troubleshooting steps, you can overcome common brake cable installation issues. Remember to regularly inspect and maintain your brake cables to ensure optimal braking performance and rider safety.
Maintenance And Care Tips For Bike Brake Cables
Bike brake cables are an essential component of your bike’s braking system, responsible for transmitting the necessary force to engage the brakes and ensure your safety. Proper maintenance and care of your bike’s brake cables will not only prolong their life but also improve the overall performance of your brakes. In this section, we will discuss some important tips for cleaning, lubricating, inspecting, and replacing bike brake cables.
Proper cleaning and lubrication techniques to prolong cable life
Regular cleaning and lubrication are essential to ensure smooth operation and prolong the life of your bike brake cables. Here are some tips to help you clean and lubricate them properly:
- Start by wiping down the cables with a clean, dry cloth to remove any dirt or debris.
- Next, apply a few drops of a high-quality lubricant, such as bike-specific cable oil, to the cables and the housing.
- Work the lubricant into the cables by squeezing the brake levers and moving the cables back and forth.
- Wipe off any excess lubricant with a clean cloth, as excessive lubrication can attract dirt and cause the cables to become sticky.
Regular cleaning and lubrication should be done every few months or more frequently if you ride in wet or dusty conditions. This will help prevent corrosion, reduce friction, and ensure your brake cables are operating smoothly.
Regular inspection and replacement of worn brake cables
Inspecting your brake cables regularly is crucial for identifying any signs of wear or damage. Here’s what you should look for:
- Check for fraying, kinks, or sharp bends in the cables, as these can weaken the structure and affect their performance.
- Ensure that the cables are properly seated in the housing and the cable ends are securely attached to the brake calipers and levers.
- Test the brakes to see if they engage smoothly and have sufficient stopping power. If you notice any inconsistencies, it could indicate a problem with the cables.
If you notice any signs of wear or damage, it is crucial to replace the brake cables immediately. Continuing to ride with worn or damaged cables can compromise your safety and lead to brake failure.
Frequently Asked Questions On How To Install Bike Brake Cables
How Do You Fit A New Brake Cable On A Bike?
To fit a new brake cable on a bike, first, locate the existing cable. Loosen the brake barrel adjuster and pinch bolt on the brake caliper. Remove the old cable by pulling it through the cable housing. Insert the new cable and tighten the pinch bolt.
Adjust the barrel adjuster for proper brake tension.
How Do You Tension A Bike Brake Cable?
To tension a bike brake cable, follow these steps: 1. Locate the barrel adjuster on the brake lever or caliper. 2. Turn the barrel adjuster to increase or decrease tension. 3. Test the brakes by squeezing the lever. 4. Adjust as needed for proper braking performance.
Remember to consult your bike’s manual for specific instructions.
Is It Easy To Replace Brake Cable On Bike?
Replacing the brake cable on a bike is a relatively easy task. It can be done quickly with basic tools by following simple instructions.
How Do You Install Cable Brake Levers?
To install cable brake levers: 1. Remove the old levers. 2. Slide the new levers onto the handlebars. 3. Connect the brake cable to the lever. 4. Adjust the lever position and tighten securely. 5. Test the brakes to ensure they are functioning properly.
Conclusion
To sum it up, installing bike brake cables can seem daunting at first, but with the right tools and a step-by-step approach, it becomes a manageable task. By following the instructions outlined in this guide, you can ensure that your bike’s brake cables are installed correctly, leading to smoother and safer rides.
Remember to regularly check and maintain your brake cables for optimal performance. Happy biking!