To install bicycle pedals, start by placing the right pedal into the right crank arm and rotating it clockwise until it is tight. Then, do the same with the left pedal and left crank arm, rotating it counterclockwise until it is tight.
Installing bicycle pedals is an essential skill every cyclist needs to know. Whether you’re a seasoned pro or just starting out, having the ability to properly install pedals is crucial for maintaining your bike’s performance and functionality. In this guide, we will walk you through the step-by-step process of installing bicycle pedals.
By following these simple instructions, you’ll be able to install your pedals quickly and securely, ensuring a smooth and comfortable ride. So, let’s get started and learn how to install bicycle pedals like a pro.
Factors To Consider When Selecting Bicycle Pedals
Factors to Consider When Selecting Bicycle Pedals
When it comes to optimizing your cycling experience, selecting the right bicycle pedals is essential. The right pedals can enhance your performance, comfort, and overall enjoyment on the bike. However, with a wide range of options available in the market, choosing the perfect pedals can be a daunting task. To help you make an informed decision, here are the key factors to consider when selecting bicycle pedals:
Pedal material: Understand the differences between plastic, aluminum, and composite pedals
When it comes to pedal material, there are three main options to choose from: plastic, aluminum, and composite pedals. Each material has its own unique characteristics and benefits.
Plastic pedals:
Plastic pedals are lightweight and corrosion-resistant, making them a popular choice for casual cyclists and those on a budget. They are also more forgiving in case of accidental impacts on rough terrain. However, plastic pedals may not provide the same level of grip and durability as their metal counterparts.
Aluminum pedals:
Aluminum pedals are known for their durability and strength. They can handle the rigors of off-road cycling and provide excellent power transfer. These pedals are relatively lighter than composite pedals but can be heavier compared to plastic options. However, be aware that aluminum pedals may be more prone to corrosion if not properly maintained.
Composite pedals:
Composite pedals, often made from a combination of materials such as carbon fiber and nylon, offer a great balance of weight, strength, and affordability. They are designed to provide a good grip and some even come with additional features like replaceable pins for better traction. Composite pedals are a popular choice among both casual and performance-oriented cyclists due to their versatility.
Pedal design: Evaluate the pros and cons of flat pedals, toe clip pedals, and clipless pedals
When selecting bicycle pedals, it’s important to consider the design that best suits your riding style and preferences. Here are the three main types to consider:
| Pedal Design | Pros | Cons |
|---|---|---|
| Flat pedals | – Easy to use and suitable for casual cycling – Can be used with any type of footwear – Allow quick foot placement and removal | – Limited power transfer compared to other pedal types – Feet may slip off during wet conditions or aggressive riding |
| Toe clip pedals | – Provide added control and efficiency – Prevent feet from slipping off the pedals – Allow for more power transfer compared to flat pedals | – Require specific cycling shoes with toe clips for optimal performance – May take time to get accustomed to clipping in and out |
| Clipless pedals | – Offer maximum power transfer and efficiency – Provide a secure connection between the shoe and pedal – Allow for precise foot placement | – Require compatible cycling shoes with cleats – Can be challenging for beginners to clip in and out |
Pedal compatibility: Ensure your pedals are compatible with your cycling shoes and crankset
Before making a final decision, it’s crucial to ensure that your chosen pedals are compatible with your cycling shoes and crankset. Different pedal types require specific shoe and cleat integration. Flat pedals, for example, can be used with any type of shoe. However, clipless pedals require compatible cycling shoes with corresponding cleats attached to the sole. Additionally, ensure the pedal threads match the crankset threads on your bike to ensure a secure and stable connection.
By considering the pedal material, design, and compatibility, you can select the perfect pedals that meet your cycling needs. Remember to prioritize comfort, performance, and your personal preferences when making your decision. Happy cycling!
Essential Tools For Pedal Installation
Installing bicycle pedals is a relatively straightforward process, but having the right tools can make a world of difference. With the proper tools at hand, you can ensure a secure and smooth installation that will keep your pedals in place for countless rides. In this section, we will outline the essential tools required to install bicycle pedals.
Pedal wrench or Allen wrench
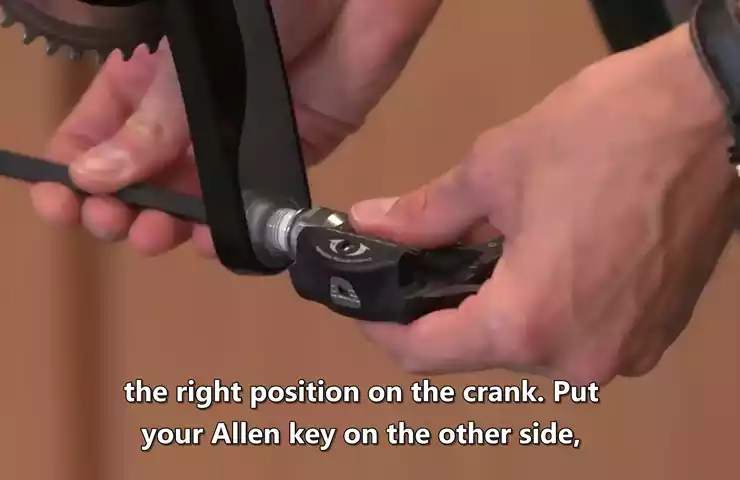
The first tool you will need is either a pedal wrench or an Allen wrench, depending on the type of pedals you have. Most pedals can be installed using a pedal wrench, which is specifically designed to fit the flats on pedal spindles. However, some pedals have a hexagonal socket on the back instead of flats, requiring an Allen wrench for installation.
If you’re unsure which type of tool is needed for your pedals, consult the manufacturer’s instructions or do a quick online search. Once you have the correct wrench, you’re ready to move on to the next step.
Grease or threadlocker
Another essential tool for pedal installation is either grease or threadlocker. Applying a thin layer of grease to the pedal threads can help prevent them from seizing and make it easier to remove the pedals in the future. This is especially important if you ride in wet or muddy conditions, as moisture can accelerate corrosion and make pedal removal more difficult.
On the other hand, if you want to provide additional security and prevent the pedals from unscrewing while riding, you can use a threadlocker. Threadlockers are liquid adhesives that prevent vibration-induced loosening of fasteners. They come in different strengths, so be sure to choose one appropriate for your pedals.
Rag or towel for cleaning
Prior to installing your pedals, it’s a good idea to clean the pedal threads and the crank arm to ensure a smooth and tight fit. A rag or towel is the perfect tool for this task. Simply wipe away any dirt, debris, or old grease from the threads of the crank arm and the pedal before proceeding with installation.
Keeping the threads clean allows for better contact and reduces the risk of misalignment or cross-threading, which can damage both the pedal and the crank arm. Once the threads are clean, you’re ready to install your pedals with confidence.
Preparation Before Installing Pedals
Before you can start enjoying smooth rides on your bike, it’s important to properly prepare before installing your new bicycle pedals. This crucial step ensures that the installation process goes smoothly and that your pedals are securely attached to your bike. There are a few key steps you should take to prepare for the installation, including removing any existing pedals and inspecting the pedal and crank threads for any signs of damage or dirt. Let’s dive into these steps in more detail:
Remove any existing pedals
The first step in preparing to install new bicycle pedals is to remove any existing ones. Using a pedal wrench, turn the pedal spindle counterclockwise to loosen and remove the old pedals. It’s essential to remember that the non-drive side pedal (usually the left side) loosens in the opposite direction, turning clockwise to remove. Once the pedals are completely unscrewed, take them off and set them aside.
Inspect pedal threads and crank threads for damage or dirt
After removing the old pedals, it’s crucial to inspect the pedal threads and the crank threads for any signs of damage or dirt. Look closely for any stripped or worn threads, as this can affect the stability and security of your new pedals. Additionally, any dirt or debris on the threads can prevent proper installation. Inspecting the threads thoroughly ensures that you can address any issues before proceeding with the installation.
Clean threads if necessary
If you notice any dirt or debris on the pedal threads or the crank threads, it’s crucial to clean them thoroughly. Using a clean rag, carefully wipe away any dirt, grime, or residue that may be present. This helps to ensure a clean and secure attachment between the pedals and the crank, optimizing the longevity and performance of your bicycle. If the threads are heavily soiled, consider using a brush or a mild solvent to remove any stubborn debris.
By following these preparation steps, you are well on your way to installing your new bicycle pedals successfully. Removing any existing pedals, inspecting the pedal and crank threads, and cleaning them if necessary, are essential in ensuring a secure and stable connection. With proper preparation taken care of, you can move on to the exciting step of installing your new pedals and enjoying your bike rides to the fullest.
Installing Flat Pedals
When it comes to installing flat pedals on your bicycle, following the correct steps is crucial to ensure a secure and effective installation. In this guide, we will take you through the process step by step, from preparing the pedal threads to tightening them securely.
Apply grease or threadlocker to pedal threads
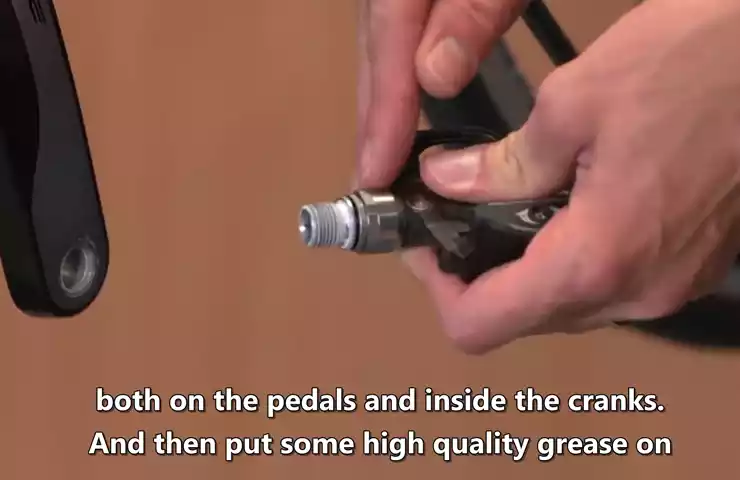
The first step in installing flat pedals is to apply grease or threadlocker to the pedal threads. This is important as it helps to prevent the pedals from seizing or loosening during use and makes them easier to remove in the future.
Before applying the grease or threadlocker, make sure to clean the pedal threads and remove any dirt or debris. Once the threads are clean, apply a small amount of grease or threadlocker to the threads using a brush or applicator. Make sure to evenly distribute the grease or threadlocker along the entire length of the threads.
Identify left and right pedal markings
When installing flat pedals, it is important to identify the left and right pedals. Most pedals are marked with an “L” or “R” to indicate their respective sides. Look for these markings on the pedals before proceeding with the installation.
If the pedals are not marked, you can identify the left and right pedals by looking at the threading. The left pedal has reverse threading, meaning it tightens in a counter-clockwise direction, while the right pedal tightens in a clockwise direction.
Align pedals with crank arms
Before installing the pedals, align them with the crank arms. The pedal spindles should be parallel to the crank arms to ensure proper alignment.
Make sure that the holes in the crank arms and the threads on the pedals are clean and free of debris. Insert the left pedal into the left crank arm and the right pedal into the right crank arm. Start threading the pedals by hand, making sure they are threaded in the correct direction.
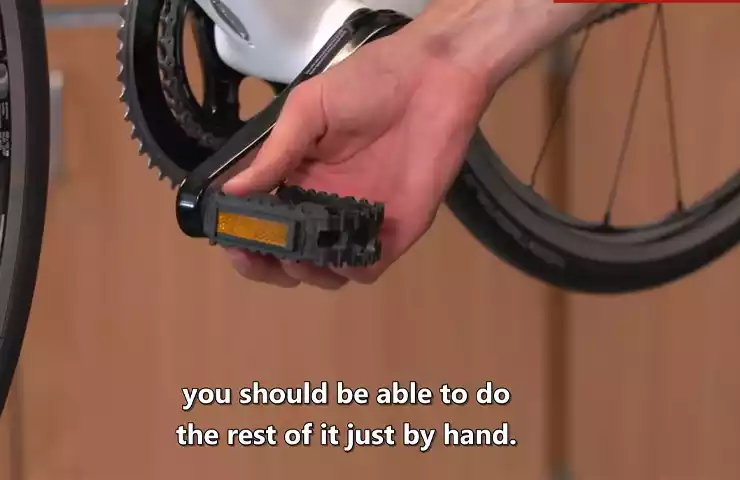
Hand-tighten pedals until snug
Once the pedals are aligned with the crank arms, hand-tighten them until snug. Use your fingers to turn the pedals clockwise on the right side and counter-clockwise on the left side. Make sure that the pedals are securely threaded into the crank arms, but avoid over-tightening them at this stage.
Use a pedal wrench to tighten pedals securely
After hand-tightening the pedals, use a pedal wrench to further tighten them securely. A pedal wrench is a specialized tool with a long handle and a thin, open-ended wrench on one end.
- Start with the right pedal. Insert the pedal wrench into the pedal flats and turn it clockwise to tighten the pedal securely in the right crank arm.
- Repeat the process for the left pedal, but remember that it has reverse threading. Insert the pedal wrench into the pedal flats and turn it counter-clockwise to tighten the pedal securely in the left crank arm.
Make sure to tighten the pedals securely, but be careful not to over-tighten them as this can damage the threads.
By following these steps, you can easily install flat pedals on your bicycle and enjoy a smoother and more comfortable ride. Remember to check the tightness of your pedals periodically and re-tighten if necessary to ensure they remain secure.
Installing Toe Clip Pedals
Toe clip pedals are a popular choice among cyclists for their ability to provide additional power and control while riding. Whether you’re a seasoned cyclist or a beginner, installing toe clip pedals is a simple and straightforward process that you can easily do at home. In this guide, we’ll walk you through the step-by-step process of installing toe clip pedals onto your bicycle. Let’s get started!
Attach toe clips to pedals
The first step in installing toe clip pedals is attaching the toe clips to the pedals. Toe clips are usually sold separately from the pedals, so make sure you have both before you begin. Start by aligning the holes on the toe clips with the corresponding holes on the pedals. Use a small wrench or screwdriver to securely fasten the toe clips in place. Be sure to tighten the screws or bolts until they are snug, but be careful not to overtighten as this may cause damage to the pedals.
Position pedals with toe clips onto crank arms
With the toe clips attached to the pedals, it’s time to position them onto the crank arms. The crank arms are the metal arms that connect the pedals to the bicycle frame. To do this, start by lining up the threaded hole on the pedal with the corresponding hole on the crank arm. Once aligned, thread the pedal into the crank arm by turning it clockwise. Repeat the process for the other pedal, making sure they are both securely threaded into the crank arms.
Align straps for proper foot placement
Now that the pedals with toe clips are attached to the crank arms, it’s important to align the straps for proper foot placement. The straps should crisscross over the top of your shoe, providing support and ensuring your foot stays in place while riding. Adjust the straps to a length that feels comfortable for you, ensuring they are tight enough to hold your foot in place but not so tight that they restrict circulation.
Hand-tighten pedals until snug
Once the straps are aligned, it’s time to hand-tighten the pedals until they are snug. Use your hands to turn the pedals in a clockwise direction, ensuring they are securely fastened to the crank arms. Give each pedal a gentle tug to make sure they are properly tightened and won’t come loose while you’re riding.
Use pedal wrench to tighten pedals securely
While hand-tightening the pedals is usually sufficient, for an
extra secure fit, you can use a pedal wrench. A pedal wrench is a specialized tool that provides extra leverage to tighten pedals securely. Insert the wrench onto the pedal spindle and turn it in a clockwise direction to tighten the pedals further. Be careful not to overtighten, as this may cause damage to the spindle or the crank arm.
Following these steps will ensure that your toe clip pedals are installed correctly and securely. Once installed, you’ll be ready to enjoy the added power and control that toe clip pedals provide. Happy riding!
Installing Clipless Pedals
Clipless pedals are a popular choice among cyclists because they provide a secure connection between the cyclist and the bike. With clipless pedals, your feet are attached to the pedals, which allows for more efficient pedaling and better control of the bike. If you’re new to clipless pedals or just need a refresher on how to install them, this guide will walk you through the process step by step.
Determine correct placement for cleats on cycling shoes
Before you can install clipless pedals, you need to determine the correct placement for the cleats on your cycling shoes. The placement of the cleats can affect your pedaling efficiency and comfort, so it’s important to get it right. Here’s how:
- Start by placing your cycling shoes on a flat surface and aligning them so that the soles are level.
- Locate the ball of your foot, which is usually the widest part.
- Measure the distance from the ball of your foot to the center of your heel.
- Use these measurements to adjust the position of the cleats on your cycling shoes. Typically, the center of the cleat should align with the ball of your foot.
Align pedals with crank arms
After determining the correct placement for the cleats on your cycling shoes, it’s time to align the pedals with the crank arms. Here’s how:
- Position the crank arms in a parallel position to the ground.
- Locate the threaded holes on the crank arms where the pedals will be attached.
- Thread the pedals into the crank arms in a clockwise direction. Remember that the right pedal has a right-hand thread, while the left pedal has a left-hand thread.
Attach cleats to cycling shoes
Once the pedals are aligned with the crank arms, it’s time to attach the cleats to your cycling shoes. Follow these steps:
- Using the appropriate bolts and washers, secure the cleats to the designated holes on the soles of your cycling shoes.
- Ensure that the cleats are aligned properly according to the measurements you took earlier.
- Tighten the bolts securely, but be careful not to overtighten them as this can damage the cleats or the sole of your shoes.
Engage cleats into pedals
With the cleats securely attached to your cycling shoes, it’s time to engage them into the pedals. Here’s how:
- Position your foot with the cleat over the pedal.
- Push down firmly to engage the cleat into the pedal mechanism.
- Listen for a click or feel for a secure connection between your foot and the pedal.
Hand-tighten pedals until snug
Before using a pedal wrench, it’s important to hand-tighten the pedals until they are snug. This will help prevent them from coming loose while you’re riding. Here’s how:
- Using your hand, turn the pedals clockwise to tighten them into the crank arms.
- Make sure both pedals are tightened evenly.
Use pedal wrench to tighten pedals securely
Once the pedals are hand-tightened, you can use a pedal wrench to tighten them securely. This will ensure that they are firmly attached and won’t come loose during your rides. Follow these steps:
- Place the pedal wrench on the flats of the pedal axle.
- Hold the crank arm steady with one hand while turning the wrench clockwise with the other hand.
- Tighten the pedals as much as you can without exerting excessive force.
- Check that the pedals are secure by trying to move them laterally. If they feel loose, use the pedal wrench to tighten them further.
Now that you know how to install clipless pedals, it’s time to hit the road and enjoy the benefits of a more connected and efficient ride!
Common Mistakes To Avoid
Cross-threading pedals during installation
One common mistake to avoid when installing bicycle pedals is cross-threading. Cross-threading occurs when the threads of the pedal and the crank arm do not align properly, leading to difficulty in tightening or loosening the pedals. This can result in stripped threads and a damaged crank arm, making it extremely difficult to remove or replace the pedals in the future.
To prevent cross-threading, it’s crucial to carefully align the threads before starting the installation process. Take your time and make sure the pedal threads are correctly aligned with the crank arm threads.
Over-tightening pedals, which might damage threads
Over-tightening your bicycle pedals is another mistake you should avoid. Applying excessive force when tightening the pedals can lead to damaged threads, making it challenging to remove or replace the pedals in the future.
It’s important to remember that pedals need to be securely tightened, but excessive force is unnecessary and can cause harm. The recommended torque for pedal installation is typically between 30 to 40 Newton-meters (Nm). Using a torque wrench can help ensure you tighten the pedals to the proper specifications, preventing any damage to the threads.
Neglecting to grease or apply threadlocker to pedal threads, ensuring
Another mistake that people often make when installing bicycle pedals is neglecting to grease or apply threadlocker to the pedal threads. This crucial step can help prevent the pedals from loosening during rides, ensuring your safety and avoiding any potential accidents.
Greasing the pedal threads creates a smooth interface, allowing easier installation and reducing the likelihood of threads seizing or rusting over time. Alternatively, you can also use threadlocker, which helps secure the pedal threads, preventing them from loosening due to vibrations while riding.
Before installing the pedals, apply a thin layer of grease or threadlocker to the threads, ensuring even coverage. This will help maintain a tight fit and minimize any chances of the pedals coming loose while you’re out on your bike.
Safety Tips For Pedal Installation
Ensure both left and right pedals are correctly installed
One of the most important safety tips when it comes to installing bicycle pedals is to ensure that both the left and right pedals are correctly installed. This may sound obvious, but it’s a crucial step that is often overlooked. Incorrectly installed pedals can loosen or even detach while riding, leading to accidents and injuries. So, how do you make sure you have the right pedal on the right side and the left pedal on the left side?
To ensure proper installation, remember the basic rule: Righty tighty, lefty loosey. The right pedal is installed on the right side of the bike, and you should turn it clockwise to tighten it. The left pedal is installed on the left side, and you should turn it counterclockwise to tighten it. Make sure you correctly identify the left and right pedals before installation, as mixing them up can lead to major problems.
Check pedal tightness after a few rides
Once you’ve installed both pedals correctly, it’s important to check their tightness after riding for a few miles. This is to ensure that they haven’t become loose due to the vibrations and movements during the rides. Loose pedals can cause instability and affect your control over the bicycle, putting you at risk of accidents.
To check the tightness of the pedals, use a pedal wrench or a 15mm open-end wrench. Hold the crank arm steady with one hand and use the wrench to turn the pedal axle in a clockwise direction. If there is any movement or play in the pedal, it needs to be tightened further. On the other hand, if the pedals are difficult to turn, they may be too tight, and it’s important to loosen them slightly. Finding the right balance of tightness will ensure the pedals stay securely in place while allowing smooth and efficient pedaling.
Wear appropriate safety gear during installation
When installing bicycle pedals, it’s essential to prioritize your safety. This means wearing appropriate safety gear to protect yourself during the installation process. Even though it might seem like a simple task, accidents can happen, and it’s better to be safe than sorry.
Before getting started, put on a pair of protective gloves to shield your hands from potential injuries. It’s also advisable to wear safety glasses to protect your eyes from any flying debris or particles during the installation. Additionally, consider wearing closed-toe shoes or safety boots to protect your feet from accidental slips or impact.
By following these safety tips for pedal installation, you can ensure a secure and enjoyable riding experience. Remember to correctly install both the left and right pedals, check their tightness periodically, and wear appropriate safety gear throughout the process. By taking these precautions, you’ll be well on your way to pedal with confidence and peace of mind.
Loose Pedals
If your bicycle pedals feel loose or wobbly, it’s essential to address the issue promptly to ensure a safe and comfortable riding experience. Loose pedals can lead to inefficient pedaling, reduced power transfer, and even accidents. In this section, we’ll guide you through the steps to check for inadequate tightening and inspect crank threads for potential damage.
Check for Inadequate Tightening
Before inspecting the crank threads, it’s important to verify whether the pedals are adequately tightened. Loose pedals can often be resolved by simply tightening them properly. To check for inadequate tightening, follow these steps:
- Grab a pedal wrench or a 15mm wrench, depending on the pedal type.
- Position the wrench on the pedal spindle, ensuring a solid grip.
- Turn the wrench clockwise to tighten the pedal.
- Apply force until you feel resistance and the pedal no longer feels loose.
- Repeat the process for the other pedal.
Tightening the pedals should effectively resolve any looseness in most cases. However, if the problem persists, it’s essential to inspect the crank threads for potential damage.
Inspect Crank Threads for Damage
In some instances, loose pedals may indicate damage to the crank threads, requiring further attention. To inspect the crank threads, follow these steps:
- Remove the pedals using the appropriate wrench.
- Examine the threads on the crank arms and the pedals.
- Look for signs of stripping, cross-threading, or any visible damage.
- If you notice any damage, it’s recommended to consult a professional mechanic to assess the severity and determine the best course of action.
- If the threads appear undamaged, carefully reinstall the pedals following the correct installation procedure.
By inspecting and addressing any potential damage to the crank threads, you can ensure the stability and longevity of your bicycle pedals, minimizing the risk of further looseness.
Remember, it’s crucial to maintain a secure connection between the pedals and the crank arms to enjoy a smooth and safe riding experience. Regularly check for loose pedals and take appropriate measures to tighten or repair them when needed.
Stuck Pedals
When it comes to installing bicycle pedals, sometimes you may encounter a frustrating issue – stuck pedals. This can happen due to various reasons, such as rust or thread damage. However, fear not! With the right approach and tools, you can easily tackle this problem and get your pedals installed smoothly. In this section, we will discuss two effective methods to deal with stuck pedals.
Apply lubricant or rust dissolver to stuck pedal threads
If the pedals are stuck due to rust or corrosion, applying a lubricant or rust dissolver can work wonders. This will help loosen the pedal threads and make it easier to remove and install the pedals. Here are the steps to follow:
- First, carefully clean the pedal threads using a clean cloth or brush to remove any dirt or debris.
- Next, apply a generous amount of lubricant or rust dissolver to the stuck pedal threads. You can use specialized products like WD-40 or penetrating oil.
- Allow the lubricant or rust dissolver to penetrate and work its magic for a few minutes. This will help break up the rust and make the threads easier to turn.
- With the help of a pedal wrench, attempt to unscrew the stuck pedal in a counterclockwise direction. Apply steady pressure while turning, but be careful not to use excessive force that may damage the threads.
- If the pedal starts to loosen, continue unscrewing it until it is completely removed. Clean the threads and apply a small amount of grease before installing the new pedals.
Use pedal wrench with additional leverage if necessary
If the pedals are still stubbornly stuck even after applying lubricant or rust dissolver, you may need to exert more force using a pedal wrench with additional leverage. Follow these steps:
- Securely position your bicycle so that it doesn’t move or tip over during the pedal removal process. This can be done by using a bicycle stand or having a helper hold the bike steady.
- Attach the pedal wrench to the stuck pedal, ensuring a strong grip on the wrench handle.
- If necessary, you can use a long pipe or an extension tool to provide extra leverage. Slide the pipe over the end of the wrench handle, increasing your leverage and making it easier to turn the pedal.
- With a firm grip on the wrench and pipe, apply controlled force in a counterclockwise direction to loosen the stuck pedal. Take care not to apply excessive force that may cause injury or damage to the bike.
- Once the pedal starts to turn, continue rotating until it is fully unscrewed.
By following these methods, you can overcome the frustration of stuck pedals and successfully install the new pedals on your bicycle. Remember to always exercise caution and be patient during the process to avoid any mishaps. Happy pedaling!
Stripped Pedal Threads
One of the common issues cyclists face when installing bicycle pedals is stripped pedal threads. This refers to the condition when the threads on the crank arm or the pedal become damaged or worn out, making it difficult or even impossible to screw the pedal in securely. Stripped pedal threads can occur due to various reasons, such as incorrect installation, over-tightening, or using the wrong pedal wrench.
Seek professional help to repair or replace crank arm
If you encounter stripped pedal threads, it is important to address the issue promptly to avoid further damage to your bicycle and potential accidents while riding. In some cases, you may be able to salvage the situation by seeking professional help to repair or replace the crank arm.
Professional bicycle mechanics have the expertise and specialized tools required to fix stripped threads effectively. They can rethread the crank arm or install a helicoil insert to restore the threads’ integrity. If the damage is beyond repair, they can also replace the crank arm entirely.
| Advantages of seeking professional help: |
|---|
| Accurate assessment of the damage. |
| Expertise in repairing or replacing crank arms. |
| Access to specialized tools and equipment. |
| Ensures safe and secure installation of pedals. |
Avoid using the damaged pedal or crank arm
In the meantime, it is essential to avoid using the damaged pedal or crank arm. Continuing to ride with stripped pedal threads can lead to further thread damage, loosening of the pedal, and potentially causing the pedal to detach while riding. This can result in a loss of control and a risk of accidents.
Using a damaged crank arm can also affect your cycling performance, as it compromises the pedal’s stability and power transfer efficiency. It is best to address the stripped pedal threads issue before embarking on any rides.
- Inspect the crank arm and pedal threads for damage.
- Consider seeking professional help for repair or replacement.
- Temporarily use a different bicycle if available.
- Communicate with your local bike shop for recommendations.
Remember, safety should always be a top priority, and addressing stripped pedal threads promptly will ensure a smooth and secure riding experience.
Frequently Asked Questions On How To Install Bicycle Pedals
What Are The Direction Of Pedals?
The direction of pedals vary depending on the type of vehicle. In a standard car, the accelerator is on the right, the brake is in the middle, and the clutch (if applicable) is on the left. In motorcycles, the throttle is on the right handlebar and the brake is operated by the right foot.
Do Pedals Fit Every Bike?
Pedals do not fit every bike. Compatibility depends on the type of pedal and the bike’s crank arm threading. Always check the pedal and bike specifications before purchasing to ensure a proper fit.
Which Pedal Is Reverse Threaded?
The pedal with reverse threading is the left pedal on bicycles.
Is It Easy To Swap Bike Pedals?
Swapping bike pedals is easy and straightforward. It can be done quickly with basic tools and minimal effort. Just unscrew the old pedals and attach the new ones in their place. Make sure to tighten them securely, and you’re good to go.
Conclusion
To sum it up, learning how to install bicycle pedals is an essential skill for any cyclist. By following the step-by-step guide provided in this blog post, you can easily and efficiently install your pedals with confidence. Remember to use the appropriate tools, apply the correct torque, and double-check for tightness.
With proper installation, your pedals will provide a secure and comfortable ride every time. Happy cycling!