To install bicycle hand grips, remove the old grips and clean the handlebars, then apply grip glue or rubbing alcohol to secure the new grips in place. Installing bicycle hand grips is a simple process that can greatly improve your cycling experience.
By providing better grip and comfort, hand grips enhance your control over the bike and reduce hand fatigue. In this guide, we will explain how to properly install bicycle hand grips. Following these steps will ensure a secure and long-lasting fit for your grips.
Whether you are a seasoned cyclist or a beginner, this guide will help you easily install new hand grips and make your rides more enjoyable. So, let’s get started and learn how to install bicycle hand grips.
Choosing The Right Bicycle Hand Grips
Factors to consider when selecting bicycle hand grips
When it comes to choosing the right bicycle hand grips, there are several factors to consider. Finding the perfect grip can greatly enhance your cycling experience, providing comfort, control, and stability. To help you make an informed decision, here are some key factors to keep in mind:
Finding the right grip size and shape for your hands
The first step in choosing the right bicycle hand grips is finding the perfect size and shape for your hands. Grip size can vary greatly depending on the brand and model, so it’s important to try out different options to see what feels most comfortable. The grip should feel secure without squeezing your hand too tightly or allowing it to slip. Determining the shape of the grip is equally important. Some riders prefer a more ergonomic grip that contours to the natural shape of the hand, while others may prefer a straighter grip for a more traditional feel. It’s all about finding what works best for you and your riding style.
The importance of grip material and texture
Another crucial factor to consider is the grip material and texture. The material should be durable and sturdy, able to withstand the elements and provide long-lasting performance. Popular grip materials include rubber, silicone, and foam, each with its own advantages. Texture is also key when it comes to grip selection. A grip with a textured surface can provide additional traction, preventing your hands from slipping off during sweaty rides or wet conditions. It’s particularly important if your rides involve off-road or mountain biking, where a secure grip is essential. In conclusion, when choosing the right bicycle hand grips, it’s important to consider factors such as size, shape, material, and texture. By finding the perfect grip for your hands and riding style, you can ensure a comfortable and controlled cycling experience. Don’t be afraid to try out different options and ask for recommendations from fellow cyclists or professionals at your local bike shop. Happy cycling!
Removing The Old Hand Grips
Whether you’re replacing your bicycle hand grips for cosmetic reasons or because they are worn out, removing the old grips is the first step towards a successful installation. In this article, we will guide you through the process of removing old hand grips without damaging the handlebars. We will also provide tips to deal with stubborn or stuck grips. Let’s get started!
Tools needed for removing old grips
Before you begin, make sure you have the following tools handy:
- Flathead screwdriver
- Isopropyl alcohol or rubbing alcohol
- Clean cloth or rag
Step-by-step guide for removing old grips without damaging the handlebars
Follow these simple steps to remove your old bicycle hand grips safely:
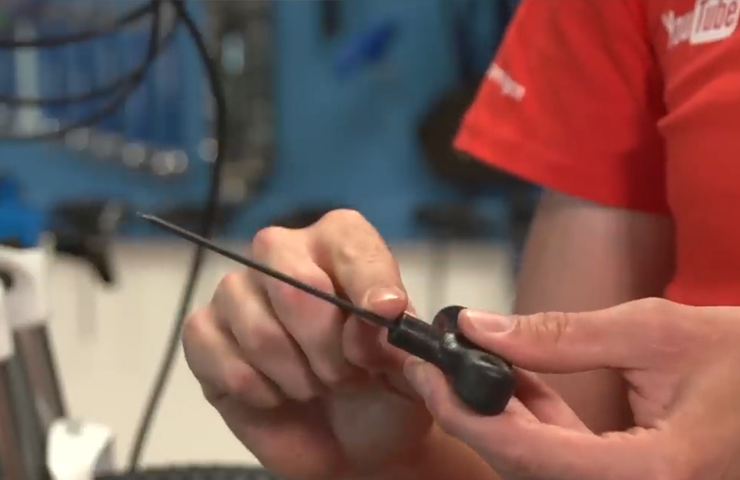
- First, determine if your old grips are attached with adhesives. If they are, you will need to warm them up with a hairdryer set to low heat. Heating the grips will loosen the adhesive bond, making it easier to remove.
- Once the grips are warmed up, use a flathead screwdriver to carefully pry the edges of the grip away from the handlebars. Take your time and work your way around the entire grip, gently lifting it up as you go.
- If the grips are not attached with adhesives, they may be secured with an end plug or a clamp. In this case, locate the end plug or clamp and remove it first before proceeding to remove the grip.
- With the grip loosened or the clamp removed, grasp the grip firmly and twist it back and forth while pulling it away from the handlebars. The twisting motion will help break any remaining bond between the grip and the handlebars. Continue twisting and pulling until the grip comes off entirely.
- Once the grip is removed, inspect the handlebars for any residue or adhesive left behind. If there is any, use isopropyl alcohol or rubbing alcohol and a clean cloth or rag to wipe it off. This will ensure a clean surface for installing the new grips.
Tips for dealing with stubborn or stuck grips
If your old hand grips are being tricky and you’re finding them hard to remove, here are a few tips to help you out:
- If your grips are made of rubber, applying a small amount of soapy water or window cleaner to the inside of the grip can lubricate the surface and make it easier to slide off.
- Using an air compressor or compressed air can also be useful in forcing air between the grip and handlebars, creating enough of a gap to loosen the grip.
- If all else fails, cutting off the old grips with a utility knife can be an effective last resort. Just be extremely cautious not to damage the handlebars or yourself while doing so.
By following these steps and tips, you will be able to remove your old bicycle hand grips effortlessly, preparing the way for a smooth installation of your new grips. Stay tuned for our upcoming article on installing new bicycle hand grips!
Installing New Bicycle Hand Grips
If you’re an avid cyclist, you know how important it is to have a comfortable and secure grip on your handlebars. Over time, hand grips can wear down or become damaged, leading to discomfort and reduced control while riding. Installing new bicycle hand grips is a simple process that can make a world of difference in your cycling experience. In this article, we will guide you through step-by-step instructions for installing new grips securely, ensuring proper alignment and comfort along the way.
Tools required for installing new hand grips
Before you begin the installation process, make sure you have the following tools on hand:
| Tools |
|---|
| Allen wrench or screwdriver (depending on your bicycle’s handlebar type) |
| Rubbing alcohol or soapy water |
| New hand grips |
Step-by-step instructions for installing the grips securely
Now that you have gathered all the necessary tools, let’s get started with the installation:
- Remove the old hand grips: Use an Allen wrench or screwdriver to loosen and remove any bolts or screws securing the old hand grips. Gently twist and pull the old grips off the handlebars.
- Clean the handlebars: Before installing the new hand grips, it’s important to remove any dirt, grease, or residue from the handlebars. This will ensure a secure and long-lasting grip. Use rubbing alcohol or soapy water to thoroughly clean the handlebars. Let them dry completely before proceeding to the next step.
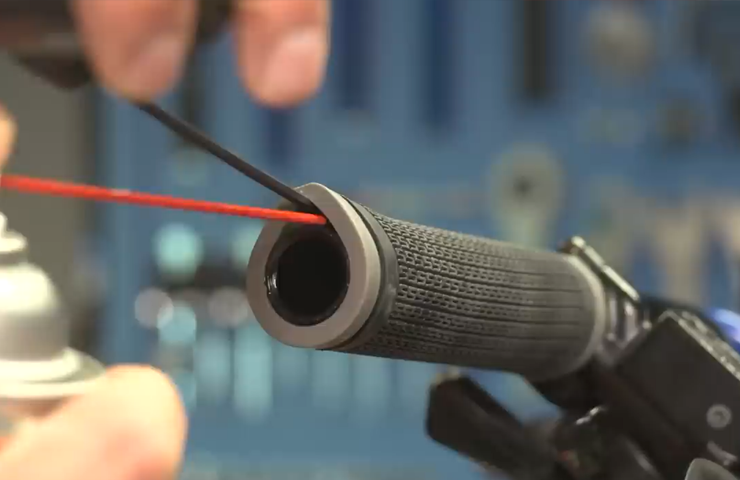
- Prepare the new hand grips: If your new hand grips come with an adhesive backing, remove the protective layer. This adhesive layer will help keep the grips in place during your rides.
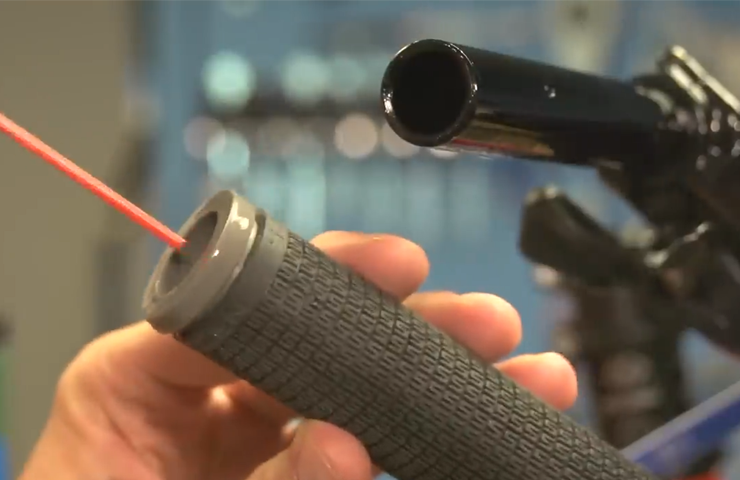
- Align the new hand grips: Start by aligning one end of the new grip with the edge of the handlebar. Slowly and firmly push the grip onto the handlebar, applying even pressure. Continue pushing the grip until it is fully in place.
- Repeat the process for the other grip: Once the first grip is securely installed, repeat the alignment and pushing process for the other grip. Make sure both grips are aligned evenly and snugly on the handlebars.
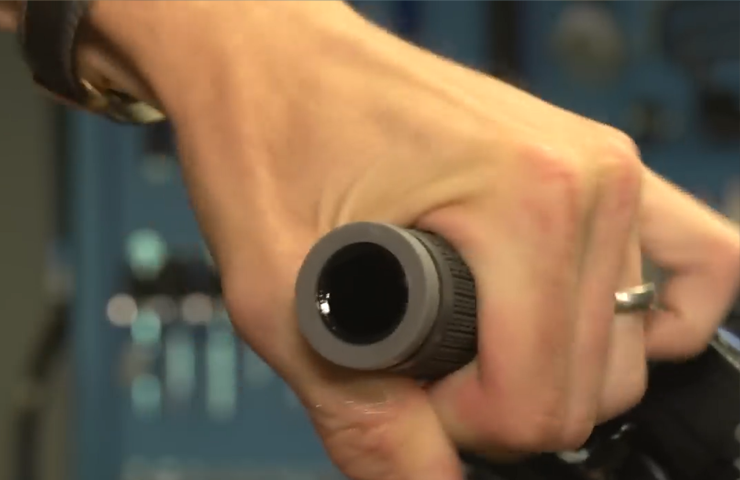
- Double-check the grips: After both grips are installed, give them a firm tug to ensure they are securely in place. If they slide or rotate, readjust them until they are firmly seated on the handlebars.
Ensuring proper alignment and comfort

Proper alignment and comfort are crucial for a pleasant cycling experience. Here are a few tips to ensure your hand grips are aligned correctly and provide maximum comfort:
- Place your hands on the grips and make sure they feel comfortable. Adjust the position of the grips if necessary.
- Check that the grips are parallel to the ground and not at an awkward angle.
- If your grips have a pattern or texture, ensure the pattern lines up with your hand placement for added grip and control.
By following these steps, you can easily install new bicycle hand grips and enjoy a more comfortable and secure ride. Remember to check the grips periodically for any signs of wear or loosening, and replace them as needed to maintain optimal performance on your bike.
Enhancing Grip Comfort And Performance
If you’re an avid cyclist, you know the importance of having a secure and comfortable grip on your bicycle handlebars. The right hand grips can drastically improve your control and overall riding experience. In this article, we’ll discuss how to install bicycle hand grips and focus on enhancing grip comfort and performance.
Adjusting grip angle and position for optimal comfort
One of the key factors in achieving a comfortable grip is adjusting the angle and position of your hand grips. Every cyclist has a unique preference, so it’s essential to find the most comfortable position for you. Follow these steps to adjust your grip angle and position:
- Loosen the bolts or clamps that secure your hand grips in place.
- Experiment with different angles by rotating the grips until you find the most comfortable position.
- Tighten the bolts or clamps to secure the grips in the chosen position.
By adjusting the grip angle and position, you can find the sweet spot that offers optimal comfort during your rides.
Tips for reducing hand fatigue and improving grip control
Hand fatigue is a common issue among cyclists, especially during long rides. Luckily, there are several tips you can follow to reduce hand fatigue and improve your grip control:
- Ensure your bike’s handlebars are at the appropriate height and width for your body size.
- Keep a relaxed grip on the handlebars, avoiding excessive tension in your hands and wrists.
- Take breaks during long rides to stretch and relax your hands.
- Consider using padded gloves or handlebar tape to absorb vibration and reduce pressure on your hands.
By incorporating these tips into your cycling routine, you’ll be able to ride longer and with greater control, reducing hand fatigue.
Using grip accessories to enhance performance
Aside from adjusting grip angles and following fatigue-reducing tips, you can further enhance your grip comfort and performance by utilizing grip accessories. Here are some popular grip accessories for cyclists:
| Grip Accessory | Function |
|---|---|
| Bar-ends | Provide extra hand positions, reducing strain on wrists and providing more control. |
| Foam or gel inserts | Offer additional cushioning, absorbing road vibrations and minimizing hand discomfort. |
| Ergonomic grips | Designed to support the natural shape of your hands, reducing pressure points and increasing comfort. |
Using these grip accessories can make a significant difference in your grip comfort and overall cycling performance. Experiment with different accessories to find the ones that work best for you.
By adjusting grip angles, following hand fatigue reduction tips, and utilizing grip accessories, you’ll be on your way to achieving optimal grip comfort and performance on your bicycle. Enjoy your rides with a secure and comfortable grip!
Maintaining And Caring For Bicycle Hand Grips
Cleaning and maintaining grips for longevity
To ensure the longevity of your bicycle hand grips, it is crucial to clean and maintain them regularly. Dirt, sweat, and grime can accumulate on your grips over time, affecting their performance and comfort. Here are some steps you can follow to keep your grips clean:
- Start by removing the grips from your bicycle handlebars. This can be done by loosening the screws or using some soapy water to loosen them.
- Once the grips are off, rinse them with water to remove any surface dirt or debris.
- Use a mild soap or a specialized grip cleaner to thoroughly clean the grips. You can use a soft brush or cloth to gently scrub away any stubborn dirt.
- Rinse the grips again with water to remove any remaining soap residue.
- Dry the grips completely before re-installing them. Avoid using heat sources such as hairdryers, as they can damage the grips.
By regularly cleaning your hand grips, you can extend their lifespan and maintain their grip and comfort while riding.
Inspecting grips for wear and tear
It is important to inspect your bicycle hand grips for any signs of wear and tear. Over time, grips can become worn and lose their original shape, compromising their effectiveness. Here’s how you can inspect your grips:
- Check for cracks or tears in the grip material. This can happen due to age, excessive use, or exposure to harsh weather conditions.
- Look for any signs of wear on the grip pattern. If the grip feels smoother than usual or if the pattern is significantly worn down, it might be time to replace the grips.
- Examine the grip ends for any damage. The ends of the grips can wear out faster, especially if the bike is regularly leaned against walls or dropped on hard surfaces.
Regularly inspecting your hand grips will help you identify any potential issues early on and prevent accidents or discomfort while riding.
When to replace hand grips
Knowing when to replace your bicycle hand grips is essential for maintaining a safe and comfortable riding experience. Here are some signs that indicate it’s time to replace your grips:
- If there are cracks or tears in the grip material that cannot be repaired.
- If the grip pattern is completely worn down, making it difficult to maintain a secure grip on the handlebars.
- If the grips feel excessively slippery, even after cleaning.
- If the grips are stretched or deformed, causing discomfort or making it harder to control the bike.
- If the grips are damaged at the ends, exposing the handlebars or affecting the bike’s aesthetics.
Replacing your hand grips when necessary will ensure optimal performance, safety, and comfort during your rides.
Riding Safely With Properly Installed Hand Grips
When it comes to riding a bicycle, proper hand grips are essential for several reasons. Not only do they offer comfort during long rides, but they also play a crucial role in bike control and overall safety. By installing hand grips correctly, riders can improve their grip on the handlebars, enhance shock absorption, and avoid common mistakes that may lead to accidents. In this article, we will discuss the impact of hand grips on bike control, how to choose grips that provide better shock absorption, and the common mistakes to avoid when installing hand grips. So, let’s dive in!
The impact of hand grips on overall bike control
Bicycle hand grips are more than just accessories; they significantly affect overall bike control. When properly installed, hand grips improve riders’ ability to steer, accelerate, and brake effectively. By providing a comfortable and secure hold on the handlebars, they enhance control and reduce the risk of slipping or losing control in challenging terrains or sudden maneuvering situations.
Choosing grips that provide better shock absorption
When riding on bumpy or uneven surfaces, shocks and vibrations can be absorbed by the hand grips, preventing them from transmitting to the rider’s hands, wrists, and arms. This not only enhances comfort during the ride but also reduces the risk of developing long-term injuries like numbness or tingling in the hands. When selecting hand grips, riders should prioritize those that offer excellent shock absorption properties. Grips made from materials like rubber or foam are known for their ability to absorb shocks effectively and provide a cushioning effect.
Common mistakes to avoid when installing hand grips
Installing hand grips may seem like a simple task, but it’s crucial to do it correctly to avoid potential safety hazards. Here are some common mistakes to avoid:
- Using improper tools: Make sure to use the appropriate tools, such as a wrench or Allen key, to tighten the grips securely. Avoid using excessive force, as it may damage the grips or handlebars.
- Inadequate grip alignment: Ensure that the grips are aligned correctly with the handlebars. Uneven or misaligned grips can lead to discomfort and reduced control while riding.
- Forgetting to remove old grips: Before installing new hand grips, remove any old ones that may still be attached to the handlebars. This ensures a clean and secure installation.
- Not applying grip glue: Apply a small amount of grip glue or adhesive to the handlebars and inside the grips to prevent them from loosening during rides. This extra step ensures a firm and reliable grip.
By avoiding these common mistakes and following proper installation techniques, riders can ensure their hand grips are securely fitted and ready for safe and enjoyable rides.
Frequently Asked Questions For How To Install Bicycle Hand Grips
How Do You Install Grips Easily?
To easily install grips, follow these steps: 1. Remove the old grips from your handlebar. 2. Apply a small amount of grip glue or soapy water to the inside of the new grip. 3. Slide the grip onto the handlebar, ensuring it’s fully in place.
4. Let it dry for a few hours (if using grip glue). 5. Enjoy a secure and comfortable grip on your handlebar.
How Do You Install A Hand Grip?
To install a hand grip, follow these steps: 1. Ensure the handlebar is clean and dry. 2. Apply soapy water or rubbing alcohol to the inside of the grip. 3. Slide the grip onto the handlebar, aligning it properly. 4.
Use a twisting motion while pushing the grip onto the handlebar. 5. Let it dry for a few hours before using.
How Do You Replace Hand Grips On A Bike?
To replace hand grips on a bike, first, remove the old grips by cutting or pulling them off. Then, clean the handlebars and handlebar ends. Apply soapy water or rubbing alcohol to the new grips and slide them onto the handlebars.
Ensure the grips are secure and aligned before tightening any screws or clamps.
Are Bike Grips Glued On?
Yes, bike grips are typically glued onto the handlebars for a secure fit.
Conclusion
Installing bicycle hand grips is a simple yet essential task that every cyclist should know. By following the step-by-step guide provided in this blog post, you can ensure a comfortable and secure grip on your handlebars. Don’t overlook the importance of replacing worn-out or damaged hand grips, as they can greatly affect your riding experience.
Remember to choose the right type of hand grips and use the proper tools for installation. Happy cycling!