To install a battery terminal, first, remove the old terminal by loosening the nut and disconnecting the wire. Then, attach the new terminal by sliding it onto the battery post and tightening the nut securely.
Installing a battery terminal is a simple process that anyone can do with a few basic tools. Whether you’re replacing an old terminal or upgrading to a new one, this guide will walk you through the steps. By following the steps below, you can ensure a secure connection for your battery, which is essential for proper functioning of your vehicle.
Don’t worry if you’re not a car expert – this process is straightforward and does not require any specialized knowledge. Just gather the necessary tools and follow these instructions to complete the installation successfully.
Understanding Battery Terminal Types
When it comes to installing a battery terminal, it is important to understand the different types available. Choosing the right battery terminal type is crucial for ensuring a secure connection and optimal performance of your vehicle’s electrical system. In this section, we will delve into the various battery terminal options, their advantages, and disadvantages, assisting you in making an informed decision.
Different types of battery terminals
There are primarily three types of battery terminals commonly used in automotive applications:
- Top post terminals
- Side post terminals
- Universal terminals
Top post terminals: These are the most common type of battery terminals found in vehicles. They feature a round post that protrudes from the top of the battery. Top post terminals are reliable and easy to install, as they generally require no additional tools. They are compatible with a wide range of battery cables and provide a secure connection.
Side post terminals: Unlike top post terminals, side post terminals are situated on the side of the battery. They are often found in vehicles with limited space under the hood or in certain non-automotive applications. Side post terminals are compact and facilitate easy access for connecting and disconnecting the battery. However, they may not provide as secure a connection as top post terminals.
Universal terminals: As the name suggests, universal terminals are designed to accommodate both top and side post battery terminals. They offer flexibility and convenience, as they can be used in various applications. Universal terminals typically feature a clamp mechanism, allowing for quick and easy installation.
Advantages and disadvantages of each type
| Battery Terminal Type | Advantages | Disadvantages |
|---|---|---|
| Top post terminals | Reliable and secure connectionEasy to installCompatible with most battery cables | May require occasional cleaning and maintenanceLess suitable for vehicles with limited hood space |
| Side post terminals | Compact design for space-restricted installationsEasy access for connecting and disconnecting | May not provide as secure a connection as top post terminalsMay require specific battery cables |
| Universal terminals | Compatible with both top and side post battery terminals/li>Quick and easy installation with clamp mechanism | Less common and may be harder to findMay require additional accessories |
Understanding the advantages and disadvantages of each battery terminal type allows you to select the most suitable one for your specific requirements. Whether you prioritize ease of installation, space constraints, or universal compatibility, making an informed decision ensures a successful battery terminal installation.
Selecting The Right Battery Terminal For Your Vehicle
When it comes to installing a battery terminal in your vehicle, it’s important to choose the right one that not only fits securely but also meets your vehicle’s specifications. Whether you’re a car enthusiast or a DIYer, selecting the perfect battery terminal can make a significant difference in the performance and longevity of your vehicle’s electrical system. In this guide, we’ll take a closer look at the factors you should consider when choosing a battery terminal, along with how to match it to your vehicle’s specifications.
Factors to consider when choosing a battery terminal
When selecting a battery terminal, there are several important factors that you should keep in mind. These factors can help you make an informed decision and ensure that the battery terminal you choose is the right fit for your vehicle. Let’s explore these factors below:
Matching the battery terminal to your vehicle’s specifications
To ensure optimal performance and compatibility, it’s crucial to match the battery terminal with your vehicle’s specifications. Each vehicle has different requirements and limitations, and selecting a battery terminal that adheres to these specifications is essential.
1. Battery Type: The first thing you need to consider is the type of battery your vehicle uses. Whether it’s a standard lead-acid battery, AGM (Absorbent Glass Mat) battery, or a lithium-ion battery, you must choose a battery terminal that is compatible.
2. Terminal Size: Battery terminals come in various sizes, such as 3/8 inch, 5/16 inch, and 1/4 inch. It’s essential to check your vehicle’s battery post size and select a terminal with the corresponding size to ensure a secure and tight fit.
3. Cable Connection: Another factor to consider is how the terminal connects to the cable. There are different types of cable connections, including stud connections and crimp connections. Ensure that the battery terminal you choose matches the connection type of your vehicle’s cables.
4. Current Capacity: The current capacity, also known as the gauge or wire size, determines how much current can flow through the terminal. It’s crucial to match the battery terminal’s current capacity to your vehicle’s electrical system requirements. Incorrect sizing can lead to overheating, voltage drops, and potential damage to the electrical components.
5. Material and Coating: Battery terminals are typically made of materials like lead, brass, or stainless steel. Each material has its own pros and cons, such as corrosion resistance and conductivity. Consider the environment and climate in which your vehicle operates and choose a terminal with the appropriate coating or plating to ensure durability and longevity.
By considering these factors and matching the battery terminal to your vehicle’s specifications, you can ensure a secure and reliable electrical connection. Taking the time to choose the right battery terminal can save you from potential issues and ensure optimal performance for your vehicle.
Now that you know the factors to consider when choosing a battery terminal and how to match it to your vehicle’s specifications, you’re ready to install the battery terminal with confidence. Stay tuned for our upcoming guide on the installation process to complete your vehicle’s electrical system upgrade.
Gathering The Necessary Tools
When it comes to installing battery terminals, it is essential to gather the necessary tools beforehand. By having the right tools for the job, you can ensure a smooth and hassle-free installation process. In this section, we will provide you with a comprehensive list of tools required for battery terminal installation and highlight the importance of having the correct tools for the task at hand.
List of Tools Required for Battery Terminal Installation
To successfully install battery terminals, you will need the following tools:
| Tool | Description |
|---|---|
| Socket Wrench | A socket wrench is used to fasten and loosen nuts and bolts on the battery terminals. |
| Wire Brush | A wire brush helps in removing any corrosion or dirt from the battery terminals for a clean connection. |
| Terminal Cleaner | A terminal cleaner is specifically designed to remove oxidation and buildup from the battery terminals. |
| Protective Gloves | Protective gloves will safeguard your hands from any potential harm during the installation process. |
| Battery Terminal Cleaner Spray | A battery terminal cleaner spray is a cleaner that removes any contaminants from the battery terminals effectively. |
| Side Cutters | Side cutters are useful for cutting and removing any excess wire or cable during the installation. |
Importance of Having the Right Tools for the Job
Having the right tools for installing battery terminals is crucial for several reasons. Firstly, using the correct tools ensures that you can perform the installation accurately and efficiently. The socket wrench allows you to securely tighten the nuts and bolts of the battery terminals, creating a solid connection that minimizes the risk of loose connections or electrical faults.
Secondly, using a wire brush and terminal cleaner helps in maintaining the cleanliness of the battery terminals. Corrosion and dirt can hinder the conductivity of the terminals, leading to poor electrical performance. With a wire brush and terminal cleaner, you can remove any oxidation or buildup, ensuring optimal contact between the battery and the terminals.
Thirdly, protective gloves are essential to protect your hands from any potential harm during the installation process. Battery terminals can carry a significant amount of electrical current, and it is essential to prioritize your safety by wearing gloves.
By having the necessary tools at your disposal, you can streamline the battery terminal installation process, promote better electrical performance, and ensure your safety throughout the entire procedure. Now that you know the importance of having the right tools, let’s move on to the next section to understand the step-by-step process of installing battery terminals.
Gathering The Required Materials
Before you start the process of installing a battery terminal, it’s important to gather all the necessary materials to ensure a smooth and efficient installation. By having everything you need on hand, you can avoid unnecessary delays and interruptions during the process. In this section, we will discuss the types of materials you will need for battery terminal installation.
Types of materials needed for battery terminal installation
When it comes to installing battery terminals, there are a few key materials that you will need to have. These materials include:
- Battery terminal – This is the main component of the installation process. The battery terminal is responsible for connecting the battery to the electrical system of your vehicle. It is important to choose a high-quality terminal that is compatible with your battery type.
- Wrench or pliers – A wrench or pliers will be necessary to remove the old battery terminal and tighten the new one securely. It is important to choose a tool that fits snugly to ensure a proper connection.
- Wire brush or sandpaper – Before installing the new battery terminal, it is essential to clean the battery posts and terminals thoroughly. A wire brush or sandpaper can be used to remove any corrosion or debris, ensuring a clean and efficient connection.
- Protective gloves and safety glasses – Safety should always be a priority when working with batteries. Wearing protective gloves and safety glasses can prevent any potential accidents or injuries.
- Battery terminal cleaner and protector – Using a battery terminal cleaner and protector can help maintain the overall health and lifespan of your battery. This product can remove any corrosion and protect the terminals from future damage.
- Anti-corrosion felt pads or washers – To further protect the battery terminals from corrosion, anti-corrosion felt pads or washers can be applied. These pads act as a barrier between the terminals and the battery, reducing the risk of corrosion.
By ensuring you have all these necessary materials before starting the installation process, you can save yourself time and effort. With everything in place, you will be well-prepared to successfully install the battery terminal and maintain the overall health of your vehicle’s electrical system.
Preparing For The Installation
Safety Precautions to Take Before Starting the Installation
Before you begin installing battery terminals, it’s crucial to prioritize your safety. Taking the necessary precautions will help prevent any accidents or damage to yourself or your vehicle. To ensure a smooth and safe installation process, here are some safety measures you should keep in mind:
- Work in a well-ventilated area: It’s recommended to install the battery terminals in a well-ventilated area, preferably outdoors or in a garage with the door open. This will help dissipate any potentially harmful fumes and prevent the accumulation of explosive gases that may be emitted during the installation process.
- Wear protective gear: When working with batteries, it’s essential to wear protective gear to minimize the risk of injury. Remember to equip yourself with gloves, safety goggles, and appropriate clothing that covers your skin to safeguard against any potential chemical spills or accidents.
- Avoid smoking and open flames: Battery chemicals are highly flammable, so it’s crucial to avoid any sources of open flames or sparks in the vicinity. Smoking should be strictly prohibited during the installation process.
- Keep children and pets away: To prevent accidents and distractions, it’s advisable to keep children and pets away from the installation area. Batteries contain corrosive substances that can cause harm if ingested or exposed to skin.
- Use insulated tools: When handling battery terminals, always use insulated tools to minimize the risk of short circuits or electric shock. Insulated wrenches or pliers will help prevent unintentional contact with live electrical connections.
- Turn off the ignition: Before you begin the installation process, ensure that the vehicle’s ignition is turned off. This will prevent any electrical surges or accidental starting of the engine, reducing the risk of injury.
Disconnecting the Battery for Safe Handling
Disconnecting the battery is a crucial step in preparing for the installation of battery terminals. This process ensures safe handling and prevents accidental electrical shocks. To disconnect the battery correctly, follow these simple steps:
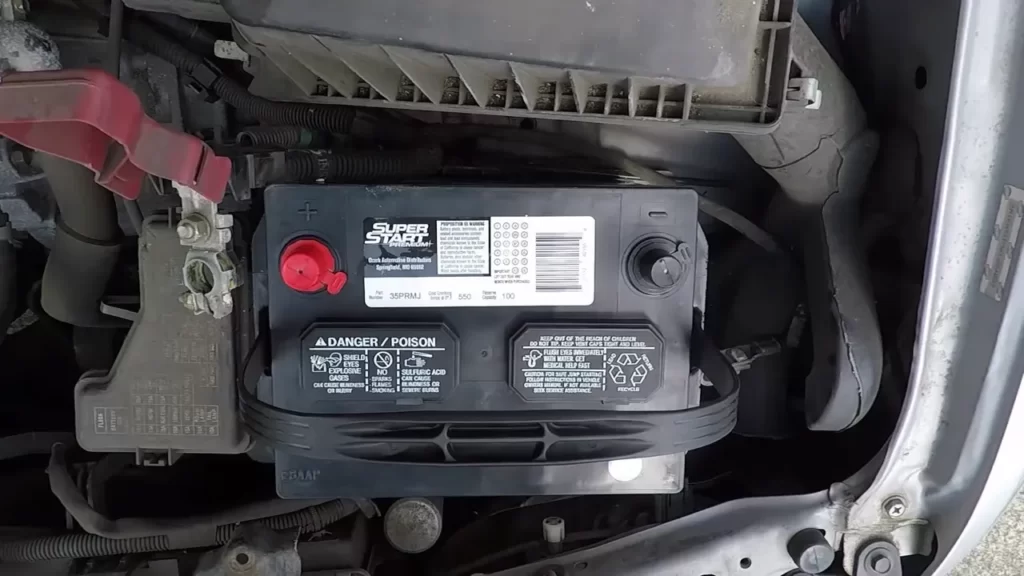
- Locate the battery: Firstly, locate the battery in your vehicle. The battery is typically found under the hood or in the trunk, depending on the make and model of your vehicle.
- Identify the positive and negative terminals: Once you’ve found the battery, identify the positive and negative terminals. The positive terminal is usually marked with a (+) symbol, while the negative terminal is marked with a (-) symbol.
- Remove the negative (black) cable: Start by using an appropriately-sized wrench or pliers to loosen and remove the negative (black) cable from its terminal. Be cautious not to touch any metal surfaces with the wrench while doing this step.
- Remove the positive (red) cable: After safely disconnecting the negative cable, proceed to loosen and remove the positive (red) cable in the same manner.
- Secure the cables: To avoid accidental reconnection, it’s recommended to secure the disconnected cables away from the battery terminals. Tuck them aside and ensure they won’t come into contact with any metal parts.
By following these safety precautions and correctly disconnecting the battery, you’ll be well-prepared to proceed with the installation of your battery terminals. Ensuring your safety and abiding by the necessary steps will lead to a successful and hassle-free installation process.
Removing The Old Battery Terminal
When it comes to replacing a battery in a vehicle, one crucial step is removing the old battery terminal. This process ensures a smooth installation of the new terminal, maintaining the efficiency and functionality of the battery. Follow these simple steps and use the right tools and techniques for safely detaching the terminal.
Steps to remove the existing battery terminal
- Start by gathering the necessary tools. To safely remove the battery terminal, you will need:
- A pair of safety glasses
- A pair of gloves
- Adjustable wrench (or a battery terminal puller)
- Put on the safety glasses and gloves before proceeding to protect yourself from any potential accidents.
- Locate the battery in your vehicle. It is typically found under the hood. Ensure that the engine is off and the keys are removed from the ignition.
- Identify the negative terminal (-) and the positive terminal (+) of the battery. The negative terminal is usually marked with a minus sign (-) and is connected to the black cable.
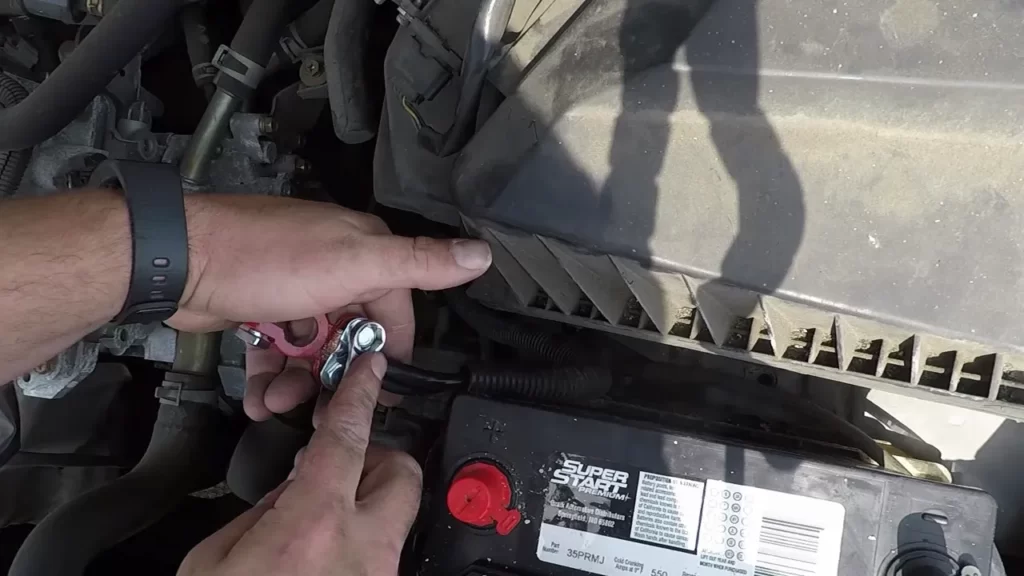
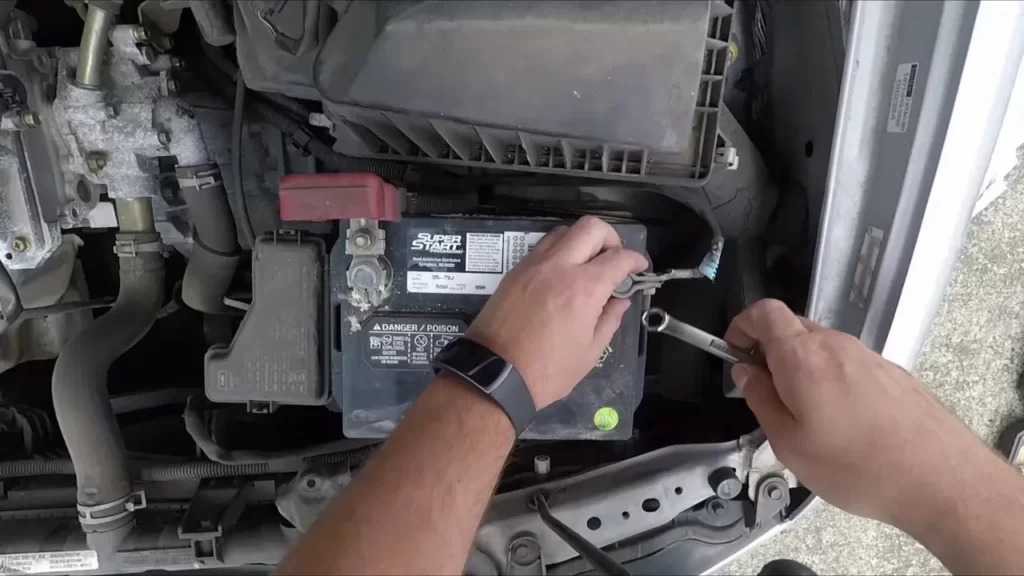
- Loosen the nut or bolt that holds the negative terminal in place, using an adjustable wrench or the appropriate tool. Turn it counterclockwise to loosen it.
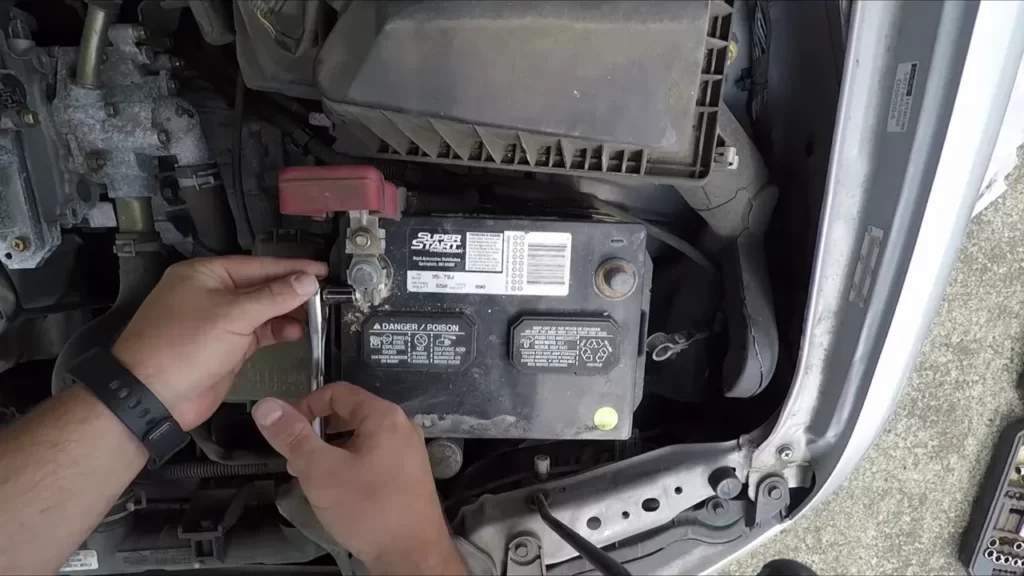
- Once the nut or bolt is loose, carefully lift the negative terminal off the battery post. Twist it gently if needed, while ensuring that your hands and tools do not touch both terminals simultaneously.
- Place the disconnected negative terminal away from the battery to avoid any accidental contact with the positive terminal.
- Repeat the above steps for the positive terminal by loosening the corresponding nut or bolt in the same manner and lifting the terminal off the battery post.
- With both terminals disconnected, you have successfully removed the old battery terminal.
With the old battery terminal safely removed, you can now proceed with installing the new terminal. Stay tuned for the next section on how to install the battery terminal correctly.
Cleaning And Preparing The Battery
One important step in installing a battery terminal is the cleaning and preparation of the battery. This ensures that the terminals are free from dirt, corrosion, and other debris. By properly cleaning and preparing the battery, you can ensure a good connection and extend the life of your battery. In this section, we will discuss the importance of cleaning the battery terminals and how to do it effectively using appropriate cleaning agents and tools.
Importance of cleaning the battery terminals
The battery terminals are vital for the proper functioning of your vehicle’s electrical system. Over time, corrosion and dirt can accumulate on the terminals, inhibiting the flow of electricity and causing various issues such as starting problems, dim lights, and poor overall performance. Cleaning the battery terminals is essential to remove this buildup and maintain a strong connection between the battery and the electrical components of your vehicle.
Using appropriate cleaning agents and tools
To effectively clean the battery terminals, it is important to use appropriate cleaning agents and tools. Here are some steps you can follow:
- Gather your tools: Before you start, make sure you have the necessary tools and supplies. These may include a wrench, wire brush or battery terminal cleaner, safety goggles, gloves, and a post cleaner tool.
- Disconnect the battery: To ensure safety, start by disconnecting the negative (black) terminal first, followed by the positive (red) terminal. Use a wrench to loosen the terminal nuts and carefully remove the terminals from the battery posts.
- Inspect the terminals: Once the terminals are disconnected, examine them closely for any signs of corrosion, dirt, or damage. This will help you determine the extent of cleaning required.
- Clean the terminals: Using a wire brush or battery terminal cleaner, gently scrub the terminals to remove any corrosion and dirt. Be careful not to apply excessive force, as this may damage the terminals. Additionally, you can use a post cleaner tool to clean the battery posts.
- Rinse and dry: After cleaning, rinse the terminals with water to remove any remaining residue. Once rinsed, dry the terminals thoroughly with a clean cloth.
- Reconnect the terminals: Now that the terminals are clean and dry, carefully reattach them to the battery posts. Start with the positive (red) terminal and then connect the negative (black) terminal. Ensure that the nuts are securely tightened.
By following these steps and using appropriate cleaning agents and tools, you can effectively clean and prepare the battery terminals for installation. This will help ensure a strong and reliable electrical connection, prolonging the life of your battery and improving the performance of your vehicle.
Installing The New Battery Terminal
Now that you have removed the old battery terminal, it’s time to install the new one. Follow this step-by-step guide to ensure a proper installation:
Step-by-Step Guide on How to Install the New Battery Terminal
- Inspect the new battery terminal: Before installing it, make sure that the new battery terminal is in good condition and free from any defects or damage. Check for any loose connections or signs of corrosion.
- Prepare the battery: Ensure that your car’s battery is disconnected from the power source before proceeding. This will prevent any electrical accidents during the installation process.
- Clean the battery terminal: Use a wire brush or sandpaper to clean any corrosion or debris from the battery terminal and cable ends. A clean surface will help establish a better connection between the terminal and the cables.
- Apply anti-corrosion compound (optional): To further prevent corrosion and improve conductivity, apply a thin layer of anti-corrosion compound to the battery terminal and cable ends.
- Install the new terminal: Place the new battery terminal over the positive or negative post, aligning it properly. Ensure that it fits securely and snugly.
- Tighten the terminal: Using a wrench or pliers, tighten the terminal’s clamp or bolt. Make sure it is securely fastened to the battery post, ensuring a strong connection between the terminal and the battery.
- Reconnect the battery: Once the new battery terminal is securely attached, reconnect the battery cables to their proper terminals. Ensure that the positive cable is connected to the positive terminal, and the negative cable to the negative terminal.
- Check the tightness: Double-check the tightness of the terminal clamp or bolt to ensure it is firmly secured. A loose connection can cause issues with the electrical system.
- Perform a functionality test: Start your vehicle’s engine to verify that the new battery terminal is properly installed and functioning correctly. If everything is in order, congratulations! You’ve successfully installed the new battery terminal.
By following these simple steps, you can easily and effectively install a new battery terminal. Remember to exercise caution and ensure a tight and secure connection for optimal performance. Regularly inspect your battery terminals for any signs of wear or damage to avoid future issues. Now you can confidently tackle this task and keep your vehicle running smoothly.
Testing And Verifying The Installation
Once you have successfully installed your battery terminal, it is important to test and verify the connection and functionality to ensure everything is in working order. Testing the installation will give you peace of mind and help identify any potential issues or problems that may have occurred during the installation process. In this section, we will outline methods to test the connection and functionality of the battery terminal, as well as troubleshoot common issues that may arise after installation.
Methods to test the connection and functionality of the battery terminal
When it comes to testing the connection and functionality of your battery terminal, there are a few methods you can use to ensure a proper installation. These methods will help you confirm that the terminal is securely connected and that the battery is supplying power to your vehicle. Let’s take a look at these methods:
- Visual inspection: Start by visually inspecting the battery terminals and cables to ensure they are clean, free of corrosion, and properly connected. Look for any loose connections or damaged components that may affect the performance of the battery.
- Testing the voltage: To check the voltage of your battery, you will need a multimeter. Set the multimeter to the voltage setting and connect the positive (red) probe to the positive terminal and the negative (black) probe to the negative terminal of the battery. The multimeter should display the voltage reading of your battery, which should be within the recommended range specified by your vehicle’s manual.
- Testing battery load: Another method to test the functionality of your battery is by performing a load test. This test measures the battery’s ability to hold a charge under a load. You can use a battery load tester for this purpose. Follow the instructions provided with the tester to apply the load and check the battery’s performance. A healthy battery should be able to maintain a steady voltage under load.
Troubleshooting common issues after installation
If you encounter any issues after installing your battery terminal, there are a few common problems you can troubleshoot to ensure everything is working as it should. Here are some troubleshooting tips:
- Poor connection: If you notice intermittent loss of power or weak electrical performance, the issue could be a poor connection. Check that the battery terminal is tightly secured and the cables are properly attached. Clean any corrosion or dirt on the terminals and cables to ensure a solid connection.
- Corrosion buildup: Over time, battery terminals can accumulate corrosion, which can hinder the electrical connection. If you notice a white or powdery substance on the terminals, clean it using a mixture of baking soda and water. Scrub gently with a brush, and then rinse and dry the terminals thoroughly.
- Worn-out cables: If you experience issues even after ensuring a good connection, it is possible that the cables themselves are worn out or damaged. In this case, consider replacing the cables to ensure a reliable connection and proper functionality.
By testing the connection and functionality of your battery terminal, and troubleshooting any issues that arise, you can ensure that your vehicle’s electrical system remains reliable and efficient. Regular maintenance and inspection of your battery terminals will help prolong the life of your battery and prevent potential breakdowns.
Regular Maintenance To Extend Battery Terminal Life
Proper maintenance is essential for extending the lifespan of your battery terminal. By following some simple tips, you can keep the terminal clean, corrosion-free, and in optimal condition. In this article, we will explore the best practices for regular maintenance, ensuring that your battery terminal works efficiently for a long time.
Tips for Keeping the Battery Terminal Clean and Corrosion-Free
- Regular cleaning: Cleaning your battery terminal should be a part of your routine maintenance. Use a mixture of baking soda and water to create a paste, then use a brush to scrub away dirt and corrosion. Rinse the terminal thoroughly with water and dry it before reconnecting.
- Preventive measures: To prevent corrosion from building up, consider using dielectric grease on the battery terminals. This grease forms a protective barrier that blocks moisture and prevents corrosion from forming. Apply a thin layer with a brush or cloth after cleaning the terminals.
- Inspect for loose connections: Loose connections can lead to increased resistance and poor electrical flow, causing damage to the battery terminal. Regularly inspect the terminals to ensure they are tightly connected. If you notice any loose connections, tighten them immediately to prevent further damage.
- Avoid shortcuts: Shortcuts, such as tapping directly into the terminal with sharp objects or using excessive force, can damage the battery terminal. Always use the appropriate tools and ensure a secure and gentle connection to avoid unnecessary harm.
Best Practices for Preventing Damage and Prolonging Lifespan
- Apply corrosion preventive spray: There are specialized sprays available that provide an additional layer of protection against corrosion. Applying a corrosion preventive spray regularly can help prolong the lifespan of your battery terminal by preventing buildup and damage.
- Check battery acid levels: Monitoring the battery acid levels is critical for preventing damage. Make sure the acid levels are within the recommended range. If they are low, top them up with distilled water, following the manufacturer’s instructions.
- Keep your battery secure: Vibrations can loosen the battery terminal connections over time. Ensure that your battery is securely mounted and tightly fastened in its location to minimize movement and prevent damage to the terminals.
- Regularly inspect for leaks: Battery leaks can cause corrosion and damage to the terminals. Regularly inspect your battery for any signs of leakage, such as a white powdery substance or an unpleasant smell. If you notice any leaks, address them promptly to prevent further damage.
By following these tips and best practices, you can keep your battery terminal in excellent condition and extend its lifespan. Regular maintenance and preventive measures will ensure that your battery terminal functions optimally, providing efficient power to your vehicle or equipment when you need it the most.
Troubleshooting Common Battery Terminal Issues
When it comes to maintaining your vehicle’s battery, the battery terminals play a crucial role. They connect the battery to the electrical system of your car, allowing it to start and power various components. However, over time, these terminals can develop issues that might hinder proper battery function. To ensure your vehicle starts consistently and runs smoothly, it is essential to identify and resolve common battery terminal problems promptly.
Identifying Common Problems with Battery Terminals
Before delving into the troubleshooting process, it is crucial to recognize common issues associated with battery terminals. Here are some common problems you might encounter:
| Problem | Symptoms |
|---|---|
| Corrosion | White or greenish powdery substance around the terminals |
| Loose Connections | Inconsistent starting, flickering lights, or intermittent power loss |
| Broken Terminals | Visible physical damage or inability to tightly connect battery cables |
Steps to Troubleshoot and Resolve Issues
If you encounter any of the above problems with your battery terminals, follow these simple steps to troubleshoot and resolve the issues:
- Step 1: Safety First
- Step 2: Cleaning the Terminals
- Step 3: Tightening the Connections
- Step 4: Inspecting for Damage
- Step 5: Preventative Measures
By following these straightforward troubleshooting steps, you can address common battery terminal problems effectively, ensure a reliable connection, and extend the lifespan of your battery.
Frequently Asked Questions Of How To Install Battery Terminal
Which Battery Terminal Do I Install First?
First, always disconnect the negative terminal. Next, connect the positive terminal. This order ensures safety and prevents accidents or electrical shorts.
How Do You Attach A Battery Terminal?
To attach a battery terminal, follow these steps: 1. Start by disconnecting the negative terminal and then the positive terminal. 2. Clean the terminals and cable ends to remove corrosion. 3. Slide the terminal onto the battery post and tighten it securely.
4. Repeat the process for the other terminal. 5. Finally, check the tightness of both terminals to ensure proper connection.
What Order Do You Install Car Battery Terminals?
To install car battery terminals, follow these steps: 1. Attach the positive terminal (marked with a + sign) first, ensuring a secure and tight connection. 2. Then, connect the negative terminal (marked with a – sign), also ensuring a secure fit.
That’s the correct order to install car battery terminals.
Do You Connect Red Or Black First?
Connect the red cable first, followed by the black one.
Conclusion
To sum up, installing a battery terminal is a simple process that can greatly improve the performance of your vehicle’s electrical system. By following the steps outlined in this guide, you can ensure a secure connection and extend the lifespan of your battery.
Remember to take safety precautions and consult your vehicle’s manual if you encounter any difficulties. Now, you can confidently tackle this DIY task and enjoy the benefits of a well-maintained battery. Happy installing!Categories