Installing bar tape is a straightforward process. Start by removing the old tape and cleaning the handlebars.
Then, wrap the new tape tightly and evenly, starting from the bottom, and secure the ends with tape or bar plugs.
Preparing For The Installation
Installing new bar tape on your bicycle can be a fun and rewarding DIY project. Not only does it give your bike a fresh, stylish look, but it also enhances grip and comfort while riding. However, before you dive into the installation process, proper preparation is key. This section will guide you through the necessary steps to ensure a successful bar tape installation.
Choosing the Right Bar Tape: Factors to Consider
Selecting the right bar tape is crucial for both aesthetics and functionality. Here are some key factors to consider when choosing your bar tape:
- Material: Bar tapes come in a variety of materials such as cork, rubber, foam, and leather. Each material has its own unique properties, so consider your personal preference and riding style.
- Thickness: Bar tapes vary in thickness, ranging from thin and lightweight to thick and cushioned. Thicker tapes provide better shock absorption, while thinner tapes offer a more direct feel of the handlebars.
- Texture: The texture of the bar tape affects grip and comfort. Some tapes have a smooth surface, while others may offer a tackier or textured feel to improve grip, especially in wet conditions.
- Color and design: Choose a bar tape that complements the overall look of your bike. Whether you prefer a classic black tape or a bold, eye-catching color, the choice is yours.
Gathering the Necessary Tools and Materials
Before you begin the installation, make sure you have all the necessary tools and materials at hand. Here is a list of items you’ll need:
| Tools | Materials |
|---|---|
| ScissorsElectrical tapeBar end plugsMeasuring tapeA sharp utility knife | Bar tape (length depending on your handlebars)Isopropyl alcohol or a gentle degreaserClean cloth |
Cleaning and Prepping the Handlebars
Now that you have gathered all the required tools and materials, it’s time to prepare the handlebars for the installation. Follow these steps:
- Remove the old bar tape and any adhesive residue from the handlebars. Use a sharp utility knife or scissors to carefully cut and peel off the old tape.
- Next, clean the handlebars thoroughly with isopropyl alcohol or a gentle degreaser. This will remove any dirt, grease, or residue, ensuring a clean and secure bond with the new tape.
- Use a clean cloth to dry the handlebars effectively, ensuring there is no moisture left that could compromise the adherence of the new bar tape.
By carefully considering the factors when choosing your bar tape, gathering the necessary tools and materials, and properly cleaning and prepping your handlebars, you are well on your way to a successful bar tape installation. Follow the next section to learn the step-by-step process of installing your new bar tape.
Wrapping The Bar Tape
When it comes to cycling, having a good grip on your handlebars is vital for control and comfort. This is where bar tape comes in. Not only does it provide a cushioned surface for your hands, but it also absorbs sweat and reduces vibrations from the road. While installing bar tape may seem like a daunting task, it is actually quite straightforward with the right techniques. In this guide, we will walk you through the process of wrapping the bar tape, ensuring a secure grip and consistent tension along the way.
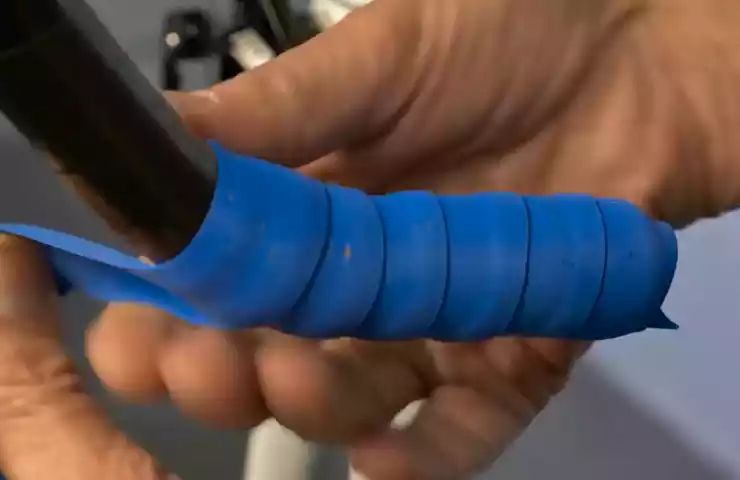
Starting at the Bar End: Overlapping Method
The key to a professional-looking bar tape installation is starting at the bar end. This ensures a neat and secure finish. Begin by removing the old bar tape and clean the handlebars to remove any dirt or residue. Position the bar tape so that it overlaps the bar end by approximately one centimeter.
To secure the bar tape, wrap it tightly around the handlebars while maintaining a consistent tension. Use your thumb to hold the tape in place at the starting point. This will help keep it in position as you wrap the rest of the handlebars.
Wrapping Techniques for a Secure Grip
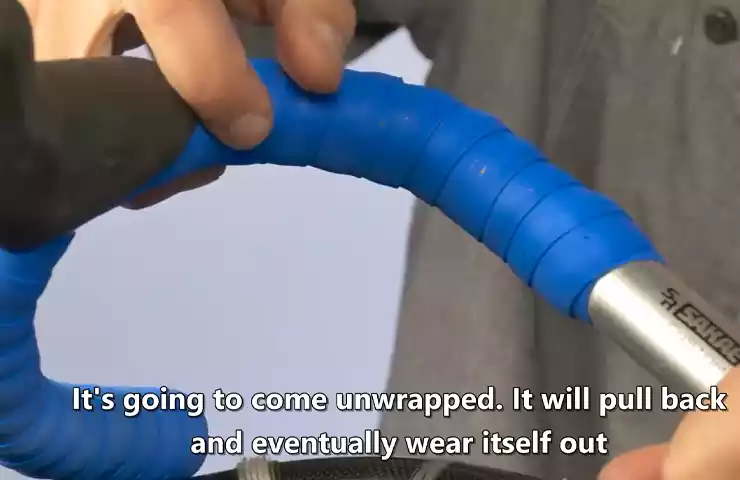
Now that you have started wrapping the bar tape, it’s important to employ the correct technique for a secure grip. As you wrap the handlebars, overlap the tape by about half of its width. This ensures a tight and uniform wrap that prevents the tape from unraveling under stress.
When reaching the curve of the handlebars, it can be helpful to slightly stretch the tape to maintain a snug fit. This ensures that the tape conforms to the shape of the handlebars, giving you maximum control and comfort.
Ensuring Consistent Tension Throughout the Wrapping Process
Consistent tension throughout the wrapping process is crucial for a professional-looking finish. While wrapping the bar tape, ensure that you maintain a consistent level of tension to avoid any loose or uneven sections.
One way to achieve this is by applying steady pressure with your hands and fingers while wrapping the tape. This will help keep the tape taut and prevent any slack. At regular intervals, give the wrapped tape a gentle tug to check for any loose spots and adjust accordingly.
Keep in mind that different handlebars require different levels of tension. For example, if you have drop bars, you may need to apply more tension on the tops than on the drops to achieve an even wrap.
With these wrapping techniques and insights, you can confidently install bar tape on your handlebars. Whether you’re a seasoned cyclist or a beginner, a properly wrapped bar tape will provide you with a comfortable and secure grip, enhancing your riding experience.
Finishing And Securing The Bar Tape
Cutting and Securing the Bar Tape Ends
Once you have wrapped the bar tape around the handlebars, it’s time to finish off the installation by cutting and securing the ends. Here’s how you can achieve a clean and secure finish for your bar tape:
- Start by trimming the excess tape on both ends. Use a sharp pair of scissors or a utility knife to carefully cut the tape. Make sure to leave about an inch of tape beyond the bar end.
- Next, fold the excess tape towards the inside of the handlebars. This will create a clean and neat look.
- Use electrical tape or bar plugs to secure the folded tape. Electrical tape is a popular choice as it is easy to use and provides a secure hold. Wrap the tape tightly around the folded end, ensuring that it covers the exposed handlebar and tape.
- If you prefer a more professional finish, you can use bar plugs instead of electrical tape. Bar plugs not only provide added stability but also give your handlebars a polished look. Simply insert the bar plugs into the open ends of the handlebars.
Finalizing the Installation: Checking for Loose Ends and Adjusting as Needed

With the ends secured, it’s essential to give your bar tape installation a final check to ensure everything is in place. Here are a few steps to follow:
- First, inspect the entire length of the bar tape to make sure it is in position and tightly wrapped around the handlebars. Check for any loose areas or gaps between the tape. If you find any, gently pull and rewrap the tape to eliminate any slack.
- Test the grip of the bar tape by holding onto the handlebars firmly. Make any necessary adjustments to improve the grip and ensure a comfortable and secure hold.
- Check that the brake levers, shifters, and any other accessories attached to the handlebars are not impeded by the bar tape. Adjust the positioning if necessary to ensure unobstructed access to these components.
By following these steps, you can confidently finish and secure your bar tape installation, giving your handlebars both a sleek appearance and a comfortable grip. Remember to regularly check and maintain your bar tape to keep it in optimal condition for your rides. Enjoy the smooth and stylish ride with your newly installed bar tape!
Frequently Asked Questions On How To Install Bar Tape
Which Way Do You Wrap Bar Tape?
To wrap bar tape, start at the end and wrap it in a direction away from you. Make sure to overlap each wrap by about half its width. Keep it tight and smooth as you go, and secure the end with electrical tape or an adhesive strip.
How Do You Secure Bar Tape?
To secure bar tape, follow these steps: 1. Start by wrapping the tape tightly around the handlebars, ensuring it is evenly spaced. 2. Use electrical tape or adhesive strips to secure the ends of the tape. 3. Wrap more tape around the bar ends for added support.
4. Trim any excess tape for a neat finish. 5. Test the grip and adjust as needed.
Do You Put Bar Tape On The Inside Or Outside?
You should put bar tape on the outside of your handlebars. It provides grip and cushioning while riding.
How Do You Install Leather Bar Tape?
To install leather bar tape, follow these steps: 1. Start at one end of the handlebar and unravel the tape. 2. Wrap it around the handlebar, overlapping slightly with each turn. 3. Secure the end of the tape with electrical tape or adhesive.
4. Repeat the process for the other handlebar. 5. Trim any excess tape.
Conclusion
Installing bar tape is a straightforward process that can give your bike a fresh look and improve your grip on the handlebars. By following the steps outlined in this guide, you can easily wrap the bar tape around your handlebars and achieve a professional finish.
Remember to choose a high-quality tape and take your time during installation for the best results. So go ahead and give your bike a makeover with new bar tape – your hands will thank you!