To install an anti rattle hitch tightener, insert it between the receiver and the hitch. When it comes to securing your hitch and preventing rattling and wobbling during travel, installing an anti rattle hitch tightener is a simple and effective solution.
By inserting the hitch tightener between the receiver and the hitch, you can eliminate any movement and noise, ensuring a safe and comfortable towing experience. We will guide you on how to install an anti rattle hitch tightener, providing step-by-step instructions to help you get it done quickly and efficiently.
Whether you are a seasoned camper or a first-time tower, this installation process is straightforward and requires no special tools. Follow these instructions to enjoy a smooth and quiet towing experience every time you hit the road.
What Is An Anti Rattle Hitch Tightener?
Are you tired of the annoying rattling noise coming from your hitch? Do you want to secure your hitch more effectively and prevent any excessive movement? Then an anti rattle hitch tightener is the solution you need. In this section, we will explore the definition and purpose of an anti rattle hitch tightener, and how it can help make your towing experience much smoother and quieter.
Definition of an Anti Rattle Hitch Tightener
An anti rattle hitch tightener, as the name suggests, is a device designed to eliminate or significantly reduce the rattling noise that is often associated with towing hitch installations. It is a mechanism that secures the hitch receiver tightly to the trailer hitch, eliminating any play or movement between the two components.
Purpose of an Anti Rattle Hitch Tightener
The primary purpose of an anti rattle hitch tightener is to eliminate the annoying rattling sound that occurs when towing a trailer. This sound is caused by the movement and vibration that occurs between the hitch receiver and the trailer hitch. With an anti rattle hitch tightener in place, this movement is minimized, resulting in a quieter and more enjoyable towing experience.
Furthermore, an anti rattle hitch tightener also serves to enhance the overall stability and safety of the towing setup. By securing the hitch receiver tightly to the trailer hitch, it reduces the risk of misalignment or detachment while on the road. This can help prevent accidents and damage to both your vehicle and the trailer you are towing.
Another noteworthy advantage of using an anti rattle hitch tightener is the added durability it provides. Excessive movement and play between the hitch receiver and the trailer hitch can cause wear and tear over time, leading to premature damage and potential failure. By minimizing this movement, the tightener helps extend the lifespan of your hitch and ensures it continues to perform optimally for years to come.
Overall, an anti rattle hitch tightener is a simple yet powerful solution to the common problem of hitch rattling. It not only improves the towing experience by reducing noise and enhancing stability but also helps prolong the lifespan of your towing equipment. Whether you are a seasoned trailer owner or a casual weekend warrior, investing in an anti rattle hitch tightener is a wise decision that will make your tow trips smoother and more enjoyable.
Benefits Of Using An Anti Rattle Hitch Tightener
Installing an anti rattle hitch tightener can greatly enhance your towing experience, providing several benefits that make it a worthwhile investment. In this section, we will explore the various advantages of using an anti rattle hitch tightener, ranging from improved stability and safety while towing to reduced noise and vibration during travel.
Improved stability and safety while towing
One of the key benefits of using an anti rattle hitch tightener is the improved stability it offers while towing. When you attach a trailer or hitch carrier to your vehicle, there is often some amount of play or movement between the hitch and the receiver. This can lead to an unstable towing experience, especially when driving on uneven terrain or encountering sudden stops or turns.
By utilizing an anti rattle hitch tightener, you can effectively eliminate this unwanted movement and play, resulting in a more stable towing setup. This not only enhances safety on the road but also provides a smoother and more controlled towing experience.
Reduced noise and vibration during travel
Another significant advantage of using an anti rattle hitch tightener is the reduction in noise and vibration experienced during travel. When there is play or movement between the hitch and the receiver, it can often lead to annoying rattling sounds and excessive vibrations, both of which can be quite bothersome.
An anti rattle hitch tightener works by effectively eliminating this movement and play, thereby significantly reducing the noise and vibration levels. This ensures a quieter and more comfortable journey, allowing you to enjoy your towing adventure without any unnecessary distractions or discomfort.
Whether you are planning a long road trip or simply need to transport heavy loads, installing an anti rattle hitch tightener is a smart choice. Its ability to improve stability and safety while towing, along with the added benefit of reducing noise and vibration, makes it an essential accessory for any towing setup. So, why compromise on a sub-par towing experience when a simple solution can provide a more secure and enjoyable journey?
Step-By-Step Guide To Install An Anti Rattle Hitch Tightener
Installing an anti rattle hitch tightener is a simple and effective way to eliminate rattling and movement in your trailer hitch. This device securely holds the receiver and trailer hitch together, preventing any unwanted noise or shaking. In this step-by-step guide, we will walk you through the process of installing an anti rattle hitch tightener, from choosing the right one for your vehicle to ensuring a secure fit. Let’s get started!
Choosing the right hitch tightener for your vehicle
Before you begin the installation process, it is crucial to select the appropriate hitch tightener for your vehicle. Hitch tighteners come in various sizes and styles, so it is essential to choose one that fits your specific receiver and trailer hitch dimensions. Consider the diameter of your receiver and the size of your hitch pin hole to ensure a proper fit.
Gathering the necessary tools and equipment
Once you have determined the correct size of the hitch tightener, gather the necessary tools and equipment for the installation. Here’s a list of what you’ll need:
| Tools & Equipment |
|---|
| Socket wrench or adjustable wrench |
| Hex key or Allen wrench |
| Lubricant (such as WD-40) |
Ensuring the hitch and receiver are clean and free from debris
Before installing the hitch tightener, it is important to ensure that the hitch and receiver are clean and free from any dirt or debris. Use a soft brush or cloth to remove any loose particles, ensuring a clean surface for the hitch tightener to be attached to.
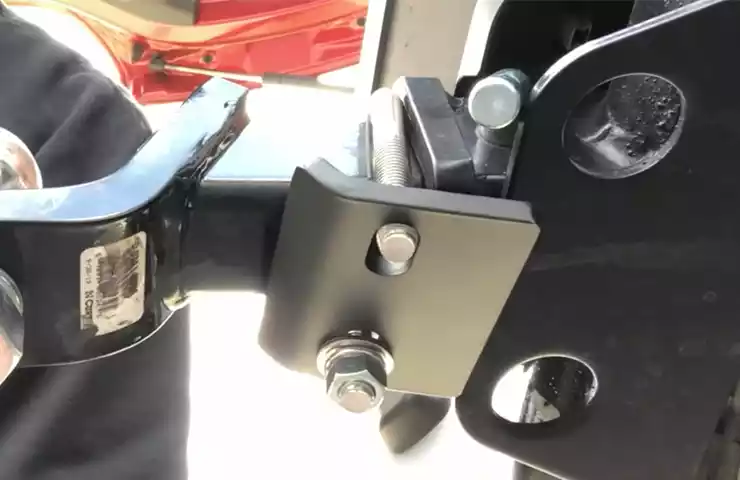
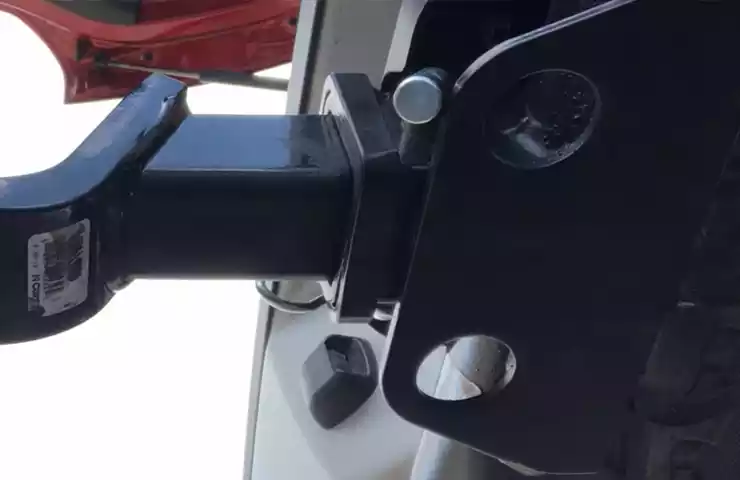
Attaching the hitch tightener to the receiver and trailer hitch
Now it’s time to attach the hitch tightener to the receiver and trailer hitch. Place the hitch tightener over the receiver and align the holes with the hitch pin hole. Insert the hitch pin through the holes to secure the tightener in place. Make sure the hitch pin is inserted completely and securely.
Tightening the hitch tightener to eliminate rattling and movement
Once the hitch tightener is in position, use a socket wrench or adjustable wrench to tighten the nut on the hitch tightener. This step is crucial to eliminate any rattling or movement between the receiver and trailer hitch. Tighten the nut until it is snug, but be careful not to over-tighten.
Testing the hitch tightener for a secure fit
After tightening the hitch tightener, give it a gentle shake to ensure a secure fit. The hitch tightener should eliminate any rattling or movement between the receiver and trailer hitch. If there is still some play, you may need to tighten the nut further. Repeat this step until the fit is secure.
By following this step-by-step guide, you can easily install an anti rattle hitch tightener and enjoy a quiet and secure towing experience. Remember to choose the right hitch tightener, gather the necessary tools, clean the hitch and receiver, attach the tightener securely, and test for a snug fit. Happy towing!
Installing The Anti Rattle Hitch Tightener On A Standard Hitch
In this article, we will guide you through the step-by-step process of installing an anti-rattle hitch tightener on a standard hitch. If you’ve ever experienced an annoying rattling noise or noticed excessive movement when towing, this simple solution can make a world of difference. Follow along with our clear instructions to ensure a secure and stable hitch setup for your next adventure.
Step-by-Step Instructions for Installation on a Standard Hitch
Step 1: Gather the Necessary Tools
Before you begin, make sure you have all the tools required for the installation:
- Anti-rattle hitch tightener
- Wrench or socket set
Having these tools ready will help streamline the installation process.
Step 2: Position the Hitch Tightener
Position the anti-rattle hitch tightener between the hitch receiver and the accessory, such as a bike rack or cargo carrier. The tightener will help eliminate any unwanted movement or rattling noise.
Step 3: Insert the Bolt
- Insert the provided bolt through the hitch pin hole on one side of the tightener.
- Thread the bolt through the hole until it protrudes slightly on the other side.
Tip: Applying some lubrication, such as WD-40, to the bolt can make the threading process smoother.
Step 4: Attach the Locking Nut
Place the locking nut onto the protruding end of the bolt and tighten it securely using a wrench or socket set. This will ensure that the bolt and tightener are locked in place, preventing any movement or rattling.
Step 5: Verify the Tightness
Once the locking nut is tightened, check the tightness of the anti-rattle hitch device. Ensure that there is little to no movement between the hitch receiver and the accessory. A snug fit is what you’re aiming for.
Step 6: Test for Rattle
Give your hitch setup a gentle shake or push to test for any remaining rattle or movement. If you notice any, double-check the tightness of the bolt and locking nut. Adjust if necessary until the rattling is eliminated.
Step 7: Repeat if Necessary
If you have multiple accessories attached to your hitch, repeat steps 2 to 6 for each attachment. This will ensure that all of your accessories are secured tightly and prevent any rattling.
Step 8: Enjoy a Quiet and Stable Towing Experience
With the anti-rattle hitch tightener properly installed, you can now enjoy a quieter and more stable towing experience. Say goodbye to annoying rattling noises and excessive movement.
By following these simple step-by-step instructions, you can easily install an anti-rattle hitch tightener on a standard hitch. With a few basic tools and a little bit of time, you’ll have a secure and stable hitch setup that will enhance your towing adventures.
Installing The Anti Rattle Hitch Tightener On A Bike Rack
Installing an anti rattle hitch tightener on your bike rack is an essential step to ensure a smooth and secure ride. The anti rattle hitch tightener not only eliminates annoying rattling noises but also prevents wobbling and movement of your bike rack, providing a safer and more stable transport for your bicycles. Below are step-by-step instructions for installing the anti rattle hitch tightener on a bike rack.
Step-by-step Instructions for Installation on a Bike Rack:
Follow these easy steps to properly install the anti rattle hitch tightener on your bike rack:
- First, ensure that your bike rack is securely attached to your vehicle’s hitch receiver. Make sure the hitch pin is properly inserted and tightened.
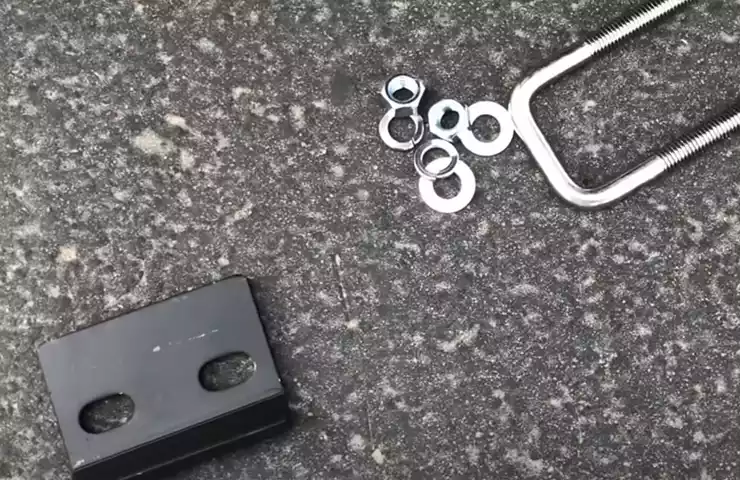
- Locate the hitch tightener, which typically consists of a U-bolt, a plate, and a single nut.
- Place the U-bolt around the bike rack’s shank or the part that inserts into the vehicle’s hitch receiver.
- Next, slide the plate onto the U-bolt, with the flat side of the plate facing the bike rack shank.
- Tighten the nut onto the U-bolt, using a wrench or socket set. Make sure to tighten it securely, but be careful not to overtighten.
- Check for any remaining movement or play in the bike rack. If there is still noticeable wobbling or rattling, you may need to tighten the nut further.
- Once the anti rattle hitch tightener is securely installed, test the stability of your bike rack by giving it a gentle shake. It should feel much more solid and secure.
By following these simple steps, you can easily install an anti rattle hitch tightener on your bike rack and enjoy a quiet and stable ride. Remember to periodically check the tightness of the nut to ensure the hitch tightener remains secure during your travels. Happy biking!
Installing The Anti Rattle Hitch Tightener On A Trailer Hitch
In order to ensure a smooth and noise-free towing experience, it is important to properly install an anti rattle hitch tightener on your trailer hitch. This simple device eliminates any annoying rattling or wobbling that can occur between the hitch receiver and the hitch bar, providing a secure and stable connection. Follow these step-by-step instructions to easily install the anti rattle hitch tightener on your trailer hitch.
Step-by-step instructions for installation on a trailer hitch
- Start by completely removing the hitch pin and clip that secure the hitch bar to the hitch receiver. Set them aside for later use.
- Slide the anti rattle hitch tightener onto the hitch bar, ensuring that the threaded portion of the device faces outwards.
- Tighten it by turning the included bolt with a wrench. This will compress the Hitch Tightener’s spring and pull the hitch bar tight against the receiver, effectively eliminating any play or movement.
- Continue tightening until the hitch tightener is securely in place and you no longer notice any movement or rattling between the hitch receiver and the hitch bar.
- Once the anti rattle hitch tightener is properly installed, insert the hitch pin through the hole in the hitch bar and hitch receiver, ensuring that the clip or lock is in place to prevent the hitch pin from accidentally coming loose.
That’s it! By following these simple steps, you can easily install an anti rattle hitch tightener on your trailer hitch, providing a stable and noise-free towing experience. Whether you’re hauling gear for a camping trip or towing a boat to the nearest lake, this device ensures that your hitch connection stays secure, giving you peace of mind on the road.
Tips And Considerations For Using An Anti Rattle Hitch Tightener
Installing an anti rattle hitch tightener is a great way to eliminate annoying vibrations, rattling noises, and excessive movement in your hitch setup. It helps ensure a secure and stable connection between your trailer and hitch, enhancing your towing experience. However, to get the most out of your hitch tightener, there are a few tips and considerations you should keep in mind.
Regular maintenance and inspection of the hitch tightener
Just like any other towing accessory, your anti rattle hitch tightener requires regular maintenance and inspection to ensure optimal performance and longevity. Make it part of your routine to visually inspect the tightener for any signs of damage or wear, such as cracks or rust. Additionally, lubricate the moving parts regularly with a silicone-based lubricant to prevent any seizing or binding that may occur over time. By doing so, you’ll guarantee that your hitch tightener continues to function properly trip after trip.
Properly securing the hitch tightener before each trip
Before hitting the road, it’s essential to properly secure the hitch tightener to avoid any mishaps along the way. Begin by inserting the shank of the tightener into the receiver hitch and align it with the corresponding holes. Once in position, insert the lock pin or hitch pin through the holes and securely fasten it, ensuring that the tightener is tightly engaged with the receiver. This will prevent any movement or rattling during your journey, providing a safer towing experience.
Compatibility with different types of hitch receivers and accessories
One of the key considerations when using an anti rattle hitch tightener is its compatibility with different types of hitch receivers and accessories. These tighteners are designed to work with a range of hitch sizes, including 1.25-inch, 2-inch, and 2.5-inch receivers. However, it’s important to verify the compatibility of your specific hitch tightener with your receiver size before making a purchase. Additionally, take into account any accessories you may have attached to your hitch, such as bike racks or cargo carriers, and ensure that the tightener aligns with their dimensions as well. Doing so will guarantee a tight fit and prevent any unwanted play or movement in your hitch setup.
By following these tips and considerations, you can harness the full potential of your anti rattle hitch tightener, enjoying a smoother and more stable towing experience. Remember to perform regular maintenance, secure the tightener properly before each trip, and verify its compatibility with your hitch receiver and accessories. With these measures in place, you can confidently hit the road knowing that your hitch setup is secure and rattle-free.
Troubleshooting Common Issues With An Anti Rattle Hitch Tightener
Troubleshooting common issues with an anti-rattle hitch tightener is essential to ensure a secure and noise-free towing experience. Identifying and resolving loose or ineffective installations, addressing rust or corrosion on the hitch tightener, and dealing with excessive noise or vibration even with the hitch tightener installed are some common situations you may encounter. Let’s explore each of these issues and how to troubleshoot them effectively.
Identifying and Resolving Loose or Ineffective Installations
When it comes to installing an anti-rattle hitch tightener, a loose or ineffective installation can compromise its effectiveness. Here are some steps to help you identify and resolve this issue:
- Start by checking if all the components of the hitch tightener are securely tightened. This includes the bolts, nuts, and any additional fastening mechanisms.
- If you find any loose components, use a wrench or socket set to tighten them properly.
- Inspect the hitch receiver and ensure it is free of any debris or dirt that might prevent a tight fit.
- Apply a lubricant or rust penetrant to the hitch tightener to ensure smooth rotation and optimal performance.
- Consider adding additional locking mechanisms, such as a locking pin or lock nut, to provide an extra layer of security and stability.
Addressing Rust or Corrosion on the Hitch Tightener
If you notice rust or corrosion on your hitch tightener, it’s important to address this issue promptly. Rust and corrosion can weaken the structural integrity of the tightener and reduce its effectiveness. Follow these steps to tackle this problem:
- Start by thoroughly cleaning the hitch tightener using a mild detergent or rust remover. Use a brush or sponge to scrub away any visible rust or corrosion.
- Rinse the hitch tightener with clean water and dry it thoroughly using a cloth or air compressor.
- Apply a rust-inhibiting primer or paint specifically designed for metal surfaces to protect the hitch tightener from further rust or corrosion.
- Regularly inspect the hitch tightener for any signs of rust or corrosion and address them promptly to prevent further damage.
Dealing with Excessive Noise or Vibration Even with the Hitch Tightener Installed
If you are experiencing excessive noise or vibration despite having an anti-rattle hitch tightener installed, there are a few potential causes to consider. Here are some steps to help you address this issue:
- Verify that the hitch tightener is properly installed and tightened. Loose or insufficiently tightened components can contribute to noise and vibration.
- Inspect the hitch receiver to ensure it is free of any debris or objects that may be causing the noise or vibration.
- Consider adding rubber or polyurethane hitch accessories, such as hitch isolators or dampeners, to reduce noise and vibration.
- Check the condition of your trailer or towing equipment. Any worn-out or damaged components can contribute to excessive noise and vibration.
- If the noise or vibration persists, consider consulting a professional or contacting the manufacturer for further guidance.
By troubleshooting common issues with an anti-rattle hitch tightener, you can optimize its performance and enjoy a smooth and secure towing experience. Remember to regularly inspect and maintain your hitch tightener to ensure its longevity and reliability.
Frequently Asked Questions Of How To Install Anti Rattle Hitch Tightener
How Do You Install Anti-Rattle Hitch Stabilizer?
To install an anti-rattle hitch stabilizer, follow these steps: 1. Slide the stabilizer onto the hitch receiver. 2. Insert the bolt and tighten securely. 3. Attach the included hardware to the hitch accessory. 4. Align the accessory with the stabilizer.
5. Securely tighten all nuts and bolts.
How Do You Install An Anti-Rattle Kit?
To install an anti-rattle kit, follow these steps: 1. Start by removing any existing hardware that may be causing the rattle. 2. Apply the included adhesive to the kit components. 3. Position the components in the desired locations, ensuring they are securely attached.
4. Tighten any screws or bolts provided in the kit to further secure the components. 5. Test the installation to ensure the rattle has been eliminated.
What Is The Difference Between An Anti-Rattle Hitch Clamp And Pin?
An anti-rattle hitch clamp is designed to minimize movement and noise between the hitch and receiver, providing a secure and stable connection. In contrast, a hitch pin simply holds the hitch in place without addressing the issue of rattling or movement.
The hitch clamp is a better option for those seeking a quieter and smoother towing experience.
How Can I Make My Noisy Receiver Hitch Quieter?
To make your noisy receiver hitch quieter, try applying a lubricant like grease or silicone spray to the hitch ball and trailer coupler. Adding rubber hitch tighteners can also reduce rattling. Another option is to use a noise-reducing hitch pin or a hitch silencer.
Conclusion
After following the step-by-step guide on how to install an anti rattle hitch tightener, you can now enjoy a smoother and quieter towing experience. This simple yet effective device eliminates the annoying rattling noise and movement that often occurs when towing heavy loads.
By securing your hitch and reducing vibrations, you can travel with confidence knowing that your equipment is stable and secure. So, say goodbye to noisy journeys and make your next adventure more enjoyable with an anti rattle hitch tightener.