To install an air horn, first, find a suitable location on your vehicle and mount the horn securely. Then, wire the horn to the vehicle’s power source using a relay for safety.
Finally, test the horn to ensure proper functionality.
Required Tools And Materials
Installing an air horn in your vehicle can significantly enhance its sound and make a bold statement on the road. To begin the installation process, you will need a variety of tools and materials to ensure a seamless and efficient installation. Here are the essential items you should gather before getting started:
Air horn kit
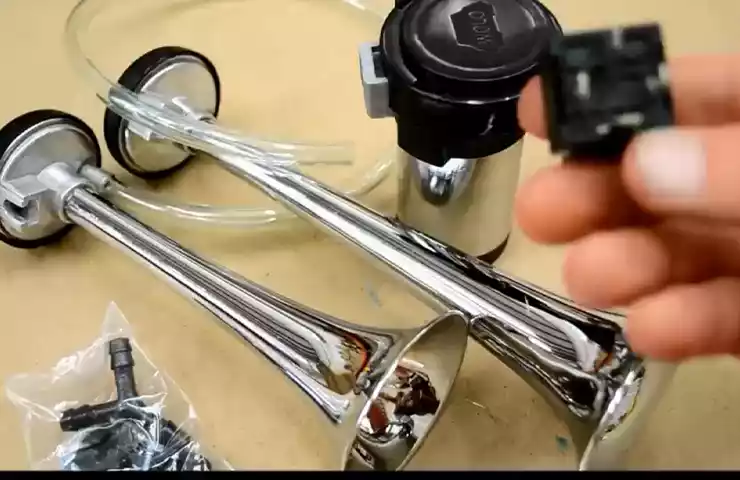
The air horn kit is the heart of your installation project. It typically includes the necessary components like the air compressor, horn, air hose, and all required fittings. Ensure that you have a high-quality air horn kit suitable for your vehicle model and sound preferences.
Wiring kit
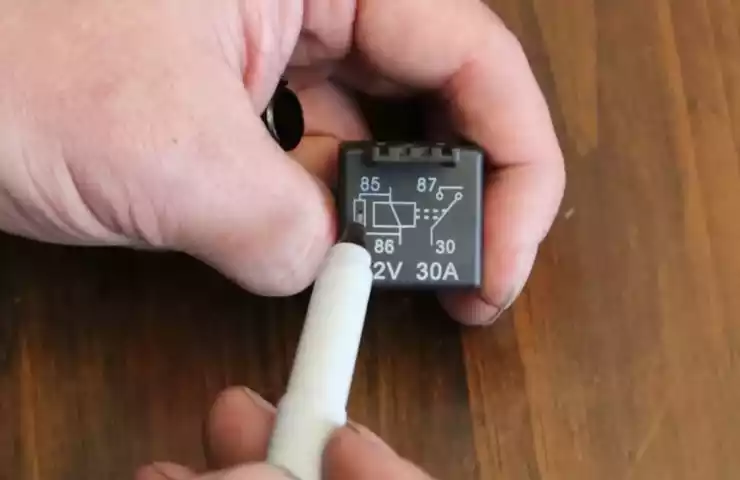
A wiring kit is crucial for connecting your air horn to your vehicle’s electrical system. It usually consists of wires, connectors, and switches needed for proper functioning. Make sure to select a wiring kit that is compatible with your vehicle’s electrical specifications.
Drill
A drill will be necessary to create the mounting holes for your air horn. Choose a drill with the appropriate power and drill bit size for your specific mounting requirements. This will allow you to securely attach the horn to your vehicle.
Screws
Along with the drill, you will need screws to secure the air horn in place. Opt for screws that are durable, rust-resistant, and suitable for the material on your vehicle’s surface. This will ensure a sturdy and long-lasting installation.
Screwdriver
A screwdriver is essential for tightening and loosening the screws during the installation process. Select a screwdriver that fits the screws you will be using, ensuring an efficient and comfortable grip.
Electrical tape
Electrical tape plays a crucial role in insulating and securing the wiring connections. Use high-quality electrical tape to prevent any electrical hazards and ensure a reliable and safe installation.
By gathering these required tools and materials before starting the installation process, you will be better equipped to successfully incorporate an air horn into your vehicle. With the essentials at hand, you’ll be ready to proceed to the next steps in the installation process, making your vehicle stand out with its powerful and attention-grabbing sound.
Safety Precautions
Welcome to our guide on how to install an air horn. Before you begin the installation process, it’s crucial to follow some safety precautions to ensure your well-being. By adhering to these precautions, you can reduce the risk of accidents and complete the installation smoothly.
Wear protective eyewear and gloves
One of the first safety measures you should take before starting the installation of your air horn is to wear the appropriate protective gear. Protective eyewear and gloves are essential to shield your eyes from potential debris and to safeguard your hands from any injury.
Disconnect the battery before starting the installation
Prior to beginning the air horn installation, it is imperative to disconnect the battery of your vehicle. This will prevent any electrical mishaps and ensure your safety throughout the process. Be sure to locate the negative terminal of the battery and carefully disconnect it.
Work in a well-ventilated area
Operating in a well-ventilated area is paramount during the installation process. Ensure that you choose an area with good airflow to prevent inhaling any harmful fumes. If possible, work in an open garage or outdoors. Adequate ventilation is crucial to maintaining your safety and well-being.
By following these essential safety precautions, you can ensure a secure installation process for your air horn. Remember to wear protective eyewear and gloves, disconnect the battery, and work in a well-ventilated area. Taking these measures will help keep you safe as you install your air horn, giving you peace of mind and an enjoyable driving experience.
Step 1: Identify The Mounting Location
Choosing a suitable location for mounting your air horn is crucial for both functionality and aesthetics. In this step, we will guide you through the process of finding the ideal spot for your air horn installation.
Choose a suitable location for mounting the air horn
When choosing a location for mounting your air horn, there are a few factors to consider. First and foremost, ensure that the placement adheres to any local regulations regarding noise levels and visibility requirements.
Moreover, it is essential to select a spot that allows for easy access to the air horn and its components for maintenance and repairs. This will save you time and effort in the long run. Considering the potential need for replacements or adjustments, accessibility is paramount.
Additionally, aesthetics should not be overlooked. While it might be tempting to tuck the air horn out of sight, remember that it should still be clearly visible to other motorists. A hidden horn may defeat the purpose of having one in the first place.
Check for any obstructions and ensure proper visibility and accessibility
Before finalizing the mounting location, visually inspect the area to identify any possible obstructions. Ensure that the chosen spot does not obstruct the driver’s field of vision or interfere with the functioning of other vehicle components.
You should also consider the air horn’s placement in relation to other components such as the battery or engine. It is important to avoid locations that may expose the air horn to excessive heat or vibrations that could potentially affect its performance.
Finalize the mounting location
Once you have thoroughly assessed the available options, it’s time to finalize the mounting location. To keep things organized, let’s summarize this step with a simple checklist:
| Considerations: |
| Adherence to local regulations |
| Easy accessibility for maintenance and repairs |
| Visible to other motorists |
| No obstructions to the driver’s field of vision |
| No interference with other vehicle components |
By following these guidelines, you can ensure a well-placed air horn that is both effective and visually pleasing. In the next step, we will dive into the process of securing the air horn in its designated location.
Step 2: Prepare The Mounting Surface
Before you can start installing your air horn, it’s crucial to properly prepare the mounting surface. This step ensures a secure fit, allowing your air horn to function optimally. If the mounting surface is not clean and roughened, the adhesive used to attach the horn might not hold up properly, leading to potential issues later on.
Clean the Mounting Surface to Ensure a Secure Fit
To begin, take a clean cloth and wipe down the area where you plan to mount your air horn. Remove any dirt, dust, or debris that may compromise the adhesion of the horn. Cleaning the surface thoroughly helps to ensure the longevity and effectiveness of the installation.
Use Sandpaper to Roughen the Surface for Better Adhesion
Once the mounting surface is clean, it’s time to roughen it up for better adhesion. Take a piece of sandpaper with a medium-grit, and gently rub it over the surface in a back-and-forth motion. This roughens up the surface and creates small grooves, enhancing the bond between the mounting surface and the adhesive.
Note: Be careful not to sand too vigorously, as you don’t want to damage the surface or make it uneven. A light sanding is usually sufficient to create the desired texture.
Pro tip: If your mounting surface is made of metal, applying a coat of primer can further improve the adhesion of the adhesive.
By taking the time to clean and roughen the mounting surface, you are setting the stage for a successful air horn installation. This step ensures a strong bond between the horn and the surface, providing a reliable and secure attachment. Follow these steps, and you’ll be one step closer to enjoying the powerful sound of your air horn whenever you need it on the road.
Step 3: Install The Horn Bracket
Now that you have prepared the mounting surface and gathered all the necessary tools and supplies, it’s time to move on to the third step of installing an air horn: installing the horn bracket. The horn bracket serves as the foundation on which you will secure the air horn, ensuring that it stays firmly in place. Follow the instructions below to complete this crucial step.
Attach the horn bracket to the mounting surface using screws
To begin, position the horn bracket on the desired spot of the mounting surface. Make sure it is aligned properly and level. Use screws provided in your installation kit to attach the bracket securely. Ensure that the screws are tight, holding the bracket firmly in place. This will prevent any movement or vibrations that may cause the bracket to loosen over time.
Note: Choose screws that are appropriate for the material of the mounting surface, ensuring a strong and durable connection.
| Step | Instructions |
|---|---|
| Step 1 | Position the horn bracket on the desired spot of the mounting surface. |
| Step 2 | Align the bracket properly and ensure it is level. |
| Step 3 | Using screws provided in the installation kit, attach the bracket securely to the mounting surface. |
Make sure it is securely fastened

After attaching the horn bracket to the mounting surface, double-check to ensure that it is securely fastened. Give the bracket a gentle shake to test its stability. If it feels loose or moves, re-tighten the screws until the bracket is firmly in place. A secure attachment is essential to prevent the bracket from coming loose while driving, which could potentially damage the air horn or cause safety concerns on the road.
- Position the horn bracket on the desired spot of the mounting surface.
- Align the bracket properly and ensure it is level.
- Using screws provided in the installation kit, attach the bracket securely to the mounting surface.
- Check the stability of the bracket by giving it a gentle shake.
- If the bracket feels loose or moves, re-tighten the screws until it is securely fastened.
With the horn bracket securely installed, you are one step closer to having your air horn fully functional. In the next step, we will guide you through the process of connecting the air horn to your vehicle’s electrical system. Stay tuned!
Step 4: Mount The Air Horn
Mounting the air horn is a crucial step in the installation process. It ensures that the horn remains secure and properly aligned, allowing it to function effectively. Follow these steps to mount your air horn:
Position the air horn on the bracket
Start by positioning the air horn on the provided bracket. Ensure that the horn is placed in a suitable location, allowing for maximum sound projection. Consider factors such as accessibility and visibility, as you want the horn to be easily seen and heard when needed. Once you have determined the perfect position, use screws to secure the air horn to the bracket. Make sure to align the holes on the horn with the corresponding holes on the bracket. This will ensure a proper and secure fit.
Secure it in place using the provided screws
Using the provided screws, carefully attach the air horn to the bracket. Tighten the screws firmly, but be cautious not to over-tighten and damage the horn or bracket. A snug fit is sufficient to keep the air horn in place. Double-check that it is stable and properly aligned After mounting the air horn, take a moment to double-check its stability and alignment. Gently shake the horn to ensure it is firmly secured to the bracket. Additionally, visually inspect the horn to ensure it is properly aligned and centered on the bracket. By following these steps, you can successfully mount your air horn and have it ready for use. Remember to refer to the manufacturer’s instructions for any specific guidelines or recommendations. Take your time and ensure a proper installation for optimal performance.
Step 5: Connect The Wiring
Step 5: Connect the Wiring
Now that you have successfully located and installed your air horn, it’s time to connect the wiring. This step is crucial to ensure that your horn functions properly and efficiently. Follow the instructions below to connect the wiring and enjoy the power of your new air horn.
Locate a Suitable Power Source Near the Horn
The first step is to find a suitable power source near the horn. This will serve as the connection point for your horn’s wiring. Look for a power source that is easily accessible and can handle the current requirements of your air horn. It’s important to choose a power source that has a fuse to protect your horn and vehicle’s electrical system.
Connect the Positive Wire from the Horn to the Power Source
Once you have located a suitable power source, it’s time to connect the positive wire from the horn. The positive wire is usually colored red or marked with a (+) symbol. Strip the end of the positive wire and connect it securely to the positive terminal of the power source. Ensure that the connection is tight to prevent any loose wires and ensure a proper electrical connection.
Use Electrical Tape to Secure the Connections and Prevent Any Short Circuits
After connecting the positive wire, it’s essential to secure the connections and prevent any short circuits. To do this, use electrical tape to wrap around the exposed wire and the connection point. This will provide insulation and protect against any accidental contact or short circuits. Make sure to wrap the electrical tape tightly and neatly to ensure a secure connection.
By following these steps, you can successfully connect the wiring for your air horn and enjoy its powerful sound. Remember to double-check all the connections and ensure that everything is properly secured before testing your horn.
Step 6: Ground The Horn
Once you have securely mounted your air horn in the desired location and connected the positive wire to a power source, it’s time to move on to the next crucial step: grounding the horn. Grounding is an important part of the installation process as it ensures a solid connection for optimal performance.
Find a grounding point nearby
The first step in grounding your air horn is to find a suitable grounding point nearby. Look for a metal surface that is clean and free from any paint or corrosion. This could be a bolt or screw on the vehicle’s chassis or any other metal component that is conveniently accessible.
Attach the negative wire from the horn to the grounding point
Once you have located a grounding point, take the negative wire from the horn and attach it securely to the chosen grounding location. Ensure that the connection is tight and secure, as a loose connection can result in poor performance or malfunctioning of the air horn.
Ensure a solid connection for optimal performance
After attaching the negative wire, double-check the connection to ensure it is solid and reliable. Wiggle the wire slightly to ensure it does not come loose. A loose connection can cause the air horn to malfunction or fail to produce the desired sound.
Having a well-grounded air horn is essential for its proper functioning. A solid ground connection ensures that the electrical current flows smoothly and efficiently, allowing the horn to produce a strong and clear sound when activated. Therefore, taking the time to ground your air horn properly will considerably enhance its performance and longevity.
Step 7: Test The Horn
Once you have completed the installation process of your air horn, it is crucial to test the horn to ensure it is working properly. This final step will help you confirm that your installation was successful and that your air horn will deliver the loud and attention-grabbing sound you desire.
Reconnect the battery
Before you proceed with testing the horn, make sure you have reconnected the battery. This is important as it will provide power to your air horn and allow it to function. Take appropriate safety precautions and ensure there are no loose wires or connections.
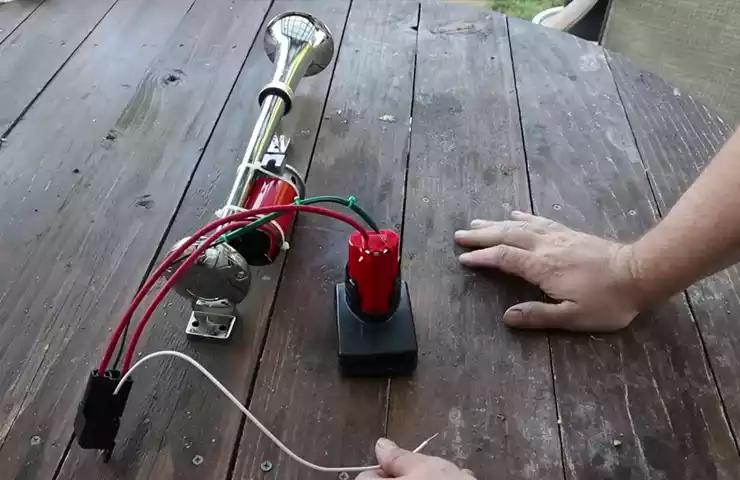
Test the horn to ensure it is working properly
With the battery reconnected, it’s time to test your air horn. Sit in the driver’s seat, start your vehicle, and press the horn button. Listen for the distinct loud sound of the air horn. If the horn does not produce the desired sound or fails to function at all, troubleshooting may be necessary.
If you notice any issues during testing, inspect the wiring connections to make sure they are secure. Check for any loose wires or faulty connections that may be affecting the horn’s performance. Additionally, review the installation instructions to ensure you have followed them accurately.
If the problem persists, consult the manufacturer’s manual or reach out to the customer support for assistance. Their expertise will help you identify and resolve any technical issues you may be experiencing.
Adjust any settings as necessary
Once you have confirmed that the air horn is working properly, take a moment to adjust any settings as necessary. Some air horns come with adjustable settings such as tone, volume, or pitch. Refer to the manufacturer’s instructions to understand how to make any desired adjustments.
Experiment with different settings to find the one that meets your preferences and requirements. Whether you want a deep, booming sound or a sharp, high-pitched tone, the adjustable settings on your air horn will allow you to fine-tune its performance.
Keep in mind that adjusting the settings may require testing the horn multiple times to find the perfect balance. Take your time and ensure that each adjustment is made carefully, so you achieve the desired sound you are looking for.
By following these steps, you will be able to successfully install and test your air horn. Remember to prioritize safety throughout the installation process and double-check all connections and settings to guarantee optimal performance. Enjoy the powerful sound of your air horn and stay safe on the road!
Step 8: Secure The Wiring
Once you have connected all the necessary wires, it is crucial to secure the wiring properly to ensure it stays in place and doesn’t cause any damage or interference with other components of your vehicle. Use zip ties or clips to neatly secure the wiring along the vehicle’s frame, keeping it organized and out of the way.
Securing the wiring may seem like a small step, but it can make a big difference in the long run. Properly securing the wiring not only prevents it from getting tangled or damaged, but it also maintains a clean and professional installation.
Use Zip Ties or Clips
When it comes to securing the wiring, there are two popular options: zip ties or clips. Both options provide reliable support and can be easily attached to the vehicle’s frame. It’s ultimately up to your preference which option you choose. Some people prefer zip ties for their flexibility, while others prefer clips for their convenience.
Avoid Potential Damage or Interference
Regardless of the method you choose, the key is to avoid any potential damage or interference with other components. Make sure you secure the wiring away from any sharp edges, heat sources, or moving parts. This will help prevent any accidental cuts, abrasions, or melting of the wires.
Neatly Organize the Wiring
In addition to avoiding damage, it’s important to neatly organize the wiring. A jumbled and messy wiring job not only looks unprofessional, but it can also make future maintenance or troubleshooting difficult. By using zip ties or clips, you can keep the wires neatly tucked away and in place.
Adhering to HTML syntax for H3 headings:
| Original H3 Heading | HTML Syntax H3 Heading |
|---|---|
| Use zip ties or clips to neatly secure the wiring along the vehicle’s frame | <h3>Use zip ties or clips to neatly secure the wiring along the vehicle’s frame</h3> |
| Avoid any potential damage or interference with other components | <h3>Avoid any potential damage or interference with other components</h3> |
Remember, securing the wiring is an essential step in the installation process. By using zip ties or clips and ensuring each component adheres to HTML syntax, you can safeguard your wiring and maintain a clean and professional installation.
Step 9: Final Checks
After completing the installation of your air horn, it is crucial to perform some final checks to ensure everything is in place and ready to go. This step is important to guarantee the proper functioning of your air horn and to prevent any potential issues down the road.
Ensure all connections are secure and properly insulated
To begin, carefully examine all the connections you made during the installation process. Ensure that every connection is secure, firmly tightened, and free from any looseness or play. Loose connections can lead to improper horn functionality and may also cause unwanted vibrations or noise.
Inspect the wires for any signs of fraying or damage. If you notice any issues, such as exposed wires or damaged insulation, take the necessary steps to repair or replace them. Proper insulation is essential to prevent any short circuits or electrical malfunctions.
Verify that the air horn is mounted securely and free from any vibrations
The mounting of your air horn should be checked thoroughly. Make sure it is securely fastened to the desired location, whether it’s under the hood of your vehicle or on the exterior. A loose or unstable mounting can cause the horn to shift or vibrate, affecting both its performance and longevity.
Take a moment to inspect the mounting hardware. Ensure that all bolts, nuts, and brackets are properly tightened. If any part seems loose, tighten it until it is secure. This step will eliminate any chance of the air horn rattling or moving in use.
Frequently Asked Questions For How To Install Air Horn
Is It Illegal To Carry An Air Horn?
No, it is not illegal to carry an air horn. However, using it inappropriately or with the intention to cause harm may be against the law. Check local regulations for specific restrictions.
What Do You Need For An Air Horn?
To have an air horn, you need an air horn device, which comprises a horn with a compressed air canister. It produces a loud sound when the canister’s air is released.
Where Do You Mount Air Horns?
Mount air horns on the front of your vehicle, typically behind the grille for easy access. It ensures the sound travels effectively and alerts others on the road. Follow the instructions provided in the air horn’s installation manual for accurate placement.
Do Air Horns Need A Compressor?
Yes, air horns require a compressor to produce the loud, audible sound. The compressor supplies the necessary pressurized air that is released through the horn, creating the distinctive noise.
Conclusion
Installing an air horn is a simple task that can greatly enhance the safety of your vehicle. By following the step-by-step guide we provided, you can easily complete this installation process on your own. Remember to gather all the necessary tools and materials beforehand for a smooth and efficient installation.
With an air horn in place, you’ll have the added assurance that your vehicle’s presence will be heard, ensuring a safer and more enjoyable driving experience.