To install a wood bed in a truck, measure the truck bed dimensions, cut the wood to fit, and secure it with screws and brackets. Looking to add a touch of rustic charm to your truck?
Installing a wood bed is a fantastic way to achieve that rugged, classic look. Whether you’re a DIY enthusiast or simply want to customize your truck, this step-by-step guide will walk you through the process. With just a few basic tools and materials, you’ll have a beautiful, durable wood bed that not only adds personality to your truck but also provides a practical and functional space for hauling cargo.
So grab your measuring tape and get ready to transform your truck into a stylish and versatile workhorse.
Gathering The Necessary Tools And Materials
Gathering the Necessary Tools and Materials
Before you can start installing a wood bed in your truck, it’s important to gather all the necessary tools and materials. By having everything you need on hand, you’ll be able to complete the installation smoothly and efficiently. Below is a detailed list of the tools and materials you will need:
List of tools needed for the installation
To successfully install a wood bed in your truck, you’ll need the following tools:
- Measuring tape: This will help you accurately measure the dimensions of the truck bed.
- Saw: A saw is necessary for cutting the wood to the appropriate size.
- Drill: You’ll need a drill to create holes for screws and fasteners.
- Screwdriver: A screwdriver is essential for tightening screws and fasteners.
- Sandpaper: You will need sandpaper to smooth out any rough edges or surfaces.
- Clamps: Clamps are helpful for securing the wood in place while you work on the installation.
- Level: A level is necessary to ensure that the wood bed is properly aligned.
- Protective gear: Don’t forget to wear safety goggles, gloves, and a dust mask to protect yourself during the installation process.
List of materials required for the installation
In addition to the tools mentioned above, you’ll also need the following materials:
- Wood: Choose a high-quality wood that is suitable for a truck bed, such as pressure-treated lumber or hardwood.
- Screws and fasteners: Select screws and fasteners that are compatible with the wood you are using.
- Sealer or paint: To protect the wood bed from weather damage, consider using a sealer or paint specifically designed for outdoor use.
- Bed liner: If you want to provide extra protection to the truck bed, you can also use a bed liner.
By gathering all the necessary tools and materials in advance, you’ll be well-prepared to tackle the installation of a wood bed in your truck. With the right equipment at your disposal, you can ensure a successful and long-lasting result.
Measuring The Truck Bed
Determining the dimensions of the truck bed
Before installing a wood bed in your truck, it is crucial to accurately measure the dimensions of your truck bed. By measuring it correctly, you can ensure that the wood bed will fit snugly and function effectively. Here’s how you can determine the dimensions of your truck bed:
- Start by gathering the necessary tools, such as a measuring tape, a pencil, and a notepad. Having these tools on hand will allow you to record the measurements accurately.
- Open the tailgate and clear the truck bed of any debris or items that may obstruct your measurements. It’s important to have a clean and clear surface to obtain accurate measurements.
- Take your measuring tape and stretch it from the inside of the front panel of the truck bed to the inside of the rear panel. Record the measurement in inches or feet based on your preference.
- Next, measure the width of the truck bed. This can be done by stretching the measuring tape from one side panel to the other. Make sure to measure it at various points to account for any irregularities.
- If your truck bed has any wheel wells, measure the distance from the inside of one wheel well to the inside of the other. This will ensure that your wood bed will fit properly around the wheel wells.
Calculating the amount of wood needed
Once you have determined the dimensions of your truck bed, the next step is to calculate the amount of wood you will need for the installation. Here’s a simple guide:
- Start by determining the length, width, and depth of the truck bed. Multiply these three measurements together to obtain the cubic volume.
- Next, consider the type of wood you plan to use for the bed. Different wood types have different densities, so you will need to consult a density chart to determine the weight per cubic inch or foot of the wood.
- Divide the cubic volume of the truck bed by the wood density to obtain the weight of the wood needed.
- To convert the weight into the number of boards required, divide the weight by the average weight of a single board. This will give you an estimate of the number of boards needed.
Make sure to account for any additional reinforcement or support structure you may want to add to the wood bed. This can include cross braces or support beams to ensure the bed is sturdy and durable.
By accurately measuring the truck bed and calculating the amount of wood needed, you can confidently proceed with the installation of a wood bed in your truck. Once installed, it will not only enhance the functionality of your truck but also add a touch of natural aesthetic appeal.
Removing The Bedliner (Seo-Friendly)
Removing the bedliner from your truck is an essential step when installing a wood bed. By following the correct steps, you can ensure a smooth removal process without causing any damage to your truck. In this section, we will discuss the steps to remove the bedliner and provide some tips for a hassle-free removal process.
Steps to remove the bedliner
- Prepare your tools:
- Heat the bedliner:
- Scrape off the bedliner:
- Clean the truck bed:
Tips for a smooth removal process
- Protect yourself:
- Work in a well-ventilated area:
- Take breaks if needed:
- Test a small area:
- Be patient:
Detaching The Bed From The Truck Frame
One of the fundamental steps in installing a wood bed in your truck is detaching the existing bed from the truck frame. This process allows you to start with a clean slate and ensures the new wood bed fits perfectly. While it may seem daunting, especially if you lack automotive experience, following the right instructions and having the necessary tools at hand can make this task much simpler than you might expect.
Instructions for safely removing the bed
Removing the bed from your truck frame requires careful attention to detail and safety precautions. Follow these step-by-step instructions to ensure a smooth and hazard-free process:
- Step 1: Prepare the work areaBefore starting, make sure you have enough space to work and gather all the required tools. Clear the work area of any obstacles that may hinder your movement. It’s also advisable to wear appropriate safety gear, including gloves and protective eyewear.
- Step 2: Lift the truck bedUsing a suitable lifting mechanism, such as a hydraulic jack, lift the truck bed to a safe working height. Ensure the load-bearing capacity of the lifting mechanism is sufficient to support the weight of the bed. It’s crucial to lift the bed evenly to prevent any strain on the frame or potential accidents.
- Step 3: Disconnect electrical connections and wiringLocate the electrical connections and wiring that connect the truck to the bed. Typically, there will be taillight wiring and other electrical connections present. Carefully disconnect them, ensuring you don’t damage any of the wires. It’s a good practice to label each connection to ease reinstallation later.
- Step 4: Remove the bed bolts or fastenersLocate the bed bolts or fasteners that secure the bed to the truck frame. Depending on the make and model of your truck, these may be accessible from inside the truck bed, underneath the vehicle, or both. Use the appropriate tools, such as a socket wrench or a torque wrench, to remove the bolts or fasteners. Make sure to keep track of the bolts and fasteners for future reassembly.
- Step 5: Lower the truck bedOnce all the bolts or fasteners have been removed, gradually lower the truck bed back to the ground. Make sure to lower it evenly to avoid any sudden shifts or tilting. Take your time during this step, verifying that the bed is secure and not placing any strain on the lifting mechanism.
Tools required for detaching the bed
To carry out the bed detachment process smoothly, you’ll need the following tools:
- Hydraulic jack: A hydraulic jack is essential for safely lifting the truck bed to an appropriate height.
- Socket wrench set: A socket wrench set with various socket sizes will be needed to remove the bed bolts or fasteners efficiently.
- Torque wrench: A torque wrench comes in handy for secure and precise tightening or loosening of bolts or fasteners.
- Labeling material: Using labels or other marking materials helps in identifying and organizing electrical connections and wiring during the dismantling process.
- Safety gear: Ensure you have protective gloves and eyewear to mitigate any potential hazards during the procedure.
Choosing The Right Wood (Seo-Friendly)

Choosing the Right Wood (SEO-friendly) When it comes to installing a wood bed in your truck, choosing the right type of wood is crucial for durability, functionality, and aesthetic appeal. Different types of wood have varying levels of strength, resistance to weather conditions, and overall longevity. To help you make an informed decision, we’ve outlined the different types of wood suitable for a truck bed, as well as the factors to consider when selecting the wood for this purpose.
Different types of wood suitable for a truck bed
Not all types of wood are suitable for a truck bed due to the heavy-duty nature of this application. You need wood that can withstand the weight of cargo, resist rot and decay, and withstand the elements. Here are some of the most commonly used woods for truck beds:
| Type of Wood | Characteristics |
|---|---|
| Pressure-treated lumber | Highly resistant to rot and decay due to the pressure treatment process. It is also strong and durable, making it a popular choice for truck beds. |
| Hardwood (such as oak, birch, or maple) | Known for their natural strength and durability, hardwoods are a great choice for truck beds. They can also add a touch of elegance to your truck. |
| Composite wood | A combination of wood fibers and resins, composite wood is engineered to be extremely durable and weather resistant. It is available in various colors and finishes as well. |
Factors to consider when selecting the wood
When choosing the right wood for your truck bed, there are several factors you should consider to ensure optimal performance and longevity. These factors include:
- Strength: The wood should have high strength to withstand the weight of heavy cargo without bending or breaking.
- Durability: Look for wood that is resistant to rot, decay, and insect damage. This will ensure that your truck bed lasts for years to come.
- Weather resistance: Consider the climate in which you’ll be using your truck. Choose wood that can withstand extreme temperatures and weather conditions, such as rain, snow, and intense sunlight.
- Cost: Evaluate the cost of different types of wood and consider your budget. Keep in mind that investing in high-quality wood initially may save you money in the long run by reducing the need for frequent repairs or replacements.
- Aesthetics: If the appearance is important to you, select wood that complements the overall look of your truck and reflects your personal style.
By carefully considering these factors and choosing the right type of wood for your truck bed, you can enjoy a sturdy and visually appealing addition to your vehicle. Remember to prioritize strength, durability, and weather resistance to ensure that your wood bed withstands the test of time.
Cutting And Preparing The Wood
When it comes to installing a wood bed in your truck, cutting and preparing the wood is a crucial step that requires careful attention. By following the right techniques and safety precautions, you can ensure a precise fit and a sturdy installation. In this section, we will discuss the safety precautions to keep in mind while cutting the wood and techniques for getting precise measurements.
Safety Precautions While Cutting the Wood
Cutting wood can be potentially dangerous, so it’s important to take the necessary safety precautions to avoid accidents and injuries. Here are some safety tips to consider:
- Wear Safety Gear: Always wear safety goggles, gloves, and a dust mask to protect yourself from flying wood chips, splinters, and dust particles that can be harmful to your eyes, hands, and respiratory system.
- Use Protective Equipment: It is recommended to use ear protection, such as earmuffs or earplugs, to minimize the impact of loud noise produced by power tools.
- Secure the Wood: Make sure to secure the wood firmly before cutting it to prevent it from moving or slipping during the cutting process. This can be done using clamps or vice grips.
- Use the Right Tools: Always use sharp and proper tools suitable for cutting wood, such as a circular saw or a jigsaw, to ensure clean and precise cuts.
- Maintain a Clear Workspace: Keep your work area clutter-free and organized, removing any unnecessary tools or materials that may hinder your ability to work safely and efficiently.
Techniques for Getting Precise Measurements
Accurate measurements are essential to ensure your wood bed fits perfectly in your truck. Here are some techniques to help you get precise measurements:
- Take Multiple Measurements: Measure the width, length, and height of your truck bed multiple times to ensure accuracy. This will help you avoid any potential errors due to inconsistencies in your measurements.
- Consider the Taper: Keep in mind that some truck beds may have a taper, meaning the width may vary slightly from the front to the back. Measure both ends to account for any variations and ensure a snug fit.
- Account for Clearances: Consider any clearances needed for hardware, such as bolts or tie-downs, and include them in your measurements. This will ensure that everything fits together without any obstructions.
- Use a Straight Edge: When marking your measurements on the wood, use a straight edge, such as a carpenter’s square or a metal ruler, to create precise lines. This will help you make accurate cuts.
- Double-Check Before Cutting: Before making any cuts, double-check your measurements to ensure they are correct. This will help you avoid any unnecessary mistakes or wasted materials.
By following these safety precautions and measurement techniques, you can cut and prepare the wood for your truck bed installation with confidence. With precise measurements and secure cuts, you’ll be well on your way to creating a durable and practical wood bed for your truck.
Assembling The Wood Bed
Installing a wood bed in your truck not only adds a touch of rustic charm but also provides a practical solution for transporting heavy items. One of the most crucial steps in this process is assembling the individual wood pieces to create a sturdy bed. In this section, we’ll guide you through the steps to assemble the wood bed and introduce joining techniques that will ensure its durability.
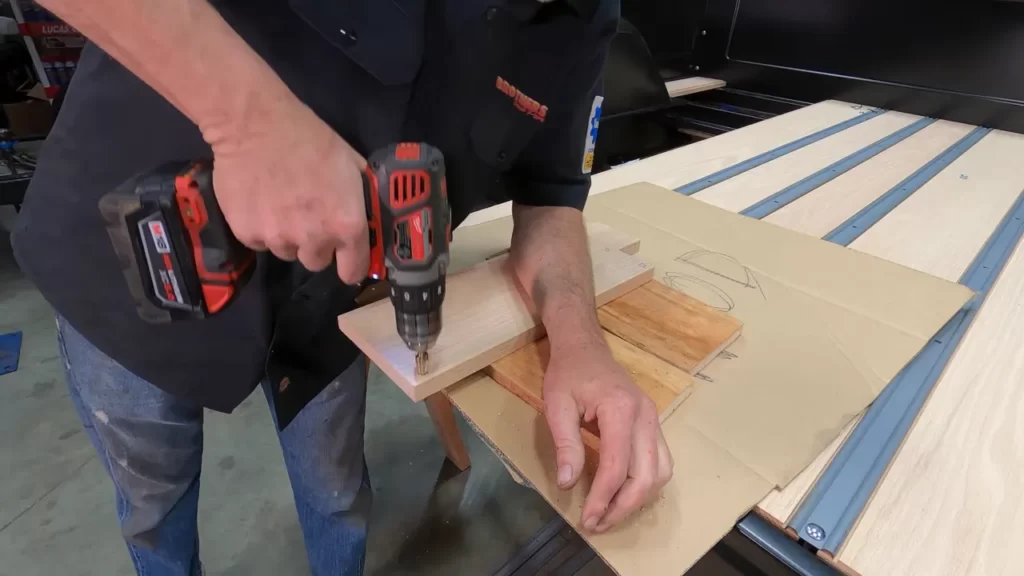
Steps to Assemble the Individual Wood Pieces
Before you can start assembling the individual wood pieces, make sure you have all the necessary materials handy. You’ll need the desired wood planks, screws, a drill, measuring tape, and a saw. Once you have everything ready, follow these steps:
- Measure and cut the wood planks according to the dimensions of your truck bed. If you’re unsure about the measurements, consider consulting the manufacturer’s guidelines or seeking professional advice.
- Place the cut wood planks on a flat surface, ensuring they align perfectly.
- Using a drill, create pilot holes along the edges of each wood plank. This will help prevent splintering and make it easier to attach the screws later on.
- Once the pilot holes are ready, use screws to join the wood planks together. Make sure to tighten the screws securely, but avoid over-tightening as it could damage the wood.
Following these steps will ensure a seamless assembly of the individual wood pieces and set you on the right track to completing your wood bed installation.
Joining Techniques for a Sturdy Bed
Now that the wood planks are assembled, it’s essential to utilize proper joining techniques to ensure a sturdy bed that can withstand the demands of daily use. Here are some joining techniques to consider:
- Lap Joints: Lap joints provide a strong connection by overlapping the ends of two wood pieces. This technique adds stability to the bed structure.
- Mortise and Tenon Joints: Mortise and tenon joints involve creating a protruding tenon on one piece of wood that fits into a corresponding mortise on the other piece. This technique is known for its strength and durability.
- Biscuit Joints: Biscuit joints involve using oval-shaped wooden biscuits and glue to join two wood pieces. These biscuits add reinforcement and stability to the bed structure.
By utilizing these joining techniques, you can ensure that your wood bed withstands the rigors of everyday use, providing you with a reliable and secure cargo storage solution.
Assembling the wood bed is a crucial step in installing it in your truck. By following the steps to assemble the individual wood pieces and employing appropriate joining techniques, you’ll create a sturdy and durable bed that enhances both the functionality and aesthetics of your truck.
Installing The Wood Bed (Seo-Friendly)
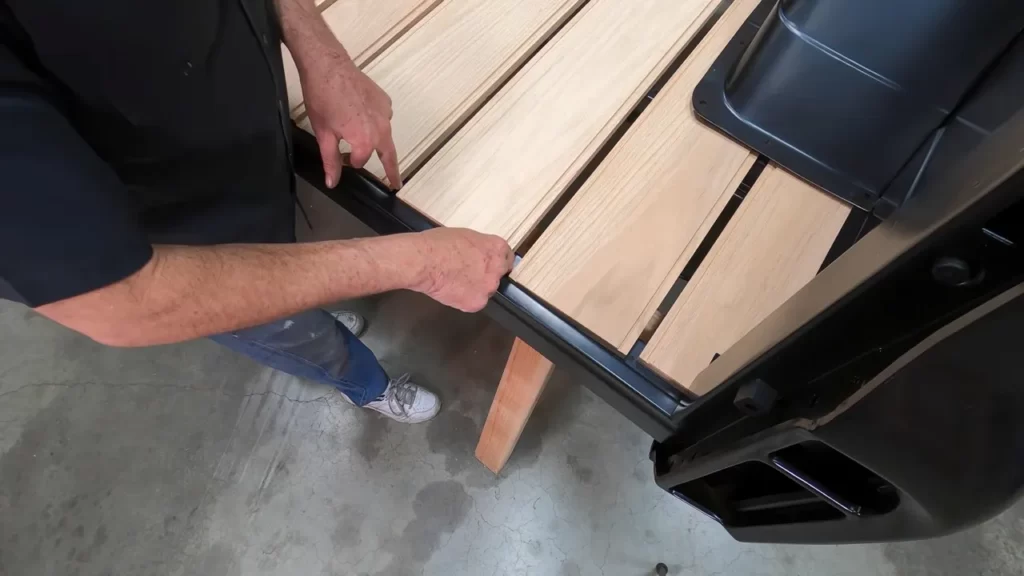
Attaching the wood bed to the truck frame
When it comes to installing a wood bed in your truck, the first step is to securely attach it to the truck frame. This ensures that the bed is stable and can withstand the weight of any cargo you plan to transport.
To attach the wood bed to the truck frame:
- Measure and mark the placement of the wood bed on the truck frame. It is important to ensure that the bed is aligned properly with the frame for a secure fit.
- Using a drill, create pilot holes on the marked spots. These pilot holes will guide the screws or bolts into the wood bed.
- Place the wood bed on the truck frame, aligning the pilot holes with the corresponding holes on the bed.
- Secure the wood bed to the truck frame by inserting screws or bolts through the pilot holes and tightening them using a wrench or screwdriver.
Securing the bed with bolts or screws
Securing the wood bed to the truck frame can be done using either bolts or screws. Both options have their own advantages and it ultimately depends on personal preference.
When using bolts:
- Choose bolts that are suitable for the size and weight of the wood bed.
- Insert the bolts through the pilot holes in the wood bed and align them with the corresponding holes in the truck frame.
- Tighten the bolts using a wrench until they are securely fastened and the wood bed is stable.
When using screws:
- Choose screws that are long enough to securely attach the wood bed to the truck frame.
- Insert the screws through the pilot holes in the wood bed and into the corresponding holes in the truck frame.
- Tighten the screws using a screwdriver until they are firmly in place.
Remember, whether you choose bolts or screws, it’s crucial to ensure that each fastener is tightened properly to prevent any movement of the wood bed.
In conclusion, installing a wood bed in your truck requires properly attaching it to the truck frame and securing it with bolts or screws. Following the steps mentioned above will help you achieve a secure and stable wood bed that can withstand the rigors of transporting cargo.
Sanding And Staining The Wood

Introduction: Sanding and Staining the Wood
Sanding and staining the wood surface of your truck bed is an essential step in the installation process. Not only does it enhance the appearance of the wood, but it also protects it from wear and tear, ensuring its longevity.
Steps for sanding the wood surface
Before you can begin staining the wood, it is crucial to prepare the surface properly. Follow these steps to achieve a smooth and polished finish:
- Start by removing any previous finish or paint using a paint stripper or sandpaper. This will allow the stain to penetrate the wood evenly.
- Next, use a medium-grade sandpaper to sand the entire wood surface. Sanding in the direction of the wood grain will help remove any roughness and create a smooth texture.
- Once the wood is sanded, switch to a fine-grade sandpaper for a final pass. This will further refine the surface, ensuring a flawless finish.
- After sanding, use a vacuum or a clean cloth to remove any dust or debris from the wood surface. This step is essential to achieve a clean and even stain application.
Tips for applying the perfect stain
Choosing the right stain color and applying it correctly can make a significant difference in the final appearance of your wood truck bed. Keep these tips in mind:
- Before applying the stain, always test it on a small, inconspicuous area of the wood to ensure you are satisfied with the color.
- Stir the stain thoroughly to mix the pigments and achieve an even color distribution.
- Apply the stain using a brush or a lint-free cloth in the direction of the wood grain. This technique allows the stain to penetrate adequately and highlights the natural beauty of the wood.
- Ensure that each section of the wood bed receives an even amount of stain to prevent uneven coloring. Take your time to apply the stain carefully and consistently.
- After applying the stain, remove any excess by wiping the wood with a clean cloth. This step helps prevent the stain from dripping or pooling, ensuring a professional-looking finish.
- Allow the stain to dry completely according to the manufacturer’s instructions before proceeding to the next step in the installation process.
By following these steps and tips, you can achieve a beautifully stained wood surface for your truck bed. The sanding process will provide a smooth foundation, while the application of the perfect stain color will enhance the overall appearance and protect the wood for years to come.
Sealing And Protecting The Wood
Sealing and protecting the wood of your truck bed is an essential step in ensuring its longevity and durability. By applying a protective coating and implementing the right maintenance methods, you can safeguard the wood from moisture, weathering, and damage. In this section, we will discuss how to apply a protective coating to the wood bed and explore various techniques for maintaining its durability.
Applying a protective coating to the wood bed
When it comes to sealing and protecting the wood bed of your truck, applying a protective coating is crucial. This coating acts as a barrier against moisture, UV rays, and other potential sources of damage. Here are the steps to follow:
- Clean the wood: Before applying any coating, make sure the wood bed is clean and free from debris. You can use a mild soap and water solution to gently clean the surface and remove any dirt or grease that might be present.
- Sand the wood: Once the wood is clean, use fine-grit sandpaper to smooth the surface and remove any rough patches or imperfections. Sanding helps the protective coating adhere better to the wood.
- Choose a protective coating: There are various options when it comes to selecting a protective coating for your wood bed. Some popular choices include polyurethane, varnish, and marine-grade sealants. Consider factors such as durability, ease of application, and the level of protection required.
- Apply the coating: Follow the manufacturer’s instructions and use a brush or roller to evenly apply the protective coating to the wood bed. Take care to cover all areas, including the edges and corners. Multiple coats may be necessary, depending on the type of coating you choose.
- Allow for sufficient drying time: After applying the protective coating, it’s important to allow it to dry completely. This will ensure that the coating hardens and forms a strong protective layer on the wood bed.
Methods for maintaining the wood’s durability
Maintaining the durability of a wood bed in a truck requires regular care and attention. By following these methods, you can help preserve the wood’s quality and extend its lifespan:
- Regular cleaning: Keep the wood bed clean by regularly removing dirt, debris, and any spilled liquids. Use a gentle cleanser and a soft cloth or sponge to prevent scratches or damage.
- Applying additional coats: Over time, the protective coating may wear off or become damaged. To maintain the wood’s durability, consider applying additional coats of the protective coating at regular intervals. This will ensure continuous protection against the elements.
- Protecting from direct sunlight: Exposure to direct sunlight can cause the wood to fade and deteriorate. If possible, park your truck in shaded areas or use a truck bed cover to shield the wood bed from harmful UV rays.
- Addressing damage promptly: If you notice any signs of damage such as cracks, warping, or splintering, address them promptly. Repairing or replacing damaged sections will prevent further deterioration of the wood bed.
By applying a protective coating and implementing proper maintenance techniques, you can ensure that your wood bed remains sturdy, resilient, and visually appealing for years to come. Remember to follow the manufacturer’s guidelines for the protective coating and conduct regular inspections to detect any potential issues early on.
Testing And Ensuring Stability
Testing and Ensuring Stability
Before you hit the road with your newly installed wood bed in your truck, it is crucial to test and ensure the stability of your setup. This step is vital to prevent any accidents or damage to your truck or cargo while you’re driving. By following these guidelines and carefully checking each component, you can have peace of mind knowing that your wood bed is securely in place.
Checking the Stability of the Wood Bed
Once you have installed the wood bed in your truck, the first step is to perform a thorough stability check. This will involve physically inspecting and testing the bed to make sure it is securely placed and able to handle your intended load. Here’s how:
1. Inspect the Connections
Start by visually inspecting all the connections between the wood bed and your truck frame. Check for any loose bolts or screws that may have been missed during installation. Ensure that all connections are tight and properly secured. If you notice anything loose, tighten it immediately using the appropriate tools and hardware.
2. Test the Bed’s Durability
Next, put your new wood bed to the test by applying pressure to various areas. Walk around the bed and press down on it using your body weight. You can also gently shake the bed from different angles to mimic the movements it might experience while driving on uneven terrain. Pay close attention to any wobbling or shifting. A stable wood bed should not budge or make any unusual noises during these tests.
3. Consider the Weight Limit
It’s essential to know the weight capacity of your wood bed to avoid overloading it. Check the manufacturer’s guidelines or consult with a professional if needed. Once you know the maximum weight limit, make sure your intended cargo falls within that range. Overloading the wood bed can lead to instability and potential damage to both your truck and the bed itself.
Ensuring All Connections Are Secure
After checking the stability of your wood bed, the next step is to ensure that all connections are secure. This will help prevent any unexpected loosening or detachment during transit. Follow these tips to properly secure your wood bed:
1. Double-Check Bolts and Screws
Go through all the bolts and screws that connect the wood bed to the truck frame. Use a wrench or screwdriver to tighten them as necessary. It’s a good idea to periodically check these connections for tightness during regular truck maintenance to prevent any potential issues in the future.
2. Consider Reinforcements
If you want to add an extra layer of security to your wood bed, consider using reinforcements. These can include additional brackets or straps that provide additional support and stability. Consult with a professional or follow the manufacturer’s recommendations for any specific reinforcement materials or methods that are compatible with your wood bed and truck model.
By performing a thorough stability check and ensuring all connections are secure, you can confidently hit the road with your wood bed installed in your truck. Remember to always prioritize safety and follow the manufacturer’s guidelines for installation. With proper maintenance and care, your wood bed will provide you with years of reliable use.
Frequently Asked Questions On How To Install A Wood Bed In A Truck
What Wood Do You Use For A Truck Bed?
For a truck bed, the most commonly used wood is pressure-treated lumber. It is durable, resistant to rot and decay, and can withstand heavy loads. Other options include oak, pine, and cedar, depending on personal preferences and budget.
How Do You Seal A Wooden Truck Bed?
To seal a wooden truck bed, follow these steps: sand the surface, apply primer to protect against moisture, use a brush to apply a sealant, let it dry completely, and then add a layer of protective clear coat. Regular maintenance is key to prolonging the seal’s effectiveness.
How Do You Distribute Weight In A Truck Bed?
Distribute weight in a truck bed by placing heavy items near the front and on the bottom. Use tie-downs to secure the load and prevent shifting. Distributing weight evenly helps maintain vehicle stability and control. Always consult your owner’s manual for specific recommendations.
How Much Does A Truck Bed Weigh?
A truck bed weighs approximately 500-2,500 pounds, depending on the size and type of the truck. The weight is influenced by factors like material used, additional features, and modifications made. It is crucial to consider the weight when towing or distributing load in the truck.
Conclusion
Installing a wood bed in your truck can be a straightforward and rewarding project. By following the steps outlined in this guide, you can easily transform your truck bed and enhance its functionality. Remember to measure carefully, choose the right materials, and take your time during the installation process.
With a little effort and some basic tools, you’ll be enjoying your new wood bed in no time. So, get started on your truck bed upgrade and enjoy the many benefits it brings!