To install a wheel bearing, jack up the vehicle, remove the wheel and brake assembly, disconnect the bearing hub from the steering knuckle, install the new bearing, and reassemble the parts. Wheel bearings are important components of a vehicle’s suspension system.
They enable smooth rotation of the wheels while supporting the weight of the vehicle. Over time, wheel bearings may wear out or become damaged, resulting in noise, vibration, and compromised handling. When this happens, it is crucial to replace them.
Knowing how to install a wheel bearing can save you time and money by avoiding costly visits to a mechanic. In this guide, we will walk you through the steps to properly install a wheel bearing on your vehicle. By following these instructions carefully, you can ensure the safe and efficient operation of your vehicle’s wheels. Let’s get started!
Understanding Wheel Bearings
Before embarking on the installation of a wheel bearing, it is crucial to have a solid understanding of what wheel bearings are and their importance in the smooth functioning of your vehicle. This section will guide you through the basics, ensuring you have all the necessary knowledge before getting your hands dirty.
What are Wheel Bearings?
Wheel bearings are vital components of your vehicle’s wheel assembly, responsible for enabling smooth rotation of the wheels. Designed to reduce friction and allow efficient movement, wheel bearings consist of metal balls or rollers enclosed within a metal ring known as a “race.” These inner and outer races are typically made of hardened steel to withstand the immense pressure and loads they experience.
By providing a low-friction surface, wheel bearings allow the wheels to spin freely, enabling your vehicle to smoothly cruise down the road. They ensure that the weight of the vehicle is distributed evenly across the wheel, preventing excessive wear and tear on other components.
Importance of Wheel Bearings
Wheel bearings play a critical role in maintaining the stability, safety, and overall performance of your vehicle. Without properly functioning wheel bearings, you risk experiencing a host of issues that can escalate into costly repairs or, worse, accidents on the road.
Here are a few reasons why wheel bearings deserve your attention:
- Smooth and Stable Ride: Wheel bearings facilitate the smooth rotation of the wheels, preventing jarring and vibrations while driving. They help maintain stability and control, providing a comfortable driving experience for both you and your passengers.
- Enhanced Safety: Faulty wheel bearings can lead to wheel misalignment, causing uneven tire wear and compromised handling. This can be especially dangerous when navigating sharp turns or braking at high speeds. By ensuring your wheel bearings are in top shape, you maximize the safety of your vehicle.
- Extended Tire Life: When wheel bearings are properly lubricated and functioning correctly, they help distribute the vehicle’s weight evenly across the tires. This reduces excessive wear on the tires and prolongs their lifespan, preventing the need for premature replacements.
- Efficient Fuel Consumption: Damaged wheel bearings can introduce unwanted friction, resulting in increased fuel consumption. By keeping your wheel bearings well-maintained and promptly addressing any issues, you can optimize fuel efficiency and save money at the pump.
Understanding the significance of wheel bearings empowers you to identify and address any potential problems promptly. By maintaining and replacing your wheel bearings as necessary, you not only safeguard your vehicle and its occupants but also ensure a smooth and enjoyable driving experience.
Signs Of A Worn Wheel Bearing
Being aware of the signs of a worn wheel bearing is crucial for maintaining the safety and performance of your vehicle. Ignoring these signs can lead to further damage and potentially unsafe driving conditions. By keeping an eye out for these indicators, you can identify when it’s time to replace your wheel bearing and ensure a smooth and enjoyable driving experience.
Strange noises
One of the most common signs of a worn wheel bearing is strange noises coming from your vehicle. These noises can vary from a low humming or rumbling sound to a high-pitched squeal. You might notice the noise gets louder as you increase your speed and disappears when you turn. These noises are typically an indication that the wheel bearing is worn down and no longer able to support the rotating wheel properly.
Vibration or wobbling
A worn wheel bearing can also cause vibrations or wobbling sensations while driving. You might feel a slight vibration through the steering wheel or experience the whole vehicle shake. This can be especially noticeable at higher speeds or when making turns. If you notice any unusual vibrations or wobbling, it’s essential to have your wheel bearings inspected and replaced if necessary to prevent further damage.
Uneven tire wear
Uneven tire wear is another sign of a worn wheel bearing. When the wheel bearing is deteriorating, it can cause the tire to wear unevenly. You might notice one tire wearing down faster than the others or see patterns of wear such as cupping or scalloping on the tread. If you find that your tires are wearing unevenly, it’s essential to address the issue promptly as it can lead to premature tire failure and affect your vehicle’s handling.
Tools And Materials Required
In order to successfully install a wheel bearing, it’s important to have the right tools and materials at your disposal. This will help ensure a smooth and efficient installation process while also minimizing the risk of any damage to the bearing or other components.
List of tools needed
Here is a comprehensive list of the tools you will need to install a wheel bearing:
- Jack and jack stands
- Socket set with various sizes
- Torque wrench
- Breaker bar
- Hammer
- Pliers
- Screwdriver set
- Slide hammer
- Bearing puller
- Wire brush
- Clean rags
Having these tools readily available will make the installation process much easier and efficient. Make sure to have them organized and within reach before you begin.
Necessary materials for the installation
In addition to the tools, there are several materials you will need to ensure the proper installation of a wheel bearing:
- New wheel bearing: It’s important to have a brand new wheel bearing ready for installation. Using a worn-out or damaged bearing can lead to further complications or premature failure.
- Grease: Applying a suitable high-temperature wheel bearing grease is crucial for proper lubrication and protection against friction and heat. Make sure to use a grease specifically formulated for wheel bearings.
- Threadlocker: This adhesive is used to secure bolts and nuts in place, preventing them from loosening due to vibrations. Using threadlocker can help maintain the integrity of the installation and ensure long-term stability.
- Brake cleaner: Cleaning the surfaces around the wheel bearing and removing any dirt or debris is essential for a clean and reliable installation. Brake cleaner will help remove any grease, oil, or grime that could interfere with the bearing’s performance.
- Axle nut: Depending on the type of wheel bearing and vehicle, you may need a new axle nut to ensure proper fitment and security. It’s always recommended to replace the nut with a new one to maintain the correct torque and prevent any issues.
Having these materials on hand will help facilitate a successful wheel bearing installation and ensure optimal performance and longevity.
Preparing The Vehicle
Preparing the Vehicle
Raising the Vehicle Safely
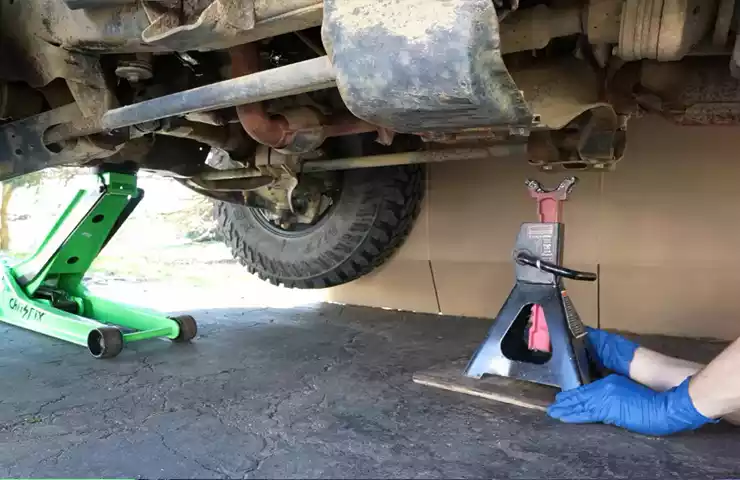
Before you begin installing a wheel bearing, it’s crucial to ensure the vehicle is raised safely to provide enough space to work and prevent any accidents. Follow these steps to raise your vehicle safely:
- Find a suitable location: Look for a flat, even surface such as a garage or level driveway, where you can work comfortably.
- Gather the necessary tools: Make sure to have a hydraulic jack, jack stands, and wheel chocks on hand.
- Secure the vehicle: Park the vehicle on a level surface and engage the parking brake. Place wheel chocks behind the rear tires to prevent the vehicle from rolling.
- Locate the jacking points: Refer to the vehicle’s user manual to identify the recommended jacking points. These are typically indicated on the body of the vehicle and should be used to lift the vehicle safely.
- Position the hydraulic jack: Place the hydraulic jack under the jacking point closest to the wheel you want to replace the bearing on. Ensure it is positioned securely and the jack pad is centered on the jacking point.
- Lift the vehicle: Using the hydraulic jack, slowly raise the vehicle until the wheel is off the ground. Make sure to raise it high enough to allow easy access to the wheel well and suspension components.
- Secure the vehicle with jack stands: Once the vehicle is raised to the desired height, place jack stands under suitable points along the vehicle’s frame or subframe. Slowly lower the hydraulic jack, allowing the vehicle to rest securely on the jack stands.
- Check stability: Give the vehicle a gentle shake to ensure it is securely supported by the jack stands. If there is any wobbling or instability, readjust the jack stands or lower the vehicle and reposition the stands.
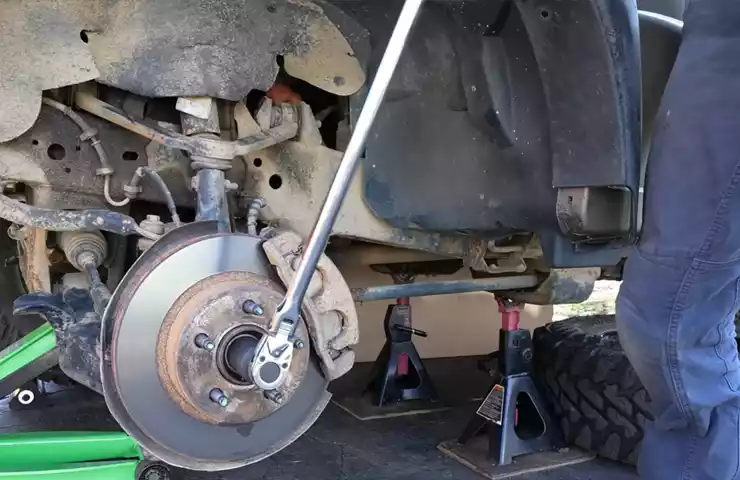
Removing the Wheels
Now that the vehicle is safely raised, it’s time to remove the wheels to gain access to the wheel bearings. Follow these steps carefully:
- Loosen the lug nuts: Use a lug wrench or socket wrench to loosen the lug nuts on the wheel you are removing. Do not remove them completely at this stage; just loosen them enough to make the next step easier.
- Position a jack stand: Slide a jack stand under the vehicle, as close to the wheel you are removing as possible, to act as an additional safety measure.
- Complete the wheel removal: Once the lug nuts are sufficiently loosened, lift the wheel slightly off the ground and remove the lug nuts completely. Carefully slide the wheel off the wheel hub and set it aside.
- Inspect the wheel bearings: Take a moment to visually inspect the exposed wheel bearings for any signs of damage, wear, or excessive play. If you notice any issues, consider replacing the wheel bearings before reinstalling the wheel.
By following these steps to prepare your vehicle safely, you can proceed with confidence to the next stage of installing a new wheel bearing. Stay tuned for our next blog post on how to install a wheel bearing.
Removing The Damaged Wheel Bearing
When it comes to maintaining your vehicle’s performance and safety, ensuring that your wheel bearings are in good condition is essential. Over time and with regular use, wheel bearings can become worn out or damaged, leading to issues such as excessive noise, vibration, and even steering problems. In this guide, we will walk you through the process of removing a damaged wheel bearing to help you keep your vehicle running smoothly and safely.
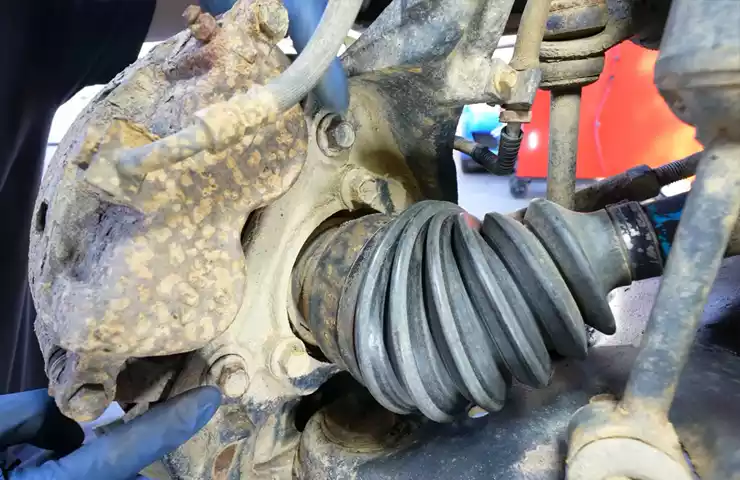
Removing the brake assembly
The first step in the process of removing a damaged wheel bearing is to remove the brake assembly. The brake assembly is typically held in place by a series of bolts or screws that need to be loosened or removed completely. To access these bolts, you may need to remove the wheel or any other components that are obstructing your access. Once the bolts are loosened or removed, gently pull the brake assembly away from the wheel hub. Be sure to support the assembly to prevent any unnecessary strain on the brake lines.
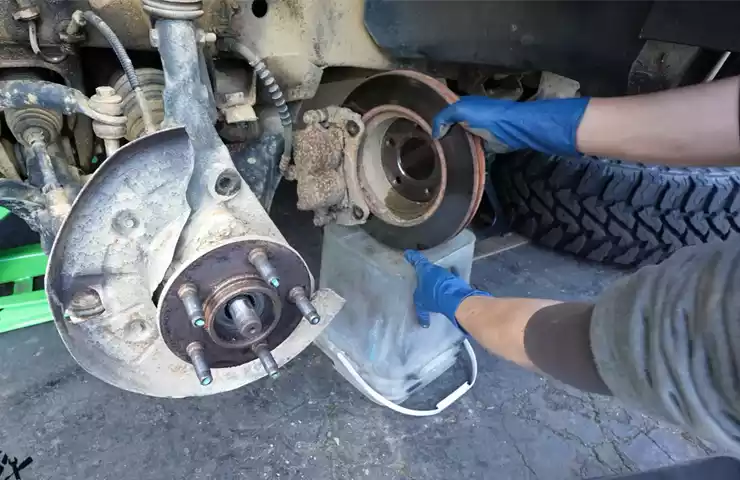
Extracting the old wheel bearing
Once the brake assembly has been removed, you can now focus on extracting the old wheel bearing. This step requires a few specialized tools, including a bearing puller or a bearing press. Begin by locating the retaining ring or clip that is holding the wheel bearing in place. Using the appropriate tools, carefully remove the retaining ring or clip and set it aside. Next, align the bearing puller or press with the inner race of the wheel bearing and apply steady pressure to extract it from the wheel hub.
If the bearing is stubborn or too damaged to be extracted using conventional tools, you may need to resort to more advanced techniques, such as heating the wheel hub or using a hydraulic press. It is important to be cautious when employing these methods, as excessive force or heat can cause further damage.
Once the old wheel bearing has been successfully extracted, take the time to inspect the wheel hub for any signs of damage or wear. Clean the hub thoroughly to remove any debris or dirt that may have accumulated. Additionally, inspect the brake assembly for any signs of damage or wear and address any necessary repairs or replacements before proceeding with the installation of the new wheel bearing.
In conclusion, removing a damaged wheel bearing is a crucial part of maintaining your vehicle’s performance and safety. By following these steps and using the proper tools, you can ensure a smooth and successful removal process. Remember to exercise caution and patience, and if you are unsure about any step, it is always recommended to seek professional assistance to avoid any potential damage to your vehicle.
Cleaning And Preparing The Hub
When it comes to installing a wheel bearing, it’s crucial to properly clean and prepare the hub. This step ensures optimal performance and longevity of the new bearing. In this section, we’ll guide you through inspecting the hub, cleaning the hub surface, and preparing it for the installation process.
Inspecting the Hub
Before you start cleaning, it’s essential to inspect the hub for any signs of damage or excessive wear. A thorough inspection will help you identify potential issues that may affect the installation and performance of the new wheel bearing. Here are some key points to look out for:
- Check for cracks or deformations on the hub surface.
- Look for any signs of rust or corrosion.
- Ensure that the hub is free from any excessive grease or dirt.
- Inspect the hub’s flange for any damage or warping.
If you notice any significant damage or irregularities during the inspection, it’s important to address them appropriately before moving forward with the installation.
Cleaning the Hub Surface
Once you’ve completed the inspection and verified that the hub is in good condition, it’s time to clean the hub surface. This step is crucial to ensure proper adhesion between the new wheel bearing and the hub. Follow these steps to clean the hub surface effectively:
- Start by removing any larger debris or loose particles from the hub using a brush or compressed air.
- Prepare a mixture of mild soap or degreaser with warm water in a bucket.
- Using a clean cloth or sponge, dip it into the soapy solution and gently scrub the hub surface.
- Pay extra attention to areas with stubborn dirt or grease buildup.
- Rinse the hub surface thoroughly with clean water to remove any soap residue.
- Dry the hub surface completely using a lint-free cloth.
Remember to avoid any harsh chemicals or abrasive cleaning tools that may cause damage to the hub surface. The goal is to achieve a clean and smooth hub ready for the installation process.
By following these steps, you’ll ensure that the hub is in optimal condition and ready for the installation of the new wheel bearing. Inspecting and cleaning the hub surface is a crucial part of the installation process that shouldn’t be overlooked.
Installing The New Wheel Bearing
Once you have removed the old wheel bearing, it’s time to install the new one. This step-by-step guide will walk you through the process of properly installing a new wheel bearing, ensuring smooth and safe driving.
Preparing the new wheel bearing
Before you begin installing the new wheel bearing, take a few moments to prepare it properly. Follow these steps:
- Inspect the new wheel bearing for any damage or defects. Ensure that it is clean and in perfect condition before proceeding.
- If necessary, apply a thin layer of high-temperature grease to the inner race of the wheel bearing. This will help to reduce friction and improve its lifespan.
- Take note of any additional components or accessories that may need to be installed along with the wheel bearing. These could include snap rings, seals, or spacers. Make sure you have all the necessary parts before moving forward.
Pressing the new wheel bearing into the hub
Now that the new wheel bearing is prepared, it’s time to press it into the hub. Follow these steps:
- Place the hub on a clean and stable surface, ensuring that it is aligned properly.
- Using a hydraulic press or a bearing press tool, carefully position the new wheel bearing onto the hub.
- Slowly apply pressure to the press, gradually pressing the wheel bearing into the hub. Make sure the bearing is aligned correctly and goes in straight.
- Continue pressing until the wheel bearing is fully seated in the hub. You may hear a distinct ‘pop’ sound, indicating that it is in place.
- Once the wheel bearing is installed, double-check that it is seated correctly and securely in the hub. Ensure there is no excessive play or movement.
Congratulations! You have successfully installed the new wheel bearing into the hub. Remember, it’s important to take your time and follow these steps carefully to ensure a proper installation. Doing so will ensure the longevity and performance of your vehicle’s wheel bearing.
Reassembling The Brake Assembly
Once you have successfully removed the old wheel bearing and inspected the hub for any damage, it’s time to reassemble the brake assembly. This step is crucial to ensure that the wheel bearing works properly and provides optimal performance.
Installing the brake assembly components
The first step in reassembling the brake assembly is to install the brake components. Start by inserting the brake pads into the caliper brackets and then slide the caliper back onto the rotor. Make sure the brake pads are properly aligned with the rotor surface to ensure effective braking.
Next, attach the brake caliper bolts and tighten them to the manufacturer’s specifications. Be careful not to overtighten as it can damage the caliper and affect its performance. It’s always recommended to use a torque wrench to achieve the correct torque.
After securing the calipers, you need to reattach the brake hose to the caliper. Ensure that the brake hose is properly seated and tighten the brake line fitting using an appropriate wrench. This will prevent any leaks or brake fluid loss during operation.
Tightening all bolts to specifications
Now that the brake assembly components are installed, it’s essential to tighten all the bolts to their required specifications. This ensures that the brake assembly is securely fastened and stable, preventing any potential issues in the future.
Start by referring to the manufacturer’s guidelines for the recommended torque specifications. Use a torque wrench to tighten the bolts to the specified values. Remember to work in a diagonal pattern and gradually increase the torque for uniformity and stability.
Check each bolt after tightening to ensure that it is secure and properly aligned. A loose bolt can compromise the integrity of the brake assembly and affect its performance.
Once all the bolts are tightened to specifications, give the brake assembly a final visual inspection. Look for any signs of misalignment or loose components. Address any issues immediately to avoid safety hazards.
Reassembling the brake assembly is a critical part of wheel bearing installation. Taking the time to install the brake components correctly and tighten all bolts to specifications will ensure optimal performance and safety on the road. Now that the brake assembly is complete, you’re one step closer to enjoying a smooth and efficient ride!
Mounting The Wheels And Lowering The Vehicle
Mounting the wheels and lowering the vehicle after replacing the wheel bearings is a crucial step in ensuring a smooth and safe ride. Properly mounting the wheels and lowering the vehicle will not only prevent any further damage to the new wheel bearings but also ensure optimal performance and stability. In this section, we will discuss the steps involved in properly mounting the wheels and safely lowering the vehicle.
Properly mounting the wheels
When it comes to mounting the wheels, it is important to follow the correct procedure to avoid any potential issues or damage. Here are the steps you need to follow:
- First, make sure that the hub and the wheel mounting surface are clean and free from any dirt, rust, or debris. Use a wire brush or a cleaning solution if necessary.
- Next, align the wheel with the wheel studs and carefully slide it onto the hub. Make sure the wheel is centered properly.
- Tighten the lug nuts by hand in a crisscross pattern to ensure even tightening. This will help avoid warping or damaging the wheel.
- Once the lug nuts are hand-tightened, use a torque wrench to tighten them to the manufacturer’s recommended torque specification. This is important to ensure proper clamping force and prevent wheel detachment.
Lowering the vehicle safely
Lowering the vehicle safely is essential to avoid any accidents or damage to the vehicle. Here are the steps to follow:
- Start by using a floor jack to raise the vehicle off the ground. Make sure to position the jack under the recommended lifting point specified in the vehicle’s manual.
- Once the vehicle is lifted, place jack stands under the recommended support points to ensure stability and prevent the vehicle from falling.
- Gently lower the vehicle onto the jack stands by slowly releasing the pressure on the floor jack. Take your time and make sure the vehicle is resting securely on the jack stands.
- Once the vehicle is safely lowered onto the jack stands, give it a gentle shake to ensure stability and make sure it is securely supported before proceeding with any repairs or maintenance activities.
By following these steps to properly mount the wheels and safely lower the vehicle, you can ensure a smooth and safe ride after replacing the wheel bearings. Remember to always refer to the vehicle’s manual for specific instructions and torque specifications.
Testing And Final Checks
After successfully installing the wheel bearing, it is essential to perform a series of tests and final checks to ensure a smooth and safe ride. By following these steps, you can verify that the wheel bearing is functioning correctly without any issues that might compromise your vehicle’s performance.
Spin the wheels to check for smooth rotation
As the final step in installing a wheel bearing, give the wheels a good spin to assess their rotation. While spinning each wheel individually, ensure the rotation is smooth and consistent without any resistance or hesitation. Pay close attention to any irregularities that may indicate a problem with the newly installed wheel bearing.
Verify no unusual noises or vibrations
While the wheels are spinning, keep your ears alert for any unusual noises or vibrations. A properly installed wheel bearing should operate silently and smoothly, without generating any unfamiliar sounds such as grinding, squeaking, or humming. Likewise, there should be no vibrations that could indicate a misalignment or instability in the wheel bearing.
If you detect any unfamiliar noises or vibrations, it may be a sign of a faulty or improperly installed wheel bearing. In such cases, it is recommended to revisit the installation process or seek assistance from a professional mechanic.
By spinning the wheels for smooth rotation and verifying the absence of any unusual noises or vibrations, you can wrap up the installation process confidently knowing that your wheel bearing is properly installed and functioning optimally. These final checks are crucial for ensuring your vehicle’s safety and performance on the road.
Preventative Maintenance Tips
Proper maintenance of wheel bearings is crucial for ensuring the longevity and performance of your vehicle’s wheels. By regularly inspecting and cleaning your wheel bearings, and replacing them as recommended, you can prevent costly repairs down the line. Here are some helpful tips to help you keep your wheel bearings in top shape.
Regular inspection and cleaning
Regularly inspecting and cleaning your wheel bearings is an essential step in preventative maintenance. By doing so, you can catch any initial signs of wear or damage before they escalate into more significant issues.
To begin, jack up the vehicle and securely support it on jack stands. Next, remove the wheels, brakes, and dust caps to gain access to the wheel bearings. Be sure to take note of any visible signs of wear, such as excessive play or grinding noises.
Once you have inspected the bearings, it’s time to clean them. Use a clean, lint-free cloth and some degreaser to remove any dirt, grime, or old grease that may have accumulated. This will help ensure proper lubrication and prevent contaminants from causing damage.
After cleaning, carefully inspect the bearings again to ensure they are free of any remaining debris. If you notice any signs of damage or excessive wear, it’s best to replace the bearings promptly to avoid further problems.
Replacing wheel bearings as recommended
While regular cleaning and inspection can help prolong the lifespan of your wheel bearings, eventually, they will need to be replaced. Following the manufacturer’s recommendations for replacement intervals is important to prevent sudden failures and potentially dangerous situations.
When replacing your wheel bearings, it’s essential to use high-quality bearings that are suitable for your specific vehicle make and model. Using substandard or incompatible bearings can lead to premature failure, compromising the safety and performance of your vehicle.
Before installing the new bearings, thoroughly clean the wheel hub and spindle to remove any dirt or debris. Apply a thin layer of high-temperature wheel bearing grease to the inner and outer surfaces of the new bearings to ensure proper lubrication.
In some cases, it may be necessary to use a bearing installation tool or a press to properly seat the new bearings into the wheel hub. Follow the manufacturer’s instructions and use the appropriate tools to ensure a secure and accurate installation.
Finally, reinstall the dust caps, brakes, and wheels, and torque the lug nuts to the manufacturer’s specifications. Performing a test drive after replacing the wheel bearings is recommended to ensure proper functionality and to detect any potential issues.
By following these preventative maintenance tips and regularly inspecting, cleaning, and replacing your wheel bearings as recommended, you can enjoy smoother rides and extend the life of your vehicle’s wheels. Taking care of your wheel bearings not only saves you money in the long run but also ensures your safety on the road.
Frequently Asked Questions For How To Install A Wheel Bearing
Can I Install Wheel Bearings Myself?
Yes, you can install wheel bearings yourself. However, it is crucial to have the right tools, knowledge, and experience for a successful installation. It’s recommended to refer to the vehicle’s manual or consult a professional for guidance.
Is It Hard To Install A Wheel Bearing?
Installing a wheel bearing can be challenging but with the right knowledge and tools, it is manageable. Proper installation requires some mechanical skills and attention to detail. It is recommended to seek professional help if you are not confident in your abilities.
How Do You Press A Bearing Without A Press?
To press a bearing without a press, you can use alternative methods like using a hammer and a socket or freezing the bearing and heating the housing. These methods help create enough force to press the bearing into place without the need for a press.
Which Way Do You Put A Wheel Bearing?
To install a wheel bearing, first, remove the old bearing by disconnecting the hub and spindle. Then, press the new bearing into the hub using a bearing press. Make sure it is oriented correctly, with the tapered side facing inwards.
Reassemble the hub and spindle.
Conclusion
To conclude, installing a wheel bearing may seem like a daunting task, but with the right tools, knowledge, and step-by-step instructions, it can be easily accomplished. By following the proper procedure and taking the necessary precautions, you can ensure a smooth and safe ride for your vehicle.
Remember to pay attention to any abnormal noises or vibrations and address them promptly to avoid further damage. With patience and a little bit of effort, you can successfully replace a wheel bearing and enjoy a smoother and more comfortable driving experience.