To install a transmission temperature gauge, start by disconnecting the negative battery cable and routing the temperature sensor wire through the firewall into the engine bay. Then, locate and remove the transmission’s temperature sensor and install the gauge’s sensor in its place.
Finally, connect the gauge to an ignition-switched power source, ground the gauge properly, and mount it in a convenient location on the dashboard. Now, you can monitor the transmission temperature accurately and ensure optimal performance and longevity. Introducing a transmission temperature gauge to your vehicle can be a wise investment, enabling you to monitor your transmission’s temperature and prevent potential damage.
By keeping track of the transmission temperature, you can identify and address any potential issues before they become major problems. In this guide, we will outline the step-by-step process to install a transmission temperature gauge, allowing you to take control of your transmission’s health and performance. So let’s get started and ensure your transmission stays cool and reliable!
Understanding The Importance Of Transmission Temperature Monitoring
Monitoring the temperature of your vehicle’s transmission is crucial for maintaining its overall health and preventing potential damage. In this section, we will explore why monitoring transmission temperature is of utmost importance, the consequences of high transmission temperatures, and the benefits of installing a transmission temperature gauge.
Why monitoring transmission temperature is crucial for vehicle health
Regularly monitoring the temperature of your vehicle’s transmission is essential for maintaining its overall health. The transmission plays a vital role in the smooth operation of the vehicle, transmitting power from the engine to the wheels.
By monitoring the temperature, you can ensure that the transmission is running within its optimal operating range. Excessive heat can cause fluid breakdown, leading to various mechanical issues. Continuous monitoring allows you to detect any abnormalities in the temperature and take appropriate action before serious damage occurs.
Consequences of high transmission temperatures
When the transmission temperature rises beyond acceptable limits, it can have severe consequences for your vehicle. Excessive heat can accelerate the breakdown of the transmission fluid, causing decreased lubrication and impaired performance.
High temperatures can also lead to the formation of harmful sludge and varnish, negatively affecting the transmission’s internal components. As the fluid deteriorates, the transmission may experience increased friction, slipping, and shifting problems. In extreme cases, the transmission can overheat to the point of complete failure, necessitating costly repairs or replacement.
Benefits of installing a transmission temperature gauge
Installing a transmission temperature gauge provides numerous benefits that help you keep your vehicle in optimal condition:
- Early detection of problems: By monitoring the temperature in real-time, you can quickly detect any anomalies that may indicate potential issues with your transmission. This allows you to address the problem promptly, preventing further damage.
- Prolonged transmission life: Keeping the transmission temperature within the recommended range helps extend its lifespan. By avoiding excessive heat, you can prevent premature wear and tear, increasing the longevity of your transmission.
- Enhanced performance: Optimal temperatures ensure that the transmission fluid maintains its properties, providing efficient lubrication and smooth operation. This results in improved performance and fuel efficiency.
- Peace of mind: With a transmission temperature gauge installed, you can have peace of mind knowing that you are actively monitoring the health of your vehicle’s transmission. This proactive approach allows you to take necessary precautions and avoid unexpected breakdowns.
In conclusion, understanding the importance of monitoring your vehicle’s transmission temperature is crucial for maintaining its health and avoiding costly repairs. Installing a transmission temperature gauge provides the necessary tools to monitor temperature levels continuously, allowing you to ensure optimal performance and longevity for your transmission.
Selecting The Right Transmission Temperature Gauge
Installing a transmission temperature gauge is crucial for monitoring the health of your vehicle’s transmission system. This essential tool allows you to keep an eye on the temperature of the transmission fluid, ensuring it stays within a safe operating range. However, with so many options available in the market, it can be overwhelming to choose the right transmission temperature gauge for your needs. To help you make an informed decision, this section will discuss the factors to consider when selecting a transmission temperature gauge, the different types available, and how to evaluate their accuracy and reliability.
Factors to Consider when Choosing a Transmission
Temperature Gauge
When it comes to selecting a transmission temperature gauge, there are a few key factors to consider:
- Compatibility: Ensure that the gauge is compatible with your vehicle’s make and model. Different vehicles may require specific gauge fittings and connections.
- Size and Design: Consider the size and design of the gauge. It should be easy to read and install in your vehicle’s dashboard without obstructing your view. Additionally, choose a gauge that matches your vehicle’s interior aesthetics for a seamless integration.
- Temperature Range: Check the temperature range supported by the gauge. It should cover the temperature limits recommended by your vehicle’s manufacturer to accurately monitor any fluctuations. Additionally, choose a gauge that provides both Celsius and Fahrenheit readings, depending on your preference.
- Ease of Installation: Look for a transmission temperature gauge that comes with a comprehensive installation kit and detailed instructions. This will ensure a hassle-free installation process.
- Additional Features: Consider any additional features offered by the gauge, such as warning lights or audible alerts when the temperature exceeds a certain threshold. These features can provide an extra level of protection for your transmission system.
Different Types of Transmission Temperature Gauges Available
Transmission temperature gauges come in various types, including:
| Type | Description |
|---|---|
| Dial Gauges | A traditional gauge with a needle that indicates the temperature on a numerical scale. They are straightforward and easy to read. |
| Digital Gauges | These gauges utilize digital displays to provide a clear and precise temperature reading. They often offer additional features like customizable color displays. |
| LED Gauges | A modern gauge that uses light-emitting diodes (LEDs) to display the temperature. They offer a sleek and futuristic appearance. |
Evaluating the Accuracy and Reliability of Gauges
When selecting a transmission temperature gauge, it’s essential to evaluate its accuracy and reliability to ensure precise readings. Consider the following:
- Brand Reputation: Research and choose a gauge from a reputable brand known for manufacturing reliable automotive gauges.
- Customer Reviews: Read customer reviews and feedback to gauge the experience of other users. Look for positive feedback regarding accuracy and durability.
- Quality Build: Assess the build quality of the gauge. It should be sturdy, durable, and resistant to vibrations and shocks.
- Calibration: Check if the gauge comes factory-calibrated or if it requires manual calibration. Accurate calibration ensures precise temperature readings.
- Warranty: Look for gauges that offer a good warranty period, as it indicates the manufacturer’s confidence in their product.
By considering these factors, understanding the different types of transmission temperature gauges available, and evaluating their accuracy and reliability, you can confidently select the right gauge for your vehicle. Installing a reliable and accurate transmission temperature gauge will ensure you have the necessary insights to maintain the health of your transmission system.
Gathering The Necessary Tools And Materials
Installing a transmission temperature gauge is a crucial step in monitoring the health and performance of your vehicle’s transmission system. Whether you are an experienced DIY enthusiast or a novice, having the right tools and materials is essential to ensure a smooth installation process. In this section, we will discuss the essential tools required for the installation process, as well as the additional materials that may be needed.
Essential tools required for the installation process
Before you start installing a transmission temperature gauge, make sure you have the following essential tools:
| Tool | Description |
|---|---|
| Screwdriver | A flathead or Phillips screwdriver, depending on the gauge and mounting method. |
| Wrench set | A set of wrenches, including both open-end and socket wrenches, for fastening and loosening various components. |
| Drill | A power drill for creating holes in the dashboard or console to mount the gauge. |
| Wire strippers | To remove insulation from wires and make proper electrical connections. |
| Crimping tool | To securely crimp wire connectors and ensure reliable electrical connections. |
| Electrical tape | To insulate and protect exposed wires. |
Additional materials that may be needed
In addition to the essential tools, you may need the following materials depending on the specifics of your transmission temperature gauge installation:
- Mounting bracket or pod: This is necessary to secure the gauge to the dashboard or console.
- Mounting hardware: Screws, nuts, and washers to attach the gauge and mounting bracket.
- Wire connectors: Butt connectors, crimp connectors, or soldering equipment for splicing the gauge’s wiring into your vehicle’s electrical system.
- Electrical wires: Sufficient length of wire to connect the gauge to the transmission temperature sensor and power source.
- Fuse tap or add-a-circuit: If you are connecting the gauge to a power source, these devices allow you to tap into an existing fuse box without cutting or splicing the vehicle’s wiring.
- Heat shrink tubing: Offers an extra layer of protection for wires and connections in high-temperature environments.
By gathering all the necessary tools and materials beforehand, you can save time and ensure a hassle-free installation process. Now that you have everything you need, let’s move on to the next step in installing a transmission temperature gauge: locating the transmission temperature sensor.
Locating The Transmission Temperature Sensor
Understanding the sensor’s role in monitoring transmission temperature
Before we dive into locating the transmission temperature sensor, it’s important to understand its crucial role in monitoring the temperature of your vehicle’s transmission. The transmission temperature sensor is responsible for relaying real-time temperature data to the transmission control module (TCM) or the engine control module (ECM), depending on the vehicle’s make and model. This data helps ensure that the transmission operates within optimal temperature ranges, maximizing its performance and lifespan while preventing costly damage.
Identifying the sensor’s location in different types of vehicles
The location of the transmission temperature sensor can vary depending on the type of vehicle you have. Here’s a breakdown of its common locations in different vehicle types:
1. Front-Wheel Drive (FWD) Vehicles:
- In FWD vehicles, the transmission temperature sensor is typically located within the transmission housing, near the fluid inlet or outlet. It may require the removal of certain components or panels for access. Consult your vehicle’s service manual for specific instructions.
2. Rear-Wheel Drive (RWD) Vehicles:
- For RWD vehicles, the transmission temperature sensor is commonly located on the transmission itself, usually on the side or top of the unit. In some cases, it may be found on the transmission fluid pan. Again, consulting the service manual is recommended to determine the exact location.
3. All-Wheel Drive (AWD) Vehicles:
- The location of the transmission temperature sensor in AWD vehicles can vary. It may be found on the transmission housing, similar to FWD vehicles, or near the transfer case. Referencing the service manual for your specific AWD vehicle is essential to pinpoint the sensor’s exact location.
Remember, each vehicle model may have slight variations in the sensor’s placement, so it’s crucial to consult your vehicle’s service manual or seek professional assistance, if needed, to locate the transmission temperature sensor accurately.
Installing The Transmission Temperature Gauge
Installing a transmission temperature gauge is an essential task for any car enthusiast or off-road adventurer. Monitoring your transmission’s temperature can help prevent costly damage and ensure optimal performance. In this guide, we will provide step-by-step instructions on how to install a transmission temperature gauge in your vehicle.
Step-by-step instructions for installing the gauge
- Start by gathering all the necessary tools: a transmission temperature gauge kit, wire strippers, electrical tape, a screwdriver, and a panel removal tool.
- Disconnect the negative battery terminal to ensure safety during the installation process.
- Removing dashboard panels or trim
Begin by using a panel removal tool to gently pry off the dashboard panels or trim surrounding the area where you plan to install the temperature gauge. Take your time and be careful to avoid scratching or damaging any surfaces.
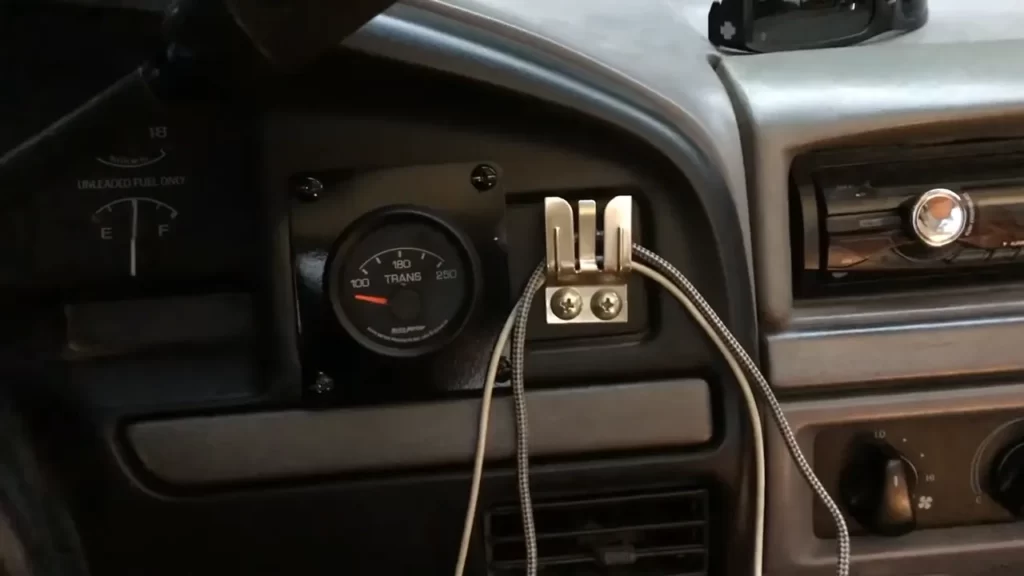
Locating a suitable location for the gauge
Once the panels or trim are removed, you will need to find a suitable location to mount the gauge. Some popular locations include the dashboard, center console, or A-pillar. Consider visibility, accessibility, and aesthetics when choosing the spot.
Connecting the necessary wires and cables
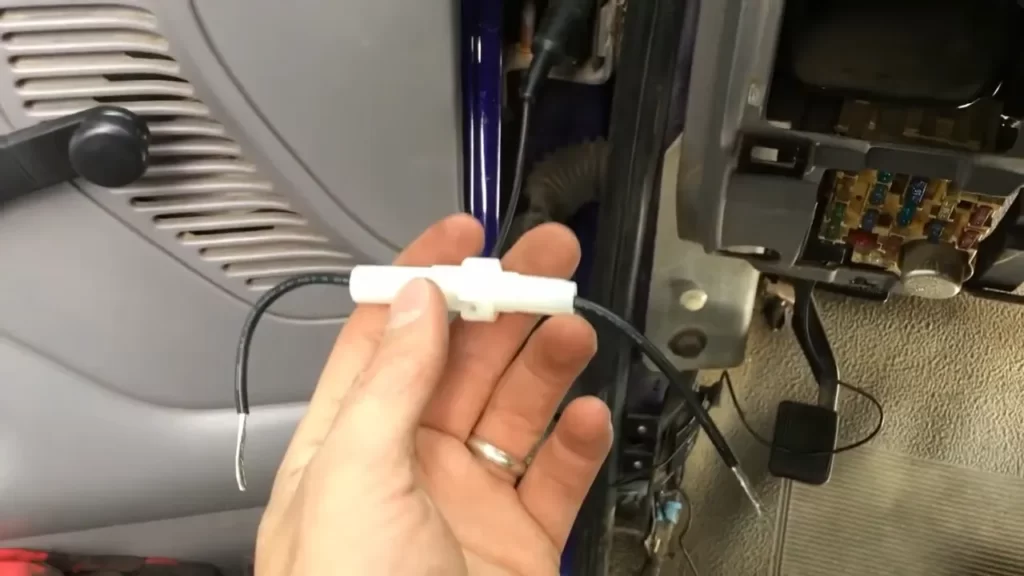
- Begin by identifying the wiring harness that connects to the transmission temperature sensor. This may require referencing your vehicle’s service manual or using an online resource.
- Once the wiring harness is identified, carefully disconnect it from the sensor.
- Take the wiring harness coming from the temperature gauge kit and connect it to the sensor. Use wire strippers to expose the necessary amount of wire and twist the ends together. Secure the connection with electrical tape.
- Mounting and securing the gauge in place
After connecting the wires, it’s time to mount and secure the gauge in place. Refer to the manufacturer’s instructions for specifics on how to mount the gauge. Typically, this involves using screws or brackets provided in the kit.
Once the gauge is securely mounted, double-check all connections to ensure they are tight and secure. Reattach any panels or trim that were removed earlier.
With the gauge installed, reconnect the negative battery terminal and turn on your vehicle. Check that the gauge is functioning properly by monitoring the transmission temperature as you drive.
Congratulations! You have successfully installed a transmission temperature gauge in your vehicle. Regularly monitoring your transmission temperature will help you maintain optimal performance and prevent any potential issues.
Verifying The Gauge’S Accuracy
Conducting a Temperature Test to Ensure the Gauge Readings are Accurate
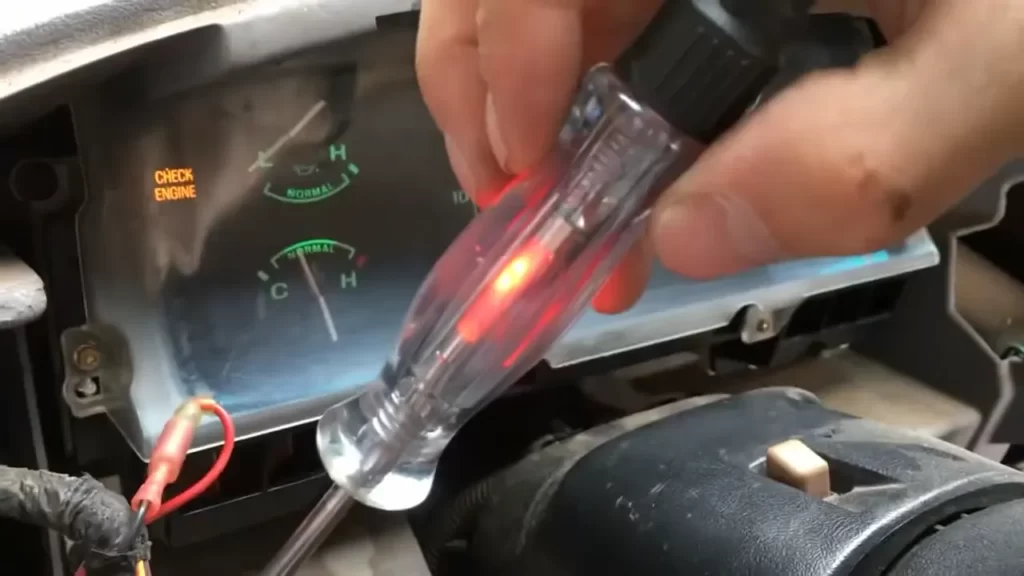
One of the most crucial steps in installing a transmission temperature gauge is verifying its accuracy. Conducting a temperature test is essential to ensure that the gauge readings are reliable and trustworthy. This will help you monitor the temperature of your transmission accurately and prevent any potential damage or breakdowns due to overheating. To conduct a temperature test, you will need an accurate digital thermometer and a reliable reference point for measuring the temperature. Here is a step-by-step guide to help you verify the accuracy of your gauge:
- Start by warming up your vehicle’s engine and transmission. It is important to bring them to operating temperature before conducting the test.
- Once the engine and transmission are warmed up, locate the transmission’s dipstick tube. This is usually located near the back of the engine bay.
- Carefully pull out the dipstick and wipe it clean with a lint-free cloth or paper towel.
- Insert the digital thermometer into the dipstick tube and ensure that it is fully inserted without touching any other components.
- Wait for a few seconds and read the temperature displayed on the thermometer. This reading will serve as your reference point for comparing it to the gauge readings.
Troubleshooting Common Issues with Gauge Accuracy
While verifying the accuracy of your transmission temperature gauge, you may encounter some common issues that can affect its readings. These issues can lead to inaccurate temperature readings and potentially cause confusion or errors in your monitoring efforts. Here are a few troubleshooting tips to address these common gauge accuracy problems:
- Incorrect Gauge Calibration: If you notice a consistent deviation between the gauge readings and the thermometer’s reference point, the gauge may need to be recalibrated. Check the manufacturer’s instructions or consult a professional for guidance on adjusting the gauge’s calibration.
- Faulty Sensor Installation: Improper sensor installation can also lead to inaccurate temperature readings. Ensure that the sensor is securely attached to the transmission and properly connected to the gauge. Double-check the sensor’s wiring and connections for any signs of damage or loose connections.
- Electrical Interference: Sometimes, electrical interference from other components or wiring in your vehicle can affect the gauge’s accuracy. To minimize this interference, ensure that the gauge’s wiring is properly shielded and isolated from other electrical sources. Additionally, avoid routing the gauge’s wiring near high-voltage or high-current components.
- Overheating Transmission: If you consistently observe high temperature readings on the gauge, it may indicate an issue with your transmission’s cooling system. Check for any clogs or leaks in the transmission cooler, radiator, or hoses. Consider flushing the system and replacing the transmission fluid and filter if necessary.
By conducting a temperature test and troubleshooting any gauge accuracy issues, you can ensure that your transmission temperature gauge provides accurate readings. This allows you to monitor your transmission’s temperature effectively and take necessary precautions to prevent overheating and potential damage.
Calibrating The Gauge (If Necessary)
Steps to calibrate the gauge for precise temperature monitoring
Calibrating the transmission temperature gauge is an essential step to ensure accurate and reliable temperature measurements. This process allows you to adjust the gauge settings to match your specific vehicle’s transmission, providing you with precise temperature monitoring. Here are the steps you need to follow to calibrate the gauge effectively:
- Begin by referring to your vehicle’s owner’s manual or contacting the manufacturer to determine the recommended temperature range for your particular transmission. This information will serve as your reference point during the calibration process.
- Locate the calibration screw or adjustment knob on the back of the gauge. This screw or knob allows you to fine-tune the temperature readings displayed on the gauge.
- Start your vehicle’s engine and let it warm up to its normal operating temperature. It’s crucial to perform the calibration process while the transmission is at its regular temperature range.
- Using a screwdriver or a small wrench, turn the calibration screw or knob in the direction indicated by the manufacturer’s instructions. This adjustment will either increase or decrease the temperature readings on the gauge.
- Monitor the temperature readings on the gauge as you make adjustments to the calibration screw or knob. Aim to align the gauge’s readings with the recommended temperature range provided by the vehicle manufacturer. This ensures accurate and reliable transmission temperature monitoring.
It’s essential to note that not all transmission temperature gauges require calibration. Some gauges come pre-calibrated from the manufacturer, allowing for immediate installation without any additional adjustment. However, if your gauge provides the option for calibration, it is highly recommended to fine-tune the settings to match your vehicle’s transmission specifications. Remember to consult your vehicle’s owner’s manual or contact the gauge manufacturer for specific calibration instructions that might be unique to your gauge model. Calibrating your transmission temperature gauge is a simple yet critical step to ensure precise temperature monitoring. By following the steps outlined above, you can confidently adjust the gauge settings to match your vehicle’s transmission specifications. This calibration process allows you to have accurate readings, providing you with valuable insights into your transmission’s health and performance. So, take the time to calibrate your gauge and enjoy the peace of mind that comes with knowing your transmission temperature is being accurately monitored.
Regular Maintenance And Cleaning
Regular maintenance and cleaning of your transmission temperature gauge is essential to ensure its accurate readings and optimal performance. By keeping the gauge clean and free from debris, and regularly checking for signs of damage or malfunction, you can prolong its lifespan and avoid potential issues down the line. In this section, we will discuss some tips and guidelines for maintaining and cleaning your transmission temperature gauge effectively.
Tips for keeping the gauge clean and free from debris
To maintain the accuracy of your transmission temperature gauge, it’s crucial to keep it clean and free from any debris that could hinder its performance. Here are some tips to help you keep your gauge in top condition:
- Avoid using abrasive cleaners: When cleaning your gauge, never use harsh or abrasive cleaners. These cleaners can cause scratches and damage the surface of the gauge, affecting its readability. Instead, use a soft, non-abrasive cloth or sponge with a mild soapy solution to gently wipe the gauge and remove any dirt or dust.
- Regularly remove dust and debris: Dust and debris can accumulate on the surface and around the buttons or dials of your gauge over time. To prevent any interference with its functionality, use a microfiber cloth or a small soft brush to regularly remove any dust or debris from the gauge. Pay extra attention to the gaps and crevices where dirt tends to accumulate.
- Protect the gauge from moisture: Moisture can cause damage to your gauge, leading to inaccurate readings or even malfunction. Avoid exposing the gauge to excessive moisture or water. If you are cleaning the surrounding area, always cover the gauge with a plastic bag or a protective cover to prevent any moisture from seeping in.
- Avoid using sharp objects: It’s important to never use sharp or pointed objects to clean the gauge. These objects can scratch the surface or damage the internal components, affecting its functionality. Stick to using soft materials like cloths or brushes specifically designed for electronic equipment.
Checking for any signs of damage or malfunction
Regularly inspecting your transmission temperature gauge for signs of damage or malfunction can help you address any issues promptly and prevent further damage. Here are some steps to follow when checking the condition of your gauge:
- Visual inspection: Start by visually examining the gauge for any visible signs of damage, such as cracks on the screen, loose buttons, or abnormal display behavior. If you notice any signs of damage, it’s important to address them as soon as possible by contacting the manufacturer or a qualified technician.
- Functional test: Perform a functional test to ensure that all the buttons, dials, and features of the gauge are working properly. This includes checking the responsiveness of the buttons, the accuracy of the temperature readings, and any additional functions specific to your gauge. Refer to the user manual for guidance on how to perform a proper functional test.
- Calibration check: If your gauge has a calibration feature, it’s recommended to periodically check its accuracy. This can be done by comparing the readings on the gauge with a trusted and accurate reference thermometer or gauge. If there is a significant difference in the readings, consider recalibrating the gauge following the manufacturer’s instructions.
By following these maintenance and cleaning tips, as well as regularly checking for any signs of damage or malfunction, you can ensure the longevity and reliability of your transmission temperature gauge. A well-maintained gauge will not only provide accurate readings but also contribute to the overall performance and smooth operation of your transmission system.
Monitoring Transmission Temperature
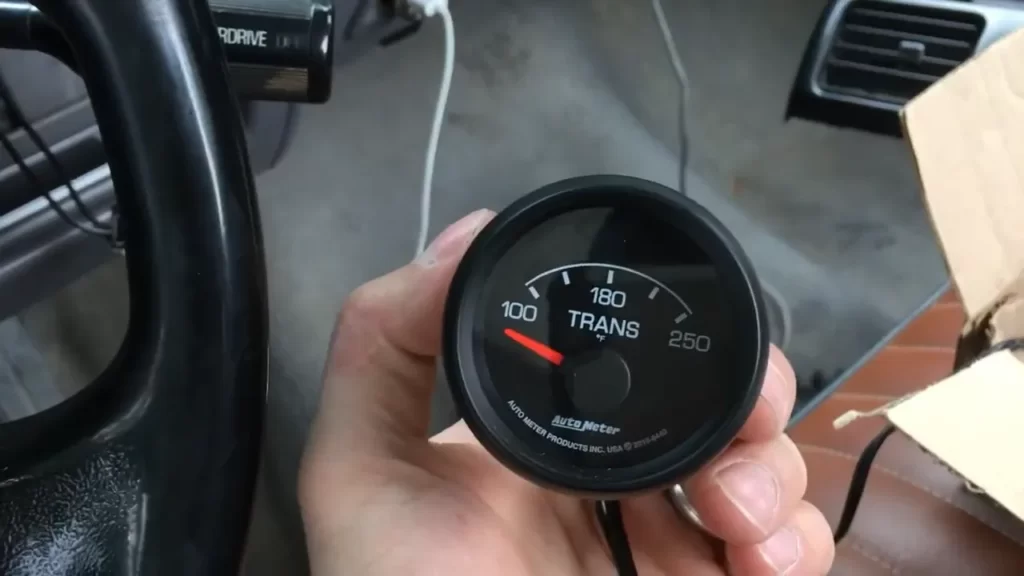
Monitoring the temperature of your vehicle’s transmission is crucial for maintaining its health and longevity. Excessive heat can lead to a host of problems, including accelerated wear and tear, fluid breakdown, and even transmission failure. By installing a transmission temperature gauge, you can keep a close eye on the temperature of your transmission fluid and take appropriate action if necessary. In this section, we will discuss how to read and interpret the gauge readings, understand safe temperature ranges for different vehicles, and take appropriate actions based on the gauge readings.
How to read and interpret the gauge readings
Reading and interpreting the gauge readings accurately is essential to understanding the state of your transmission’s temperature. The transmission temperature gauge provides a visual representation of the temperature in either degrees Celsius or Fahrenheit, depending on the gauge. Here’s how you can effectively interpret the readings:
- Normal Range: The normal range for transmission temperature typically falls between 160°F and 200°F (71°C to 93°C). This range indicates that the transmission is operating within acceptable parameters, and you can continue driving without worry.
- Warning Range: If the temperature starts to exceed the normal range and reaches around 230°F (110°C), it’s important to pay attention and take action. This temperature indicates that the transmission is running hotter than usual, which may result in increased wear and potential damage to the internal components.
- Danger Zone: If the temperature surpasses the warning range and goes beyond 250°F (121°C), you have entered the danger zone. At this point, immediate action is required to prevent severe damage to the transmission. Continued driving under these extreme temperature conditions can lead to transmission failure.
By understanding these temperature ranges and their implications, you can promptly respond to any deviations from the normal temperature range and take appropriate action to safeguard your transmission’s health.
Understanding safe temperature ranges for different vehicles
It’s important to note that safe temperature ranges can vary among different vehicles and transmission types. While the guidelines mentioned above provide a general range, it’s always recommended to consult your vehicle’s manufacturer or the transmission manufacturer for specific temperature recommendations.
| Vehicle Type | Safe Temperature Range |
|---|---|
| Passenger cars | 160°F to 200°F (71°C to 93°C) |
| Heavy-duty trucks | 180°F to 210°F (82°C to 99°C) |
| Performance vehicles | 140°F to 230°F (60°C to 110°C) |
These are just general guidelines, and it’s crucial to refer to your specific vehicle’s documentation to determine the safe temperature range. This information can help you set appropriate alarm points on your transmission temperature gauge, allowing you to take necessary actions to prevent any potential damage.
Taking appropriate actions based on the gauge readings
When the transmission temperature gauge indicates an elevated temperature, it’s crucial to take appropriate actions promptly. Here are some steps you can follow based on the gauge readings:
- If the temperature is in the warning range: Monitor the temperature closely and look for any signs of transmission slipping, unusual noises, or fluid leaks. If you notice any of these symptoms, it’s advisable to pull over safely and allow the transmission to cool down. Check the transmission fluid level to ensure it is within the recommended range and inspect for any signs of contamination or degradation.
- If the temperature is in the danger zone: Stop driving immediately and allow your transmission to cool down. Continuing to drive in this extreme temperature range could cause irreversible damage to the transmission. It’s essential to let the vehicle cool down completely before checking the fluid level and inspecting for any potential issues. If the problem persists, it’s recommended to seek professional assistance to prevent further damage.
Remember, regular maintenance and inspections can help prevent transmission overheating and potential costly repairs. By installing a transmission temperature gauge and monitoring it closely, you can detect any anomalies early on and take appropriate actions to safeguard your transmission’s health.
Troubleshooting Common Gauge Issues
Common Problems with Transmission Temperature Gauges and Their Solutions
Transmission temperature gauges are essential for monitoring the health and performance of your vehicle’s transmission. However, like any other electrical device, these gauges can encounter issues that may affect their accuracy or functionality. In this section, we will discuss some common problems with transmission temperature gauges and provide solutions to troubleshoot these issues.
Troubleshooting Tips for Gauge Malfunction or Inaccurate Readings
1. Check the wiring connections: Loose or faulty wiring connections can lead to gauge malfunctions or inaccurate readings. Ensure that all wires are securely connected to their respective terminals. If any wires appear damaged or frayed, replace them to ensure proper connectivity. 2. Inspect the temperature sensor: The temperature sensor is responsible for measuring the transmission’s temperature. If it is faulty or dirty, it may provide inaccurate readings. Inspect the sensor for any signs of damage or debris accumulation. Clean or replace the sensor if necessary. 3. Verify power supply: Inadequate power supply can impact the gauge’s performance. Use a multimeter to check the voltage at the gauge’s power source. Ensure that it is within the recommended range specified by the manufacturer. If the voltage is too low, consider using a power relay or upgrading the power source. 4. Calibrate the gauge: Sometimes, the temperature gauge may require calibration to ensure accurate readings. Refer to the manufacturer’s instructions on how to calibrate the gauge properly. Follow the steps carefully to adjust the gauge’s settings and calibrate it accordingly. 5. Test the gauge with a separate sensor: To determine if the issue lies with the gauge or the sensor, you can connect a separate known-to-be-good temperature sensor to the gauge. If the readings are still inaccurate or the gauge malfunctions, it may indicate a problem with the gauge itself. 6. Consider environmental factors: Extreme temperature conditions, such as high ambient heat or cold, can affect the gauge’s performance. Ensure that the gauge and its components are suitable for the environment in which they are installed. Consider using temperature-resistant materials or insulation to protect the gauge from external factors. 7. Consult a professional: If you have exhausted all troubleshooting steps and the issue persists, it is advisable to seek assistance from a professional mechanic or automotive technician. They have the expertise and specialized equipment to diagnose and resolve complex gauge issues. Remember, troubleshooting and resolving gauge issues require patience and attention to detail. By following these troubleshooting tips, you can identify and resolve common problems with transmission temperature gauges, ensuring accurate readings and optimal performance of your vehicle’s transmission.
Frequently Asked Questions Of How To Install A Transmission Temperature Gauge
Where Do You Put A Transmission Temp Gauge?
The transmission temp gauge should be installed on the transmission cooler line to accurately measure the temperature. It helps to avoid overheating and potential damage to the transmission.
Do I Need A Transmission Temp Gauge?
Yes, a transmission temp gauge is important as it helps monitor the temperature of your transmission fluid. This can prevent damage to your transmission and improve its overall performance.
What Is The Best Transmission Temperature Gauge?
The best transmission temperature gauge is the one that accurately measures your transmission’s temperature and is easy to read. Look for gauges with clear displays and reliable sensors for precise readings. Choose a gauge that suits your vehicle’s make and model.
How Do I Know If My Transmission Temperature Sensor Is Bad?
If your transmission temperature sensor is bad, you may notice symptoms such as inaccurate temperature readings, warning lights on the dashboard, and issues with shifting gears. It is advisable to get it checked by a professional mechanic for accurate diagnosis and repair.
Conclusion
To wrap things up, installing a transmission temperature gauge is an essential step to keep your vehicle’s transmission running smoothly and efficiently. By monitoring the temperature, you can detect any potential issues early on and prevent costly repairs. With the simple steps outlined in this guide, you can easily install a transmission temperature gauge and gain peace of mind while on the road.
So don’t wait any longer, get started on this DIY project and ensure the longevity of your transmission.