To install a trailer hitch receiver, begin by gathering the necessary tools and equipment. Then, locate the vehicle’s frame and attach the hitch receiver using bolts and nuts, ensuring a secure fit.
Tools You’Ll Need
When it comes to installing a trailer hitch receiver, having the right tools on hand makes a world of difference. With the proper tools, you can ensure a smooth installation process and avoid unnecessary frustrations along the way. Here are the essential tools you’ll need to complete this project:
<h3>Wrench</h3>
A wrench is an indispensable tool that you’ll need for installing a trailer hitch receiver. It is used to tighten and loosen nuts and bolts throughout the installation process. Make sure to have a set of wrenches in different sizes to cater to the specific requirements of your trailer hitch receiver.
<h3>Socket Set</h3>
A socket set is another essential tool for installing a trailer hitch receiver. It consists of various sizes of sockets that are used to loosen and tighten bolts. With a socket set, you can easily access areas that may be too tight for a wrench to fit into, providing greater convenience and ease during the installation process.
<h3>Torque Wrench</h3>
To ensure that the bolts are properly secured and tightened to the manufacturer’s recommended torque specifications, a torque wrench is required. This specialized tool allows you to apply the precise amount of torque needed, preventing over-tightening or under-tightening of the bolts.
<h3>Screwdriver</h3>
A screwdriver is a versatile tool that can come in handy during the installation of a trailer hitch receiver. It can be used for tasks such as removing or tightening screws, as well as prying off covers or panels that may be obstructing the installation area. It’s recommended to have both a flathead and a Phillips screwdriver in your toolkit.
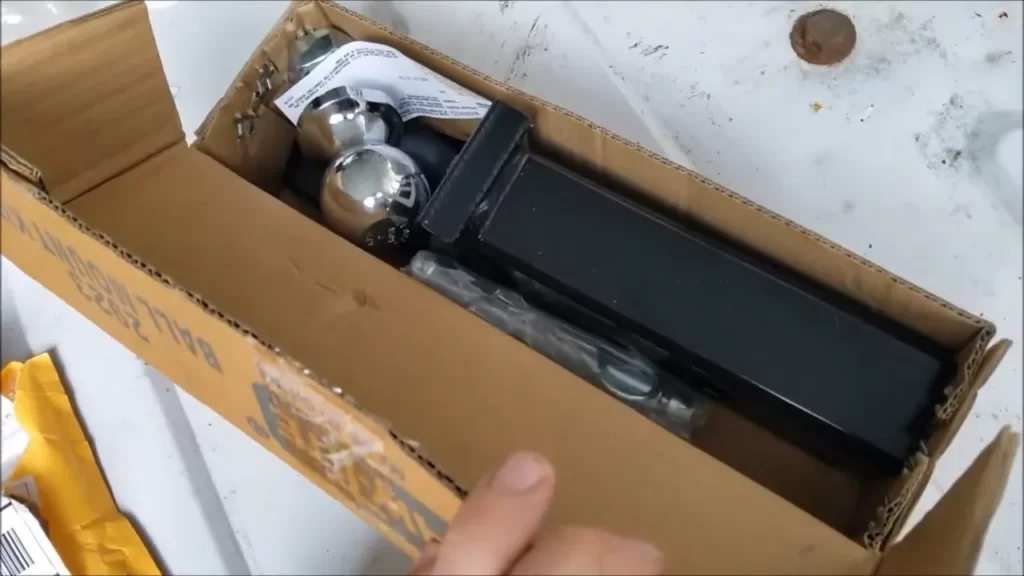
<h3>Trailer Hitch Receiver Kit</h3>
A trailer hitch receiver kit is a comprehensive set of components specifically designed for installing a trailer hitch receiver. It typically includes the hitch receiver, mounting hardware, and other necessary accessories. Make sure to choose a kit that is suitable for your vehicle’s make and model.
Checking Compatibility With Your Vehicle
Before you begin the installation process of a trailer hitch receiver, it is crucial to check the compatibility of the hitch with your vehicle. This step will ensure that the hitch is capable of safely towing the weight of your trailer and is compatible with your vehicle’s design.
Vehicle’s Weight Capacity
First and foremost, you need to understand your vehicle’s weight capacity. This refers to the maximum weight that your vehicle can safely carry, including passengers, cargo, and the trailer tongue weight. Exceeding this weight capacity can lead to instability, damage to your vehicle, and even accidents.
To determine your vehicle’s weight capacity, refer to your owner’s manual or check the driver’s side door jamb for a label that specifies the Gross Vehicle Weight Rating (GVWR). The GVWR indicates the maximum weight of your fully loaded vehicle, including the trailer tongue weight.
If you are unsure about your vehicle’s weight capacity, it is recommended to consult with your vehicle manufacturer or a professional mechanic.
Vehicle’s Towing Capacity
Another important factor to consider when checking compatibility is your vehicle’s towing capacity. This refers to the maximum weight that your vehicle can tow without causing strain or damage to its engine, transmission, or other components.
You can find the towing capacity of your vehicle in the owner’s manual or by searching online with your vehicle’s make, model, and year. The towing capacity is usually specified in pounds and can vary based on the engine type, transmission, and optional towing packages.
It is important to remember that the towing capacity of your vehicle should always exceed the weight of the trailer and its contents. This ensures safe and efficient towing without putting unnecessary stress on your vehicle.
If you are unsure about your vehicle’s towing capacity or need assistance in calculating it, consult your vehicle manufacturer or a reputable trailer hitch specialist.
Conclusion
Checking compatibility with your vehicle is a crucial step before installing a trailer hitch receiver. Understanding your vehicle’s weight capacity and towing capacity ensures that the hitch can safely handle the weight of your trailer without causing any damage or compromising your safety on the road. Always refer to your vehicle’s manual or consult with professionals if you have any doubts or concerns about compatibility.
Preparing Your Vehicle
Before you can begin the installation process for your trailer hitch receiver, it’s important to properly prepare your vehicle. This involves gathering the necessary tools and materials, positioning your vehicle correctly, and taking the necessary safety precautions. By following these steps, you’ll ensure a smooth and successful installation.
Gathering Necessary Tools and Materials
Firstly, you’ll need to gather all the tools and materials required for the installation. Having everything on hand will save you time and hassle later on. Here is a list of the essential items you will need:
| Tools | Materials |
|---|---|
| Wrench or socket set | Trailer hitch receiver kit |
| Torque wrench | Vehicle-specific mounting hardware |
| Jack and jack stands | Electrical connectors (if applicable) |
Be sure to check the specific requirements for your vehicle and trailer hitch receiver, as the tools and materials needed may vary.
Positioning Your Vehicle Correctly
Once you have gathered all the necessary tools and materials, it’s time to position your vehicle correctly. This step is crucial for a successful installation. Follow these steps to ensure proper positioning:
- Park your vehicle on a flat and level surface.
- Engage the parking brake to prevent any accidental movement.
- Locate the rear frame rails underneath your vehicle, as this is where the trailer hitch receiver will be installed.
- Use the jack to raise the rear of your vehicle slightly, providing enough clearance to work comfortably.
- Place jack stands under the frame rails to secure the vehicle in an elevated position.
Necessary Safety Precautions
Your safety should always be a top priority when performing any vehicle-related task. Before starting the installation, take the following safety precautions:
- Wear safety goggles to protect your eyes from debris and potential hazards.
- Use gloves to shield your hands from sharp edges and potential injuries.
- Ensure that you are working in a well-ventilated area to avoid inhaling any fumes or exhaust gases.
Additionally, refer to your vehicle owner’s manual for any specific safety guidelines or precautions that may apply.
By following these steps for preparing your vehicle, you’ll be ready to move on to the next phase of the trailer hitch receiver installation process. Remember, safety first!
Removing Rear Bumper
Removing the rear bumper is an essential step when installing a trailer hitch receiver. By following these simple instructions, you can easily remove the bumper without any hassle. Let’s dive into the process step by step.
Identifying bumper attachment points
Before you begin removing the rear bumper, it’s crucial to identify the attachment points. These are the areas where the bumper is securely fastened to the vehicle’s frame. Typically, these attachment points are located on the sides and underneath the bumper. Take a close look at the bumper to spot any bolts or screws that need to be removed.
Removing bumper bolts
Once you have identified the bumper attachment points, it’s time to remove the bumper bolts. Using a suitable wrench or socket set, carefully loosen and remove the bolts that hold the bumper in place. Make sure to keep track of the bolts as they will be needed when reattaching the bumper later on. Take your time to ensure all bolts are fully removed, allowing the bumper to be detached.
Detaching electrical connections
Many modern vehicles have electrical connections attached to the rear bumper. These connections are linked to the taillights, sensors, and other electronic components. To successfully remove the bumper, you must first detach these electrical connections. Locate the wiring harnesses or connectors and gently unplug them. Pay close attention to any clips or securing mechanisms that may be in place to prevent accidental disconnection. Once the electrical connections are detached, you can proceed with removing the bumper completely.
Storing and labeling bumper components
As you remove the rear bumper, it’s wise to label and store each component properly. This will make the reinstallation process much easier later on. Use small adhesive labels or masking tape to mark each part with its corresponding location. Additionally, you can take photos to serve as a visual reference. Ensure that all components are safely stored in a secure location, away from potential damage or misplacement. With these steps, the process of removing the rear bumper for installing a trailer hitch receiver becomes straightforward and manageable. By labeling and storing bumper components appropriately, you’ll have a smooth reinstallation process once the hitch receiver is in place. Remember to take your time and exercise caution throughout the process to ensure a successful hitch installation.
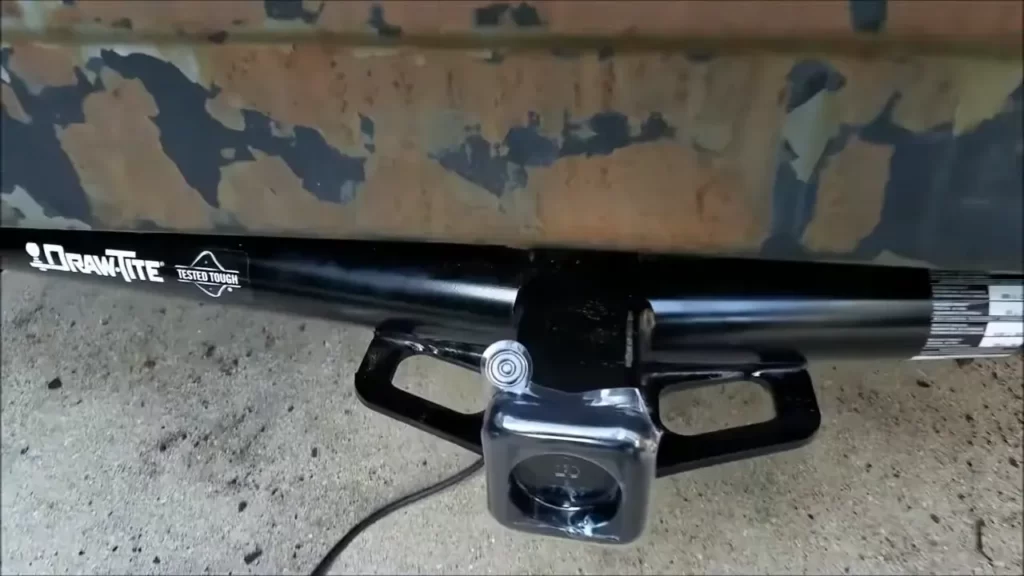
Installing Trailer Hitch Receiver
Assembling the Receiver Kit
To start installing a trailer hitch receiver, the first step is to assemble the receiver kit. This kit typically includes the receiver itself, mounting brackets, bolts, and other necessary hardware. Make sure you have all the components required before beginning the installation process.
Begin by laying out all the pieces of the receiver kit in an organized manner. Refer to the instruction manual provided with the kit to familiarize yourself with each part and its function. This will help ensure a seamless installation process.
Attaching the Receiver to the Vehicle
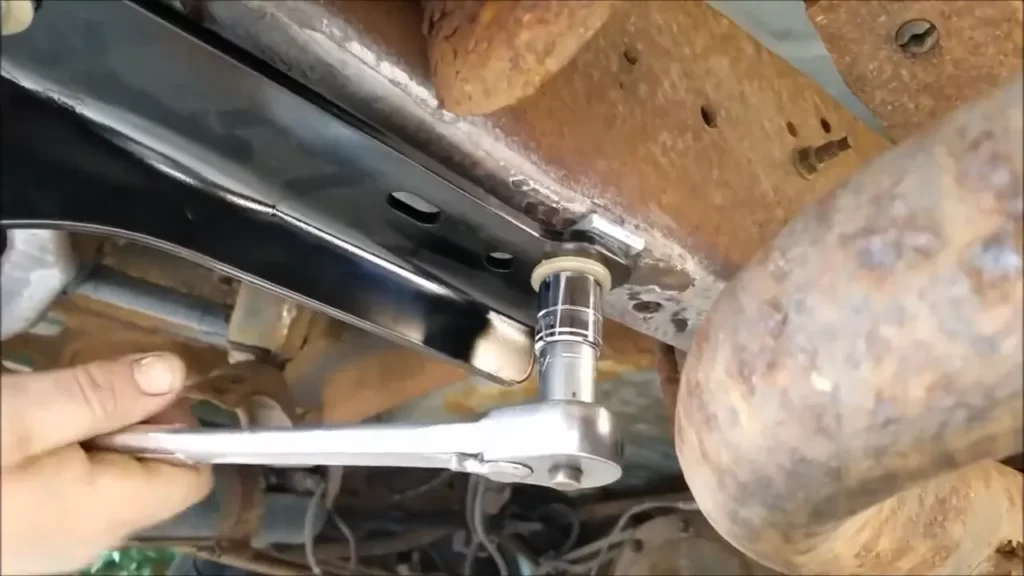
Once the receiver kit is assembled, you can move on to attaching the receiver to your vehicle. Before starting this step, it is important to locate and inspect the mounting points on your vehicle. These are typically located underneath your vehicle’s rear end.
Align the receiver with the vehicle’s mounting points, ensuring that it is centered and level. Take note of any additional hardware required to secure the receiver to the vehicle. This may include extra brackets, bumper mounts, or reinforcement plates.
Securing the Receiver with Bolts
With the receiver in the correct position, it’s time to secure it to the vehicle using the provided bolts. Insert and hand-tighten the bolts through the mounting points and into the receiver. Ensure that the bolts are securely fastened, but be careful not to overtighten them as this may cause damage.
Refer to the instruction manual to determine the recommended torque specifications for the bolts. Make use of a torque wrench to achieve the correct level of tightness, ensuring a safe and secure installation.
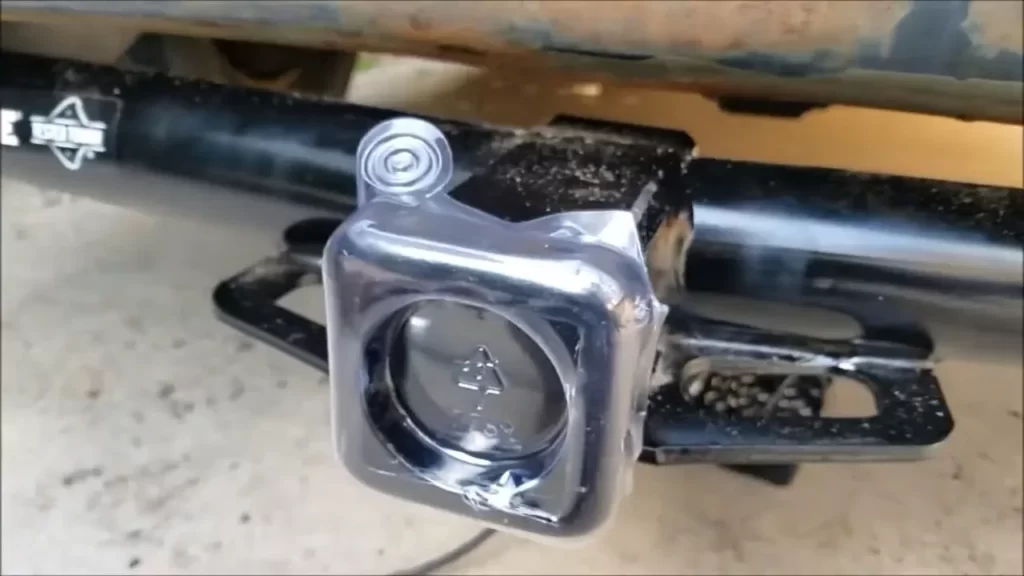
Aligning the Receiver Properly
Once the receiver is securely attached to the vehicle, it is crucial to ensure proper alignment. This will ensure that the trailer hitch receiver functions optimally and does not cause any issues while towing.
Visually inspect the alignment of the receiver from various angles. Look for any signs of misalignment or unevenness. Make any necessary adjustments to ensure that the receiver is level and straight.
By following these steps, you can install a trailer hitch receiver with ease and confidence. Remember to always refer to the manufacturer’s instructions for your specific vehicle and receiver kit to ensure a successful installation.
Wiring The Trailer Hitch
When it comes to installing a trailer hitch receiver, one of the most important steps is wiring the trailer hitch properly. This ensures that your trailer’s electrical system is connected to your vehicle’s electrical system, allowing for safe and efficient towing. In this section, we will guide you through the process of locating the vehicle’s electrical system, connecting the wiring harness, and testing the electrical connections to ensure everything is in working order.
Locating the Vehicle’s Electrical System
Before you can begin wiring the trailer hitch, you need to locate your vehicle’s electrical system. This system is usually found at the rear of the vehicle, near the bumper. Look for the wiring harness, which is a bundle of wires designed to connect to various components of your vehicle. It may be necessary to remove a panel or cover to access the wiring harness.
Connecting the Wiring Harness
Once you have found the vehicle’s electrical system, it’s time to connect the wiring harness. Start by identifying the wiring harness that is specifically designed for trailer towing. This harness will have connectors that match the ones on your vehicle’s electrical system. Ensure you match the connectors properly to avoid any compatibility issues later on.
Next, carefully connect the wiring harness to the vehicle’s electrical system. Align the connectors and firmly push them together until you hear a click, indicating that they are securely connected. Double-check that all connections are tight and secure before proceeding.
Testing the Electrical Connections
With the wiring harness successfully connected, it’s crucial to test the electrical connections to ensure they are working correctly. This step is essential for your safety and the safety of other drivers on the road.
To test the electrical connections, plug a trailer wiring tester into the trailer hitch’s wiring harness. This tester will verify if all the necessary signals, such as brake lights, turn signals, and headlights, are functioning correctly.
- If any issues are detected during the testing process, carefully review the wiring connections and ensure they are properly aligned and securely connected.
- If necessary, consult your vehicle’s owner manual or seek professional assistance from a qualified technician.
Keep in mind that properly wiring the trailer hitch is essential for safe and legal towing. By following these steps to locate the vehicle’s electrical system, connect the wiring harness accurately, and test the electrical connections, you can ensure a smooth and stress-free towing experience.
Reassembling The Rear Bumper
Reattaching the bumper to the vehicle
Once you have successfully installed the trailer hitch receiver, it is time to reassemble the rear bumper onto your vehicle. This step is crucial in ensuring the structural stability and visual appeal of your vehicle. Follow these simple steps to reattach the bumper securely: 1. Carefully position the bumper back onto the vehicle’s frame, aligning it accurately with the mounting points. Take into account any additional brackets or support plates that may be required for the specific make and model of your vehicle. 2. Once the bumper is aligned correctly, insert the mounting bolts into their respective holes. Ensure that each bolt is tightened snugly to secure the bumper in place. 3. It is recommended to use a torque wrench when tightening the bumper bolts to the manufacturer’s specified torque rating. This will prevent overtightening or under tightening, ensuring the bumper remains securely attached. 4. Double-check the alignment of the bumper to ensure that it sits flush and is evenly positioned on both sides of the vehicle. This will not only enhance the overall appearance but also guarantee proper functionality. 5. In the case of plastic clips or push pins, make sure to reattach them to secure any trim pieces or splash guards that were removed during the installation process.
Reconnecting electrical connections
When reinstalling the rear bumper, it is crucial to reconnect any electrical connections that were disconnected earlier, such as backup sensors, license plate lights, or trailer plug wiring. Follow these steps to ensure a proper electrical connection: 1. Carefully locate the electrical connectors that were detached before removing the bumper. These connectors may be located near the taillights or behind the bumper itself. 2. Align each connector correctly and firmly push them together until you hear a click or feel them lock into place. Ensure that they are securely attached to prevent any electrical issues in the future. 3. Inspect the wiring harness for any signs of damage or wear. If any issues are detected, consider repairing or replacing the wiring before completing the installation.
Aligning and tightening bumper bolts
Proper alignment and tightness of the bumper bolts are essential to secure the bumper in place and prevent any potential issues down the road. Follow these steps to ensure a safe and secure attachment: 1. Align the bumper bolts with the corresponding holes on the vehicle’s frame. Take your time to ensure proper alignment, as misalignment can result in a loose or unstable bumper. 2. Begin tightening the bolts by hand, starting from the center and working your way outwards. This will help distribute the pressure evenly and ensure a secure fit. 3. Once the bolts are hand-tightened, use a wrench or socket set to tighten them further. Be cautious not to overtighten, as this may damage the bumper or its mounting points. 4. If your vehicle has specific torque specifications for the bumper bolts, use a torque wrench to achieve the recommended torque. This will ensure that the bolts are tightened to the correct level without causing any damage.
Verifying proper bumper alignment
After reassembling the rear bumper, it is essential to verify its proper alignment. A correctly aligned bumper not only enhances the overall aesthetics of your vehicle but also prevents any potential issues with functionality. Follow these steps to ensure proper bumper alignment: 1. Stand back and visually inspect the bumper from multiple angles. Ensure that it appears symmetrical and aligned with the rest of the vehicle’s body. 2. Check for any gaps or misalignments between the bumper and adjacent body panels. If any discrepancies are noted, adjustments may be required to achieve proper alignment. 3. Open and close the tailgate or trunk to ensure that it operates smoothly without any interference from the bumper. 4. Verify that all lights and sensors mounted on the bumper are unobstructed and functioning correctly. Taking the time to reassemble the rear bumper correctly will guarantee a seamless installation and reliable performance of your trailer hitch receiver. By following these steps and paying attention to the finer details, you can ensure a secure and visually pleasing reattachment of the bumper.
Testing The Installation
Once you have successfully installed a trailer hitch receiver onto your vehicle, it is crucial to conduct a series of tests to ensure that the installation is secure and safe. Testing the installation involves conducting a test tow, inspecting the hitch and bumper for any issues, and ensuring proper performance and stability. Let’s go through each of these steps in detail below:
Conducting a test tow
After installing the trailer hitch receiver, it is essential to conduct a test tow to assess how well it performs when under load. This test allows you to determine if the installation was done correctly and if any adjustments need to be made. To conduct a test tow, follow these steps:
- Attach the trailer securely to the hitch receiver using the appropriate coupler or connector.
- Ensure that the trailer’s weight is evenly distributed and that it is within the recommended towing capacity of your vehicle.
- Slowly drive the vehicle, making turns and stopping to observe how the trailer and hitch behave.
- Pay close attention to any unusual noises, vibrations, or swaying of the trailer. These could indicate improper installation or an issue with the hitch.
- If you notice any issues during the test tow, consult the installation instructions or seek professional help to rectify the problem.
Inspecting the hitch and bumper for any issues
Another crucial step in testing the installation is inspecting the hitch and bumper for any signs of damage or issues. This inspection allows you to catch any potential problems before they lead to more significant issues. Here’s how to inspect the hitch and bumper:
- Visually examine the hitch receiver and its components, ensuring that all bolts and nuts are securely fastened.
- Check for any signs of corrosion or rust that could weaken the hitch over time. If present, consider applying an anti-corrosion treatment.
- Inspect the bumper around the hitch area for any cracks, dents, or misalignment that may have occurred during installation.
- If you detect any damage or issues, address them promptly by consulting the manufacturer’s guidelines or seeking professional assistance.
Ensuring proper performance and stability
The final step in testing the installation is ensuring that the trailer hitch provides proper performance and stability while towing. This is crucial to the overall safety of both the vehicle and the trailer. Here are some key considerations:
- Check that the hitch and trailer remain aligned and level while towing. Any tilting or misalignment can affect the stability of the trailer, leading to potential accidents.
- Test the vehicle’s braking system to ensure that it can effectively stop both the vehicle and the trailer when needed.
- Observe how the vehicle handles various driving conditions, such as acceleration, deceleration, and turns. A properly installed hitch should provide a smooth and controlled towing experience.
- If you notice any issues related to performance or stability, consult an expert to diagnose and resolve the problem before embarking on any long trips or heavy-duty towing.
By conducting a test tow, inspecting the hitch and bumper, and ensuring proper performance and stability, you can rest assured that your trailer hitch receiver installation is secure, safe, and ready for the road ahead. Regular inspections and maintenance will also help prolong the lifespan of your trailer hitch and ensure continued reliability.
Tips For Maintenance And Safety
Proper maintenance and safety are essential when it comes to ensuring the reliable and efficient operation of your trailer hitch receiver. By regularly checking the hitch and receiver components, properly lubricating moving parts, securely attaching trailers, and adhering to weight and towing capacity guidelines, you can enjoy worry-free towing experiences. Let’s dive into these important tips in detail:
Regularly Check Hitch and Receiver Components
To ensure the longevity and functionality of your trailer hitch receiver, it is crucial to perform regular inspections. **Regularly** checking the hitch and receiver components allows you to identify any signs of wear and tear or potential issues. Here are some key areas that warrant your attention:
- Inspect the receiver for any cracks, dents, or other structural damages.
- Check if the hitch ball is securely attached and shows no signs of excessive wear.
- Examine the safety chains and ensure they are intact and free from any rust or corrosion.
- Inspect the electrical connections to ensure they are properly functioning.
By **regularly** keeping an eye on these components, you can detect and address any issues before they become major problems.
Properly Lubricating Moving Parts
To maintain smooth operation and prevent unnecessary wear, it is important to lubricate the moving parts of your trailer hitch receiver. **Applying lubrication** to these components helps to reduce friction and extends their lifespan. Focus on the following areas when lubricating:
- Grease the ball mount and hitch ball to ensure smooth rotation and pivoting.
- Lubricate the receiver tube to facilitate easy insertion and removal of the hitch.
- Apply grease to the locking mechanism and pins to prevent rust and ensure proper engagement.
By **properly lubricating** these moving parts at regular intervals, you can ensure optimal performance and prevent unnecessary wear and tear.
Securely Attaching Trailers to the Hitch
To ensure safe towing and prevent accidents, it is vital to **securely attach trailers** to your hitch. Follow these steps to properly connect your trailer:
- Align the trailer coupler with the hitch ball and ensure both are the correct size.
- Lower the trailer onto the hitch ball, ensuring it is fully seated.
- Engage the coupler latch and verify that it is locked in place by applying a slight upward force.
- Attach the safety chains to the hitch using the appropriate hooks or attachments.
- Plug in and test all electrical connections to ensure proper functioning of lights and brakes.
By adhering to these steps when attaching your trailer, you can have peace of mind knowing that it is securely connected and ready for towing.
Adhering to Weight and Towing Capacity Guidelines
One of the most critical aspects of trailer hitch receiver safety is **adhering to weight and towing capacity guidelines**. Overloading your hitch can lead to excessive strain and compromise the overall safety of your towing setup. Follow these guidelines to ensure you are within the recommended limits:
| Component | Weight and Towing Capacity |
|---|---|
| Hitch Receiver | Refer to the manufacturer’s specifications for the maximum tongue weight and towing capacity. |
| Trailer | Check the trailer’s Gross Vehicle Weight Rating (GVWR) and ensure it does not exceed the hitch capacity. |
| Payload | Consider the weight of the cargo and passengers inside the vehicle and ensure it falls within the tow vehicle’s capacity. |
By **adhering to weight and towing capacity guidelines**, you can prevent dangerous situations and prolong the lifespan of your trailer hitch receiver.
Proper maintenance and safety practices are essential when it comes to trailer hitch receiver installation. By regularly checking components, lubricating moving parts, securely attaching trailers, and following weight and towing capacity guidelines, you can enjoy safe and hassle-free towing experiences for years to come.
Frequently Asked Questions Of How To Install A Trailer Hitch Receiver
Can I Install A Hitch Receiver Myself?
Yes, you can install a hitch receiver yourself. Just make sure to follow the instructions carefully and use proper tools.
What Is The Difference Between A Tow Hitch And A Tow Hitch Receiver?
A tow hitch is a device used for towing, while a tow hitch receiver is the part of the vehicle that receives and holds the hitch. The receiver is typically mounted to the rear of the vehicle and allows for easy attachment and removal of the hitch.
Do You Need Wiring For A Hitch?
Yes, wiring is needed for a hitch.
Do You Need A Ball Mount For A Trailer Hitch?
Yes, you need a ball mount for a trailer hitch. A ball mount is necessary to connect the trailer to the hitch and ensure safe towing. Without a ball mount, the trailer cannot be securely attached to the vehicle.
Conclusion
Installing a trailer hitch receiver may seem daunting at first, but with the right tools and guidance, it can be a straightforward process. By following the step-by-step instructions in this blog post, you can confidently attach a hitch receiver to your vehicle.
Remember to always prioritize safety and double-check your work to ensure a secure installation. With your new hitch receiver in place, you’ll be ready to hit the road and enjoy all the adventures that await. Happy towing!