To install a toolbox in a truck bed without drilling, use a clamp-on installation method. This method allows you to securely attach the toolbox to the bed without the need for drilling holes.
When it comes to adding storage to your truck bed, a toolbox is a convenient and practical option. However, drilling holes into the bed can be a daunting task. Luckily, there is a solution that allows you to install a toolbox without drilling.
By using a clamp-on installation method, you can securely attach the toolbox to the bed without causing any damage. We will guide you through the step-by-step process of installing a toolbox in your truck bed without drilling. So let’s get started!
Factors To Consider When Selecting A Toolbox
When it comes to selecting a toolbox for your truck bed, there are several important factors that should be taken into consideration. These factors will not only ensure that the toolbox fits properly and securely in the truck bed, but also meets your specific needs and requirements. The size and shape of the truck bed, material and durability, locking mechanism, and budget constraints are four crucial factors that should be evaluated before making a final decision.
Size and Shape of Truck Bed
The first factor to consider is the size and shape of your truck bed. Every truck has a different bed size and shape, so it is essential to choose a toolbox that fits snugly. Before making a purchase, measure the width, length, and depth of your truck bed to ensure a perfect fit. Additionally, consider the overall shape of your truck bed. Some truck beds have wheel wells or other obstructions that may limit the available space for a toolbox. Taking accurate measurements and considering the shape are vital steps to avoid any installation issues later on.
Material and Durability
The material and durability of the toolbox are next on the list of factors to consider. A toolbox is an investment, and you want it to last for a long time. Opt for strong and durable materials such as aluminum or steel that can withstand harsh weather conditions and protect your valuable tools. Look for features like weatherproof seals and reinforced corners that enhance the overall durability of the toolbox. A well-built and robust toolbox will provide the necessary protection and ensure that your tools remain safe and secure during transportation.
Locking Mechanism
The third factor that deserves your attention is the locking mechanism of the toolbox. Keeping your tools safe and secure is essential, especially when your truck is unattended. Look for a toolbox with a reliable and robust locking system. Features to consider include a secure latch or handle, as well as the option for adding additional padlocks. Having a toolbox with a strong locking mechanism will give you peace of mind, knowing that your valuable tools are protected from theft or unauthorized access.
Budget Constraints
Finally, budget constraints are an essential factor to consider when selecting a toolbox. Determine your budget range and explore options that fit within that range. Keep in mind that while price is important, it should not be the sole determining factor. Look for a toolbox that offers a good combination of quality, features, and affordability. Remember, investing a little more upfront in a high-quality toolbox can save you money in the long run, as you won’t need to replace it prematurely due to wear and tear.
By considering these factors – size and shape of the truck bed, material and durability, locking mechanism, and budget constraints – you can make an informed decision and select the right toolbox for your truck bed without needing to drill any holes. The perfect toolbox will not only serve its purpose effectively but also enhance the functionality and convenience of your truck bed. So, take your time, evaluate your options, and choose wisely!
Researching Different Types Of Toolboxes
When it comes to installing a toolbox in your truck bed without drilling, it is important to research different types of toolboxes available in the market. Understanding the options available to you will help you make an informed decision and find the perfect toolbox that suits your needs. In this section, we will discuss three popular types of toolboxes – Cross Bed Toolboxes, Side Mount Toolboxes, and Chest Toolboxes.
Cross Bed Toolboxes
A cross bed toolbox is one of the most common types of toolboxes used in truck beds. It is designed to span the width of the truck bed, providing ample storage space for your tools and equipment. These toolboxes come in various materials such as aluminum, steel, and plastic, offering durability and resistance to weather conditions.
If you’re looking for easy access to your tools, cross bed toolboxes are a great option. They usually come with a hinged lid that can be easily opened and closed, allowing you to retrieve your tools without any hassle. These toolboxes can also be secured with a lock, ensuring the safety of your valuable tools.
Side Mount Toolboxes
Side mount toolboxes are another popular choice for truck owners who want to install a toolbox without drilling. As the name suggests, these toolboxes are mounted on the sides of the truck bed, providing easy access to your tools from the sides.
Side mount toolboxes are available in various sizes and configurations, allowing you to choose the one that best fits your truck bed and storage needs. They often feature a hinged lid or a side-opening door, making it convenient to grab the tools you need while working.
Chest Toolboxes
Chest toolboxes are a versatile option for truck owners who prefer a toolbox that can also serve as a secure storage unit. These toolboxes are designed to sit directly on the truck bed and are typically larger in size, offering a generous amount of storage space.
Chest toolboxes usually feature a single, large lid that can be opened fully, providing easy access to all your tools and equipment. Some models come with built-in locks, ensuring the safety of your tools when the toolbox is not in use.
When researching different types of toolboxes, consider the size of your truck bed, the amount of storage space you need, and the accessibility of your tools. Each type has its own advantages and considerations, so take the time to compare and choose the best option for your truck.
Measuring Your Truck Bed For Proper Fit
Taking Accurate Measurements
Before installing a toolbox in your truck bed without drilling, it is crucial to take accurate measurements to ensure a proper fit. Precision is key to prevent any unexpected issues and ensure the toolbox is securely installed. Here’s how you can measure your truck bed:
- Start by measuring the length of your truck bed. Using a tape measure, begin at the inside edge of the truck bed near the tailgate. Take the measurement up to the inside edge of the bulkhead. Make sure to note down the exact measurement in inches.
- Next, measure the width of the truck bed. Begin at the widest point of your bed, preferably near the wheel wells. Extend the tape measure across the bed until you reach the opposite side. Note down this measurement as well.
- Additionally, don’t forget to measure the height of your truck bed. Measure from the bed floor to the top of the bed rails. Again, jot down this measurement for reference.
Considering Clearance Space
When selecting a toolbox for your truck bed, it’s essential to consider clearance space. This ensures that the toolbox doesn’t interfere with the functionality of your truck or cause any damage. Here are some factors to keep in mind:
- Check the clearances around your truck bed. Pay attention to any protrusions, such as fuel filler doors or bed rail caps, which may affect the installation of the toolbox.
- Consider the clearances when opening the truck bed tailgate or accessing the truck bed storage. Ensure the toolbox doesn’t hinder these operations by selecting a suitable size and position.
- Keep in mind any additional accessories you may have, such as truck bed liners or tonneau covers. Make sure the toolbox integrates well with your existing setup for a seamless fit.
Ensuring Compatibility with Truck Model
Lastly, verifying the compatibility of the toolbox with your specific truck model is crucial for a successful installation. Not all toolboxes are designed to fit every truck, so follow these steps to ensure compatibility:
- Research toolbox options that are compatible with your truck make and model. Look for manufacturer recommendations, customer reviews, and specifications that match your truck.
- Consider the mounting system of the toolbox. Some toolboxes use clamps or brackets that secure it to the truck bed without drilling, while others may require additional hardware or modifications.
- Ensure the toolbox is designed to fit your truck bed dimensions. Check the product description or consult the manufacturer’s website for compatibility information.
By taking accurate measurements, considering clearance space, and ensuring compatibility with your truck model, you can confidently install a toolbox in your truck bed without drilling. This will not only provide you with convenient storage space but also enhance the functionality of your truck for all your hauling and work needs.
Cleaning The Truck Bed Surface
Removing Debris and Dirt
Before installing a toolbox in your truck bed without drilling, it is crucial to prepare the surface properly. The first step in this process is to remove any debris and dirt that may be present. Any loose items such as rocks, dirt clumps, or leaves should be cleared away to ensure a clean surface for installation.
Using a broom or a brush, sweep away any loose debris on the truck bed. This will help prevent any interference with the toolbox installation and ensure a secure fit. Make sure to pay extra attention to the corners and edges of the bed, as these areas can accumulate more dirt and debris.
Using Appropriate Cleaning Agents
Once you have removed the visible debris, it’s time to thoroughly clean the truck bed surface with appropriate cleaning agents. The type of cleaning agent you use will depend on the material of your truck bed.
For metal truck beds:
- Prepare a mixture of mild soap and water in a bucket.
- Using a sponge or a soft cloth, dip it into the soapy water and scrub the truck bed surface.
- Rinse the truck bed with clean water to remove any soap residue.
- Dry the truck bed surface completely using a clean towel or allow it to air dry.
For plastic or composite truck beds:
- Use a cleaning agent specifically designed for plastic or composite materials.
- Follow the manufacturer’s instructions on how to properly clean and prepare the surface.
- Rinse the truck bed with clean water to remove any cleaning agent residue.
- Dry the truck bed surface completely using a clean towel or allow it to air dry.
By using appropriate cleaning agents, you ensure that the truck bed surface is free from dirt, grease, and other substances that may impede the toolbox installation. A clean surface will provide maximum adhesion for the mounting brackets or adhesive pads that you will use to secure the toolbox.
Applying Protective Coating To Truck Bed
One of the most important steps in installing a toolbox in a truck bed without drilling is applying a protective coating. This not only helps to protect your truck bed from rust and corrosion but also provides a nice finished look. In this section, we will discuss the process of applying a protective coating to your truck bed.
Choosing the Right Coating Material
When it comes to choosing the right coating material for your truck bed, there are several options available in the market. It is essential to select a coating that is durable, provides excellent adhesion, and is resistant to chemicals, UV rays, and extreme weather conditions. Here are a few popular coating materials:
| Coating Material | Description |
|---|---|
| 1. Spray-on Bedliner | These are thick and protective coatings that provide a rubberized finish to your truck bed. They are easy to apply and create a textured surface that prevents items from sliding around. |
| 2. Roll-on Bedliner | Similar to spray-on bedliners, these coatings are applied using a roller brush. They offer a more affordable option and can be easily touched up if needed. |
| 3. Drop-in Bedliner | These are pre-formed liners made of plastic or rubber that can be easily installed and removed. They provide good protection but may not offer the same level of customization as spray-on or roll-on bedliners. |
Before applying any coating material, make sure to thoroughly clean and dry the truck bed. Remove any dirt, grease, or old paint as this can affect the adhesion of the coating.
Applying Coating for Longevity
To ensure the longevity of the coating and maintain its protective properties, it is crucial to follow the manufacturer’s instructions for application. Here are some general steps to keep in mind:
- Prepare the coating material as per the manufacturer’s instructions. Shake or stir the material well to ensure it is properly mixed.
- Using a paintbrush or roller brush, apply an even coat of the coating material to the truck bed. Start from one end and work your way towards the other end.
- Be sure to coat all areas thoroughly, including the sides and corners.
- Allow the first coat to dry as per the manufacturer’s instructions. This will typically take a few hours.
- Apply a second coat for added durability and protection. Make sure to follow the drying time recommended by the manufacturer between coats.
- Once the coating has fully dried, inspect the truck bed for any missed spots or unevenness. Touch up these areas if necessary.
By following these steps and choosing the right coating material, you can effectively protect your truck bed and install a toolbox without the need for drilling. Remember to take your time and ensure proper application for the best results.
Installing Bed Rail Caps
When it comes to installing a toolbox in a truck bed without drilling, one crucial step is attaching bed rail caps. These caps not only protect the truck bed from scratches and dents but also provide a secure foundation for the toolbox. In this guide, we will walk you through the process of measuring, cutting, and attaching bed rail caps to your truck bed.
Necessary Tools and Materials
Before you begin installing bed rail caps, make sure you have the following tools and materials:
- A measuring tape
- A marker
- A hacksaw or tin snips
- Adhesive promoter (optional, for added adhesion)
- Clean cloth
- Bed rail caps (choose the appropriate size for your truck bed)
Measuring and Cutting Bed Rail Caps
The first step in installing bed rail caps is to accurately measure your truck bed. Use a measuring tape to measure the length and width of the bed, ensuring you account for any protrusions or curves.
Once you have the measurements, transfer them onto the bed rail caps using a marker. It’s essential to be precise during this step to ensure a proper fit. If necessary, you can use a hacksaw or tin snips to carefully cut the bed rail caps to the correct size.
Attaching Bed Rail Caps to Truck Bed
With the bed rail caps cut to size, you can now proceed to attach them to your truck bed. Here’s a step-by-step guide:
- Start by thoroughly cleaning the truck bed surface with a clean cloth to remove any dirt, grease, or debris that may hinder adhesion.
- If desired, you can apply adhesive promoter to the truck bed surface following the manufacturer’s instructions. This step will enhance the adhesion of the bed rail caps.
- Carefully position the bed rail caps along the edges of the truck bed, ensuring they line up with the measurements taken earlier.
- Apply firm pressure to the bed rail caps, pressing them down onto the truck bed surface. Make sure they adhere securely.
- Repeat the process for all sides of the truck bed, checking alignment and adhesion as you go.
With the bed rail caps properly attached, you now have a sturdy and protective base for installing your toolbox in the truck bed without drilling. Take a moment to double-check the placement and adhesion of the bed rail caps before proceeding.
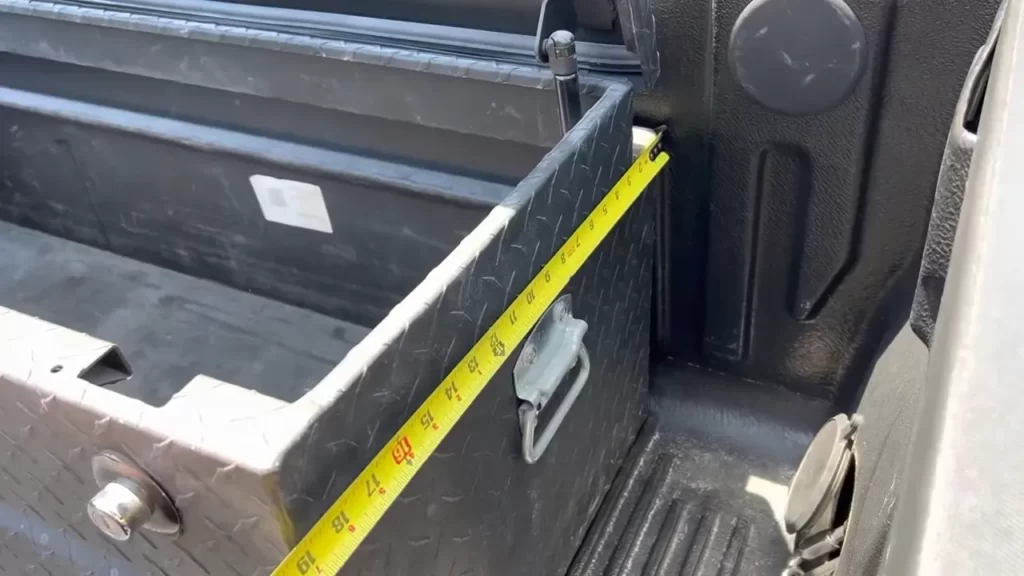
Utilizing Mounting Brackets And Clamps
Installing a toolbox in your truck bed can greatly enhance its functionality and organization. However, you may be hesitant to drill holes into your truck bed, especially if it’s a leased vehicle or you prefer to keep it in its original condition. Fortunately, there are alternative methods to secure a toolbox without the need for drilling. One such method involves utilizing mounting brackets and clamps, which provide a secure and reliable solution for attaching a toolbox to your truck bed. In this guide, we will explore how to install a toolbox in a truck bed without drilling by understanding different mounting options, installing mounting brackets, and securing the toolbox with clamps.
Understanding Different Mounting Options
Before you begin the installation process, it’s important to familiarize yourself with the different mounting options available for securing a toolbox without drilling. These options include:
- Mounting brackets: These are typically metal brackets specifically designed to attach a toolbox to the truck bed without drilling. They are durable and provide a stable base for the toolbox.
- Clamps: Clamps come in various sizes and designs and are used to secure the toolbox onto the truck bed. They provide a strong grip and allow for easy installation and removal of the toolbox.
Installing Mounting Brackets to Truck Bed
Installing mounting brackets is the first step in securing a toolbox without drilling. Follow these steps to install the mounting brackets:
- Measure the dimensions of your toolbox and mark the corresponding locations on the truck bed where you want to place the toolbox.
- Position the mounting brackets on the marked locations and use a measuring tape to ensure they are aligned evenly.
- Secure the mounting brackets to the truck bed by tightening the bolts or screws provided with the brackets. Ensure the brackets are securely fastened to prevent any movement
- Double-check the alignment and stability of the mounting brackets. Adjust if necessary.
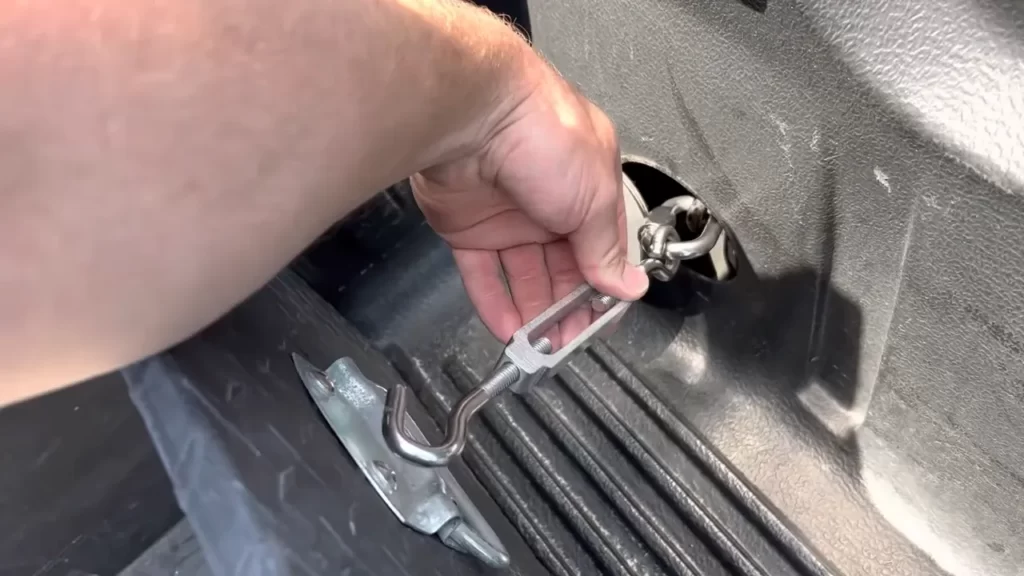
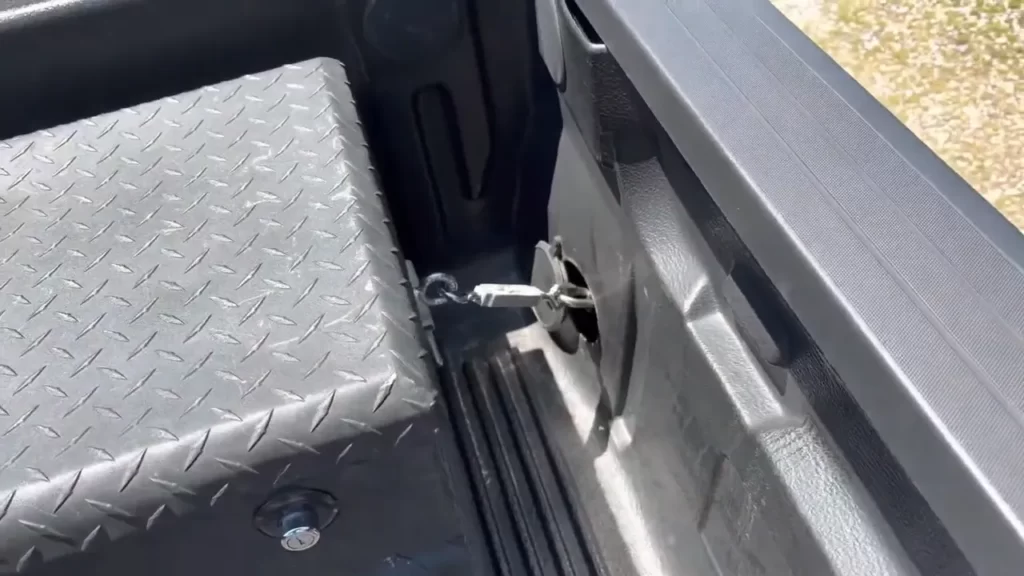
Securing Toolbox with Clamps
Once the mounting brackets are securely installed, you can proceed to secure the toolbox onto the truck bed using clamps. Follow these steps to secure the toolbox with clamps:
- Place the toolbox onto the mounting brackets, ensuring it aligns properly.
- Position the clamps on the sides of the toolbox, ensuring they are evenly spaced.
- Tighten the clamps using the provided hardware until they firmly attach the toolbox to the mounting brackets.
- Double-check the tightness of the clamps and ensure the toolbox is securely fastened to prevent any movement during travel.
By utilizing mounting brackets and clamps, you can install a toolbox in your truck bed without drilling, providing a secure and convenient storage solution for your tools and equipment. Always refer to the manufacturer’s instructions and guidelines when installing your specific toolbox model for the best results.
Using Adhesive Tape Or Velcro Strips
When it comes to installing a toolbox in your truck bed, drilling may not always be the best option. Luckily, there are alternatives that can securely hold the toolbox in place without damaging your truck. One method is using adhesive tape or Velcro strips. This enables you to easily attach and remove the toolbox whenever needed, while still ensuring it stays firmly in place. In this post, we will guide you through the process of installing a toolbox in your truck bed without drilling, specifically by using adhesive tape or Velcro strips.
Preparing the Truck Bed and Toolbox Surfaces
Before you can begin attaching the toolbox using adhesive tape or Velcro strips, it’s crucial to properly prepare the truck bed and toolbox surfaces. Follow these steps:
- Clean the truck bed surface using a mild detergent or degreaser. This will remove any dirt, debris, or grease that could interfere with the adhesive.
- Thoroughly dry the truck bed surface to ensure optimal adhesion.
- Similarly, clean the bottom of the toolbox to remove any dirt or grease.
- Ensure both surfaces are completely dry before proceeding to the next step. Moisture can compromise the adhesive’s effectiveness.
Applying Adhesive Tape or Velcro Strips
Once you’ve prepared the truck bed and toolbox surfaces, it’s time to apply the adhesive tape or Velcro strips. Follow these instructions:
- Measure the length and width of the toolbox base.
- Cut the adhesive tape or Velcro strips accordingly, ensuring they match the measurements of the toolbox base.
- Remove the backing from the adhesive tape or Velcro strips to expose the sticky side.
- Press the sticky side of the tape or strips firmly onto the clean, dry truck bed surface. Ensure they are evenly spaced and aligned to match the toolbox base measurements. Apply pressure for a few seconds to ensure proper adhesion.
- If using adhesive tape, repeat the same process for the bottom of the toolbox. If using Velcro strips, remove the backing from the opposite side of the tape or strips and firmly press them onto the bottom of the toolbox.
Securing the Toolbox in Place
Now that the adhesive tape or Velcro strips are applied, it’s time to secure the toolbox in place:
- Carefully align the bottom of the toolbox with the adhesive tape or Velcro strips on the truck bed surface.
- Press the toolbox firmly onto the surface so that the adhesive tape or Velcro strips make full contact with each other.
- Apply pressure to ensure a strong bond between the toolbox and the truck bed. This will help prevent any shifting or movement during transportation.
- Wait for the recommended curing time provided by the adhesive tape or Velcro strip manufacturer before loading the toolbox with any heavy items.
Using adhesive tape or Velcro strips to install a toolbox in your truck bed without drilling offers convenience and flexibility. It allows for easy removal and repositioning of the toolbox as needed, while ensuring a secure attachment. Follow the preparation, application, and securing steps outlined in this guide to successfully install your toolbox without drilling.
Exploring Alternative Fastening Methods
When it comes to installing a toolbox in your truck bed, drilling may not be an option for everyone. Thankfully, there are alternative fastening methods that can securely hold your toolbox in place without the need for any permanent modifications. In this article, we will delve into two popular options: utilizing ratchet straps or bungee cords, and considering the use of cargo nets or tie-downs.
Utilizing Ratchet Straps or Bungee Cords
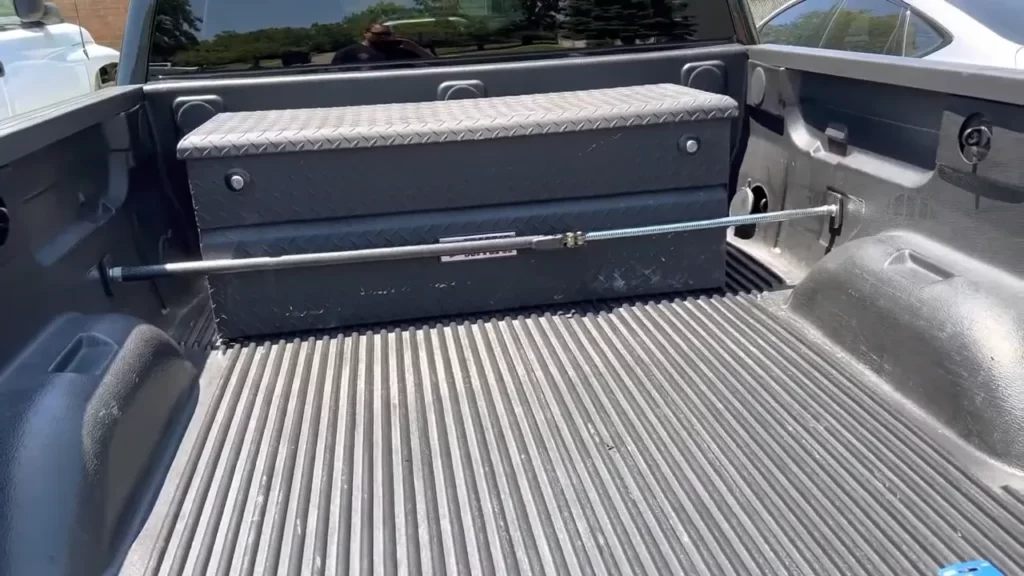
If you’re looking for a quick and easy way to install your toolbox without drilling, ratchet straps or bungee cords can be a lifesaver. These versatile tools are commonly used for securing cargo during transport, and they can work just as well for keeping your toolbox in place.
Here’s how you can utilize ratchet straps or bungee cords:
- Position your toolbox securely in your truck bed, making sure it’s centered and aligned with the sides.
- Attach one end of the ratchet strap or bungee cord to a stable anchor point in your truck bed, such as a tie-down hook.
- Loop the strap or cord around the toolbox, ensuring it’s taut and snug against the sides.
- Attach the other end of the strap or cord to another anchor point on the opposite side of the truck bed.
- Repeat the process for additional straps or cords until your toolbox is securely fastened in place.
Using ratchet straps or bungee cords to install your toolbox provides a non-permanent solution that allows for easy removal and repositioning whenever needed. Just remember to periodically check the straps or cords for any signs of wear and tear, and replace them if necessary.
Considering Using Cargo Nets or Tie-Downs
If the idea of using ratchet straps or bungee cords doesn’t quite fit your needs, cargo nets or tie-downs can be a viable alternative. These options provide a secure and flexible solution for keeping your toolbox in place without the need for drilling.
Here are some key considerations when using cargo nets or tie-downs:
- Make sure you choose a cargo net or tie-down system that is suitable for the size and weight of your toolbox. Refer to the manufacturer’s guidelines for the maximum load capacity.
- Position the cargo net or tie-downs over your toolbox, ensuring that it covers the top and sides completely.
- Secure the net or tie-downs to the anchor points in your truck bed, ensuring a snug and secure fit.
- Tighten the cargo net or tie-downs to eliminate any slack and prevent movement during transportation.
By considering the use of cargo nets or tie-downs, you open up a range of possibilities for installing your toolbox without drilling. These methods provide a secure and removable solution that offers both convenience and flexibility.
Remember to regularly inspect your cargo nets or tie-downs to ensure they are in good condition and replace any damaged components as needed. With the right choice of fastening method, you can confidently transport your toolbox without the need for permanent alterations to your truck bed.
Checking Stability And Tightness
Once you have successfully installed your toolbox in your truck bed without drilling, it is essential to ensure that it is stable and secure. Checking the stability and tightness of the toolbox will give you peace of mind, knowing that your tools and equipment are safe and won’t move around during transportation.
Testing Toolbox Stability
To test the stability of your toolbox, follow these simple steps:
- Give the toolbox a gentle shake to check if it wobbles or moves excessively. Stability is crucial to prevent any damage to your tools and ensure a safe driving experience.
- If you notice any movement, try adjusting the position or tightness of the fastenings and connections.
- Place a few heavy objects inside the toolbox and drive the truck around, paying attention to any shifts or rattling noises.
Repeat the process until you are confident that the toolbox is secure and stable, even during bumpy rides or sharp turns.
Tightening Fastenings and Connections
Tightening the fastenings and connections of your toolbox will further enhance its stability and prevent any unexpected movement. Use the following guidelines:
- Inspect all the screws, bolts, and nuts that hold the toolbox in place. Ensure they are tight and secure.
- If you notice any loose fastenings, use a wrench or socket set to tighten them properly.
- Check the hinges and latches of the toolbox to make sure they are functioning smoothly. Lubricate them if necessary.
By securing all the fastenings and connections, you can minimize the risk of your toolbox shifting or becoming dislodged while driving. Regularly inspect and tighten the fastenings to maintain the stability of your toolbox.
Remember, while installing a toolbox without drilling may be convenient, it’s essential to prioritize stability and tightness to ensure the safety of your tools and equipment during transportation. By following these simple steps, you can have peace of mind knowing that your toolbox is securely anchored in your truck bed, ready to withstand the rigors of the road.
Securing Toolbox With Additional Locking Mechanisms
When it comes to installing a toolbox in your truck bed without drilling, it’s essential to consider the security of your valuable tools and equipment. While mounting the toolbox securely is a great first step, adding additional locking mechanisms can provide an extra layer of protection and peace of mind. In this section, we will discuss two effective ways to enhance the security of your toolbox by installing supplementary locks or padlocks.
Installing Supplementary Locks or Padlocks
One of the most common methods for securing a toolbox without drilling is by installing supplementary locks or padlocks. These locks act as an additional deterrent for any potential thieves, making it harder for them to access your toolbox. Here’s how you can install these locks:
- Start by selecting a suitable lock or padlock that matches the size and design of your toolbox. Look for durable locks made from materials like hardened steel, which are more resistant to tampering.
- Identify the ideal locations to install the supplementary locks on your toolbox. Usually, these will be the existing latches or handles. Make sure to choose spots that provide a secure attachment point without compromising the functionality of the toolbox.
- Once you have determined the installation points, use the necessary tools to mount the locks securely. This might involve drilling small holes or using adhesive plates provided with the locks. Follow the manufacturer’s instructions carefully to ensure proper installation.
- Attach the locks to the designated spots and test their functionality. Ensure that the locks engage properly and provide a tight fit, preventing any unwanted movement or jostling of the toolbox.
By installing supplementary locks or padlocks, you can significantly enhance the security of your toolbox without the need for drilling. These locks act as a deterrent and make it more difficult for thieves to access your tools. However, remember to choose high-quality locks and follow the installation instructions to ensure maximum effectiveness.
Enhancing Toolbox Security
Aside from installing supplementary locks or padlocks, there are several other measures you can take to enhance the overall security of your toolbox. Here are some additional tips:
- Use a heavy-duty security cable: Consider securing your toolbox using a heavy-duty security cable. This cable can be threaded through the toolbox handles and secured using a reliable padlock. It adds an extra layer of protection against theft.
- Opt for a toolbox with built-in locking mechanisms: If you haven’t purchased a toolbox yet, look for models that come with built-in locking mechanisms. These toolboxes often have reinforced latches or integrated locks, offering superior security without the need for additional installations.
- Ensure proper placement: Place your toolbox in a location that is not easily visible, such as under a tonneau cover or a camouflaged bed liner. This way, potential thieves are less likely to target your toolbox, reducing the risk of theft.
- Regularly inspect and maintain your toolbox: Keep your toolbox in good condition by routinely inspecting and maintaining it. Replace any damaged locks or latches promptly, and ensure that your toolbox remains securely mounted to prevent any vulnerabilities.
By incorporating these additional security measures, you can increase the protection of your toolbox, keeping your valuable tools safe and secure. Remember to choose high-quality locks, follow proper installation procedures, and regularly inspect your toolbox to mitigate any risks. With these precautions in place, you can have peace of mind knowing that your tools are well-protected.
Installing a toolbox in your truck bed without drilling doesn’t mean compromising on security. By implementing supplementary locks or padlocks and considering additional security measures, you can ensure that your valuable tools and equipment stay safe even while on the move.
Regular Maintenance And Inspection
Regular maintenance and inspection are crucial for keeping your truck bed toolbox secure and in the best possible condition. By following a few simple steps, you can ensure that your toolbox remains clean, well-maintained, and free from any loose fastenings. In this section, we will discuss two key aspects of regular maintenance and inspection: cleaning and maintaining the toolbox, as well as conducting periodic inspections for loose fastenings.
Cleaning and Maintaining Toolbox
To keep your toolbox in pristine condition, it is important to regularly clean and maintain it. Follow these steps to ensure your toolbox remains in top shape: 1. **Remove all items:** Before cleaning the toolbox, remove all tools and items stored inside. This will allow you to thoroughly clean the interior and exterior of the toolbox. 2. **Clean the interior:** Use a mild soap or cleaning solution and a soft cloth to wipe down the interior of the toolbox. Pay close attention to corners and crevices where dirt and debris may accumulate. For stubborn stains or grease, you can use a degreaser or specialized cleaning solution. 3. **Clean the exterior:** Wipe down the exterior surface of the toolbox using the same soap or cleaning solution. Be sure to remove any dirt, dust, or grime that may have accumulated. For metal toolboxes, consider applying a coat of wax or protective sealant to prevent rust and corrosion. 4. **Inspect for damage:** While cleaning, carefully inspect the toolbox for any signs of damage such as cracks, dents, or loose hinges. If you notice any issues, address them promptly to prevent further damage.
Periodic Inspection for Loose Fastenings
In addition to regular cleaning and maintenance, it is essential to conduct periodic inspections to check for loose fastenings. Fasteners that become loose over time can compromise the security and stability of your toolbox. To perform a thorough inspection, follow these steps: 1. **Check hinges and latches:** Inspect the hinges and latches of the toolbox to ensure they are securely fastened. Look for any signs of wear or damage that may require repair or replacement. 2. **Examine mounting brackets and hardware:** If your toolbox is mounted using brackets or hardware, check these components for any signs of looseness or damage. Tighten any loose bolts or screws and replace any worn or damaged parts as necessary. 3. **Confirm overall stability:** Once you have inspected the individual components, step back and assess the overall stability of the toolbox. Gently shake the toolbox to ensure it is firmly attached to the truck bed without any excessive movement. 4. **Repeat periodically:** Regularly repeating these inspections is essential to ensure the ongoing security and stability of your toolbox. Aim to inspect your toolbox at least once every few months or after any significant vehicle or driving-related events. By following these guidelines for cleaning and maintaining your toolbox and conducting periodic inspections for loose fastenings, you can maximize the longevity and effectiveness of your truck bed storage solution. Don’t overlook the importance of regular maintenance, as it can save you time, money, and potential headaches in the long run.
Frequently Asked Questions For How To Install A Toolbox In A Truck Bed Without Drilling
How Do You Mount A Truck Tool Box Without Drilling?
To mount a truck toolbox without drilling, you can use alternative methods like using a mounting kit with brackets or utilizing clamps. These options provide secure attachment without the need for drilling into your truck bed.
How Do You Anchor A Tool Box To A Truck Bed?
To anchor a toolbox to a truck bed, follow these steps: 1. Choose the right mounting kit for your truck and toolbox. 2. Position the toolbox in the desired location on the truck bed. 3. Use drilling or clamping methods to secure the toolbox in place.
4. Ensure that the toolbox is tightly fastened and won’t shift during transport. 5. Double-check the anchor points regularly for any loosening or wear.
How Do You Mount A Small Tool Box In A Truck Bed?
To mount a small tool box in a truck bed, follow these steps: 1. Measure the available space in your truck bed. 2. Clean the bed surface and remove any dirt or debris. 3. Position the tool box in the desired location.
4. Secure the tool box using mounting brackets or clamps. 5. Double-check the fastenings to ensure a secure fit.
How Do You Strap Down A Tool Box?
To secure a tool box, follow these steps: 1. Place the box in your desired location. 2. Use strong straps to fasten it securely. 3. Ensure the straps are tightly secured around the box. 4. Double-check the straps to make sure they are snug.
5. Test the stability of the tool box before transporting it.
Conclusion
Installing a toolbox in your truck bed without drilling can be a simple and convenient solution. By using alternative methods such as clamps, brackets, or adhesive tape, you can secure your toolbox safely and effectively. Not only does this save you time and effort, but it also ensures that your truck bed remains unharmed.
So, follow the steps outlined in this guide and enjoy the convenience of a toolbox without the need for drilling.