To install a tire patch, you will need the necessary tools and materials, including a tire patch kit, an air compressor, and a tire iron. Start by locating the puncture on the tire and removing any debris from the area.
Apply rubber cement to the puncture and then place the tire patch over it. Use the tire iron to press the patch firmly onto the tire. Finally, inflate the tire to the recommended pressure using an air compressor. Nowadays, punctured or damaged tires are a common occurrence for vehicle owners.
Whether it’s a nail or another sharp object, a tire patch can be an effective solution to repair the tire and get you back on the road quickly. However, knowing how to install a tire patch properly is essential to ensure a safe and reliable repair. In this guide, we will walk you through the step-by-step process of installing a tire patch, so you can confidently fix any small punctures in your tires and avoid the hassle and expense of a full tire replacement.
Understanding The Importance Of Proper Tire Maintenance
Importance of tire maintenance for safety and performance
Proper tire maintenance is crucial for both the safety of the driver and the optimal performance of the vehicle. By understanding the importance of tire maintenance, you can ensure that your tires are in top condition, reducing the risk of accidents and maximizing the longevity of your tires.
Common causes of tire damage
Tire damage can be caused by a variety of factors, some of which are more common than others. It is important to be aware of these common causes to minimize the risk of tire damage and to take the necessary steps to address any issues promptly. Here are a few common causes of tire damage:
- Puncture: sharp objects like nails or screws on the road can penetrate the tire, causing punctures.
- Underinflation: when tires are not properly inflated, they can become more susceptible to damage from potholes and other road hazards.
- Overloading: exceeding the maximum load capacity of your tires can lead to excessive wear and tear, increasing the risk of tire failure.
- Uneven wear: lack of regular tire rotations and misalignment can cause uneven wear, leading to reduced tread life and compromised performance.
Ensuring proper tire maintenance
Maintaining your tires properly is not only important for your safety but also for the performance and longevity of your tires. Here are a few key steps you can follow to ensure proper tire maintenance:
- Regularly check tire pressure: Use a tire pressure gauge to check the inflation pressure of your tires at least once a month. Maintaining the recommended tire pressure will help prevent underinflation and improve fuel efficiency.
- Inspect for damage: Perform visual inspections of your tires to check for signs of cuts, punctures, bulges, or other damage regularly.
- Rotate tires: Rotate your tires regularly to promote even wear and extend their lifespan. Refer to your vehicle’s owner’s manual for the recommended rotation pattern.
- Ensure proper alignment: Misaligned tires can result in uneven wear and reduced handling performance. Have your tires aligned by a professional if you notice any signs of misalignment.
- Consider tire patches: If you have a small puncture or damage, a tire patch can be a cost-effective solution to repair the tire. Understanding how to properly install a tire patch can save you money and extend the life of your tire.
By following these steps and understanding the importance of proper tire maintenance, you can ensure that your tires are in optimal condition, promoting your safety and enhancing the performance of your vehicle on the road.
Determining The Feasibility Of Installing A Tire Patch
Before attempting to install a tire patch, it is crucial to assess the feasibility of this repair method. This involves considering the severity and location of the tire damage, the type of tire, its age, and consulting with a professional tire expert. By taking these factors into account, you can determine whether a tire patch is a suitable solution for your specific situation.
Assessing the Severity and Location of the Tire Damage
The first step in determining the feasibility of installing a tire patch is assessing the severity and location of the tire damage. Inspect the tire carefully to identify any punctures or tears. Pay close attention to the size and depth of the damage, as well as its location on the tire.
For small punctures or tears that are located on the tread area and are less than a quarter-inch in size, a tire patch may be a suitable option. However, if the damage is extensive, with large cuts or punctures near the sidewall, a tire patch may not be sufficient and a tire replacement might be necessary for proper safety.
Considering the Type of Tire and Its Age
Another important factor to consider is the type of tire and its age. Take into account whether the tire is tubeless or tubed, as patching techniques can vary. Additionally, the age of the tire plays a crucial role in determining the feasibility of a patch. Old or deteriorated tires may not hold the patch properly and could pose a risk.
If the tire is relatively new and in good condition, a patch may provide an effective and long-lasting solution. However, if the tire is nearing the end of its lifespan or has signs of wear and tear, it may be safer to replace it entirely rather than relying on a patch.
Consultation with a Professional Tire Expert
Lastly, consult with a professional tire expert before proceeding with a tire patch. Their expertise and experience will help you make an informed decision. They can thoroughly inspect the tire, assess the severity of the damage, and provide guidance on whether a patch is feasible and safe.
Remember, it is always better to err on the side of caution when it comes to tire repairs. Putting your safety first should be a top priority, and if a professional determines that a tire patch is not advisable, it is best to follow their recommendation and explore other options.
Gathering The Required Tools And Materials
When it comes to installing a tire patch, having the right tools and materials is essential for a smooth and effective repair. In this section, we will go over the necessary items you will need to gather before starting the patching process. By being prepared and having everything at hand, you can ensure a successful tire patch that will keep you back on the road in no time.
List of tools needed for tire patch installation
To begin with, let’s take a look at the tools you will need for the tire patch installation. Having these on hand will make the process much easier and faster:
- Tire patch kit
- Tire repair cement
- Tire pressure gauge
- Tire jack
- Tire iron or lug wrench
- Valve core tool
- Wire brush
- Pliers
- Rubber cement
- Razor blade or utility knife
- Tire inflator or air compressor
- Safety goggles and gloves
Make sure you have all these tools readily available before you begin the tire patch installation process. It’s important to note that some tire patch kits already include some of these tools, so check the kit to avoid duplicates.
Overview of tire patching kits available in the market
There are various tire patching kits available in the market, each offering its own unique features and advantages. Here is a brief overview of some popular tire patching kits:
| Kit Name | Features |
|---|---|
| Brand A Tire Patch Kit | Includes pre-cut patches, adhesive, and tools for easy installation. |
| Brand B Tire Patch Kit | Offers a comprehensive kit with a wide range of patch sizes for any tire repair. |
| Brand C Tire Patch Kit | Provides a quick and efficient patching solution with self-vulcanizing patches. |
Before choosing a tire patching kit, consider factors such as the type of patch, ease of use, and customer reviews. Additionally, check if the kit includes all the necessary tools or if you need to purchase them separately.
Now that you have an understanding of the tools needed and the available tire patching kits in the market, you are ready to proceed with the tire patch installation process. In the next section, we will explore the step-by-step instructions to effectively patch your tire and get back on the road safely.
Preparing The Tire For Patch Installation
Deflating the tire and removing it from the vehicle
Before you can install a tire patch, it’s important to deflate the tire and safely remove it from the vehicle. Follow these steps to ensure a smooth and efficient process:
- Park your vehicle on a level surface and engage the parking brake to prevent any accidents.
- Locate the valve stem on the tire and use a valve stem tool to depress the pin, releasing the air. Ensure that you fully deflate the tire to make it easier to remove.
- Once the tire is deflated, use a jack to raise the vehicle. Consult your vehicle’s manual to find the appropriate lifting points for the jack.
- After lifting the vehicle, use a lug wrench to loosen and remove the lug nuts from the wheel. Place the lug nuts in a safe spot to avoid misplacing them.
- Gently pull the tire off the wheel assembly, ensuring that you have a good grip on the tire. Be cautious of any potential sharp objects that might be sticking out.
Properly inspecting the damaged area of the tire
Once the tire is removed, it’s crucial to thoroughly inspect the damaged area to determine if a patch is suitable or if the tire needs to be replaced. Follow these steps for a comprehensive inspection:
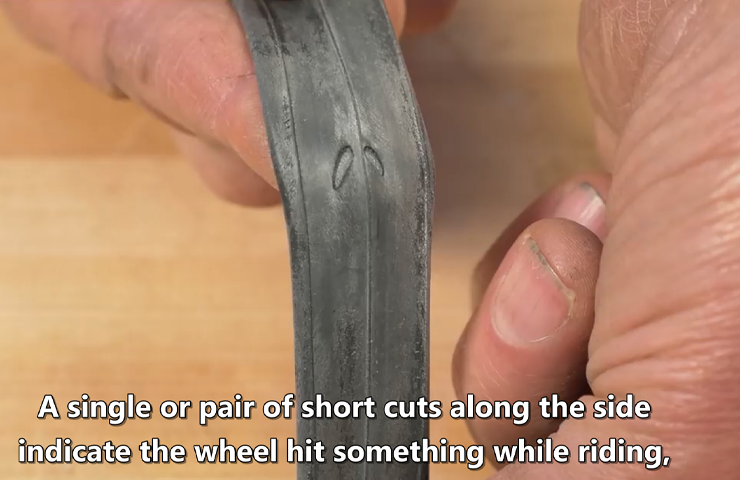
- Visually examine the entire tread surface for any punctures or cuts. Take note of the size and location of the damage.
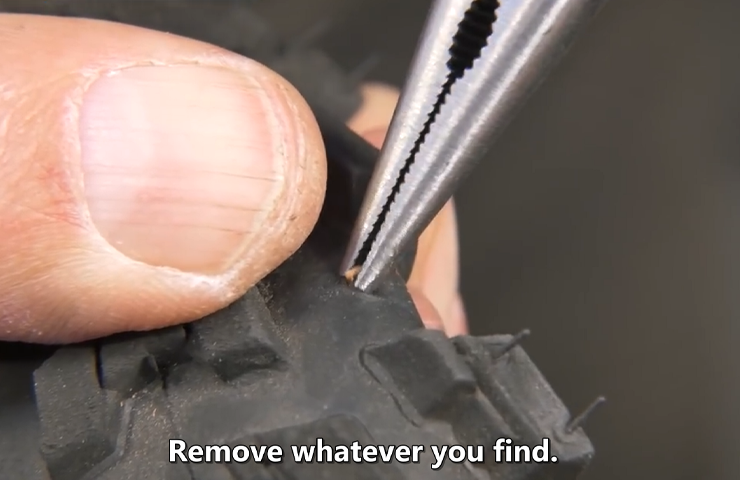
- Run your fingers along the damaged area to check for any foreign objects embedded in the tire. Remove any debris you find using pliers or similar tools.
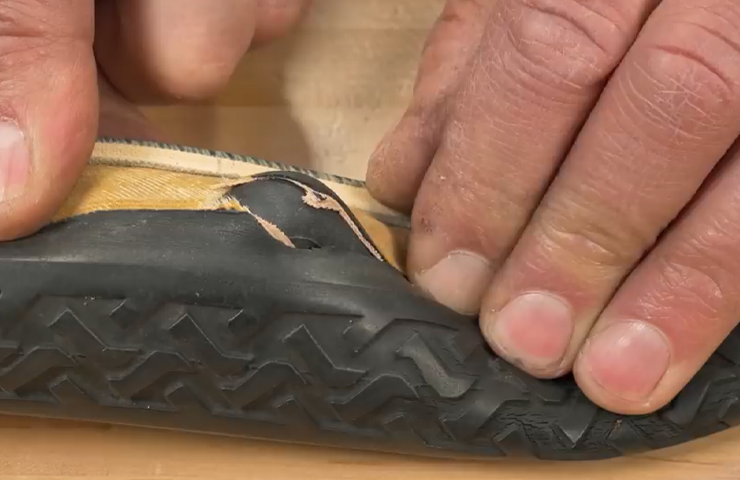
- Pay close attention to the sidewalls of the tire as well. Look for any bulges, cracks, or signs of aging that may indicate further damage.
- If the damage appears minor and confined to the tread area, it may be suitable for a patch. However, if the damage is severe, extensive, or located on the sidewalls, it’s best to replace the tire altogether for safety reasons.
Cleaning and prepping the damaged area for patching
Once you’ve determined that the damaged area is suitable for a patch, it’s important to clean and prepare the area before applying the patch. Follow these steps to ensure a proper seal:
- Use a wire brush or sandpaper to gently scrub the damaged area of the tire. This will remove any dirt, rust, or loose rubber that may interfere with the patch’s adhesion.
- Ensure that the area is completely dry and free from moisture. Wipe it down with a clean cloth if necessary.
- Apply a thin layer of rubber cement or patch adhesive to the damaged area. Spread it evenly and allow it to dry according to the manufacturer’s instructions.
- Once the adhesive is dry to the touch, you can proceed with applying the tire patch. Make sure to follow the specific instructions provided with the patch kit for best results.
By following these steps to prepare the tire for patch installation, you’ll increase the chances of a successful repair. Remember to prioritize safety throughout the process and consult a professional if you’re unsure about the condition of your tire.
Installing The Tire Patch
Installing the Tire Patch
When it comes to repairing tire punctures, installing a tire patch can be a cost-effective solution that saves you the hassle of replacing the entire tire. A tire patch is a rubber patch that is applied to the damaged area of the tire and provides a barrier against further air leakage. In this guide, we will take you through the step-by-step process of installing a tire patch, ensuring a secure and long-lasting fix.
Applying the patch adhesive to the damaged area
The first step in installing a tire patch is to apply the patch adhesive to the damaged area. This adhesive acts as a bonding agent between the tire patch and the tire, ensuring a strong and secure seal. Here’s how you can apply the patch adhesive:
- Clean the damaged area of the tire with a tire cleaner or mild soap and water. This will remove any dirt, debris, or grease that may interfere with the adhesion of the patch.
- Dry the area thoroughly using a clean cloth or towel.
- Apply a thin layer of the patch adhesive to the damaged area using a brush or applicator. Make sure to cover the entire damaged area evenly.
Placing the patch onto the adhesive
Once the patch adhesive has been applied, it’s time to place the tire patch onto the adhesive. This step ensures that the patch adheres firmly to the tire, creating an airtight seal. Follow these steps to place the patch onto the adhesive:
- Peel off the protective backing from the tire patch to expose the adhesive side.
- Position the patch over the damaged area, ensuring that it covers the entire area of the adhesive.
- Press down firmly on the patch, starting from the center and working your way outwards. This will help to remove any air bubbles and ensure a secure bond.
Ensuring proper adhesion of the patch
After placing the patch onto the adhesive, it’s essential to ensure that it is properly adhered to the tire. This will ensure the longevity of the repair and prevent any further air leakage. Here are a few steps to ensure proper adhesion of the patch:
- Allow the adhesive to dry completely as per the manufacturer’s instructions. This typically takes around 5-10 minutes.
- Inspect the patch to ensure that there are no bubbles or gaps between the patch and the tire.
- If any bubbles or gaps are present, press down firmly on the patch to remove them.
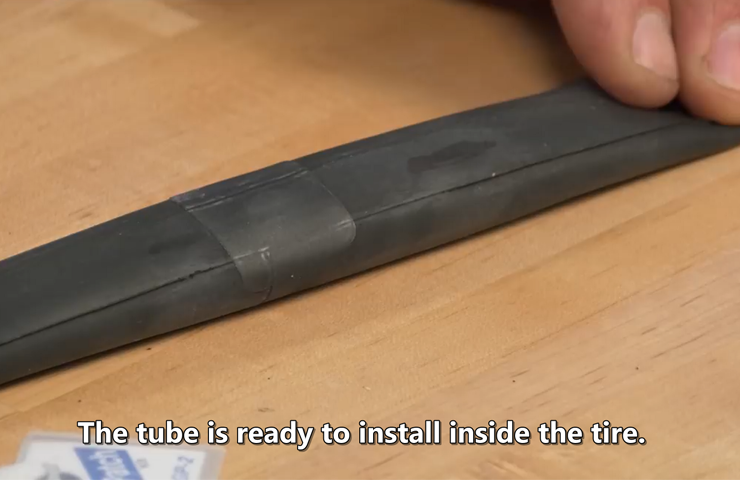
- Once the patch is securely adhered, inflate the tire to the recommended pressure and check for any signs of air leakage.
By following these steps, you can effectively install a tire patch and repair a punctured tire. Remember to always consult a professional if you are unsure or uncomfortable performing the repair yourself. Happy patching!
Reassembling And Testing The Tire
Now that you have successfully patched your tire, it’s time to reassemble it and ensure it is ready to hit the road again. Follow these steps for a seamless reassembly and thorough testing process:
Re-inflating the tire to the recommended pressure
The first step in reassembling your tire is to re-inflate it to the recommended pressure. Refer to your vehicle’s owner’s manual or the sticker on the driver-side door jamb for the manufacturer’s recommended PSI (pounds per square inch).
- Attach the air chuck to the valve stem securely.
- Turn on the air compressor and start inflating the tire.
- Regularly check the tire pressure with a gauge to ensure it reaches the recommended PSI.
- Once the tire reaches the correct pressure, remove the air chuck and quickly reseal the valve stem with its cap.
Mounting the tire back onto the vehicle
Now that the tire is properly inflated, it’s time to mount it back onto your vehicle. Follow these steps to ensure a safe mounting process:
- Align the tire with the wheel studs, making sure the holes on the rim match the studs.
- Gently push the tire onto the studs, ensuring it is centered properly.
- Screw on the lug nuts by hand until they are snug. Avoid using excessive force at this stage.
- Using a torque wrench, tighten the lug nuts in a star pattern to the manufacturer’s recommended torque specifications.
- Double-check that all lug nuts are securely tightened.
Conducting a thorough inspection and testing for leaks
Before considering the tire fully reassembled, it’s essential to conduct a thorough inspection and test for any potential leaks. Follow these steps to ensure the tire is leak-free:
- Use a soap and water solution to spray the patched area of the tire.
- Observe closely for any bubbles forming on the surface. This indicates a leak that needs further attention.
- If bubbles are visible, deflate the tire completely and repeat the patching process, ensuring a proper seal this time.
- If no leaks are detected, inflate the tire to the recommended pressure once again and recheck for any signs of leakage.
By following these steps, you can reassemble your patched tire with confidence, ensuring it is safe and ready to perform optimally on the road. Remember, regular inspections and maintenance are crucial for the longevity and safety of your tires.
Additional Tips And Best Practices For Installing A Tire Patch
Proper storage and handling of tire repair materials, regular tire inspections and maintenance, and knowing when to seek professional assistance are essential for successful tire patch installation. By following these additional tips and best practices, you can ensure a safe and effective repair that extends the life of your tires.
Proper storage and handling of tire repair materials
When it comes to tire patch installation, proper storage and handling of tire repair materials play a crucial role. It’s important to store these materials in a cool, dry place away from direct sunlight, moisture, and extreme temperatures. This helps prevent the materials from deteriorating or becoming ineffective.
Additionally, ensure that the materials are stored in well-sealed containers or packaging to protect them from contamination and air exposure. This will help maintain their quality and effectiveness over time.
Regular tire inspections and maintenance
Regular tire inspections and maintenance are vital to identifying punctures early and preventing further damage. Inspecting your tires on a monthly basis allows you to detect any small cuts, punctures, or embedded objects that can lead to leaks.
During the inspection, make sure to check the tread depth, sidewall condition, and overall tire condition. If you notice any bulges, cracks, or other signs of damage, it’s important to take proper action immediately. This can help prevent tire failure and potential accidents.
Knowing when to seek professional assistance
While tire patch installation can be done as a DIY project, there are situations where seeking professional assistance is necessary. If you’re unsure about the severity of the damage, lack the necessary tools and equipment, or feel uncomfortable performing the repair yourself, it’s always better to seek help from a trained tire technician.
Professional assistance ensures that the tire patch is installed correctly and adheres to industry standards. It also reduces the risk of potential safety hazards or further damage to your tire.
In conclusion, proper storage and handling of tire repair materials, regular tire inspections and maintenance, and knowing when to seek professional assistance are crucial for successful tire patch installation. By adhering to these additional tips and best practices, you can ensure a reliable and long-lasting tire repair that keeps you safe on the road.
Frequently Asked Questions For How To Install A Tire Patch
How Do You Put A Patch On A Tire?
To put a patch on a tire, follow these steps: First, locate the puncture by inflating the tire and listening for air leaks. Next, remove the tire from the rim and clean the area surrounding the puncture. Apply adhesive to the patch and press it firmly onto the punctured area.
Finally, reassemble the tire and inflate it to the recommended pressure.
Can You Patch A Car Tire Yourself?
Yes, you can patch a car tire yourself. A tire patch kit is available to fix small punctures. However, if the damage is extensive or the sidewall is affected, it’s best to consult a professional. Remember to follow safety precautions and instructions while patching the tire.
Do You Need Cement To Patch A Tire?
No, cement is not needed to patch a tire. Tire patches are usually made of a rubber material and are applied with adhesive to fix punctures or small damages.
How Long Does A Patched Tire Last?
A patched tire can last for up to 5 years with proper care and maintenance. Regular inspections and inflation checks are necessary to ensure its longevity.
Conclusion
Installing a tire patch is an essential skill for every driver. By following the step-by-step guide outlined in this blog post, you can confidently repair minor tire punctures and extend the life of your tires. Remember to always prioritize safety and consult a professional if you are unsure.
With practice, you’ll become proficient at this essential maintenance task, saving you time and money in the long run. Happy patching!