To install a sun visor, start by locating the mounting holes on the vehicle’s roof and aligning them with the holes on the visor bracket. Secure the brackets with screws or clips, ensuring they are tightly fastened for a secure fit.
Sun visors are essential accessories in vehicles that help protect drivers and passengers from the blinding glare of the sun. Installing a sun visor is a simple task that can be completed with a few basic tools. By following a straightforward process, you can have a sun visor in place to enhance your driving experience and provide protection from excessive sunlight.
We will discuss the step-by-step procedure to install a sun visor, enabling you to enjoy clear visibility and added comfort while on the road. So, let’s dive right in and learn how to install a sun visor in your vehicle with ease.
Choosing The Right Sun Visor
When it comes to keeping the glaring sun out of your eyes while you drive, a sun visor is an essential accessory for your vehicle. It not only provides shade, but also helps to block harmful rays that can damage your eyes and skin. However, with a wide range of sun visors available in the market, choosing the right one can be overwhelming. To make your decision easier, consider the compatibility of the sun visor and look for adjustable features that cater to your specific needs.
Consider the Compatibility of the Sun Visor
Before purchasing a sun visor for your car, it is crucial to ensure that it is compatible with your vehicle’s make and model. Compatibility issues can cause the visor to not fit properly or interfere with the functioning of other components. To avoid such problems, refer to the manufacturer’s guide or check online resources to find a sun visor that is specifically designed for your car.
If you find it challenging to find a visor that matches your vehicle, consider opting for a universal sun visor. These visors typically come with adjustable clips or hooks that allow them to fit various car models. Universal sun visors are a convenient choice, as they can be easily installed and removed without any hassle.
Look for Sun Visors with Adjustable Features
When choosing a sun visor, it is important to look for adjustable features that can provide you with optimal shade and visibility. Adjustable visors allow you to position them according to your preference, ensuring that the sun is effectively blocked from your eyes.
One of the key adjustable features to consider is the tilt mechanism. A visor with a tilting function allows you to angle the visor to the desired position, providing maximum coverage from the sun’s rays. This feature is especially beneficial when driving during sunrise or sunset, as the sun’s angle constantly changes.
In addition to the tilt mechanism, consider sun visors that come with extendable arms or sliding features. These features enable you to customize the length of the visor, ensuring that it adequately covers the entire windshield or side window. The ability to adjust the size of the visor is particularly useful when dealing with low-lying sun or when driving on winding roads where the sun’s position frequently changes.
Moreover, it is worth noting that some sun visors come with built-in accessories such as vanity mirrors or pockets for storing small items like sunglasses or parking tickets. These additional features can enhance the functionality of the visor and add convenience to your driving experience.
To conclude, when choosing a sun visor, be sure to consider the compatibility with your car and look for adjustable features that can cater to your specific needs. By investing in the right sun visor, you can enjoy a more comfortable and safe driving experience, even on the sunniest days.
Assessing The Tools And Materials Needed
Before diving into the installation process, it’s crucial to assess the tools and materials you’ll need. Gathering the right equipment beforehand will not only save you time but also ensure a smooth installation process. In this section, we will discuss the essential tools and materials required to install a sun visor.
Gather the Tools Required for Installation
The first step is to gather the necessary tools for installing the sun visor. Below is a list of items you’ll need:
- Screwdriver
- Screws or Clips
- Sun Visor Replacement
Having a screwdriver is essential as it will be used to remove the old sun visor, detach any existing fixtures, and secure the new sun visor in place. It’s important to select a screwdriver that matches the type of screws used in your vehicle to ensure a proper fit.
Next, you’ll need either screws or clips, depending on your vehicle’s sun visor mounting mechanism. If your current sun visor is attached with screws, you’ll need proper replacement screws to secure the new visor. On the other hand, if your vehicle uses clips, be sure to gather the correct clips to ensure a secure installation.
Lastly, you’ll need a sun visor replacement. You can either purchase a replacement visor from a car parts store or order one online. Before buying, ensure that the replacement visor is compatible with your vehicle’s make and model.
Prepare the Workspace
Once you have gathered all the necessary tools and materials, it’s time to prepare the workspace. A clutter-free and well-lit area will make the installation process much easier. Here are a few steps to prepare your workspace:
- Find a spacious area where you have enough room to work comfortably around the vehicle.
- Remove any items from the area that may obstruct your movement or potentially damage the vehicle’s interior.
- If possible, park the vehicle in a well-lit area or use additional lighting to ensure better visibility.
- Consider using a cloth or towel to protect the vehicle’s interior from scratches or accidental damage during the installation process.
Taking the time to prepare your workspace will not only help you stay organized but also reduce the risk of any unwanted mishaps during the installation.
Removing The Old Sun Visor
Removing the old sun visor is an important first step when installing a new one. In order to successfully replace the sun visor, you need to know how to remove the old one without causing any damage. This guide will take you through the process step by step.
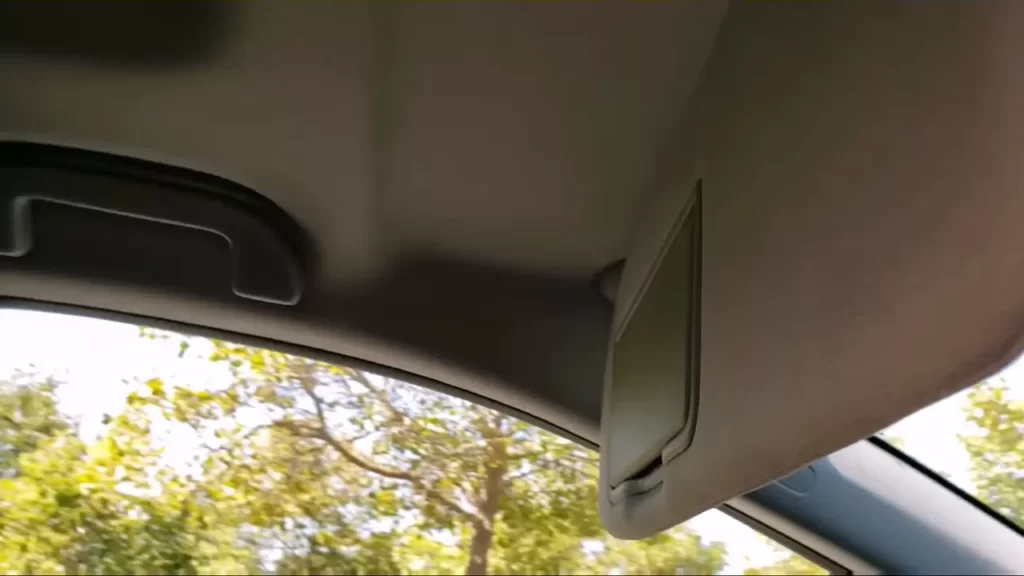
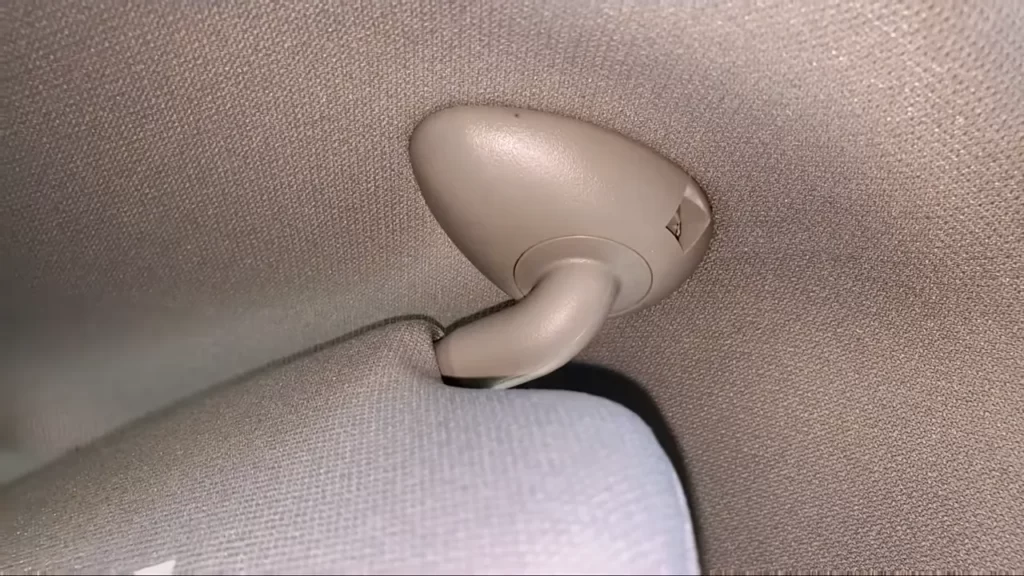
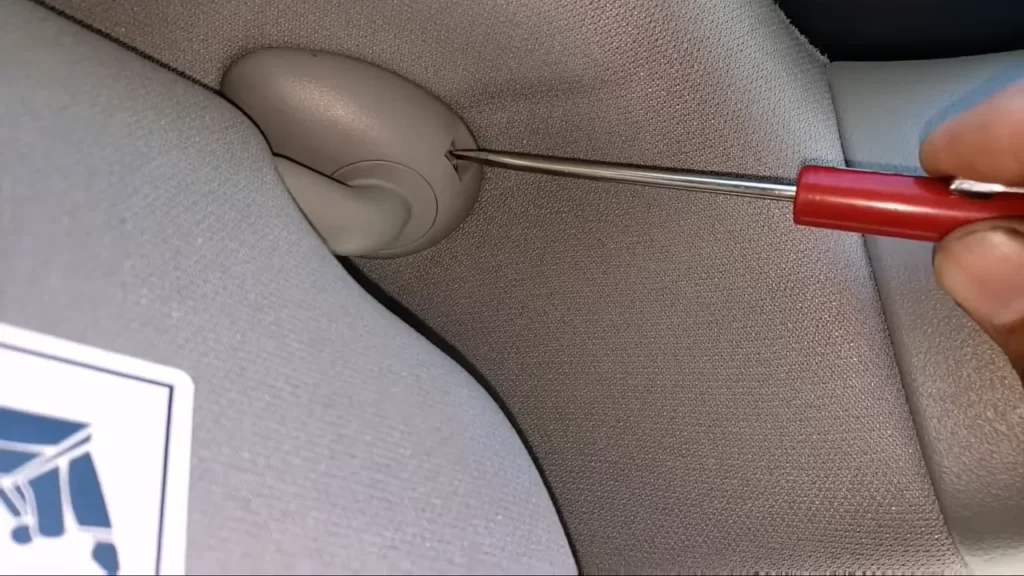
Locate and Remove the Mounting Screws or Clips
The first thing you need to do is locate the mounting screws or clips that are securing the old sun visor in place. These screws or clips are usually located near the ceiling of the car, just above the sun visor. Take a close look and you should be able to spot them. Once you’ve located the screws or clips, grab your screwdriver or pliers and carefully remove them.
Carefully Detach the Sun Visor from the Mounting Bracket
Now that you’ve removed the mounting screws or clips, it’s time to detach the sun visor from the mounting bracket. This step requires some caution as you don’t want to damage the interior of your car. Gently pull the sun visor away from the bracket, ensuring that you detach it completely. Be mindful of any wires or connectors that may be attached to the visor and make sure to disconnect them properly, if necessary.
Dispose of the Old Sun Visor
Once you’ve successfully removed the old sun visor, it’s time to dispose of it. Since sun visors are made of plastic, they can be recycled at facilities that accept plastic. Alternatively, you can dispose of it along with your regular household waste. Just make sure to follow your local regulations regarding the disposal of plastic items. By following these simple steps, you can easily remove the old sun visor from your vehicle. Remember to be careful and take your time during this process to avoid any damage. With the old sun visor out of the way, you can now proceed to the next step of installing a brand new sun visor.
Installing The New Sun Visor
Once you have successfully removed the old sun visor from your vehicle, it’s time to install the new one. Installation may vary slightly depending on the make and model of your car, so it’s always a good idea to consult the owner’s manual for specific instructions. Nevertheless, this section will guide you through the general steps to align and secure the new sun visor in place.
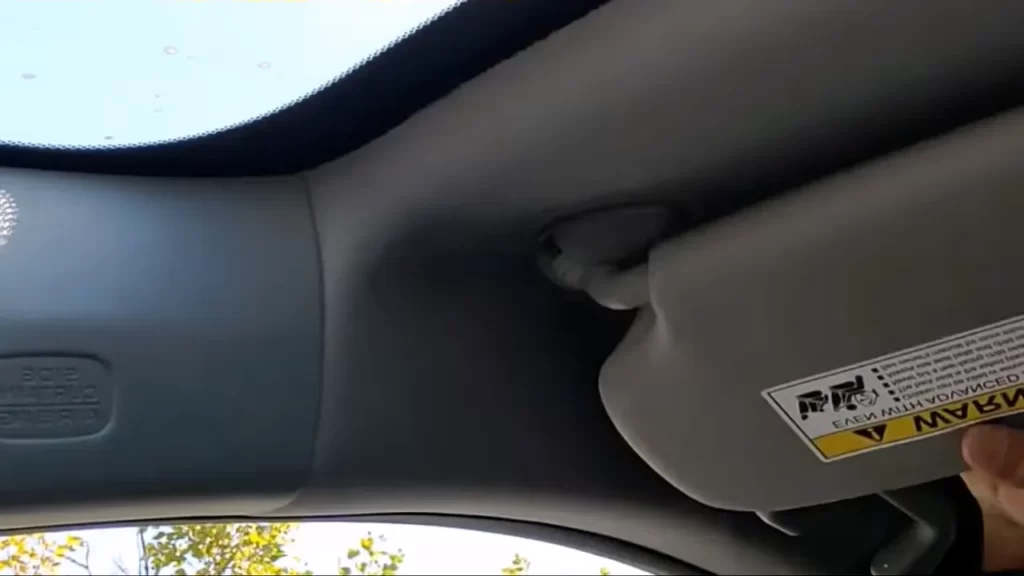
Align the New Sun Visor with the Mounting Bracket
Before attaching the new sun visor, line it up with the mounting bracket to ensure a proper fit. The mounting bracket is usually located on the roof above the driver’s or passenger’s seat. To align the sun visor:
- Position the sun visor: Hold the new sun visor in the desired position, ensuring that it covers the entire side window when extended.
- Align the holes: Carefully align the mounting holes on the sun visor with the holes on the mounting bracket.
- Check the fit: Double-check that the sun visor sits flat against the roof and does not obstruct the driver’s view when in use.
Secure the Sun Visor in Place
Once you have aligned the new sun visor, it’s time to secure it in place. Properly securing the sun visor ensures that it remains stable and functional during use. Follow these steps to secure the sun visor:
- Insert the screws: Insert the screws provided with the sun visor into the aligned holes.
- Tighten the screws: Use a screwdriver to tighten the screws until the sun visor is securely attached to the mounting bracket.
- Test the stability: Gently tug on the sun visor to ensure that it is firmly in place and does not wobble or shift.
With the new sun visor successfully aligned and secured, you can now enjoy increased visibility and protection from the sun while driving. Remember, proper installation is important to ensure optimal functionality, so take your time and follow the steps carefully for a job well done.
Testing And Adjusting The Sun Visor
When installing a sun visor, it’s important to not only secure it in place properly but also test and adjust it to ensure optimal functionality. Testing and adjusting the sun visor can help verify its effectiveness in providing shade and blocking out sunlight, as well as ensuring visibility and comfort while driving. In this section, we will walk you through the steps to test and make necessary adjustments to your sun visor.
Verify the Functionality of the Sun Visor
Before jumping into adjustments, it’s crucial to test the sun visor to make sure it is functioning as intended. The following steps will guide you through verifying the functionality:
- Lower the sun visor and ensure it rotates smoothly.
- Test the visor’s ability to block out direct sunlight by positioning it in various angles.
- Check if there is any slippage or movement when the visor is in use.
If any issues are detected during the testing process, it may indicate a need for adjustments or even replacement parts. By identifying these issues early on, you can take the necessary steps to rectify them and ensure the sun visor functions optimally.
Make Necessary Adjustments for Comfort and Visibility
After testing the functionality of the sun visor, you may need to make adjustments to optimize comfort and visibility. Consider the following tips:
- Adjust the sun visor’s position to block out the most sunlight while still allowing a clear view of the road.
- Ensure that the visor doesn’t obstruct the driver’s vision or block any essential mirrors.
- If the sun visor feels too loose or tight, adjust the tension to provide a secure fit.
- Try different positions and angles to find the most comfortable and effective placement.
Remember, the goal is to make your driving experience safer and more comfortable by reducing glare and increasing visibility. Taking the time to adjust your sun visor appropriately will help achieve this objective.
Frequently Asked Questions On How To Install A Sun Visor
How Do You Attach A Sun Visor To A Car?
Attach a sun visor to your car by following these steps: 1. Locate the mounting point on the windshield or ceiling. 2. Align the visor’s bracket with the mounting point. 3. Insert and secure the screws or clips provided. 4.
Adjust the visor to the desired position. 5. Test its stability before use.
What Keeps A Sun Visor Up?
A sun visor stays up due to the tension provided by the hinge mechanism. The hinge allows the visor to be raised and lowered, and it stays up when the tension is sufficient to hold it in place.
Can I Replace My Sun Visor?
Yes, you can replace your sun visor. It is a simple process that you can do yourself or have a professional do it for you. Start by removing the old sun visor and then install the new one following the instructions provided.
Enjoy your new sun visor!
How To Install A Sun Visor On A 2007 Toyota Camry?
To install a sun visor on a 2007 Toyota Camry, first, locate the screws that hold the old visor in place. Use a screwdriver to loosen and remove them. Next, align the new visor with the holes and secure it by screwing it back in.
Repeat the process for the other side.
Conclusion
Installing a sun visor is a straightforward process that can greatly improve your driving experience. By following the step-by-step instructions in this guide, you can easily install a sun visor in your vehicle. Remember to gather all the necessary tools, prepare the mounting area, and carefully follow the manufacturer’s instructions.
Soon enough, you’ll be enjoying the benefits of a well-installed sun visor, such as shielding yourself from excessive sunlight and improving visibility while on the road. Safe travels!