To install a slip-on exhaust, start by removing the stock exhaust system. Then, slide the slip-on exhaust onto the header and secure it with the provided mounting hardware.
Introducing a slip-on exhaust can bring an appealing look and satisfying growl to your motorcycle. Swapping out the stock exhaust for a slip-on is a popular modification among motorcycle enthusiasts looking for an easy and cost-effective way to boost performance and enhance the overall riding experience.
Whether you are a seasoned rider or a DIY enthusiast, installing a slip-on exhaust can be a simple task that can be completed with basic tools. In this guide, we will walk you through the step-by-step process of installing a slip-on exhaust, so you can enjoy the benefits of improved sound and performance in no time.
Checking Compatibility With Your Motorcycle
Researching Slip-On Exhaust Options
Before installing a slip-on exhaust on your motorcycle, it is crucial to ensure compatibility with your specific bike model. This requires thorough research to identify suitable options available in the market. Researching slip-on exhaust options will enable you to explore various brands, designs, and materials that meet your preferences and budget.
Checking Motorcycle Specifications
Once you have shortlisted a few slip-on exhaust options, it is time to dive into your motorcycle’s specifications. Understanding your bike’s specifications will help you determine whether a particular slip-on exhaust system is compatible or not. Here’s what you should consider:
- Engine size: Different slip-on exhaust systems are designed to fit specific engine sizes. Ensure that the one you choose matches or is compatible with your motorcycle’s engine size.
- Mounting points: Check the mounting points on your motorcycle’s frame to identify where the slip-on exhaust will be installed. This will help you find an exhaust system that aligns with these mounting points.
- Exhaust configuration: Motorcycles have various exhaust configurations, such as single or dual. Make sure the slip-on exhaust you select is suitable for your bike’s specific configuration.
- Exhaust outlet size: The diameter of the exhaust outlet plays a vital role in compatibility. Measure the diameter of your motorcycle’s existing exhaust outlet and ensure that the slip-on exhaust you choose has a matching or adaptable size.
Considering Any Modification Requirements
Installing a slip-on exhaust may require certain modifications to your motorcycle. It is essential to take these potential modifications into account before making a purchase. Here are some factors to consider:
- Fuel mapping: Upgrading your exhaust system can impact the air-fuel mixture. Research if your motorcycle’s ECU (Engine Control Unit) needs to be remapped or if a fuel controller is necessary to optimize performance.
- Clearance and fitment: Check if the slip-on exhaust may interfere with other components of your motorcycle, such as the rear wheel, suspension, or panniers. Ensure that the chosen exhaust system offers sufficient clearance and fitment.
- Legal considerations: Verify if the slip-on exhaust complies with local emission regulations and noise level restrictions. It’s important to follow legal requirements to avoid any potential issues in the future.
Taking the time to check compatibility, researching exhaust options, and considering any modification requirements will ensure a smooth and successful installation of the slip-on exhaust on your motorcycle. This process will also help enhance your riding experience by providing improved performance, sound, and style.
Gathering Tools And Materials
Before you get started with installing a slip on exhaust, it’s crucial to gather all the necessary tools and materials. Having everything you need right from the beginning will ensure a smooth and uninterrupted installation process. So, let’s dive into the list of tools, recommended safety equipment, and the required materials that you should have on hand before starting this project.
List of necessary tools
Here is a comprehensive list of tools that you’ll need to complete the installation of a slip on exhaust:
| Tool | Quantity |
|---|---|
| Socket wrench set with various sizes | 1 |
| Allen wrench set | 1 |
| Torque wrench | 1 |
| Socket extension | 1 |
| Flathead screwdriver | 1 |
| Tape measure | 1 |
| Wire brush | 1 |
| Shop rag or towel | 1 |
Recommended safety equipment
Prioritize your safety by using the following recommended safety equipment:
- Safety goggles
- Work gloves
- Ear protection
- Dust mask
Ensuring availability of required materials
Aside from the tools, you’ll also need to ensure the availability of the required materials for this installation. Although the specific materials can vary depending on the slip on exhaust kit you’ve purchased, here is a general list of materials you might need:
- Slip on exhaust
- New gaskets
- Installation hardware
- Mounting brackets
- Exhaust sealant
By having all the necessary tools and materials at your disposal, you’ll be well-prepared to take on the installation of a slip on exhaust. This way, you can complete the project efficiently without any delays or hiccups. So, let’s move on to the next step and get hands-on with the installation process.
Preparing The Motorcycle
Before you can install a slip-on exhaust on your motorcycle, it’s important to prepare the bike properly. This involves taking certain precautionary measures to ensure the task is done safely and efficiently. Here are the steps to follow:
Park the motorcycle in a well-ventilated area
First and foremost, find a suitable location to work on your motorcycle. Ideally, you should choose a well-ventilated area, such as a garage or an open space. This will help dissipate any fumes and ensure you have enough fresh air while working on your bike. Additionally, make sure you have ample space to maneuver around the motorcycle without any hindrance.
Allow the engine to cool down
After selecting the working area, give your motorcycle’s engine enough time to cool down. This is crucial to avoid any accidental burns or injuries. Park the bike in a stationary position and let it sit for at least 30 minutes to allow the engine to cool completely. Touch the exhaust system to ensure it is no longer hot to the touch before you proceed.
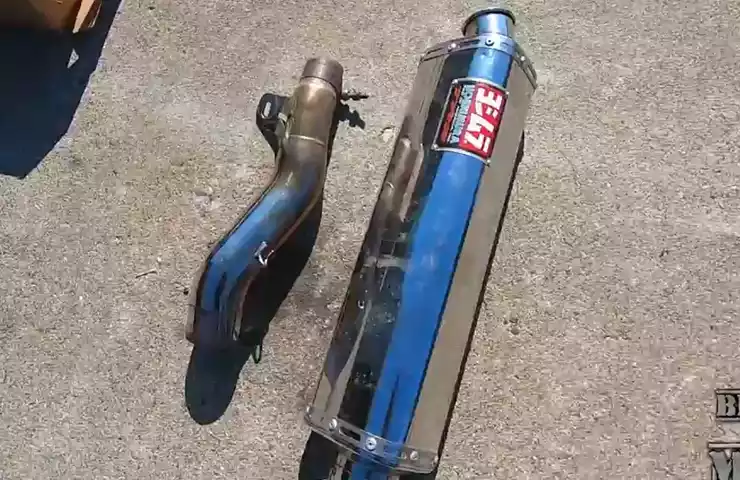
Removing any existing exhaust components
Now that the motorcycle is parked in a suitable location and the engine has cooled down, it’s time to remove any existing exhaust components. Start by locating the attachment points of the current exhaust system. This includes clamps, bolts, or any other securing mechanisms.
Using the appropriate tools, loosen and remove these components one by one, starting from the rear and working your way towards the front of the bike. Take note of the exact order in which the components were installed, as this will be important when installing the new slip-on exhaust later.
Once all the attachments have been removed, gently slide the existing exhaust system off the bike. Be cautious as the exhaust may still be warm. Set it aside in a safe location for proper disposal or storage.
With the existing exhaust components removed, your motorcycle is now ready to have the slip-on exhaust installed. Stay tuned for our next blog post, where we will guide you through the step-by-step process of installing a slip-on exhaust for an enhanced riding experience!
Positioning The Slip-On Exhaust
Installing a slip-on exhaust is a great way to enhance the performance and sound of your motorcycle. However, before you can enjoy the benefits of this upgrade, it is important to correctly position the slip-on exhaust. In this section, we will guide you through the process of positioning the slip-on exhaust, focusing on two crucial steps: identifying the correct orientation and aligning the mounting brackets.
Identifying the Correct Orientation
The first step in positioning your slip-on exhaust is to identify the correct orientation. Slip-on exhausts often come with a label or marking indicating which end is meant to go towards the engine and which end should be facing the rear of the motorcycle. It is essential to ensure that you have the correct orientation to prevent any installation issues or performance problems.
If you are unsure about the correct orientation, consult the installation manual or contact the manufacturer for guidance. Additionally, you can examine the slip-on exhaust closely to look for any indicators or markings. Taking the time to verify the proper orientation before proceeding will save you time and frustration later on.
Aligning the Mounting Brackets
The next step in positioning the slip-on exhaust is aligning the mounting brackets. Slip-on exhausts typically have mounting brackets on both ends that attach to the existing exhaust system on your motorcycle. Proper alignment of these brackets will ensure a secure and stable installation.
Start by loosely fitting the slip-on exhaust onto the existing exhaust system, making sure the brackets are aligned with the corresponding mounting points. Once the slip-on exhaust is in place, tighten the mounting bolts gradually, alternating between each bolt to ensure even pressure is applied.
It is important to note that overtightening the mounting bolts can cause damage to the slip-on exhaust or the motorcycle’s exhaust system. Therefore, it is crucial to follow the manufacturer’s recommended torque specifications to prevent any issues.
By carefully aligning the mounting brackets, you will ensure a proper fit and secure positioning of your slip-on exhaust. Take the time to double-check the alignment before tightening the bolts completely to avoid any potential problems down the road.
With the slip-on exhaust correctly positioned and the mounting brackets aligned, you are now ready to move on to the next step of the installation process.
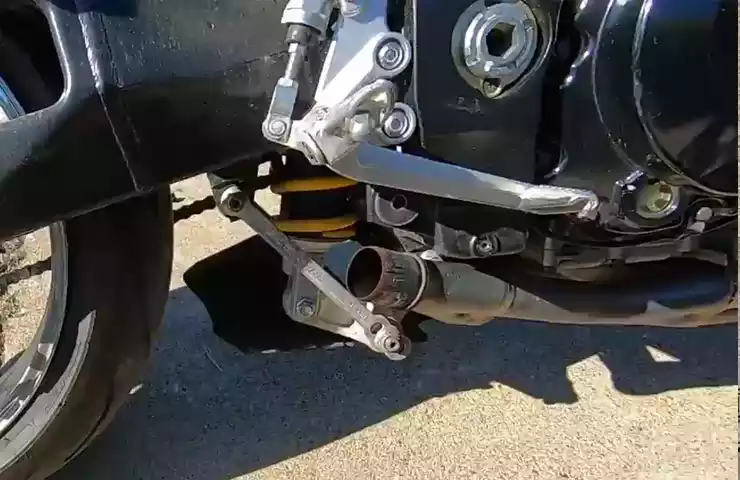
Attaching The Slip-On Exhaust
Now that you have removed the old exhaust and prepared your motorcycle for the installation of a new slip-on exhaust, it’s time to attach it securely. This step is crucial to ensure that the exhaust is properly secured and won’t come loose while you’re riding. Here’s how to attach the slip-on exhaust:
Securing the exhaust with bolts or clamps
There are two main methods to secure the slip-on exhaust to your motorcycle: using bolts or clamps. The method you use will depend on the specific exhaust system you’ve purchased.
If your slip-on exhaust comes with bolts, you’ll need to locate the mounting bracket on the bike’s frame. Align the exhaust with the mounting bracket and insert the bolts through the holes on the bracket and the exhaust. Make sure to tighten the bolts securely, but be careful not to overtighten as it can damage the exhaust or the mounting bracket.
If your exhaust uses clamps, you’ll need to position the clamp around the muffler inlet and slide it onto the header pipe. Ensure that the clamp is properly aligned and tight enough to hold the exhaust securely in place.
Ensuring proper tightening
Whether you’re using bolts or clamps, it’s essential to ensure that the slip-on exhaust is properly tightened. Incorrect tightening can lead to rattling noises, exhaust leaks, and even potential accidents. Follow these steps to ensure proper tightening:
- Start by loosely tightening the bolts or clamps, allowing you to make any necessary adjustments.
- Ensure that the slip-on exhaust is aligned properly with the motorcycle’s frame and the muffler inlet is properly aligned with the header pipe.
- Tighten the bolts or clamps gradually, alternating between each bolt or clamp to apply even pressure on all sides.
- When the exhaust is securely in place, do a final check to ensure that there are no gaps, misalignment, or loose parts.
By following these steps, you can attach your slip-on exhaust securely and enjoy the benefits of a new exhaust system. Remember, if you’re unsure about the installation process or encounter any difficulties, it’s always a good idea to consult the manufacturer’s instructions or seek professional assistance.
Adjusting The Position
Once you have successfully installed the slip-on exhaust on your motorcycle, the next crucial step is to adjust its position. Proper adjustment ensures optimal fit and performance. In this section, we will discuss the essential steps to follow for adjusting the position of your slip-on exhaust.
Making slight adjustments for optimal fit
After mounting the slip-on exhaust, it is essential to make slight adjustments to ensure an optimal fit. Here are some steps you can follow:
- Start by carefully examining the position of the exhaust and its alignment with the motorcycle’s frame. It should be parallel and centered with the rear tire for optimal performance.
- Loosen the mounting bolts or clamps that hold the slip-on exhaust in place. This will allow for easier adjustments without damaging the exhaust or the motorcycle.
- Gently move the slip-on exhaust up or down and side to side to find the best position. Remember, even minor adjustments can make a significant difference in the overall fit.
- Once you have made the necessary adjustments, tighten the mounting bolts or clamps securely to ensure the slip-on exhaust stays in place during rides.
Making these slight adjustments will not only enhance the aesthetic appeal of your motorcycle but also ensure the slip-on exhaust functions optimally.
Checking for any potential interference with other components
While adjusting the position of your slip-on exhaust, it is crucial to check for any potential interference with other components of your motorcycle. Here’s what you need to do:
- Inspect the slip-on exhaust and its proximity to the motorcycle’s rear wheel, swingarm, and any nearby components.
- Ensure there is sufficient clearance to avoid contact with the rear wheel during suspension movement or sharp turns.
- Check if the exhaust interferes with the swingarm or any other nearby parts. Any interference can result in unpleasant vibrations or damage to the motorcycle.
By carefully checking for potential interference and making the necessary adjustments, you can avoid any unwanted contact between the slip-on exhaust and other components of your motorcycle.
Remember, proper adjustment of the slip-on exhaust’s position is crucial for both performance and functionality. Following these steps will help you ensure an optimal fit and prevent any potential interference. Take the time to adjust the position correctly, and you’ll be able to enjoy the enhanced look and sound of your motorcycle with the newly installed slip-on exhaust.
Connecting The Exhaust Components

Once you have successfully removed your old exhaust system, it’s time to connect the new slip-on exhaust. This step is crucial as it ensures a secure fit and prevents any unwanted leaks. In this section, we will guide you through reattaching heat shields (if applicable) and connecting the exhaust pipe to the headers.
Reattaching Heat Shields, if Applicable
If your slip-on exhaust includes heat shields, you will want to reattach them securely. These shields not only protect your bike from excessive heat but also give it a polished, finished look. Here’s a step-by-step guide on how to reattach heat shields:
- Begin by positioning the heat shield over the exhaust pipe.
- Align the screw holes on the heat shield with the corresponding holes on the pipe.
- Insert the screws through the holes and tighten them using a screwdriver or a socket wrench.
Make sure the heat shield is snugly attached to the pipe, but be careful not to overtighten the screws, as it could damage the shield or the pipe.
Connecting Exhaust Pipe to the Headers
Now that the heat shields are securely reattached, it’s time to connect the slip-on exhaust pipe to the headers. Here’s a step-by-step guide to help you with this process:
- Apply a thin layer of anti-seize compound to the inside of the slip-on exhaust tube.
- Position the slip-on exhaust pipe onto the headers, lining up the mounting brackets or flanges.
- Secure the slip-on exhaust pipe to the headers using the provided hardware, such as bolts or springs.
- Tighten the bolts or springs using a wrench or socket, ensuring a firm connection.
Ensure that the slip-on exhaust is properly aligned and centered with the headers for optimal performance and aesthetics.
Congratulations! You have successfully connected the essential components of your slip-on exhaust. Take a moment to double-check all connections and tighten any loose fasteners. Now, you are one step closer to experiencing the enhanced sound and performance of your new exhaust system.
Verifying Secure Installation
Once you have successfully installed a slip-on exhaust on your motorcycle, it is important to verify that the installation is secure. This ensures optimal performance and prevents any potential issues down the road. In this section, we will cover two crucial steps: confirming all connections are tight and secure, and checking for any potential leaks.
Confirming all connections are tight and secure
Before you hit the road with your newly installed slip-on exhaust, it is crucial to ensure that all connections are tight and secure. A loose connection can lead to vibrations, rattling, and even damage to the exhaust system over time. Follow these steps to confirm the tightness of your installation:
- Visually inspect all joints and connections, such as the connection between the slip-on muffler and the mid-pipe or header pipe.
- Use a wrench or socket set to gently tighten any loose connections. Be careful not to overtighten, as this can cause damage.
- Check that the mounting brackets or straps are securely fastened to the motorcycle frame or subframe.
- Ensure that any clamps or springs used to secure the slip-on exhaust are tightened properly.
By confirming that all connections are tight and secure, you can ride with confidence, knowing that your slip-on exhaust is properly installed and ready to perform at its best.
Checking for any potential leaks
Another important aspect of verifying a secure installation is checking for any potential leaks in the exhaust system. Leaks can lead to loss of power, decreased exhaust efficiency, and unwanted noise. Here’s how to check for leaks:
- Start the motorcycle and let it idle for a few minutes. This will allow the exhaust system to warm up.
- Using your hand, carefully feel around each joint and connection for any escaping exhaust gases. Be cautious of hot components.
- If you feel or see any signs of exhaust gas leakage, identify the specific area and take corrective measures.
- Consider using a sealant or high-temperature silicone to seal any leaks if necessary.
Regularly checking for leaks ensures maximum performance and longevity of your slip-on exhaust system. It also helps identify any potential issues before they escalate into more significant problems.
By following these steps to verify a secure installation, you can enjoy the enhanced sound, increased performance, and overall satisfaction that a slip-on exhaust provides to your motorcycle.
Starting The Motorcycle
Starting the engine
Before installing a slip-on exhaust, it’s essential to start the motorcycle and listen for any abnormal sounds. This step ensures that the engine is in good working condition before proceeding further. To start the engine, follow these simple steps:
- Turn the ignition key to the “On” position.
- Ensure the motorcycle is in neutral by checking the neutral indicator light.
- With the side stand up, put your weight on the seat and hold onto the handlebars for stability.
- Locate the starter button, usually on the right-hand side of the handlebars, and press it firmly.
- Listen carefully for any abnormal sounds or unusual engine noises.
- If everything sounds normal, allow the engine to idle for a few minutes to warm up before proceeding.
Checking for proper exhaust flow
Once the motorcycle is running smoothly, it’s time to check for proper exhaust flow. This step ensures that there are no obstructions in the exhaust system, which could affect the performance of the slip-on exhaust. Here’s how to do it:
- Locate the exhaust pipes, typically at the rear of the motorcycle.
- Visually inspect the pipes to ensure they are clear of any debris or physical damage.
- Put on a pair of gloves to protect your hands from hot components.
- Start the motorcycle again and let it idle.
- Stand to the side of the motorcycle to avoid the exhaust gases.
- Feel the exhaust flow with your hand, carefully avoiding contact with the hot surfaces.
- Ensure that there is a steady and consistent flow of exhaust gases coming out of both pipes.
- If you notice any irregularities such as reduced flow or abnormal sounds, consult a professional before proceeding with the slip-on exhaust installation.
By following these steps and ensuring that the engine starts smoothly and the exhaust flow is proper, you can proceed with confidence to the next stages of installing a slip-on exhaust on your motorcycle.
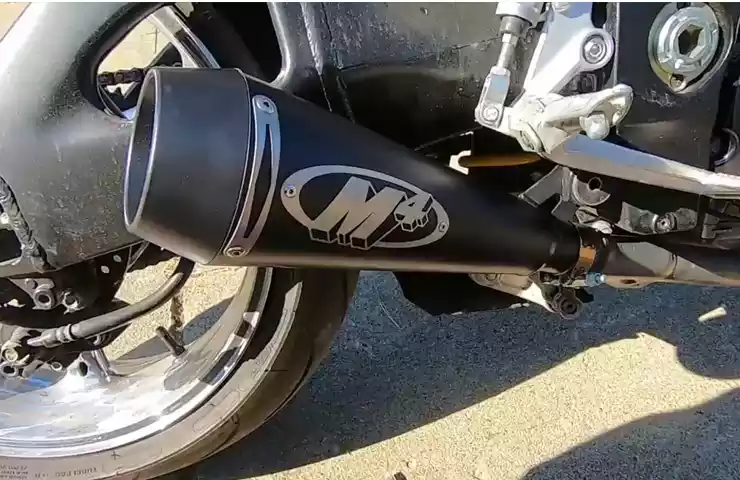
Test Ride And Adjustment
Once you have successfully installed your slip-on exhaust, it’s time to take your motorcycle for a short test ride to assess its performance and sound. This is an important step in ensuring that your bike is running smoothly and that you are satisfied with the results of the installation. Making necessary adjustments for optimum performance is the final touch to guarantee that your new exhaust is performing at its best. Read on to learn more about taking a test ride and the adjustments you need to make.
Taking a short test ride to assess performance and sound
Before you hit the road, it’s crucial to start your motorcycle and let it idle for a few minutes. This ensures that the slip-on exhaust is properly warmed up and ready for the ride. Once you feel that the exhaust has reached the right temperature, you can hop on your bike and take it for a spin.
As you ride, pay close attention to the performance and sound of your motorcycle. Observe if there are any noticeable changes in acceleration, throttle response, or overall power. It’s essential to listen carefully to the sound produced by the slip-on exhaust. Note if it’s too loud, too quiet, or just right. Remember, the ideal sound is subjective and varies depending on personal preference.
While on your test ride, try different speeds and gear changes to get a comprehensive assessment of your slip-on exhaust’s performance. Test out its responsiveness during acceleration and deceleration. Make sure to focus on any vibrations or unusual noises that may occur. These could indicate that further adjustments are needed.
Making necessary adjustments for optimum performance
If you find any issues during your test ride, don’t worry. Making adjustments to your slip-on exhaust is a normal part of the installation process. There are a few adjustments you can make to achieve optimum performance:
- Adjusting the baffles: Most slip-on exhausts come with baffles that help control the sound and performance. If you find the exhaust too loud or affecting your bike’s performance negatively, you can adjust the baffles to modify the sound and backpressure.
- Tweaking the fuel mixture: Altering the air-to-fuel ratio can enhance your motorcycle’s performance with the new slip-on exhaust. Consult your bike’s manual or seek professional advice to make the necessary adjustments to the fuel mixture.
- Checking for leaks: After your test ride, inspect the slip-on exhaust for any signs of leaks or loose connections. Tighten any loose bolts or connections and fix any leaks that may affect the performance of the exhaust.
By following these steps, you can fine-tune your slip-on exhaust and ensure that it provides the best possible performance and sound for your motorcycle. Remember, it’s essential to take your time and make adjustments incrementally until you achieve the desired results.
Now that you’re familiar with the test ride and adjustment process, it’s time to enjoy the enhanced performance and the throaty sound of your newly installed slip-on exhaust. Hit the road with confidence and take pride in your DIY installation!
Maintenance And Care
Keeping your slip-on exhaust clean and well-maintained is essential for preserving its performance and longevity. Routine maintenance not only enhances the overall look of your bike but also ensures optimal exhaust efficiency. In this section, we will discuss two crucial aspects of slip-on exhaust maintenance: cleaning and polishing, as well as periodic inspections.
Cleaning and Polishing the Slip-on Exhaust
Regular cleaning and polishing of your slip-on exhaust can help prevent rust, corrosion, and the buildup of dirt and grime. Follow these simple steps to keep your exhaust shining like new:
- Begin by rinsing off any loose dirt or debris from the surface of the exhaust using clean water.
- Apply a mild detergent or specialized exhaust cleaner to a soft cloth and gently scrub the surface of the slip-on exhaust.
- Rinse the exhaust thoroughly with water to remove any residue.
- Dry the exhaust using a clean, lint-free cloth or allow it to air dry.
- To achieve a polished finish, use a high-quality metal polish specifically designed for motorcycle exhausts.
- Apply the polish to a clean cloth and buff the surface of the slip-on exhaust in a circular motion.
- Continue polishing until the desired shine and smoothness are achieved.
By regularly cleaning and polishing your slip-on exhaust, you not only maintain its appearance but also protect it against the effects of weather and wear.
Periodic Inspections for Any Loose Connections or Wear
To ensure the slip-on exhaust performs at its best and to avoid any potential safety hazards, it is important to perform periodic inspections. Here are the key steps to follow:
- Start by visually inspecting the exhaust for any signs of damage, cracks, or excessive rust.
- Check all the connections between the slip-on exhaust and the motorcycle’s header pipe or mid-pipe to ensure they are tight and secure.
- Inspect the exhaust mounting brackets and rubber grommets for any signs of wear or deterioration.
- If you notice any loose connections or damaged components, tighten or replace them as necessary.
Performing these inspections on a regular basis will help you identify any potential issues early on and take necessary steps to address them. By maintaining a tight and secure slip-on exhaust, you can enjoy smoother rides and prolong the lifespan of both the exhaust and your motorcycle.
Frequently Asked Questions On How To Install A Slip On Exhaust
Is A Slip On Exhaust Easy To Install?
Yes, a slip-on exhaust is easy to install. It requires simple tools and can be done at home. The installation process typically involves removing the old muffler and attaching the slip-on exhaust in its place. Detailed instructions are usually provided with the product.
Do You Need To Tune After Installing Slip On Exhaust?
Yes, tuning is recommended after installing a slip-on exhaust to optimize performance. Adjustments to fuel settings may be necessary to improve air-to-fuel ratios and ensure the engine functions properly. Tuning helps achieve maximum power output and keeps the bike running smoothly.
Do Slip On Exhaust Add Horsepower?
Yes, slip-on exhausts can increase horsepower. These aftermarket exhausts improve the flow of exhaust gases, enhancing engine performance. The unrestricted airflow allows for more efficient combustion, resulting in higher power output and improved acceleration.
Do You Lose Power With A Slip On Exhaust?
Slip-on exhausts usually do not result in a loss of power. In fact, they can enhance performance by improving airflow and reducing backpressure. However, the extent of power gain may vary depending on other factors like bike model and tuning adjustments.
So, it’s advisable to consult a professional for specific outcomes.
Conclusion
Installing a slip-on exhaust can greatly enhance your motorcycle’s performance and sound. By following the step-by-step instructions outlined in this guide, you can successfully complete the installation process. Remember to gather all the necessary tools and materials beforehand and take safety precautions to ensure a smooth and enjoyable experience.
Feel free to share your thoughts and experiences in the comments section below. Happy riding!