To install a rear spoiler, first, position the spoiler on the back of your car carefully, aligning it with the contours of the vehicle. Then, using the provided hardware and adhesive, secure the spoiler firmly in place.
Adding a rear spoiler to your car can greatly enhance its aesthetic appeal, while also improving its aerodynamics. Whether you’re a car enthusiast or simply looking to give your vehicle a sporty touch, installing a rear spoiler can be a relatively simple and straightforward process.
By following a few basic steps, you’ll be able to achieve a professional-looking installation in no time. We will guide you on how to install a rear spoiler on your car, providing you with all the information and tips you need to get the job done right. So, let’s dive in and learn how to give your car that sleek and stylish look with a rear spoiler.
Factors To Consider
When it comes to enhancing the aesthetics and performance of your vehicle, installing a rear spoiler is an excellent choice. Not only does it add a stylish touch, but it can also improve the aerodynamics and stability of your car. However, before you rush to purchase a rear spoiler, there are several important factors to consider.
Vehicle Compatibility
Before selecting a rear spoiler for your vehicle, it is crucial to ensure compatibility. Each car has its unique design, and not all spoilers can seamlessly fit every model. Whether you own a sports car or a sedan, it is essential to choose a spoiler that is specifically designed for your make and model. This will guarantee a perfect fit and ensure optimal performance.
Spoiler Design and Style
The design and style of the rear spoiler play a significant role in the overall appearance of your vehicle. With a wide variety of spoiler designs available in the market, it can be overwhelming to make a choice. The key is to select a design that complements the existing features of your car while adding a touch of personal flair. Whether you prefer a subtle lip spoiler or a more aggressive wing-style spoiler, consider the overall aesthetics and choose a design that enhances the visual appeal of your vehicle.
Material and Construction Quality
When it comes to rear spoilers, material and construction quality are paramount. Spoilers can be made from various materials, including carbon fiber, fiberglass, and ABS plastic. Each material has its unique characteristics and advantages. Carbon fiber, for example, offers exceptional strength-to-weight ratio while fiberglass is durable and lightweight. It is crucial to research the different materials and choose one that suits your preferences and budget.
Additionally, pay attention to the construction quality of the spoiler. Look for well-crafted spoilers that have seamless edges and sturdy mounting points. A high-quality rear spoiler not only enhances the appearance of your vehicle but also ensures long-lasting durability and performance.
In conclusion, installing a rear spoiler is a decision that requires careful consideration. By taking into account vehicle compatibility, spoiler design and style, as well as material and construction quality, you can make an informed choice. A well-chosen rear spoiler will not only enhance the aesthetics of your car but also improve its aerodynamics and stability.
Measuring The Spoiler
Installing a rear spoiler on your car can not only enhance its appearance, but also improve its aerodynamic performance. However, before you dive into the installation process, it is crucial to carefully measure the spoiler to ensure a proper fit. In this section, we will cover the steps involved in measuring the spoiler, including determining the correct size and length, as well as mapping out the spoiler placement.
Determining the correct size and length
The first step in measuring the spoiler is to determine the correct size and length that will fit your car perfectly. This information can usually be found in the spoiler manufacturer’s instructions or specifications. However, if you don’t have access to this information, you can measure the width and length of your car’s trunk lid to get an idea of the size you need.
To measure the width, place a measuring tape across the widest part of the trunk lid, usually near the edges. Take note of the measurement in inches or centimeters. Next, measure the length by placing the tape from the front edge of the trunk lid to the back edge. Again, record the measurement accurately.
Once you have these measurements, compare them to the size options available for the spoiler you intend to install. It’s important to choose a spoiler that closely matches the dimensions of your car’s trunk lid to ensure a proper fit and optimal performance.
Mapping out the spoiler placement
After determining the correct size and length, the next step is to map out the placement of the spoiler on your car. This step is crucial for achieving the desired aesthetic outcome and ensuring the spoiler’s functionality.
Before physically attaching the spoiler, take some time to visually assess different spoiler placement options. Consider factors such as the overall shape and style of your car, as well as any existing design features that may influence the spoiler’s position. Additionally, look for areas on the trunk lid where the spoiler can be securely and evenly mounted.
Once you have a rough idea of where the spoiler should be placed, you can use masking tape or a removable marker to create a template on the trunk lid. This template will serve as a guide during the final installation process, helping you position the spoiler accurately.
When mapping out the spoiler placement, it’s essential to ensure that it is balanced and symmetrical. A lopsided or misaligned spoiler can not only detract from the overall appearance of your car, but also affect its aerodynamic performance. Take your time to make precise measurements and adjustments until you are satisfied with the placement.
Gathering The Necessary Tools And Materials
Before installing a rear spoiler, it is essential to gather the necessary tools and materials to ensure a smooth and hassle-free process. Having the right equipment at your disposal right from the start will save you time and effort, and ensure a professional-looking installation. There are a few key items you will need:
Screwdriver or Drill
One of the primary tools you will require is either a screwdriver or a drill, depending on the type of rear spoiler you are installing. A screwdriver is typically sufficient for spoilers attached with bolts, while a drill becomes necessary for spoilers that require drilling holes in the trunk lid or rear window. Choosing the right tool will depend on the manufacturer’s instructions and the specific spoiler design.
Measuring Tape
Accurate measurements are crucial when installing a rear spoiler. To ensure proper alignment and placement, a measuring tape will come in handy. With this tool, you can measure the dimensions of your spoiler and align it correctly on the trunk lid or rear window. A precise installation will not only enhance the aerodynamics of your vehicle but also give it a more stylish and refined appearance.
Mounting Brackets or Hardware
Another essential component you will need is mounting brackets or hardware. These are provided by the spoiler manufacturer and are indispensable for securing the spoiler firmly in place. Depending on the spoiler design and vehicle model, the brackets or hardware may vary. It is crucial to follow the manufacturer’s instructions and use the provided brackets or hardware to ensure a secure and stable installation.
In summary, gathering the necessary tools and materials is the first step towards installing a rear spoiler successfully. A screwdriver or drill, measuring tape, and mounting brackets or hardware are essential items you will need. By having these tools at your disposal, you can ensure a smooth installation process and achieve optimal results for your vehicle.
Preparing The Spoiler And Vehicle
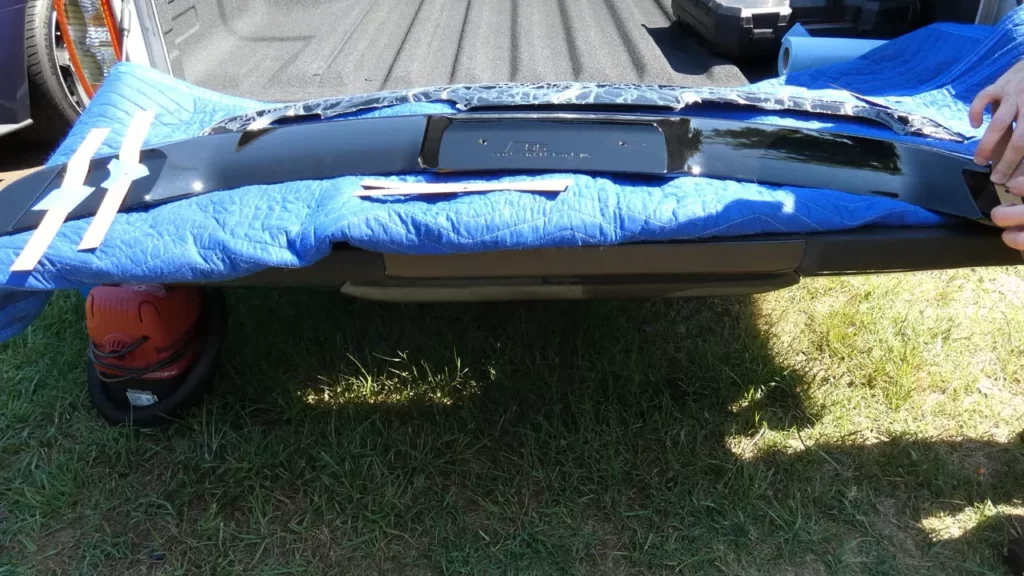
Installing a rear spoiler is a great way to enhance the performance and aesthetics of your vehicle. However, before you start the installation process, it is crucial to properly prepare both the spoiler and the vehicle to ensure a secure and professional-looking installation. This section will guide you through the necessary steps to clean the spoiler surface and prep the installation area on the vehicle.
Cleaning the Spoiler Surface
To achieve a strong and reliable bond between the spoiler and the vehicle, it is essential to clean the surface of the spoiler thoroughly. Follow these simple steps to ensure a flawless surface preparation:
- Start by removing any dirt, grime, or debris from the spoiler using a mild detergent and water solution. This will help to eliminate any contaminants that could hinder the adhesion process.
- Rinse the spoiler with clean water to remove any residue from the cleaning solution.
- Wipe down the surface of the spoiler with a lint-free cloth to ensure it is completely dry. Moisture can interfere with the adhesive bonding process, so it is vital to have a dry surface.
- Inspect the spoiler for any imperfections or scratches. If there are any visible flaws, consider sanding the area gently to create a smooth and uniform surface. Be sure to remove any dust or debris after sanding.
By properly cleaning the spoiler surface, you can eliminate any impurities that may compromise the adhesion and ensure a strong bond between the spoiler and the vehicle’s surface.
Prepping the Installation Area on the Vehicle
Equally important is prepping the installation area on the vehicle. This section will guide you through the necessary steps to prepare the area before attaching the spoiler:
- Thoroughly clean the area where the spoiler will be installed using a mild detergent and water solution. Remove any dirt, wax, or other residues that may hinder adhesion. Ensure that the surface is completely dry before proceeding.
- Inspect the installation area for any imperfections, such as dents, scratches, or unevenness. If necessary, smooth out the area using sandpaper or a similar tool. Remove any dust or debris after this step.
- Measure and mark the exact position where the spoiler will be installed. Double-check the alignment and ensure it matches your desired positioning.
- If your spoiler installation requires drilling, use a drill bit suitable for your vehicle’s surface material. Make sure to drill the holes precisely and remove any metal shavings or debris that may be left behind.
By following these steps to prep the installation area on your vehicle, you are creating a clean and ideal surface for the spoiler to be attached. This will result in a secure installation that not only enhances the appearance but also ensures optimal performance.
Marking The Hole Placement
Marking the hole placement is a crucial step when it comes to installing a rear spoiler on your vehicle. This ensures that the spoiler is securely attached and properly aligned. Whether you are using a template or measuring for accurate hole placement, following the correct process will help you achieve a professional installation. In this section, we will discuss both methods in detail.
Using a Template or Measuring for Accurate Hole Placement
Before you start marking the holes on your vehicle surface, you have two options to ensure accurate hole placement – using a template or measuring the hole positions yourself.
Using a Template
If your rear spoiler comes with a template, consider yourself lucky! Using a template takes the guesswork out of the equation and simplifies the installation process. Here’s what you need to do:
- Clean the desired area on your vehicle’s trunk or roof surface where the spoiler will be installed.
- Align the template with the markings or indents provided by the manufacturer.
- Secure the template in place using tape or clips to avoid any accidental movement.
- Ensure that the template is level and centered, making adjustments if necessary.
- Once the template is properly positioned, use a marker or a punch tool to mark the hole locations through the template onto the vehicle surface.
Measuring for Accurate Hole Placement
If your rear spoiler doesn’t come with a template, don’t worry! You can still achieve accurate hole placement by measuring the hole positions yourself. Here’s how:
- Grab a measuring tape or ruler and measure the dimensions of your spoiler, including the width and length.
- Using these dimensions, determine the proper placement for your spoiler on the vehicle surface. Consider factors such as the spoiler’s distance from the edge and its alignment with the existing body lines.
- Mark the hole locations directly on the vehicle surface using a marker or a punch tool. Make sure to double-check your measurements before making any permanent marks.
No matter which method you choose, it’s vital to take your time and be precise when marking the hole placement. Accuracy is key to achieving a neat and professional installation.
Next, let’s move on to the actual process of marking the holes on the vehicle surface.
Marking the Holes on the Vehicle Surface
Now that you have either your template or hole positions marked, it’s time to transfer those marks onto the vehicle surface. Follow these steps for a successful hole placement:
- Clean the area where the spoiler will be installed to ensure a clean surface for marking.
- Align your template or use your measurements to position the spoiler on the vehicle surface.
- Using a template: Press firmly on the template to transfer the hole marks onto the vehicle surface. The indents or marks should be clearly visible.
- Measuring for accurate hole placement: Carefully place a punch tool or marker through the marked hole positions to create indentations on the vehicle surface.
- Check the hole marks to ensure they are aligned and evenly spaced. Use a level or ruler to confirm their accuracy.
By following these steps, you have successfully marked the hole placement on your vehicle surface, ready for the next step in the installation process. Proper hole placement ensures a secure and visually appealing installation of your rear spoiler.
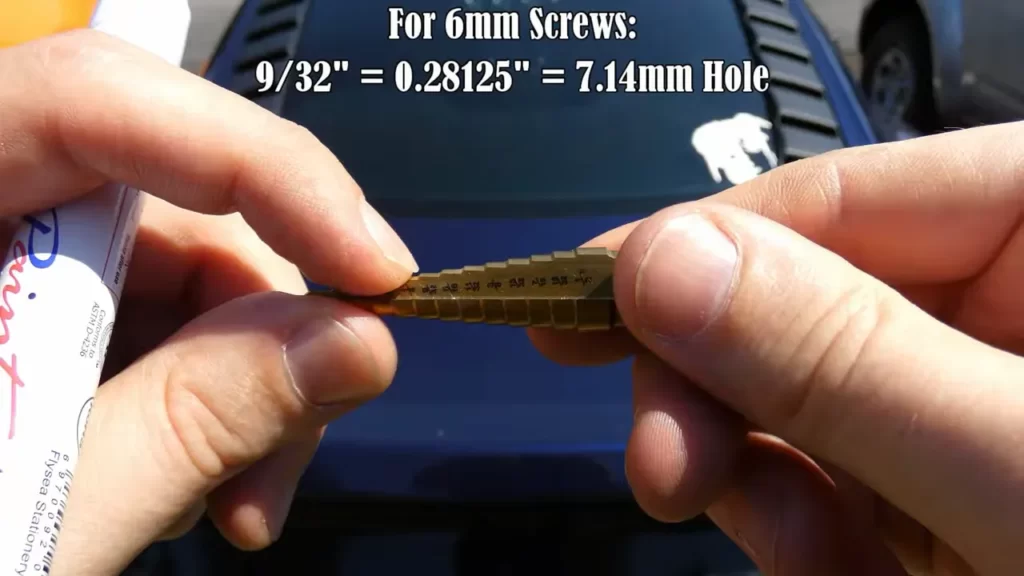
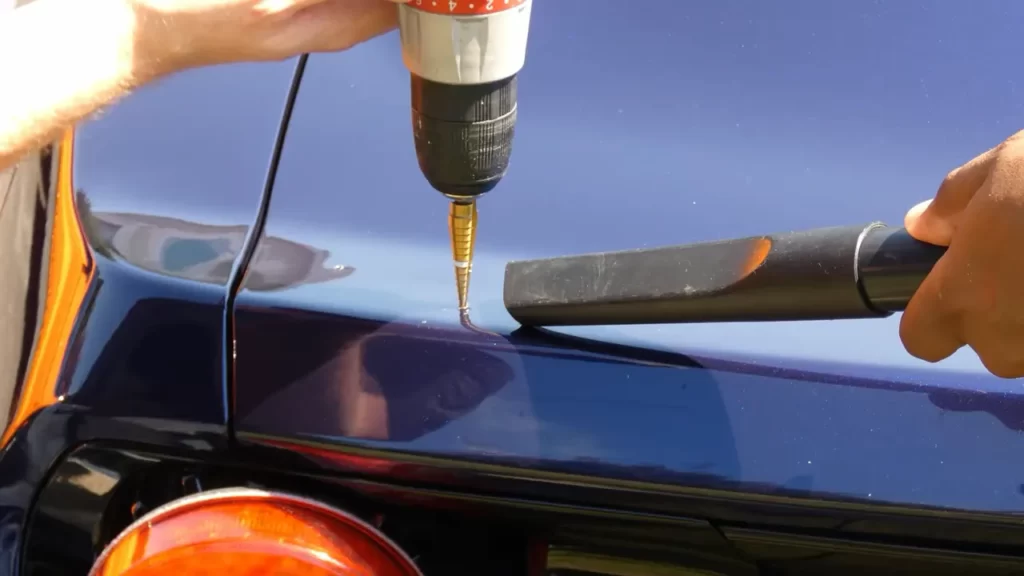
Drilling The Holes
Drilling into the Marked Spots
Drilling the holes is a crucial step when installing a rear spoiler on your vehicle. This step ensures that the spoiler is securely attached and aligned properly. To begin, you will need to mark the spots where the holes should be drilled. Refer to your spoiler’s installation instructions or use a template to determine the exact placement.
Once you have marked the spots, it’s time to begin drilling. Make sure you have the appropriate drill bit size for the holes. It’s recommended to use a sharp high-speed steel (HSS) drill bit, as it will provide clean and accurate holes.
When drilling, be mindful of the surface you are working on. If your vehicle has a painted surface, it’s important to take precautions to avoid scratching or damaging the paint. You may want to use masking tape or a rubber mat to protect the surface during the drilling process.
Pro Tip: Apply gentle pressure while drilling to prevent the drill from slipping or wandering off course. This will help ensure that the holes are drilled precisely where they need to be.
Ensuring Proper Alignment and Depth
After drilling the holes, it’s important to check the alignment and depth to ensure a proper installation. The alignment is crucial because it affects both the functionality and aesthetics of the rear spoiler.
To check the alignment, place the spoiler on the vehicle and align it with the drilled holes. Double-check that the spoiler is centered and level. You can use a measuring tape or a level to ensure accuracy.
Next, measure the depth of the drilled holes. This is important because it determines how securely the spoiler will be attached to the vehicle. Use a depth gauge or simply measure the distance from the surface to the bottom of the hole. The depth should match the specifications provided in the installation instructions.
If necessary, make adjustments to the alignment or depth by re-drilling or widening the holes. It’s better to take the time to make these adjustments now rather than having an improperly installed rear spoiler later on.
Pro Tip: Secure the spoiler temporarily with a few bolts or clamps while you check the alignment and depth. This will help you make accurate measurements and adjustments.
Once you have confirmed the alignment and depth, you can proceed with attaching the rear spoiler permanently. Follow the remaining steps in the installation instructions, which typically involve applying adhesive or using bolts to secure the spoiler in place.
With careful attention to drilling the holes, ensuring proper alignment and depth, and following the installation instructions, you’ll have a rear spoiler installed that not only enhances the appearance of your vehicle but also improves its aerodynamics. So, get your tools ready and give your car a sporty look!
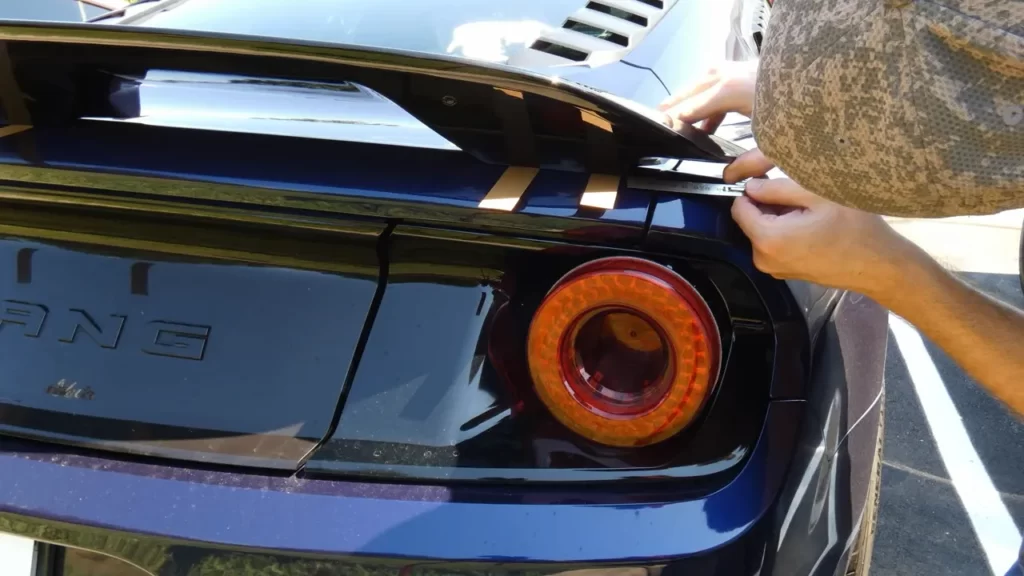
Attaching The Spoiler
Attaching a rear spoiler is a crucial step in improving the aerodynamics and visual appeal of your vehicle. By properly installing the spoiler, you can enhance its performance and give it a sporty and sleek look. In this section, we will explore the process of attaching the spoiler to your vehicle, including inserting the mounting brackets or hardware and securely fastening the spoiler.
Inserting the Mounting Brackets or Hardware
Before attaching the spoiler, you need to make sure you have the necessary mounting brackets or hardware. These are usually provided with the spoiler kit and ensure a secure and stable attachment. Follow these steps to insert the mounting brackets or hardware:
- First, locate the appropriate positions on your vehicle where the mounting brackets or hardware should be installed. This information is usually provided in the spoiler installation instructions.
- Once you have identified the locations, clean those areas thoroughly to ensure a strong bond between the brackets and the vehicle. A clean surface will also prevent any debris from interfering with the attachment.
- Next, carefully align the mounting brackets or hardware with the designated locations. Take your time to ensure they are positioned correctly as this will impact the final alignment of the spoiler.
- Once the brackets or hardware are in place, use the provided screws or bolts to secure them to the vehicle. Tighten them just enough to hold the brackets firmly but avoid overtightening, which may damage the vehicle’s surface.
- Double-check the alignment of the mounting brackets or hardware to ensure they are straight and level. This will help guarantee that the spoiler is attached symmetrically and enhances the overall appearance of your vehicle.
Securely Fastening the Spoiler to the Vehicle
Now that the mounting brackets or hardware are securely in place, it’s time to attach the spoiler. Follow these steps to ensure a secure and stable fastening:
- Carefully position the spoiler on top of the mounting brackets or hardware. Ensure that it aligns properly with the vehicle’s body lines and contours.
- Using the provided screws or bolts, attach the spoiler to the mounting brackets or hardware. Start by loosely fastening them to allow for adjustments.
- Once the spoiler is attached, adjust its position if needed. Ensure that it is centered and aligned symmetrically with the vehicle.
- After achieving the desired position, tighten the screws or bolts evenly. Start from the center and work your way outwards to maintain an equal and secure fastening.
- Finally, give the spoiler a gentle shake to make sure it is firmly attached. If there is any wobbling or movement, double-check the tightening of the screws or bolts.
By adhering to these steps and guidelines, you can successfully attach a rear spoiler to your vehicle. Remember to always refer to the specific installation instructions provided by the manufacturer, as the process may vary depending on the spoiler model and vehicle.
Checking For Proper Alignment
Proper alignment is crucial when installing a rear spoiler, as it not only enhances the aesthetic appeal of your vehicle but also ensures optimal performance. In this section, we will discuss how to verify the spoiler is centered and aligned correctly and make any necessary adjustments to achieve the perfect fit.
Verifying the spoiler is centered and aligned correctly
Before diving into the installation process, take a moment to double-check that the rear spoiler is centered and aligned correctly. This step will help you avoid future alignment issues and ensure a seamless installation.
To verify the spoiler’s alignment, follow these simple steps:
- Measure the distance between the edges of the spoiler and the rear fenders using a measuring tape.
- Compare the measurements on both sides to ensure they are equal. If one side is longer or shorter than the other, adjustments will be necessary.
- Inspect the spoiler from multiple angles to ensure it appears centered on the rear of the vehicle.
Making any necessary adjustments
If you notice any misalignment during the verification process, don’t worry. Making adjustments to achieve the proper alignment is a relatively simple task. Here’s how you can do it:
- Loosen the mounting screws or bolts that hold the spoiler in place, using the appropriate tools.
- Shift the spoiler slightly in the desired direction to align it correctly.
- Use the measuring tape again to ensure the new measurements match on both sides.
- Tighten the mounting screws or bolts securely but avoid over-tightening them.
Repeat the alignment verification process after making adjustments, and continue fine-tuning until the spoiler is perfectly centered and aligned. It’s essential to ensure the spoiler is snugly and securely fastened to the vehicle, as loose installation may cause vibrations, rattling, or even damage to the spoiler or the vehicle body.
By following these steps to check for proper alignment before proceeding with the installation and making the necessary adjustments, you can be confident your rear spoiler will enhance the look of your vehicle while maintaining its functionality. Stay tuned for the next section where we will discuss the final steps to complete the installation process.
Painting Or Finishing The Spoiler
One of the most exciting parts of installing a rear spoiler is the chance to personalize it and make it match the aesthetics of your vehicle. Painting or finishing the spoiler allows you to achieve a seamless look that seamlessly integrates with your car’s overall design. Whether you want to match the existing color or add a pop of contrast, the process of applying paint or finishing options to the spoiler is a creative and rewarding endeavor.
Applying paint or finishing options to match the vehicle
To start the process of painting or finishing your spoiler, you’ll need to gather the necessary supplies:
- Sanding paper
- Primer
- Automotive paint or spray paint
- Clear coat
- Painters tape
- Sandpaper or sanding block
- Lint-free cloth
Depending on the material of your spoiler, you might need to sand it down to create a smooth surface for the paint to adhere to. Lightly sand the spoiler using sandpaper or a sanding block, then wipe away any dust or debris with a lint-free cloth.
Next, apply a coat of primer to ensure better adhesion and durability of the paint. Use a high-quality automotive primer specifically designed for your spoiler’s material. Allow the primer to dry completely according to the manufacturer’s instructions.
Once the primer is dry, it’s time to apply the main coat of paint. Whether you’re using automotive paint or spray paint, make sure to choose a color that matches your vehicle. Follow the manufacturer’s instructions for applying the paint, ensuring even coverage and avoiding drips or runs.
After applying the paint, allow it to dry according to the recommended drying time. It’s essential to be patient during this step to prevent any smudging or damage to the freshly applied paint.
Finally, to protect the paint and give it a glossy finish, apply a clear coat. This layer not only adds shine but also acts as a barrier against environmental factors such as sunlight and moisture. Make sure to follow the instructions for the clear coat application, allowing ample drying time between coats.
Allowing ample drying or curing time
Patiently waiting for the paint and clear coat to dry or cure is crucial to achieving the best results. Rushing this process can lead to unsightly smudges or even damage to the paint job. Ensure that each coat is completely dry before proceeding to the next step.
Remember, curing time refers to the period it takes for the paint to fully harden and adhere to the spoiler’s surface. Following the manufacturer’s instructions regarding drying and curing times will ensure a durable and long-lasting finish.
Once the paint and clear coat have dried/cured completely, you can confidently install your newly finished spoiler onto your vehicle, admiring the sleek and customized look it adds.
Cleaning And Maintenance
Proper cleaning and regular maintenance are essential to ensure the longevity and performance of your rear spoiler. By following these guidelines, you can keep your spoiler looking sleek and functioning efficiently.
Proper Cleaning Techniques for the Spoiler
When it comes to cleaning your rear spoiler, it’s important to use the right techniques to avoid damaging the surface. Here are some steps you should follow:
- Start by rinsing the spoiler with clean water to remove any loose dirt or debris.
- Use a mild car wash soap and a soft sponge or cloth to wash the spoiler. Avoid using abrasive materials that could scratch the surface.
- Gently scrub the spoiler using a circular motion, paying extra attention to any stubborn stains or buildup.
- Rinse the soap off thoroughly with clean water, ensuring no residue is left behind.
- Use a clean microfiber towel to dry the spoiler, gently wiping in a back-and-forth motion.
By following these proper cleaning techniques, you can maintain the appearance of your rear spoiler and prevent any damage from occurring.
Regular Maintenance to Ensure Longevity
In addition to regular cleaning, proper maintenance is crucial to prolonging the life of your rear spoiler. Here are some important steps to include in your maintenance routine:
- Inspect the spoiler regularly for any signs of damage, such as cracks or loose screws. Address any issues immediately to prevent further damage.
- Tighten any loose screws or bolts to ensure a secure fit. This will prevent the spoiler from vibrating or becoming detached while driving.
- Apply a protective wax or sealant to the spoiler’s surface periodically to maintain its shine and protect it from environmental elements.
Regular maintenance will not only keep your rear spoiler in optimal condition but also prevent any potential safety hazards.
Frequently Asked Questions For How To Install A Rear Spoiler
How Do You Stick A Rear Spoiler?
To stick a rear spoiler, follow these steps: 1. Clean the surface thoroughly. 2. Ensure the spoiler and car surface are dry. 3. Apply adhesive tape or silicone adhesive to the spoiler’s base. 4. Align the spoiler on the car and press firmly.
5. Let it cure according to the product’s instructions. Enjoy your newly installed rear spoiler!
Can You Install Spoilers Yourself?
Yes, you can install spoilers on your own. Just make sure to follow the installation instructions carefully.
What Is The Best Thing To Stick A Spoiler On With?
The best thing to stick a spoiler on is a car’s trunk, using adhesive tape or strong automotive-grade double-sided tape.
How Do You Install A Spoiler With Drilling?
To install a spoiler with drilling, follow these steps: 1. Position the spoiler on the desired spot, marking the mounting holes. 2. Drill pilot holes through the marked spots. 3. Attach the spoiler using screws or bolts. 4. Tighten the fasteners securely.
5. Double-check the installation for stability.
Conclusion
Installing a rear spoiler can enhance the aerodynamics and overall style of your vehicle. By following these simple steps, you can easily add a sleek and sporty touch to your car. Remember to choose a spoiler that fits your car’s make and model, and carefully follow the manufacturer’s instructions.
With a little patience and attention to detail, you’ll have your rear spoiler installed in no time. Get ready to turn heads on the road!