To install a Pedal Commander, connect the device to the accelerator pedal’s sensor and then attach the controller to a suitable location in the vehicle. Introducing a Pedal Commander to your vehicle can enhance throttle response and improve acceleration, giving you a more dynamic driving experience.
This simple installation guide will walk you through the steps required to put the Pedal Commander in place, allowing you to enjoy its benefits. So, let’s dive in and discover how to install a Pedal Commander in your vehicle for optimal performance.
Gather The Necessary Tools And Materials
Before you begin installing your Pedal Commander, it is important to gather all the necessary tools and materials to ensure a smooth installation process. Having everything prepared in advance will save you time and frustration. Here is a list of tools and materials you need to have:
List of tools needed for the installation
To install your Pedal Commander, you will need the following tools:
- Socket set with various sizes (typically 10mm, 12mm, 14mm)
- Wrench set with various sizes (typically 10mm, 12mm, 14mm)
- Flathead screwdriver
- Phillips head screwdriver
- Trim removal tool
- Wire cutters
- Electrical tape
- Ratchet
- Extension bar
- Torque wrench
- Car battery charger
- Owner’s manual (specific to your vehicle model)
Pedal Commander package contents
In addition to the tools listed above, it is important to ensure that you have all the necessary contents from the Pedal Commander package. This package should include the following:
- Pedal Commander module
- Wiring harness
- Installation instructions
- Zip ties
Before starting the installation, make sure the Pedal Commander package contains all these items. If anything is missing or damaged, contact the Pedal Commander customer support for assistance.
Prepare For The Installation
Prepare for the Installation
Before you begin installing a Pedal Commander in your vehicle, it’s essential to prepare yourself and understand the installation process thoroughly. By taking the time to gather the necessary tools and familiarize yourself with the components, you’ll ensure a smooth and successful installation. In this section, we will guide you through the necessary steps to prepare for installing a Pedal Commander in your vehicle.
Understand the Installation Process
First and foremost, it’s crucial to have a clear understanding of the installation process for a Pedal Commander. Familiarize yourself with the installation instructions provided by the manufacturer. This will help you gain confidence and ensure that you are following the correct procedure. By understanding how the Pedal Commander works, you’ll have better control over your vehicle’s acceleration and response.
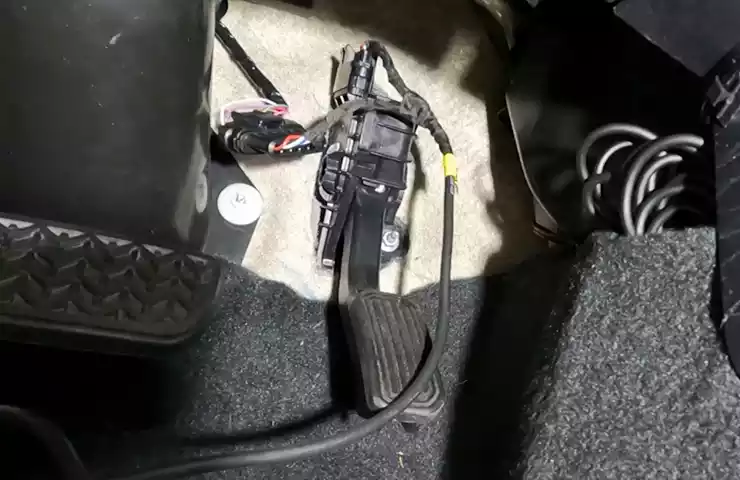
Locate the Accelerator Pedal in Your Vehicle
Next, you’ll need to locate the accelerator pedal in your vehicle. This pedal is typically located on the right side of the driver’s footwell. It is responsible for controlling the speed and power of your vehicle. Take a moment to visually identify the accelerator pedal. Ensure that you have a clear view and you know how to differentiate it from the brake and clutch pedals.
Once you have identified the accelerator pedal, it’s time to prepare it for the Pedal Commander installation.
- Gather the Necessary Tools: Before you start the installation, gather all the tools you’ll need. This may include a Phillips screwdriver, zip ties, electrical tape, and any other tools specified in the installation instructions. Having these tools readily available will streamline the installation process.
- Remove Floor Mats and Obstructions: Clear the driver’s footwell area by removing any floor mats or obstructions that may hinder your access to the accelerator pedal. This will provide you with a clear workspace and allow for a smoother installation process.
- Consult the Vehicle’s Manual: If necessary, refer to your vehicle’s manual for any additional guidance or precautions regarding the accelerator pedal. Some vehicles may have specific instructions or warnings that you need to be aware of.
By following these steps, you’ll be well-prepared to install a Pedal Commander in your vehicle. Understanding the installation process and locating the accelerator pedal are essential steps to ensure a successful installation. Now, let’s move on to the next section, where we will guide you through the installation itself.
Step-By-Step Installation Guide
Are you looking to enhance the performance of your vehicle? Installing a Pedal Commander can make a significant difference in the throttle response of your car. To help you with the installation process, we have prepared a comprehensive step-by-step guide. Follow these instructions carefully, and you’ll have your Pedal Commander up and running in no time.
Disconnect the negative battery terminal
The first step is to disconnect the negative battery terminal. This ensures your safety while working with electrical components. Open the hood of your vehicle and use a wrench to loosen the nut on the negative battery terminal. Once loosened, carefully remove the terminal from the battery.
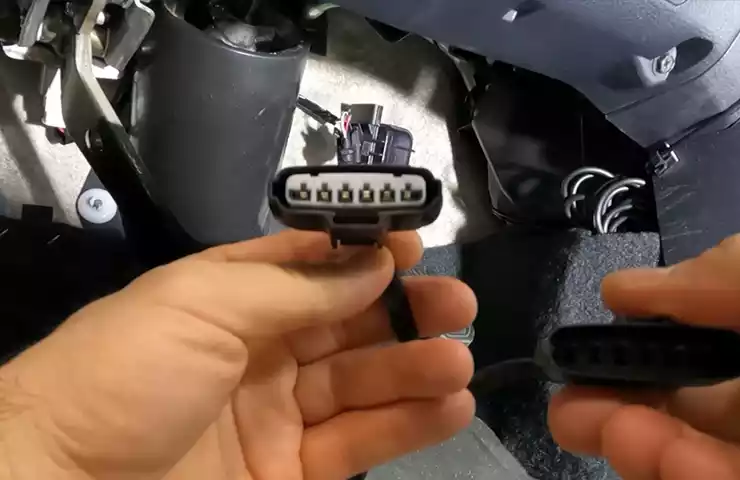
Remove the factory wiring harness from the accelerator pedal
Next, you need to remove the factory wiring harness from the accelerator pedal. Locate the wiring harness, usually located near the top of the pedal assembly. Gently disconnect the harness by pressing the release tab and pulling it apart.
Connect the Pedal Commander harness to the accelerator pedal
Now it’s time to connect the Pedal Commander harness to the accelerator pedal. Take the Pedal Commander harness and align it with the corresponding connector on the accelerator pedal. Once aligned, firmly push the two connectors together until they click into place.
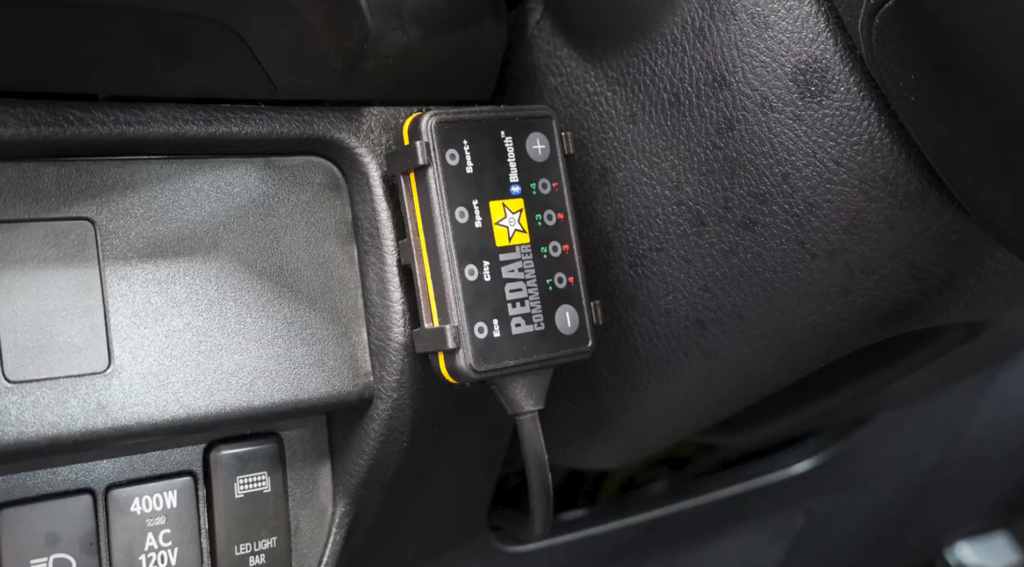
Mount the Pedal Commander module in a suitable location
Choose a suitable location to mount the Pedal Commander module. It’s recommended to find a spot where the module will be easily accessible, yet out of the way. Clean the mounting surface and use the provided adhesive strip to securely attach the module.
Connect the Pedal Commander harness to the module
With the module mounted, it’s time to connect the Pedal Commander harness. Take the loose end of the harness and plug it into the corresponding port on the module. Ensure the connection is tight and secure.
Reconnect the negative battery terminal
Finally, it’s time to reconnect the negative battery terminal. Take the previously disconnected terminal and place it back on the battery. Tighten the nut with a wrench until it is secure. This reestablishes the electrical connection.
Congratulations! You have successfully installed your Pedal Commander. Start your vehicle and test out the new throttle response. You’ll notice a significant improvement and enjoy a more responsive driving experience.
Testing And Fine-Tuning
Once you have successfully installed your Pedal Commander, it’s time to put it to the test and fine-tune the settings to your liking. This step is crucial to ensure that you get the most out of your device and experience the full potential of improved throttle response and acceleration. In this section, we will guide you through the process of testing and fine-tuning.
Turn on the ignition to test the Pedal Commander
With the installation completed, turn on the ignition and test if the Pedal Commander is working properly. You should see the device power on, indicating that it is ready to enhance your driving experience. If it doesn’t turn on, double-check the connections and make sure everything is securely in place.
Follow the instructions for fine-tuning the settings
Each vehicle and driver preferences are unique, so it’s time to customize the settings of your Pedal Commander. Refer to the user manual or the manufacturer’s instructions for the specific steps to adjust the settings. Typically, you will have the option to select different driving modes and sensitivity levels.
Test different driving modes and sensitivity levels
Once you have accessed the settings menu of your Pedal Commander, it’s time to try out the various driving modes and sensitivity levels. Experimenting with different settings will allow you to find the perfect balance that suits your driving style.
Here are some tips to help you fine-tune the settings:
- Start with the default settings and take note of the throttle response and acceleration.
- Try the different driving modes, such as Economy, City, Sport, or Sport+, depending on your preferences and driving conditions.
- Adjust the sensitivity levels to find the perfect response. Higher sensitivity levels offer a more aggressive response, while lower levels provide a smoother and more controlled acceleration.
- Take your time to test each setting and gauge how it affects your driving experience. This process may require multiple adjustments until you find the optimal configuration.
By testing and fine-tuning the settings of your Pedal Commander, you can unleash the true potential of your vehicle’s throttle response and enjoy a more engaging and responsive driving experience. Don’t be afraid to experiment and find the perfect settings that make your vehicle truly yours.
Troubleshooting Tips

Even with careful installation, it’s possible to run into issues when installing a Pedal Commander. However, troubleshooting these problems doesn’t have to be a daunting task. By following some simple steps and guidelines, you can quickly identify and resolve any common installation issues that may arise. In this section, we will walk you through the troubleshooting process to help you ensure a successful installation of your Pedal Commander.
Troubleshoot common installation issues
If you are experiencing any issues during the installation of your Pedal Commander, it’s important not to panic. Many common installation issues can be easily resolved with a few simple troubleshooting steps. Here are some common issues you may encounter and the steps to resolve them:
- Pedal Commander not lighting up: If you find that your Pedal Commander is not lighting up after installation, double-check the power connection. Make sure the power connector is securely plugged into the appropriate socket and that the fuse is not blown. If necessary, replace the fuse and try again.
- Pedal Commander not responding: If your Pedal Commander is not responding or is not adjusting the throttle response as expected, check the harness connections. Make sure all the connectors are securely plugged in and that the cables are not damaged or pinched.
- Inconsistent throttle response: If you are experiencing inconsistent throttle response or sudden fluctuations in acceleration, it may be due to a loose or faulty connection. Verify that all the connections are tight and secure, and double-check the harness installation to ensure it is properly seated.
- Lights flashing or error codes: If you notice any lights flashing or error codes appearing on the Pedal Commander, it may indicate a communication issue. Check that the connections are properly aligned and that the communication cables are not damaged.
Verify connections and harness installation
One of the most common causes of installation issues is improperly connected or loose harnesses. It’s crucial to verify all the connections and ensure the harnesses are installed correctly. Here are the steps to verify the connections and harness installation:
- Inspect the connectors: Take a close look at each connector to ensure they are free from damage and properly aligned.
- Tighten the connections: Double-check that all the connections are tight and secure. If necessary, use a screwdriver or pliers to tighten any loose connections.
- Inspect the harness installation: Carefully examine the harness installation to ensure it is properly routed and secured. Ensure that there are no pinched or damaged cables.
- Follow the installation instructions: Review the installation instructions provided with your Pedal Commander to make sure you haven’t missed any crucial steps or connections.
Reset the Pedal Commander if necessary
If you have verified all the connections and followed the installation instructions correctly, but are still experiencing issues with your Pedal Commander, a reset may be necessary. Performing a reset can help resolve any software-related problems that may be affecting the performance of the device. Here’s how to reset your Pedal Commander:
- Locate the reset button: Look for the reset button on your Pedal Commander device. It is usually located on the side or back of the unit.
- Press and hold the reset button: Press and hold the reset button for approximately 10 seconds.
- Release the button: After 10 seconds, release the reset button.
- Reconnect and test: Reconnect the Pedal Commander and test it to see if the issues have been resolved. If not, consider contacting the customer support team for further assistance.
By following these troubleshooting tips, you can overcome any common installation issues that may arise while installing a Pedal Commander. Remember to double-check the connections, verify the harness installation, and perform a reset if necessary. With these steps, you’ll be able to enjoy the enhanced throttle response and performance optimization offered by your Pedal Commander.
Safety And Precautions
Installing a Pedal Commander can greatly enhance the performance of your vehicle, giving you better control and improved throttle response. However, it’s important to follow safety guidelines during the installation process to ensure you don’t encounter any issues along the way. Taking certain precautions can help prevent any potential mishaps and ensure a smooth installation. In this section, we’ll discuss some key safety measures you should consider before installing a Pedal Commander.
Follow safety guidelines during installation
When it comes to installing a Pedal Commander, it’s crucial to prioritize safety. Here are some essential safety guidelines to keep in mind:
- Before starting the installation process, disconnect the vehicle’s battery to avoid any electrical accidents.
- Wear appropriate protective gear, such as gloves and safety glasses, to protect yourself from any potential injuries.
- Ensure you are working in a well-ventilated area to prevent the buildup of any harmful fumes.
- Read the installation manual thoroughly before beginning the installation process to understand all the steps involved.
- If you’re unsure about any step or procedure, consult a professional or seek assistance from a knowledgeable individual.
Be cautious of electrical components
During the installation of a Pedal Commander, it’s important to be cautious of electrical components to avoid any damage or electrical hazards. Here are some precautions to take:
- Before working on any electrical components, ensure that the vehicle’s battery is disconnected.
- Avoid touching any exposed wires or connectors without proper insulation, as it can lead to electric shock.
- Handle any electrical components with care, avoiding excessive force or pulling on wires.
- Double-check all connections and ensure they are securely fastened to prevent any loose or exposed electrical contacts.
- If you encounter any electrical issues or unsure about handling the electrical components, consult a professional for assistance.
By adhering to these safety guidelines and being cautious of electrical components, you can safely install a Pedal Commander and enjoy the improved performance it provides. Remember, prioritizing safety not only protects you but also ensures a successful and hassle-free installation process.
Frequently Asked Questions For How To Install A Pedal Commander
How Do You Connect A Pedal Commander?
To connect a Pedal Commander, follow these steps: 1. Locate the accelerator pedal plug under the dash. 2. Disconnect the plug. 3. Connect the Pedal Commander’s harness directly in line with the accelerator pedal plug. 4. Reconnect the accelerator pedal plug to the Pedal Commander harness.
5. Mount the Pedal Commander controller on your dashboard with the provided adhesive strip.
Where Is The Best Place To Mount The Pedal Commander?
The best place to mount the Pedal Commander is on the driver’s side in a convenient and accessible location. It should be positioned within reach and sight to easily control and adjust the settings while driving.
What Does The Pedal Commander Plug Into?
The Pedal Commander plugs into the accelerator pedal sensor of your vehicle.
How Long Does It Take To Install Pedal Commander?
Pedal Commander installation time varies but generally takes about 30-60 minutes. It’s a quick and easy process that can be done using basic tools and following the provided instructions.
Conclusion
To sum it up, installing a Pedal Commander is a simple and effective way to enhance your vehicle’s performance. By improving throttle response and eliminating lag, this device takes your driving experience to a whole new level. With the easy-to-follow steps provided in this guide, you can now confidently install a Pedal Commander and enjoy a smoother, more responsive ride.