To install a muffler tip, you need to slide it onto the exhaust pipe and secure it with clamps or welding. Muffler tips are a popular aftermarket accessory that can enhance the look and sound of your vehicle’s exhaust system.
Whether you want to add a touch of style or improve performance, installing a muffler tip is a simple and straightforward process. We will guide you through the step-by-step instructions to help you install a muffler tip on your vehicle.
By following these instructions, you can easily give your vehicle a customized and aesthetic appearance. So, let’s get started with the installation process and transform the look of your vehicle’s exhaust system in no time.
Factors To Consider When Selecting A Muffler Tip
Installing a muffler tip is a great way to enhance the appearance and sound of your vehicle. However, before you rush out to purchase a muffler tip, there are several factors you should consider to make sure you choose the right one. Here are the key factors to keep in mind:
Material and Durability
One of the primary considerations when selecting a muffler tip is the material it is made from and its durability. After all, you want a muffler tip that not only looks good but also lasts a long time.
There are several materials commonly used for muffler tips:
- Stainless Steel: Stainless steel muffler tips are known for their sleek appearance and excellent durability. They are resistant to rust and corrosion, making them a popular choice among car enthusiasts.
- Carbon Fiber: Carbon fiber muffler tips are lightweight and provide a high-end and sporty look to your vehicle. They are resistant to heat and typically last longer than other materials.
- Aluminum: Aluminum muffler tips are lightweight and affordable. While they may not be as durable as stainless steel or carbon fiber options, they are still a viable choice if you’re on a budget.
When selecting a muffler tip, consider the material that best suits your needs, taking into account factors such as your budget and desired aesthetic.
Size and Compatibility
The size and compatibility of a muffler tip are crucial factors to consider. You want to ensure that the muffler tip you choose fits your vehicle’s exhaust pipe properly.
Measure the diameter of your exhaust pipe and compare it to the sizing options available for the muffler tip you are considering. It’s essential to choose a muffler tip with the right diameter to ensure a proper fit.
Additionally, check if the muffler tip installation requires welding or if it can be attached using clamps. This information will guide you in selecting a muffler tip that matches your installation preferences.
Style and Design
Lastly, the style and design of the muffler tip play a significant role in the overall appearance of your vehicle. You want a muffler tip that complements the aesthetics of your car.
Consider factors such as the shape of the muffler tip, be it round, oval, or angled. Also, think about any additional design elements such as engraved logos or patterns that can add a unique touch to your vehicle.
Choosing a style and design that aligns with your personal preferences will ensure that your vehicle stands out from the crowd.
In conclusion, when selecting a muffler tip, consider the material and durability, size and compatibility, as well as the style and design. Taking these factors into account will help you choose a muffler tip that not only looks great but also enhances the overall performance and sound of your vehicle.
Gather The Necessary Tools And Equipment
Before you begin the installation process for your new muffler tip, it’s crucial to gather all the necessary tools and equipment. Having everything you need on hand will make the installation go smoothly and efficiently. Here are the tools and equipment you’ll need:
Socket Set
A socket set is an essential tool for this installation. It will allow you to easily tighten and loosen the bolts and nuts required to secure the muffler tip in place. Make sure you have a variety of socket sizes to accommodate different bolt sizes. This will ensure a proper fit and prevent damage to the bolts and nuts.
Wrenches
In addition to a socket set, you’ll also need a set of wrenches. Wrenches come in handy for tightening and loosening bolts and nuts that may be located in hard-to-reach areas. It’s a good idea to have both standard (or open-ended) wrenches and adjustable wrenches in your toolkit. This will ensure that you have options to fit various sizes of bolts and nuts.
Safety Glasses
When working on your vehicle, it’s important to prioritize safety. Safety glasses are a must-have item whenever you’re using tools or working in close proximity to the vehicle’s exhaust system. Safety glasses will protect your eyes from any debris or sparks that may be generated during the installation process.
Penetrating Oil
Some exhaust system components, such as bolts and nuts, may have become corroded over time. To make the removal process easier, it’s recommended to use a penetrating oil. Penetrating oil helps loosen rusted or stuck bolts and nuts, making them easier to remove without causing damage to the exhaust system or other components.
Jack Stands
While installing a muffler tip, you may need to access the underside of the vehicle. To ensure your safety, it’s crucial to use jack stands to support the weight of the vehicle. Jack stands provide a stable platform, preventing any accidental movement of the vehicle while you work underneath it. Always use jack stands on a flat, stable surface to minimize any risk of the vehicle falling or shifting.
By gathering these tools and equipment before starting the installation process, you’ll be well-prepared to tackle the task at hand. With everything you need by your side, you can proceed with confidence, knowing that you have the necessary resources to successfully install your new muffler tip.
Safety Precautions
Before you dive into the installation of a muffler tip, it’s important to prioritize your safety. By taking a few simple steps, you can ensure a smooth and accident-free installation process. In this section, we will outline the necessary safety precautions that you should follow.
Ensure the Vehicle is Cool
Always begin the installation process when the vehicle’s engine and exhaust system are completely cooled. This will reduce the risk of burns and other injuries. Wait for at least an hour after turning off the engine to allow sufficient cooling time.
Wear Protective Gloves and Clothing
Protective gloves and clothing are essential during the installation of a muffler tip. These items will shield your skin from potential cuts, scrapes, burns, and exposure to harmful chemicals. Make sure to wear heat-resistant gloves and clothing that covers your arms and legs. This will minimize the chances of injury and ensure your safety.
Work in a Well-Ventilated Area
Working in a well-ventilated area is crucial to prevent the inhalation of harmful gases and fumes released during the installation process. Choose an area with good airflow, such as an open garage or outdoor space. Open doors and windows to allow fresh air to circulate. Additionally, you can use a fan or wear a respiratory mask for added protection.
To summarize, remember to:
- Wait for the vehicle to cool down completely before starting the installation.
- Wear protective gloves and clothing to safeguard yourself from potential injuries.
- Work in a well-ventilated area to avoid inhaling harmful gases and fumes.
By adhering to these safety precautions, you can ensure a safe and successful installation of your muffler tip. Now that we’ve covered the essentials, let’s move on to the step-by-step process of installing a muffler tip.
Step 1: Park The Vehicle On A Level Surface
Parking your vehicle on a level surface is an essential first step before installing a muffler tip. This ensures stability and safety while you work on your vehicle. Here’s how you can do it:
Engage the Parking Brake
Before you begin, always engage the parking brake to prevent any potential movement of the vehicle. This extra precaution is crucial to keep the vehicle secure throughout the installation process.
Chock the Wheels
To further secure the vehicle and prevent it from rolling, it is recommended to chock the wheels. Chocks are small wedges that can be placed in front of and behind the wheels to immobilize the vehicle. Follow these steps:
- Locate a suitable chock, such as a wooden block or a dedicated wheel chock.
- Place the chock tightly against the tire, both in front and behind the wheel on the side closest to the vehicle’s frame.
By properly engaging the parking brake and chocking the wheels, you can ensure that the vehicle remains stationary and stable during the muffler tip installation process. Once the vehicle is securely parked on a level surface, you can proceed to the next steps of the installation.
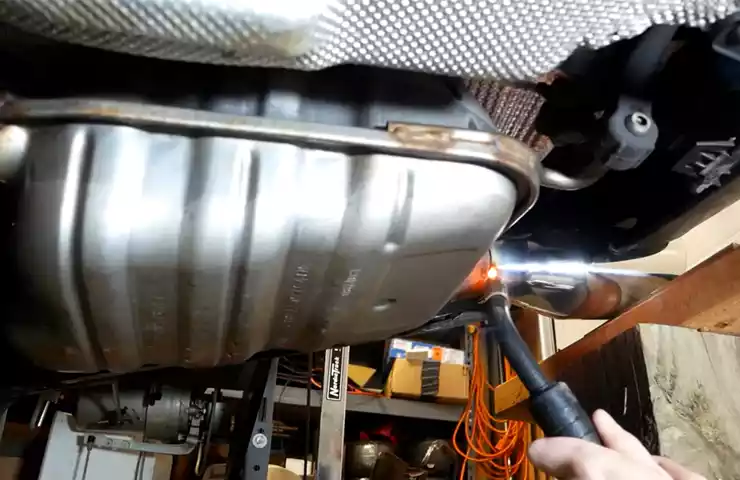
Step 2: Locate And Inspect The Existing Exhaust System
Once you have gathered all the necessary tools for installing a muffler tip and have ensured your safety, the next step is to locate and inspect your existing exhaust system. This important step will help you determine the condition of your current system and find the best position for installing the new muffler tip.
Check for any Damage or Rust
Begin by visually examining the entire length of your exhaust system, paying close attention to any signs of damage or rust. Over time, exposure to the elements and road debris can cause your exhaust system to wear down.
- Inspect the pipes and muffler for any visible dents, cracks, or holes. These can affect the overall performance of your exhaust system.
- Check for rust spots along the pipes and muffler. Rust can weaken the metal and even cause holes to form.
If you notice any significant damage or excessive rust, it may be necessary to replace the affected components before proceeding with the installation of the muffler tip. Consulting a professional mechanic or experienced enthusiast can help you make an informed decision.
Determine the Best Position for Installing the Muffler Tip
Now that you have inspected the condition of your existing exhaust system, it’s time to find the perfect position for the new muffler tip. The placement of the tip can affect both the appearance and performance of your vehicle, so consider these factors:
- Consider the aesthetics: Decide whether you want the muffler tip to be aligned with the rear bumper or slightly protruding.
- Take measurements: Measure the diameter of your existing exhaust pipe to ensure compatibility with the muffler tip you have purchased.
- Look for obstructions: Check for any obstructions, such as suspension components, spare tire, or heat shields that might interfere with the installation of the muffler tip.
Once you have determined the best position based on these considerations, it’s time to move on to the next step of installing your brand new muffler tip.
Step 3: Loosen The Clamps
Now that you have successfully positioned the muffler tip in the desired location, it’s time to loosen the clamps that hold it in place. This step is crucial as it will allow you to secure the muffler tip tightly.
Apply Penetrating Oil to Loosen Rusty Clamps
If the clamps appear rusty or seized, it’s essential to prepare them before attempting to loosen them. Rusty clamps can be stubborn and may require some extra effort to loosen. To make this process easier, apply a generous amount of penetrating oil to the affected areas.
Penetrating oil serves as a lubricant, easing the friction between the clamp and the exhaust pipe. Allow the oil to sit for a couple of minutes to penetrate the rust and corrosion before proceeding.
Use a Socket Set or Wrenches to Loosen the Clamps
Once the penetrating oil has had enough time to work its magic, it’s time to start loosening the clamps. You have a couple of options to choose from, depending on the tools you have available.
If you have a socket set handy, select the appropriate socket size that matches the diameter of the clamp’s nut. Insert the socket onto the ratchet and fit it snugly over the nut. Apply steady pressure in a counterclockwise direction to loosen the clamp. Continue loosening until the clamp is fully open and can be easily removed.
If you don’t have a socket set, don’t worry. Wrenches can also do the trick. Place an appropriately sized wrench around the nut of the clamp and turn it counterclockwise. Apply enough force to loosen the clamp, but be careful not to overtighten and risk damaging the clamp or the exhaust pipe.
Once the clamp is loose enough, repeat this process for any additional clamps that are securing the muffler tip in place.
Now that you’ve successfully loosened the clamps, you can move on to the next step in the installation process. Stay tuned for Step 4: Secure the Muffler Tip, where we’ll guide you through the final steps of ensuring a tight and secure fit.
Step 4: Remove The Old Muffler Tip
Step 4: Remove the Old Muffler Tip
Now that you have gathered all the tools you need and have prepared the new muffler tip for installation, it’s time to remove the old muffler tip. This step is important as it will allow you to properly clean the exhaust pipe surface and ensure the new muffler tip fits correctly.
Slide the Old Muffler Tip off the Exhaust Pipe
To begin, locate the old muffler tip attached to the end of your exhaust pipe. Most muffler tips are held in place by clamps or screws, so look for any visible fasteners and use the appropriate tools to loosen them.
Once the fasteners are loose, you can slide the old muffler tip off the exhaust pipe. Be cautious as the old tip may be hot, so it’s a good idea to wear gloves or use a cloth for protection.
Clean the Exhaust Pipe Surface for Proper Fitment
With the old muffler tip removed, take the opportunity to clean the surface of the exhaust pipe. This will ensure the new muffler tip fits properly and securely.
Using a clean cloth or brush, remove any dirt, grime, or rust from the surface of the exhaust pipe. Pay close attention to the area where the old muffler tip was attached, as it may have accumulated residue over time.
Once the surface is clean, visually inspect it for any signs of damage or corrosion. If you notice any issues, it’s best to address them before proceeding with the installation of the new muffler tip.
In conclusion, removing the old muffler tip is a crucial step in the installation process. By following these simple steps and ensuring a clean exhaust pipe surface, you can guarantee that the new muffler tip will fit correctly and enhance the overall appearance of your vehicle’s exhaust system.
Step 5: Install The New Muffler Tip
Now comes the exciting part – installing your new muffler tip! Follow these simple steps to ensure a seamless installation process.
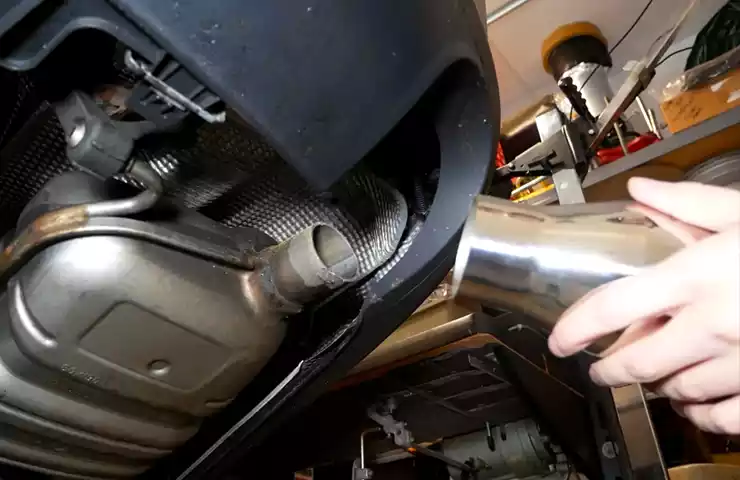
1. Slide the New Muffler Tip onto the Exhaust Pipe
First, carefully slide the new muffler tip onto the end of your exhaust pipe. Make sure it is positioned securely and snugly in place. This step requires a bit of finesse, so take your time to avoid any potential damage or misalignment.
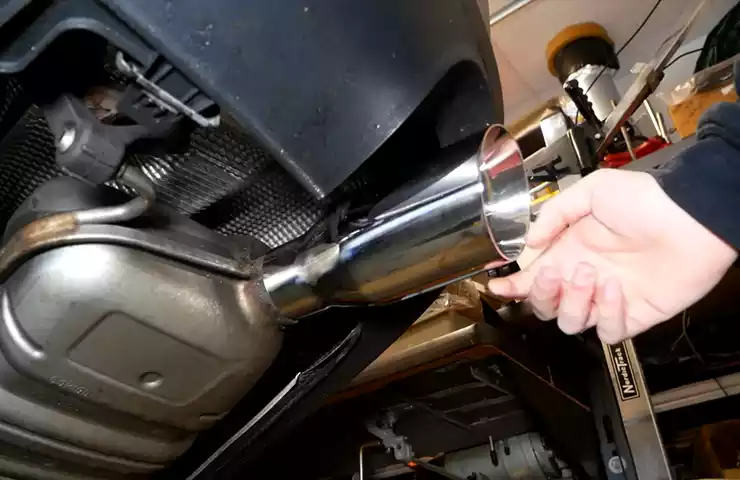
2. Align the Tip for Desired Look and Fit
Next, align the muffler tip according to your desired look and fit. Rotate and adjust it until you achieve the perfect angle and positioning. Remember that the tip should align smoothly with the rear of your vehicle, neither protruding too far nor sitting too close to the body.
Keep in mind that aside from aesthetics, proper alignment guarantees optimal performance as well. A well-fitted muffler tip ensures efficient exhaust flow and reduces the risk of any unwanted vibrations or rattlings.
If needed, refer to the manufacturer’s instructions to ensure you align the tip correctly. You can also seek assistance from a professional if you are unsure about the alignment process.
Once you are satisfied with the alignment, give the tip a gentle tug to confirm its stability. It should remain securely in place, without any wobbling or looseness.
Pro tip: If you are dealing with a dual-exhaust system, make sure to repeat these steps for the other side as well, ensuring both tips are aligned identically.
With these easy steps, you can install a new muffler tip and achieve the desired look and fit for your vehicle. So go ahead, give your car that extra touch of style and elegance!
Step 6: Tighten The Clamps
After positioning the muffler tip properly, it’s time to tighten the clamps to ensure a secure and stable fit. This step is crucial in order to prevent any potential leaks or rattling. By following the simple instructions below, you’ll be able to tighten the clamps effectively.
Use a Socket Set or Wrenches to Securely Tighten the Clamps
Start by locating the clamps that came with your muffler tip. These clamps are typically made of stainless steel and are designed to provide a strong grip around the exhaust pipe.
Use a socket set or wrenches to secure the clamps tightly. Make sure to apply equal pressure on both sides of the clamp to ensure an even and secure fit. This will prevent any loosening or slippage over time.
If you’re using a socket set, select the appropriate size socket that matches the clamp’s nut. Position the socket over the nut and attach it to a ratchet handle. Begin turning the ratchet handle clockwise to tighten the nut securely. Repeat the process with the remaining clamps.
In case you’re using wrenches, hold the bolt with one wrench while turning the nut clockwise with the other wrench. Continue tightening until the clamps stay firmly in place.
Ensure a Proper Seal between the Tip and Exhaust Pipe
Tightening the clamps properly also ensures a proper seal between the muffler tip and the exhaust pipe. This tight seal is essential to prevent any exhaust leaks and maintain optimum performance.
Ensure that the muffler tip is aligned and centered with the exhaust pipe before tightening the clamps. This will help create an airtight connection, minimizing any chances of exhaust leakage.
Take a moment to visually inspect the area where the muffler tip and the exhaust pipe meet. Look for any visible gaps or misalignments. If you notice any irregularities, adjust the position of the muffler tip accordingly and then proceed to tighten the clamps.
By properly tightening the clamps and ensuring a proper seal, you’ll not only secure the muffler tip in place but also enhance the overall efficiency and performance of your vehicle’s exhaust system.
Step 7: Test For Leaks And Alignment
Once you have successfully installed your new muffler tip, it is crucial to test for leaks and ensure proper alignment. This step will help you identify any issues that might affect the performance and longevity of your muffler system. Follow these simple steps to ensure a secure fit and prevent any unwanted noises or leaks.
Start the Vehicle and Listen for any Unusual Noises
Start your vehicle and carefully listen for any abnormal noises coming from the muffler area. A properly installed muffler tip should provide a smooth and deep exhaust note without any rattling, hissing, or excessive vibrations. Listen for consistency in the idle sound and the exhaust note when accelerating and decelerating.
If you notice any unusual noises, stop the engine immediately and inspect the installation. Check for loose connections or any signs of misalignment. It’s crucial to address these issues promptly to prevent further damage to your vehicle’s exhaust system.
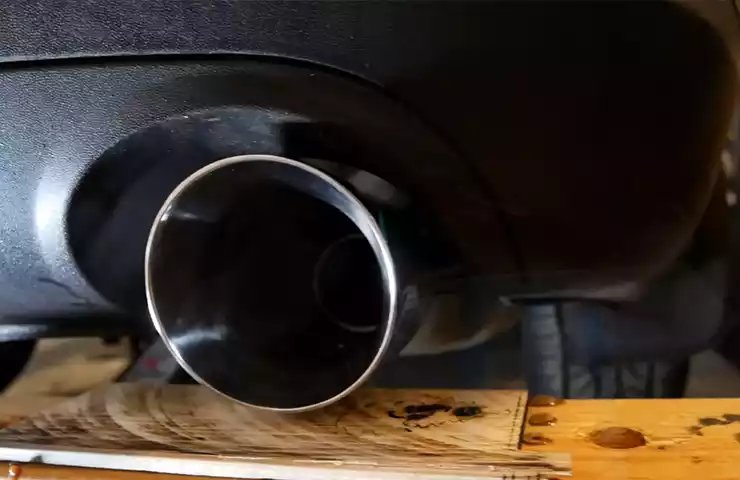
Inspect the Muffler Tip for Proper Alignment and Fit
Visually inspect the muffler tip to ensure it is properly aligned and fits snugly. The tip should be centered and aligned symmetrically with the rest of the exhaust system. A misaligned or loose muffler tip can lead to unwanted exhaust leaks, decreased performance, and potential damage to the exhaust components.
Take a moment to visually examine the tip’s position, making sure it is parallel to the ground and aligned with the rear bumper. Use your hands to gently wiggle the tip to confirm a secure fit. There should be minimal movement, indicating a tight connection.
Additionally, check for any gaps or uneven spacing between the muffler tip and the exhaust pipe. Proper alignment and fit will prevent exhaust leaks, ensuring optimal performance and longevity of your muffler system.
In conclusion, testing for leaks and alignment is a critical step after installing a muffler tip. By starting the vehicle and listening for unusual noises, as well as inspecting the tip for proper alignment and fit, you can identify any potential issues and address them promptly. This will help ensure a secure and efficient exhaust system that enhances your vehicle’s performance and adds a touch of style.
Regular Cleaning And Polishing
Regular cleaning and polishing are essential for maintaining the appearance of your muffler tip. Over time, the tip can accumulate dirt, grime, and even rust, which not only affects its aesthetic appeal but can also impact its overall performance. By regularly cleaning and polishing your muffler tip, you can keep it looking shiny and new, while also preventing any potential damage.
Use Recommended Cleaning Products
To effectively clean your muffler tip, it is important to use the right cleaning products. Avoid harsh chemicals or abrasive cleaners as they can damage the tip’s surface. Instead, opt for mild cleaning agents specifically designed for metal surfaces. Look for products that are safe for stainless steel or chrome, as these are common materials used in muffler tips. It’s always a good idea to check the manufacturer’s recommendations for cleaning products to ensure you are using the most suitable option.
Polish the Tip to Maintain its Appearance
In addition to regular cleaning, polishing your muffler tip can help maintain its appearance and shine. Polishing not only removes any remaining dirt or grime but also helps restore the tip’s original luster. There are several polishing compounds available in the market that are specifically formulated for metal surfaces. Apply a small amount of the polish onto a soft, lint-free cloth and gently rub it onto the tip. Use circular motions to evenly distribute the polish and work it into the surface. Afterward, use a clean cloth to remove any excess polish and buff the tip to a brilliant shine.
In Conclusion
Regular cleaning and polishing are essential for preserving the appearance of your muffler tip. By using recommended cleaning products and properly polishing the tip, you can ensure that it stays shiny and free from dirt, grime, and rust. Remember to always follow the manufacturer’s guidelines for cleaning and maintenance, as different materials may require specific care. By taking the time to care for your muffler tip, you can extend its lifespan and keep it looking its best for years to come.
Inspect For Damage And Rust
Before installing a muffler tip on your vehicle, it is crucial to thoroughly inspect it for any signs of wear, damage, or rust. This step is important to ensure that you are installing a tip that is in good condition and will enhance the overall appearance of your vehicle. Inspecting for damage and rust will also help prevent any further deterioration, prolonging the lifespan of your muffler tip.
Check for any Signs of Wear or Damage
When examining your muffler tip, carefully check for any visible signs of wear or damage. This can include dents, scratches, or any other physical abnormalities that may detract from the visual appeal of the tip. Furthermore, take note of any loose or missing parts, as these may affect the installation process and the overall performance of the tip.
One effective way to assess the condition of the muffler tip is by cleaning it thoroughly. Use a non-abrasive cleaner and a soft cloth to remove any dirt or grime. This will not only give you a clearer view of its surface but also help determine if there are any hidden damages that may have been concealed by dirt.
Address any Rust Issues Promptly
Rust is a common problem that can affect the appearance and functionality of your muffler tip. If you notice any signs of rust, it is important to address them promptly to prevent further corrosion. Rust can spread quickly and weaken the structure of the tip, ultimately leading to deterioration and potential leaks.
Start by inspecting the extent of the rust. If it is only superficial and limited to a small area, you may be able to remove it using a rust remover or steel wool. After removing the rust, apply a rust-inhibiting coating to prevent it from reoccurring. However, if the rust has penetrated the metal and caused significant damage, it may be necessary to replace the entire muffler tip.
In conclusion, before installing a muffler tip, inspect it for any signs of wear, damage, or rust. This will help ensure that you are installing a tip that is in good condition and will improve the overall appearance of your vehicle. Additionally, promptly addressing any rust issues will prevent further corrosion and prolong the lifespan of your muffler tip.
Avoid Harsh Cleaning Chemicals
When it comes to maintaining the appearance and longevity of your muffler tip, it’s important to avoid using harsh cleaning chemicals. These strong chemicals can cause damage to the surface of the tip, leading to corrosion and potentially ruining its overall aesthetic. Instead, opt for gentle cleaning solutions that will effectively remove dirt, grime, and other debris without causing harm.
Use Mild Soap and Water for Cleaning
One of the simplest and safest ways to clean your muffler tip is by using mild soap and water. This gentle combination is highly effective in removing dirt and residue, leaving your tip looking clean and shiny. To get started, fill a bucket with warm water and add a small amount of mild soap. Stir the mixture until it becomes soapy and then dip a soft sponge or cloth into the solution.
Make sure to scrub the entire surface of the muffler tip, paying special attention to any stubborn stains or areas with excessive grime buildup. Rinse the tip thoroughly with clean water to remove any soap residue. Finally, dry the tip completely using a soft, lint-free cloth to prevent any water spots or streaks from forming.
Avoid Chemicals that may Corrode the Tip
In order to protect your muffler tip from corrosion, it’s crucial to avoid using chemicals that could potentially cause damage. This includes any cleaning products containing harsh acids or abrasive substances. These chemicals have the potential to react with the surface of the tip, leading to corrosion and irreversible damage.
Instead, stick to mild and gentle cleaning solutions specifically formulated for automotive use. These products are designed to effectively clean without compromising the integrity of the metal. Always read the labels of any cleaning products to ensure they are safe for use on metal surfaces.
Additionally, it’s important to avoid using abrasive cleaning tools such as steel wool or harsh scrubbing brushes. These abrasive materials can scratch the surface of the muffler tip, making it more susceptible to corrosion. Stick to soft sponges or microfiber cloths that will effectively remove dirt without causing any damage.
Frequently Asked Questions On How To Install A Muffler Tip
How Do You Screw In Exhaust Tip?
To screw in an exhaust tip, follow these steps: 1. Locate the exhaust pipe on your vehicle. 2. Match the size of the exhaust tip to the pipe. 3. Apply a small amount of lubricant to the tip’s threads. 4.
Carefully align the tip and insert it into the pipe. 5. Rotate the tip clockwise until it is securely attached.
Will Muffler Tip Change Sound?
Yes, a muffler tip can change the sound of your car.
Are Exhaust Tips Easy To Fit?
Yes, exhaust tips are easy to fit. They require no special tools and can be easily installed by following simple instructions. Just slide the exhaust tip over the existing exhaust pipe and secure it in place. No professional help is needed, making it a hassle-free and quick DIY process.
Do You Have To Weld On Exhaust Tips?
No, welding on exhaust tips is not usually necessary. Most exhaust tips can be easily installed without welding, using clamps or other mounting methods. Welding may be required in some cases, depending on the specific vehicle and exhaust system, but it is not a common requirement.
Conclusion
Installing a muffler tip is a simple and effective way to enhance the appearance and sound of your vehicle’s exhaust system. By following the step-by-step guide provided in this blog post, you can easily complete the installation process yourself. Remember to gather the necessary tools and materials, take safety precautions, and refer to the manufacturer’s instructions for specific details.
With a little effort, you can achieve a customized and personalized look for your vehicle while also enjoying the benefits of improved exhaust performance. Start upgrading your muffler tip today and make your ride truly stand out.