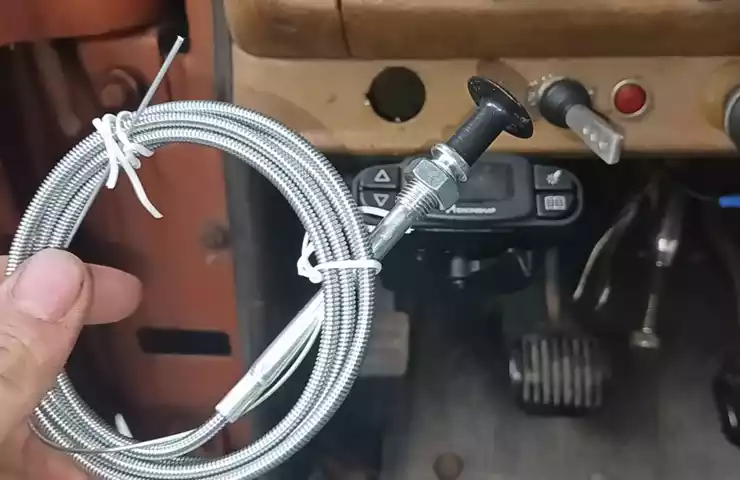
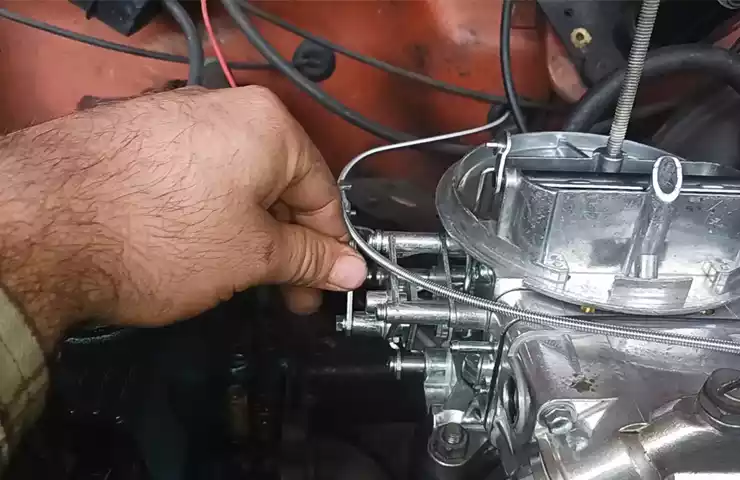
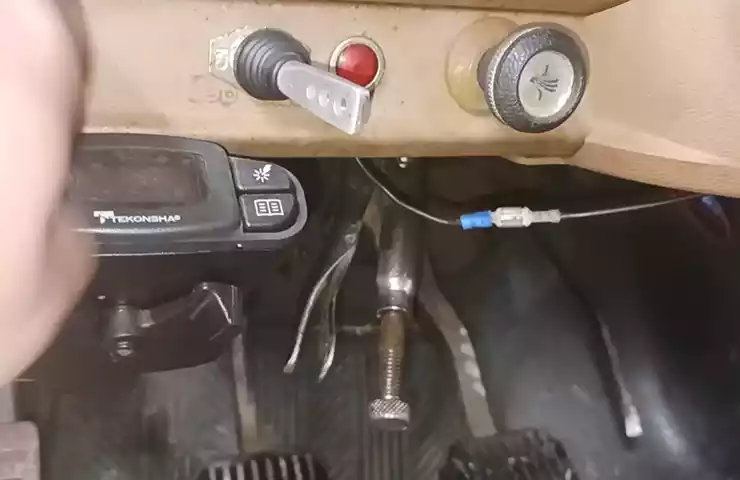
To install a manual choke, locate the carburetor, remove the automatic choke assembly, and attach the manual choke cable to the carburetor. A manual choke is a device that regulates the amount of air and fuel mixture entering the engine.
It allows the driver to manually control the air-fuel ratio, especially in cold weather conditions, to ensure smooth engine startup. Installation of a manual choke is a relatively straightforward process that requires a few simple steps. We will guide you through the necessary steps to install a manual choke, providing you with the knowledge and confidence to tackle this DIY project.
So, let’s get started and explore how to install a manual choke to enhance your engine’s performance and reliability.
Understanding The Manual Choke System
Welcome to this guide on how to install a manual choke! In this section, we will dive into the details of the manual choke system and explore what it is and how it works. Understanding the manual choke is essential for a successful installation, so let’s get started.
What is a Manual Choke?
A manual choke is a device found in older vehicles that controls the air-fuel mixture entering the engine. This system is designed to provide extra fuel to the engine when it is cold, allowing for easier starting and smoother idling. It consists of a choke plate and a manual control knob or lever located on the dashboard or the carburetor itself.
How does a Manual Choke Work?
To understand how a manual choke works, let’s break it down into a few key steps:
- The manual choke opens and closes a choke plate located within the carburetor.
- When the choke plate is closed, it restricts the flow of air into the engine.
- This restriction creates a higher vacuum, which draws more fuel into the engine.
- As the engine warms up, the choke plate gradually opens, allowing more air to enter and reducing the amount of fuel.
- Once the engine reaches its operating temperature, the choke plate should be fully open, providing the correct air-fuel mixture for smooth running.
It’s important to note that manual chokes require manual adjustment by the driver based on the engine’s temperature. In colder weather, the choke should be engaged to provide a richer fuel mixture, while in warmer weather, the choke should be disengaged for a leaner fuel mixture.
Now that we have a better understanding of the manual choke system, we can move on to the practical aspect of installing a manual choke. Stay tuned for the next section, where we will guide you through the installation process step by step.
Tools And Materials Needed
List of tools required
Introducing the tools and materials needed for installing a manual choke can help make the process more accessible for DIY enthusiasts and car owners. To ensure a smooth installation, it is essential to have the right tools and materials at hand. In this section, we will outline the necessary tools and materials needed for the installation of a manual choke. By having these items ready in advance, you can save time and ensure a successful installation. HTML Syntax Heading:
List of materials needed

Let’s dive into the list of materials required for the installation of a manual choke. Having these materials readily available before starting the installation process will streamline the entire process and make it easier to complete. Whether you are a seasoned DIY enthusiast or a beginner looking to learn, having the right materials will ensure a successful installation that will improve the performance and efficiency of your vehicle. Now, let’s take a closer look at the tools and materials required for installing a manual choke. HTML Syntax Table:
| Tools Required | |
|---|---|
| Socket wrench set | For tightening and loosening bolts |
| Screwdriver set | For removing and installing screws |
| Pliers | To grip and manipulate small components |
| Wire stripper | For stripping insulation from wires |
| Multimeter | To test electrical connections and continuity |
| Drill | For creating holes if needed |
HTML Syntax Table:
| Materials Needed | |
|---|---|
| Manual choke kit | To replace or install the new manual choke |
| Wiring connectors | For proper electrical connections |
| Electrical tape | To insulate electrical connections |
| Heat shrink tubing | For added electrical insulation and protection |
| Wire | To connect to the appropriate components |
Having the necessary tools and materials ready before installing a manual choke is crucial for a successful installation. Make sure you have a socket wrench and screwdriver set for easy access to bolts and screws. Pliers will come in handy for gripping and manipulating small components, while a wire stripper is essential for removing insulation from wires. Additionally, having a multimeter allows you to test electrical connections and continuity. If required, a drill can help create holes for a more customized installation. When it comes to materials, a manual choke kit is the main component needed to replace or install the new manual choke. Wiring connectors are essential for proper electrical connections, while electrical tape and heat shrink tubing provide insulation and protection for these connections. Lastly, having extra wire on hand will ensure you can connect the manual choke to the appropriate components seamlessly. By gathering these tools and materials beforehand, you can ensure a hassle-free installation process and enjoy the benefits of having a manual choke in your vehicle.
Step 1: Preparation
Before installing a manual choke in your car, it’s important to take the necessary safety precautions and familiarize yourself with the specific instructions found in your car’s manual. By following these steps, you can ensure a smooth and successful installation process.
Ensure Safety Precautions are Taken
Safety should always be your top priority when working on any vehicle. Before starting the installation process, make sure to adhere to these safety guidelines:
- Ensure the ignition is turned off and the key is removed from the ignition.
- Wear appropriate safety gear such as gloves and safety glasses to protect yourself from any potential hazards.
- Work in a well-ventilated area to prevent the inhalation of any harmful fumes.
- Keep a fire extinguisher close by in case of any unforeseen emergencies.
Review the Car’s Manual for Specific Instructions

Every car model is unique, so it’s crucial to review the specific instructions provided in your car’s manual. These instructions will give you insight into the correct installation process for your particular vehicle. Follow these steps to access the relevant information:
- Locate your car’s manual in the glove compartment or consult an online version provided by the manufacturer.
- Search for the section that discusses the carburetor and choking mechanism.
- Read the instructions carefully to understand the necessary tools, parts, and steps involved in installing a manual choke.
By reviewing the car’s manual, you’ll have a comprehensive understanding of how to proceed with the installation process. Make sure to note any specific warnings or precautions mentioned to avoid any potential complications.
Step 2: Locating The Choke Housing
Step 2: Locating the Choke Housing
In order to successfully install a manual choke, it is essential to locate the choke housing and understand its position. Identifying the exact location is crucial for accessing and making necessary adjustments to the choke mechanism. Here are the steps you need to follow to find the choke housing:
Identifying the choke housing location
The choke housing is typically situated on the side of the carburetor, near the air horn. It may vary depending on the make and model of the vehicle, so it is recommended to consult your vehicle’s manual or seek professional guidance if needed.
Accessing the choke housing
Once you have identified the choke housing’s general location, you can begin accessing it. Here’s how:
- Remove the air cleaner assembly: Before accessing the choke housing, it is often necessary to remove the air cleaner assembly. This assembly is usually held in place with screws or clamps. Carefully loosen or remove them to gain access to the carburetor.
- Inspect the carburetor: With the air cleaner assembly removed, you can now closely examine the carburetor. Look for the choke mechanism and the corresponding housing.
- Refer to the manual: If you are unsure about identifying the choke housing, consult your vehicle’s manual. It will provide detailed illustrations and explanations specific to your carburetor model.
- Ensure proper lighting: As you access the choke housing, make sure you have adequate lighting. This will help you see and understand the components better, ensuring a successful installation.
By following these steps, you will be able to locate and access the choke housing effectively. Now you can move on to the next steps of installing the manual choke in your vehicle.
Step 3: Removing The Old Choke
Step 3: Removing the Old Choke To successfully install a manual choke in your vehicle, it’s crucial to properly remove the old choke first. This step involves disconnecting the choke linkage and removing the mounting screws. Let’s walk through the process for each of these tasks. Disconnecting the choke linkage The first task in removing the old choke is disconnecting the choke linkage. This linkage connects the choke to the carburetor and allows it to open and close. To disconnect the linkage, follow these steps:
- Identify the choke linkage connected to the carburetor.
- Locate the retaining clip or screw securing the choke linkage.
- Use a pair of pliers or a screwdriver to remove the retaining clip or screw, depending on the type of fastener used.
- Once the retaining clip or screw is removed, gently disconnect the choke linkage from the carburetor.
Removing the mounting screws The next task is to remove the mounting screws that hold the old choke in place. These screws are typically located on the choke housing. Follow these steps to successfully remove the mounting screws:
- Locate the mounting screws holding the choke in place.
- Using the appropriate size screwdriver, loosen and remove each mounting screw one at a time.
- Be careful not to force or strip the screws, as this could cause damage to the choke housing or surrounding parts.
- Once all the mounting screws are removed, carefully lift the old choke out of its housing.
By following these steps, you can effectively remove the old choke from your vehicle. Remember to handle all parts with care to avoid any damage during the removal process. With the old choke successfully removed, you’re now ready to proceed to the next step of installing the new manual choke.
Step 4: Installing The New Choke
Now that you have successfully aligned the mounting holes and fastened the manifold, it’s time to install the new choke. This step is crucial in ensuring the proper functioning of your manual choke system. Follow these simple instructions to securely install the new choke and get your engine running smoothly.
Aligning the new choke with the mounting holes
To begin, carefully place the new choke mechanism onto the mounting bracket. Ensure that the choke aligns perfectly with the pre-drilled mounting holes on the bracket. This will ensure a proper fit and alignment of the choke with your vehicle’s intake manifold. If needed, you can refer to the manufacturer’s instructions or diagram to double-check the proper alignment of the choke. It’s important to get this step right, as any misalignment could result in improper functioning or even damage to the choke mechanism.
Fastening the new choke in place

Once the choke is properly aligned with the mounting holes, it’s time to secure it in place. Take the appropriate screws or bolts that came with the choke and carefully insert them through the mounting holes. Ensure that they are tightened enough to hold the choke firmly in place, but be careful not to overtighten as this could damage the mounting bracket or strip the threads. If there are any specific torque specifications provided by the manufacturer, be sure to follow them accordingly. This will help maintain the integrity of the choke mechanism and ensure its proper operation over time. After fastening the choke in place, give it a gentle tug or shake to make sure it is securely attached and does not wiggle or move. If everything looks good, you’re ready to move on to the next step in the installation process. By following these simple steps, you can easily install a manual choke and enjoy the benefits of having full control over your vehicle’s choke mechanism. Taking the time to align the choke properly and securely fasten it in place will ensure smooth operation and reliable performance. Get ready to experience improved engine starting and performance with your newly installed manual choke.
Step 5: Connecting The Choke Linkage
Attaching the choke linkage to the new choke
Now that you have the new choke installed, it’s time to connect the choke linkage. This step is crucial to ensure the proper functioning of the manual choke. Follow these simple steps:
- Step 1:
- Step 2:
- Step 3:
Adjusting the choke linkage tension
After connecting the choke linkage, it’s important to adjust the tension for optimum performance. Follow these steps:
- Step 1:
- Step 2:
- Step 3:
By following these steps, you can connect the choke linkage to the new manual choke and adjust the tension for optimal performance. Remember, a properly functioning choke is essential for starting your vehicle smoothly, especially in colder weather conditions.
Step 6: Testing And Adjusting
After successfully installing a manual choke, it’s essential to test and adjust it to ensure smooth operation. This step guarantees that your choke functions properly, allowing for easy starting and optimal engine performance. Here, we will walk you through the process of checking for smooth operation and making necessary adjustments.
Checking for smooth operation
Once the manual choke is installed, it’s crucial to investigate if it operates smoothly. Follow these steps to check for any issues:
- Start by visually inspecting the choke lever and linkage to ensure they are properly aligned and moving freely without any obstructions.
- Activate the choke by pulling the lever or pushing the button, depending on the choke mechanism you have installed.
- Observe the movement of the choke plate inside the carburetor. It should open and close smoothly without any sticking or hesitation.
- If you notice any sticking or hesitation, remove the air cleaner and carefully lubricate the choke linkage and pivot points with a suitable lubricant. This will enhance the smooth operation of the choke.
By thoroughly checking for smooth operation, you can ensure that the choke works efficiently, allowing for effortless starting of your engine.
Making necessary adjustments
During the testing process, if you find that the manual choke does not function as desired, you may need to make some adjustments. Follow these steps to fine-tune the choke:
- Identify the adjustment mechanism on your manual choke. It can be a ring, screw, or other type of adjustment mechanism.
- Depending on whether the choke plate is not closing completely or is closing too much, you will need to adjust the mechanism accordingly.
- If the choke plate does not close completely, tighten the adjustment mechanism in small increments until the plate fully closes.
- Conversely, if the choke plate is closing too much, loosen the adjustment mechanism incrementally until the plate opens to the desired position.
- Make sure to test the choke’s operation after each adjustment to ensure it opens and closes smoothly.
By properly adjusting the manual choke, you can optimize its performance and ensure it functions precisely according to your engine’s requirements.
Remember, a well-adjusted manual choke is essential for efficient starting and optimal engine performance. By carefully following the steps of testing and adjusting in this guide, you will be able to install and fine-tune your manual choke successfully.
Step 7: Final Checks And Tips

Now that you have successfully installed a manual choke in your vehicle, it’s important to perform some final checks and learn a few tips for maintaining the system. These measures will ensure that your manual choke operates smoothly and reliably for the long run.
Ensuring all connections are secure
Once you have installed the manual choke, it’s crucial to double-check that all the connections are secure. This will prevent any potential issues and ensure the proper functioning of the choke mechanism. Take the following steps to verify the connections: 1. Inspect the choke cable: Ensure that the choke cable is tightly connected to the choke mechanism and the dashboard control knob. A loose connection can lead to unreliable choke operation. 2. Check the intake manifold connection: Examine the connection point between the manual choke housing and the intake manifold. Make sure the housing is securely fastened using the provided screws or bolts. 3. Verify the electrical connections (if applicable): If your manual choke system includes any electrical components, such as a solenoid or light, inspect the electrical connections. Ensure that all wires are tightly connected and free from any damage or corrosion.
Tips for maintaining the manual choke system
To ensure the longevity and optimal performance of your manual choke system, here are a few tips to keep in mind: 1. Regular cleaning: Over time, the choke mechanism can accumulate dirt, debris, and lubricant residue. Periodically clean the choke housing and cable with a mild solvent to remove any buildup that may impede its operation. 2. Lubrication: Apply a small amount of white lithium grease or a suitable lubricant to the choke wire and mechanism. This will help to minimize friction and ensure smooth and effortless choke operation. 3. Inspection and adjustment: Routinely inspect the choke cable for any signs of wear or damage. If you notice any fraying or stiffness, consider replacing the cable to avoid future issues. 4. Testing the choke: Before each use, it’s a good practice to test the choke to ensure it’s working correctly. Start your vehicle and engage the choke. Observe how the engine reacts and adjust the choke as necessary for optimum starting and warm-up performance. Remember, the manual choke system is an essential component for starting your vehicle, especially in cold weather conditions. By following these final checks and maintenance tips, you can enjoy reliable and efficient choke operation for years to come. In conclusion, the installation of a manual choke is a valuable upgrade for any vehicle. By ensuring all connections are secure and implementing regular maintenance practices, you can optimize the performance of your choke system. So, go ahead and install a manual choke in your car, and experience the convenience and reliability it brings to your everyday drives.
Frequently Asked Questions On How To Install A Manual Choke
Can You Change Electric Choke To Manual?
Yes, you can change an electric choke to manual. This process involves replacing the electric choke with a manual one, which allows you to control the choke manually. It is a relatively simple modification that can be done with basic tools and mechanical knowledge.
How Do You Adjust A Manual Choke On A Carburetor?
To adjust a manual choke on a carburetor, locate the adjustment screw typically found on the side of the choke housing. Turn the screw clockwise to reduce choke tension and counterclockwise to increase it. Make gradual adjustments until the choke opens and closes smoothly.
Is Manual Choke Better?
A manual choke can offer more control over the fuel-to-air ratio, which may be beneficial in certain situations. It allows the driver to manually adjust the choke to ensure optimal starting and running of the engine.
How Do You Wire A Choke?
To wire a choke, follow these steps: 1. Identify the choke’s terminals and the wires you need to connect. 2. Strip the insulation from the wire ends. 3. Attach one wire to each terminal by twisting them together or using a screw or crimp connection.
4. Check that the connections are secure. 5. Finally, test the choke to ensure it is working properly.
Conclusion
To sum it up, installing a manual choke is not as daunting as it may seem. By following the step-by-step guide provided in this blog post, you can easily add this essential feature to your vehicle. Remember to gather all the necessary tools, carefully read the instructions, and take your time during the installation process.
With a functioning manual choke, you’ll have better control over your engine’s cold starts, ensuring smoother and more reliable performance. So go ahead and give it a try – your car will thank you. Happy installing!
