To install a kill switch on an outboard motor, locate the ignition switch wires, cut the wire leading to the ignition switch, and connect the kill switch in between the cut wires. Hello there!
If you own an outboard motor and want to enhance its safety features, installing a kill switch is a wise decision. A kill switch is a safety device that shuts off the motor in case the operator falls overboard or becomes incapacitated.
By taking a few simple steps, you can easily install a kill switch on your outboard motor. We will guide you on how to install a kill switch on an outboard motor, ensuring your safety while operating it. So, let’s dive in and learn the step-by-step process of installing a kill switch to make your boating experience safer.
Understanding The Importance Of A Kill Switch
**Understanding the Importance of a Kill Switch** H3: The function of a kill switch in an outboard motor Installing a kill switch on your outboard motor is crucial for the safety of yourself, your passengers, and other boaters on the water. A kill switch, also known as an emergency stop switch or engine cutoff switch, is designed to shut down the engine immediately in case the operator falls or is thrown overboard. This simple yet vital device can prevent accidents, injuries, and even fatalities. A kill switch consists of a lanyard that is attached to both the operator and the outboard motor. When the operator is wearing the lanyard properly, it remains taut and connected to the engine. However, if the operator falls into the water or is forcefully detached from the boat, the lanyard is pulled out of the kill switch, triggering an immediate engine shutdown. H3: The potential dangers of not having a kill switch Not having a kill switch on your outboard motor can expose you to various potential dangers that can quickly escalate into life-threatening situations. Without a kill switch, if the operator falls overboard or is ejected from the boat, the engine will continue to run, propelling the boat in a potentially hazardous trajectory, while unmanned. This can lead to collisions with other vessels, objects, or even people in the water. Furthermore, if the operator is unable to regain control of the boat after falling overboard, they may struggle to swim back to the boat while it is still in motion, increasing the risk of exhaustion, hypothermia, or drowning. Additionally, without a kill switch, attempting to reenter the boat from the water can become even more challenging, as the engine continues to run, posing a threat to the operator and anyone nearby. H3: Legal requirements for having a kill switch In many jurisdictions, the use of a kill switch in recreational boating is not only encouraged but also legally mandated. These regulations aim to ensure the safety of everyone on the water and reduce the risks associated with uncontrolled vessels. It is essential to familiarize yourself with the specific legal requirements in your region, as non-compliance can result in fines or penalties. For example, in some areas, boat operators are required by law to wear the kill switch lanyard while the boat is in motion. Others may have regulations stipulating the use of a kill switch when operating at high speeds or in specific waterways. Adhering to these legal requirements is not only a matter of compliance but also a responsible and proactive approach to boating safety. In conclusion, understanding the importance of a kill switch in your outboard motor is crucial to ensure the safety of yourself, your passengers, and other boaters on the water. By installing a kill switch, you can mitigate potential dangers, such as uncontrolled vessels, collisions, and further harm to individuals in the water. Additionally, complying with legal requirements will help avoid penalties and contribute to a safer boating community. Remember, investing in your safety today can make all the difference tomorrow. Stay safe on the water and enjoy your boating adventures responsibly!
Selecting The Right Kill Switch For Your Outboard Motor
Different types of kill switches available
When it comes to selecting the right kill switch for your outboard motor, there are several different types to choose from. Knowing the options available will help you make an informed decision that best suits your needs. Here are some of the most common types of kill switches:
- Magnetic kill switch: This type of kill switch operates using a magnet and a special reed switch. It is usually installed on the boat’s console and connected to the engine. When the magnet is separated from the reed switch, the circuit is broken, and the engine shuts off.
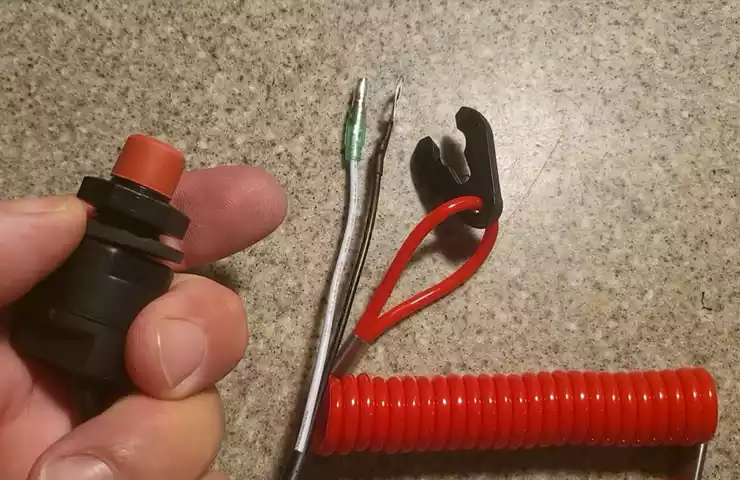
- Push-button kill switch: A push-button kill switch is a simple and convenient choice. It is often attached to a lanyard that you wear around your wrist or attach to your clothing. In case of an emergency, if you fall or are thrown overboard, the lanyard will detach from the switch, shutting off the engine instantly.
- Wireless kill switch: This modern and innovative option relies on wireless technology. It consists of a transmitter that you carry with you and a receiver connected to the engine. The transmitter sends a signal to the receiver, and if the connection is lost, the engine shuts down automatically.
Factors to consider when choosing a kill switch
Choosing the right kill switch involves considering various factors to ensure it meets your requirements. Here are some key considerations:
- Boat size and layout: Determine the size and layout of your boat to choose a kill switch that fits well and has the appropriate length of lanyard or wire.
- Personal preference: Consider which type of kill switch aligns with your personal preferences and comfort level. Some people prefer the simplicity of a push-button kill switch, while others may prefer the convenience of a wireless option.
- Reliability and durability: Look for a kill switch that is known for its reliability and durability, ensuring it can withstand harsh weather conditions and regular use without fail.
- Installation ease: Choose a kill switch that is easy to install, enabling you to set it up without any technical difficulties.
- Price: Determine your budget and find a kill switch that offers a good balance of quality and affordability.
Compatibility with your specific outboard motor
One of the most crucial aspects to consider when selecting a kill switch is its compatibility with your specific outboard motor. Each outboard motor may have different requirements, so it is essential to ensure the kill switch you choose is compatible with your particular engine model.
Check the manufacturer’s guidelines or consult with a boating expert to find out which kill switch models are recommended for your outboard motor. This will help you avoid any compatibility issues and ensure that the kill switch functions seamlessly with your engine.
In conclusion, selecting the right kill switch for your outboard motor involves understanding the different types available, considering important factors, and ensuring compatibility with your specific engine model. By taking these steps, you can install a kill switch that provides added safety and peace of mind during your boating adventures.
Step-By-Step Guide To Installing A Kill Switch
Installing a kill switch on your outboard motor is a crucial safety measure that every boat owner should consider. A kill switch is designed to shut down the engine in the event of an emergency, preventing accidents and injuries. In this step-by-step guide, we will walk you through the process of installing a kill switch on your boat, ensuring that you have all the necessary tools and materials, locate the optimal position, mount the kill switch, and connect it to the outboard motor.
Gathering the necessary tools and materials
Before you begin the installation process, it’s important to gather all the necessary tools and materials:
- Kill switch kit (includes the switch, lanyard, and mounting hardware)
- Screwdriver
- Drill and drill bits
- Wire cutter/stripper
- Electrical tape
- Marine-grade wiring
- Crimping tool
- Zip ties
Locating the optimal position for the kill switch
The next step is to locate the optimal position for the kill switch on your boat. This is typically near the helm or steering position, where it can be easily reached in case of an emergency. Consider factors such as visibility, accessibility, and comfort when choosing the location.
Here are a few tips to help you find the optimal position:
- Ensure that the kill switch is within reach of the driver while seated.
- Place it in a visible and easily noticeable location, preferably in a spot where it won’t be accidentally bumped or hit.
- Make sure the surface where you plan to mount the kill switch is clean and dry, allowing for a secure installation.
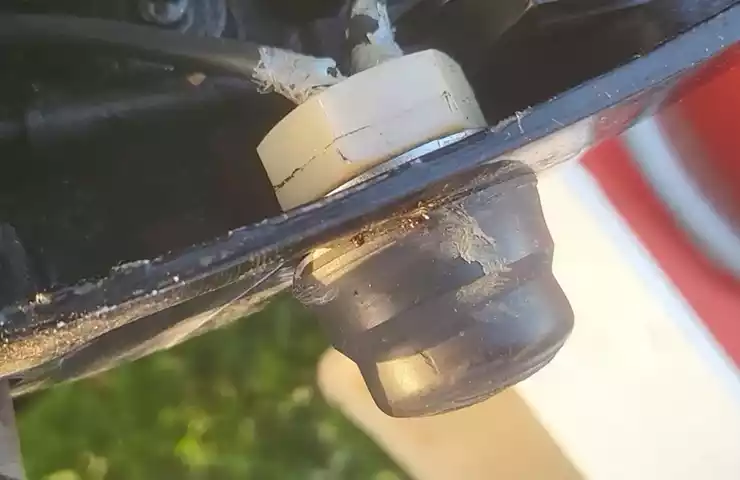
Mounting the kill switch on the boat
Once you have determined the optimal position for the kill switch, it’s time to mount it on your boat. Follow these steps:
- Using a screwdriver or drill, attach the kill switch bracket to the chosen location. Make sure it is securely fastened.
- Slide the kill switch into the bracket and ensure that it locks into place.
- Test the switch by gently pulling the lanyard to make sure it functions properly.
- Tighten any loose screws and ensure that the kill switch is firmly mounted.
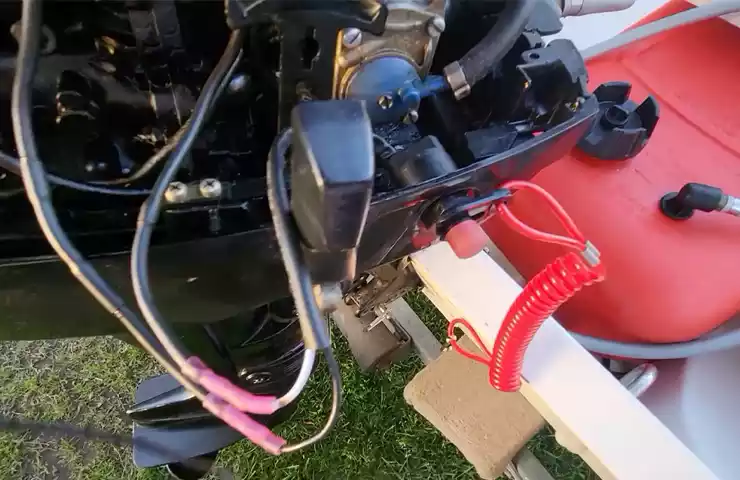
Connecting the kill switch to the outboard motor
Now it’s time to connect the kill switch to the outboard motor. Follow these steps:
- Locate the emergency stop switch or kill switch connector on your outboard motor.
- Using wire cutters, strip the wire insulation from both the kill switch wire and the connector wire.
- Twist the exposed ends of the wires together and use a crimping tool to secure them tightly.
- Wrap the connection with electrical tape to provide insulation and protect against moisture.
- Secure the wires with zip ties to prevent them from coming loose or getting damaged.
Congratulations! You have successfully installed a kill switch on your outboard motor. Remember to test the functionality of the switch before taking your boat out on the water. Safety should always be a top priority, and a kill switch is an essential component in ensuring a safe boating experience.
Testing And Ensuring Proper Functioning
Once you have successfully installed a kill switch on your outboard motor, it is crucial to test and verify its proper functioning. This step is essential to ensure that the kill switch will effectively shut off the engine in case of an emergency. In this section, we will outline three key steps to test and ensure the kill switch is working as expected.
Verifying the electrical connection
The first step in testing the kill switch is to verify the electrical connection. This connection is responsible for transmitting the signal from the kill switch to the engine, triggering the shutdown mechanism. To check the electrical connection:
- Inspect the wiring harness for any signs of wear or damage. Make sure all the connections are secure and free from corrosion.
- With the engine off, disconnect the kill switch from its harness.
- Using a multimeter, set it to continuity mode and touch the probes to the terminals on the back of the kill switch.
- If the multimeter beeps or shows continuity, it indicates that the electrical connection is intact. However, if there is no continuity, you may need to check the wiring or replace the kill switch.
Checking for proper engagement and disengagement
After ensuring the electrical connection is sound, the next step is to check for proper engagement and disengagement of the kill switch. This ensures that the switch activates the engine shutdown mechanism and disengages it when necessary. To perform this check:
- Start the engine and let it run idle.
- With the engine running, firmly attach the kill switch to your body or life jacket. This action should immediately shut off the engine.
- Detach the kill switch, and the engine should restart.
- Repeat this process a few times to ensure consistent engagement and disengagement.
Conducting a test run to ensure the kill switch works
Once you have verified the electrical connection and confirmed the proper engagement and disengagement of the kill switch, it is important to conduct a test run to ensure its functionality while the boat is in motion. Follow these steps:
- Start the engine and allow it to idle.
- Attach the kill switch to your body or life jacket.
- Slowly increase the throttle and observe the engine’s response.
- When the throttle is suddenly released, the engine should immediately shut off, indicating the kill switch successfully activates the engine shutdown mechanism.
- Repeat this process at various speeds to confirm consistency.
By verifying the electrical connection, checking for proper engagement and disengagement, and conducting a test run, you can be confident in the functioning of your kill switch. Remember, regular testing and maintenance of your kill switch is crucial for the safety of both yourself and your passengers while out on the water.
Maintaining And Troubleshooting Your Kill Switch
As with any important component of your outboard motor, your kill switch requires regular maintenance to ensure it remains in good working condition. This vital safety feature can save lives in emergency situations by immediately shutting down the engine. By following a few simple steps, you can keep your kill switch functioning optimally and troubleshoot any issues that may arise.
Regular maintenance to keep the kill switch in good condition
Maintaining your kill switch is relatively easy and can be done with a few simple steps:
- Regularly inspect the kill switch for any signs of wear and tear, such as frayed wires or loose connections. Make sure everything is securely fastened.
- Remove any dirt or debris that may have accumulated around the kill switch or on the ignition system. This will prevent any interference with the switch’s operation.
- Periodically test the kill switch to ensure it is functioning correctly. This can be done by activating the kill switch while the engine is running and observing if the engine immediately shuts off.
- If you notice any issues or suspect a problem with the kill switch, it is recommended to consult your outboard motor’s manual for specific instructions on maintenance and testing.
Common issues with kill switches and possible solutions
Despite regular maintenance, kill switches can sometimes experience issues. Here are a few common problems and their potential solutions:
| Issue | Solution |
|---|---|
| The kill switch does not shut off the engine. | Check the connection between the kill switch and the ignition system. Ensure there are no loose wires or faulty connections. If necessary, replace the kill switch. |
| The kill switch is unresponsive. | Inspect the kill switch for any signs of damage or wear. Clean the switch and surrounding area to remove any debris or dirt. If the issue persists, consider replacing the kill switch. |
| The kill switch activates randomly. | Inspect the wiring harness for any signs of damage, and ensure that it is securely connected. If the issue persists, seek professional help to identify and rectify any underlying electrical problems. |
Seeking professional help when necessary
If you encounter persistent issues with your kill switch despite troubleshooting, it is important to seek professional assistance. Electrical systems can be complex, and attempting repairs without the proper knowledge and expertise can result in further damage or safety risks.
A certified marine technician will have the necessary skills to diagnose and resolve any underlying issues with your kill switch. They can also provide expert advice on maintaining and troubleshooting your outboard motor’s safety components.
By regularly maintaining your kill switch, addressing common issues promptly, and seeking professional help when needed, you can ensure the safety and effectiveness of this crucial safety mechanism on your outboard motor.
Frequently Asked Questions On How To Install A Kill Switch On An Outboard Motor
Can You Install Kill Switch Yourself?
Yes, you can install a kill switch yourself. Take caution and follow the instructions to ensure proper installation.
Do You Need A Kill Switch On Outboard Motor?
Yes, it is important to have a kill switch on an outboard motor. A kill switch is a safety feature that automatically stops the engine if the operator falls overboard, which can prevent accidents and injuries.
Do I Have To Install A Kill Switch On My Boat?
Installing a kill switch on your boat is strongly recommended for safety purposes. It helps in emergency situations by enabling you to quickly shut off the engine. This can prevent accidents, injuries, and even fatalities. Don’t compromise on the safety of yourself and others, install a kill switch on your boat.
What Does A Kill Switch Do On An Outboard?
A kill switch on an outboard engine is a safety feature that instantly stops the engine when activated. It is usually attached to the operator’s wrist or clothing. When the switch is pulled or disconnected, it cuts off power to the engine, preventing accidents or injuries in emergencies.
Conclusion
To wrap it up, installing a kill switch on an outboard motor is a crucial step towards ensuring safety and control on the water. By following the step-by-step instructions provided in this blog post, you can easily equip your boat with this important safety feature.
Remember, a kill switch not only provides peace of mind but can also save lives in case of emergencies. Stay safe and enjoy your boating adventures!