Installing a front license plate bracket is a simple process that involves positioning the bracket on the front of the vehicle and securing it with screws or fasteners. This installation allows for legal placement of a front license plate, ensuring compliance with local regulations and preventing potential fines or penalties.
Ensure that the bracket is correctly aligned and securely attached to the vehicle’s front bumper or grille according to the manufacturer’s instructions. Following these steps will help you install a front license plate bracket effectively.
Factors To Consider When Selecting A Front License Plate Bracket
Installing a front license plate bracket is an essential task for vehicle owners who want to comply with the law. From ensuring the front license plate is clearly visible to protecting its surface, the right bracket can make all the difference. Before diving into the installation process, it’s important to consider a few factors that can affect your overall satisfaction with the bracket. Let’s explore these factors in more detail:
Vehicle Compatibility
One of the first things to consider is the compatibility of the front license plate bracket with your vehicle. Different vehicles have different mounting locations and dimensions for the front license plate. It’s crucial to ensure that the bracket you choose is specifically designed for your make and model. Failure to select a compatible bracket may result in an improper fit or even damage to your vehicle’s front bumper.
Mounting Options
When choosing a front license plate bracket, it’s important to consider the available mounting options. Some brackets may require drilling into your vehicle’s front bumper, while others may utilize existing screws or adhesive options for a more seamless installation. Each option has its pros and cons, so assessing your comfort level with drilling into the bumper or your desire for a non-invasive installation will help guide your decision.
Material and Durability
The material and durability of the front license plate bracket should also be taken into consideration. Since the bracket will be exposed to various weather conditions, it’s crucial to select a bracket made from high-quality materials that can withstand the elements. Common materials include sturdy plastic, stainless steel, and aluminum. Additionally, the bracket should be durable enough to withstand normal wear and tear, as well as potential impact from minor accidents or bumps.
By considering these factors, you can ensure that the front license plate bracket you select is not only compatible with your vehicle but also meets your personal preferences and durability requirements. Now that we’ve explored the factors to consider let’s move on to the installation process.
Researching And Locating The Correct Front License Plate Bracket
When it comes to installing a front license plate bracket on your vehicle, one of the first steps you’ll need to take is finding the correct one that fits your specific make and model. Researching and locating the correct front license plate bracket may seem like a daunting task, but with the right information and resources, it can be a breeze. In this section, we’ll explore different options to help you in your search.
Manufacturer’s Recommendations and Catalogs
One of the most reliable sources for finding the correct front license plate bracket is through the manufacturer’s recommendations and catalogs. Manufacturers often provide detailed information about the compatibility of their brackets with different vehicle models. To find this information, visit the manufacturer’s website or check the owner’s manual that came with your vehicle. Look for sections that specifically discuss front license plate brackets and their corresponding part numbers.
If you can’t find the information on their website or in the manual, contacting the manufacturer’s customer support can also be helpful. They can provide you with specific recommendations and may even guide you to authorized dealerships or retailers who carry the correct bracket for your vehicle.
Online Retailers and Marketplaces
Another convenient option for finding the correct front license plate bracket is to search online retailers and marketplaces. These platforms offer a wide range of products from various sellers, making it easier to find options specific to your vehicle.
Start by searching for your vehicle’s make and model, along with the keywords “front license plate bracket.” This will help narrow down the results and show you products that are compatible with your vehicle. Make sure to read product descriptions carefully and check customer reviews to ensure quality and proper fit.
Popular online retail platforms and marketplaces that you can explore include:
| Website | Description |
| Amazon.com | Offers a wide selection of front license plate brackets from various sellers |
| eBay.com | Provides a marketplace for both new and used front license plate brackets |
| Walmart.com | Offers a range of affordable front license plate brackets |
Automotive Specialty Stores
If you prefer to shop in-person and seek expert advice, visiting automotive specialty stores is a great option. These stores specialize in automotive accessories and parts, and their knowledgeable staff can help you find the correct front license plate bracket for your vehicle.
Some well-known automotive specialty stores that you can check out include:
- AutoZone
- Advance Auto Parts
- O’Reilly Auto Parts
They stock a wide range of front license plate brackets and can assist you in locating the right one for your vehicle. Don’t forget to mention your vehicle’s make and model to ensure accurate assistance.
When researching and locating the correct front license plate bracket, remember to refer to the manufacturer’s recommendations and catalogs, explore online retailers and marketplaces, and visit automotive specialty stores for expert guidance. By utilizing these resources, you’ll be on your way to installing the perfect front license plate bracket for your vehicle.
Tools Required For Front License Plate Bracket Installation
When it comes to installing a front license plate bracket on your vehicle, having the right tools is crucial. By using the appropriate tools, you can ensure a smooth and hassle-free installation process. In this section, we will discuss the essential tools you need to have on hand before you begin installing a front license plate bracket.
Screwdriver
One of the most important tools you will need for installing a front license plate bracket is a screwdriver. This tool is essential for removing any existing screws or bolts from the front of your vehicle and attaching the bracket securely. Make sure you have a variety of screwdriver sizes on hand to accommodate different types of screws.
Drill
In some cases, you may need to drill holes in your vehicle’s front bumper to install the license plate bracket. A drill will come in handy for this task. Ensure that you have a drill with the appropriate drill bit size for the screws or bolts you will be using. Additionally, having a set of drill bits in various sizes will give you flexibility in case you encounter different hole sizes.
Socket Set
Another tool that will be useful during the installation process is a socket set. This set will allow you to tighten and loosen nuts and bolts efficiently. It usually includes a range of socket sizes to fit different fasteners. By having a socket set, you will be able to ensure a secure and stable attachment of the license plate bracket to your vehicle.
Before starting the installation process, gather all the necessary tools mentioned above. Having them readily available will save you time and frustration during the installation. Now that you know what tools you need, let’s move on to the next step: gathering the materials for the front license plate bracket installation.
Materials Required For Front License Plate Bracket Installation
Installing a front license plate bracket is a simple task that can be done in just a few steps. To get started, you will need a few materials to ensure a successful installation. Here are the materials that you will need:
Front License Plate Bracket
The first and most important material you will need is the front license plate bracket itself. This bracket is specifically designed to hold and mount your license plate securely onto the front of your vehicle. It is typically made of durable materials such as stainless steel or ABS plastic to withstand any weather conditions.
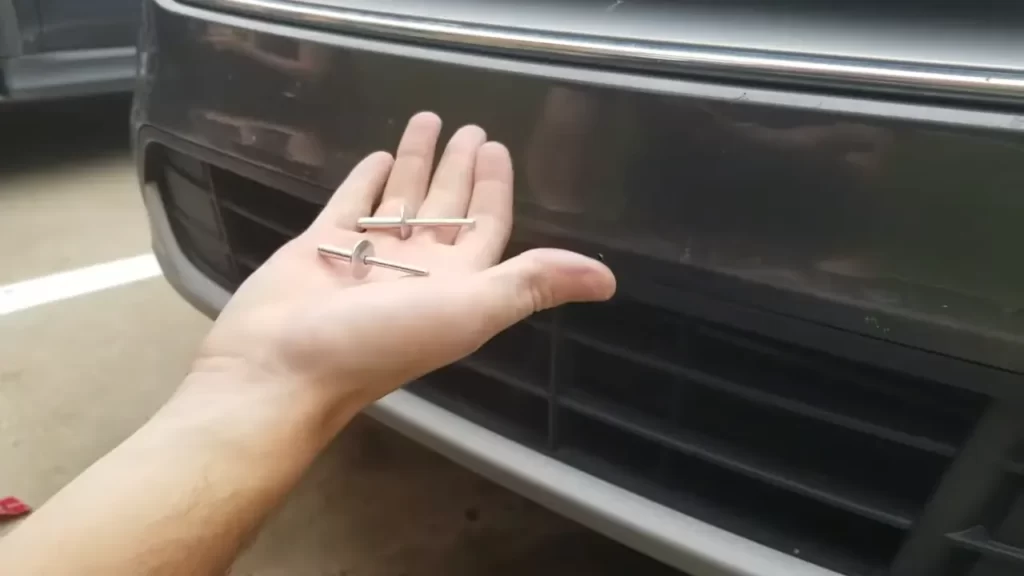
License Plate Bolts or Screws
Next, you will need license plate bolts or screws to attach the license plate to the bracket. These fasteners come in different sizes and styles, so make sure you choose ones that are compatible with your bracket and license plate. Stainless steel bolts or screws are often recommended for their durability and resistance to rust.
Mounting Hardware (if not provided with the bracket)
In some cases, the front license plate bracket may come with its own mounting hardware. However, if it is not included, you will need additional mounting hardware to secure the bracket onto your vehicle. This may include brackets, brackets, washers, and nuts. Consult the bracket’s instructions or a professional if you are unsure of the specific mounting hardware needed for your vehicle.
Rubber Gasket or Foam Pads (if required for vehicle protection)
Lastly, depending on your vehicle’s surface and requirements, you may need a rubber gasket or foam pads to protect your vehicle from scratches or damage caused by the bracket. These protective materials act as a buffer between the bracket and the vehicle’s surface, ensuring a snug fit while preventing any harm to the paint or finish.
Having gathered these materials, you are now ready to proceed with the installation of your front license plate bracket. Follow the manufacturer’s instructions provided with the bracket, and always refer to your vehicle’s manual for any specific guidelines or considerations.
Preparing The Vehicle For Installation
Preparing the vehicle for installation is an important step when it comes to installing a front license plate bracket. Taking the time to properly prepare the vehicle ensures a secure and long-lasting installation. In this section, we will discuss how to identify the right mounting location and prepare the surface if necessary.
Identifying the Right Mounting Location
Before installing a front license plate bracket, it’s crucial to identify the right mounting location on your vehicle. The front bumper or grille area is typically the most common spot. However, be sure to consult your vehicle’s owner’s manual or check local regulations to ensure compliance with any specific requirements.
To identify the right mounting location:
- Locate the existing holes or pre-marked areas on the bumper or grille where the bracket can be attached. Some vehicles may already have designated spots for front license plates.
- Measure and double-check the spacing between the mounting holes to ensure proper alignment. Use a measuring tape or ruler for accurate measurements.
- Consider the distance from the ground to ensure the license plate is visible and doesn’t obstruct any important features like sensors or air vents.
- If your vehicle doesn’t have pre-drilled holes or markings, use a pencil or masking tape to mark the desired position.
Preparing the Surface
If the chosen mounting location requires preparing the surface, it’s essential to do so before attaching the front license plate bracket. Preparing the surface helps ensure a strong and secure attachment.
To prepare the surface:
- Clean the area with mild soap and water to remove any dirt, grime, or wax that might hinder the adhesive or screws’ effectiveness.
- Dry the surface thoroughly with a clean, lint-free cloth to prevent any moisture or residue.
- If the surface has any rough spots or imperfections, use a fine-grit sandpaper to smooth it out. Be gentle to avoid damaging the paint or finish.
- For smooth or slightly textured surfaces, consider using an alcohol-based cleaner to remove any remaining contaminants, ensuring better adhesion.
- Once the surface is clean and smooth, wipe it down again with a clean cloth to remove any dust or debris.
Installing The Front License Plate Bracket
When it comes to installing a front license plate bracket on your vehicle, it is essential to ensure that it is positioned, aligned, and secured properly. In this guide, we will walk you through the steps of how to install a front license plate bracket on your vehicle, focusing on the subheading: Installing the Front License Plate Bracket. We will cover the important steps, from positioning and aligning the bracket to securing it using bolts, screws, or other mounting hardware, and finally tightening the fasteners.
Positioning and Aligning the Bracket
In order to position and align the front license plate bracket correctly, follow these steps:
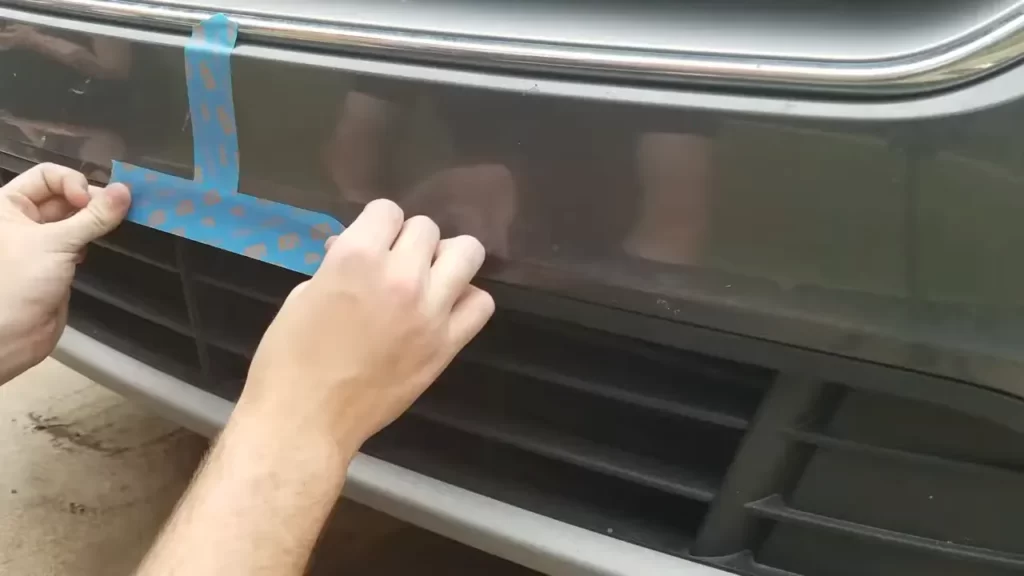
- Start by locating the front bumper of your vehicle. It is important to choose a spot that complies with your local regulations and does not obstruct the vehicle’s lights or grille. Consult your vehicle’s manual or local regulations for specific guidelines.
- Once you have determined the appropriate position, hold the front license plate bracket up to the front bumper and align it with the mounting holes or slots on the bracket with those on the bumper.
- Ensure that the bracket is level and centered properly. Use a measuring tape or level to make sure the bracket is straight and not slanted.
- Once you are satisfied with the positioning and alignment, mark the mounting hole locations on the bumper using a marker or pencil.
Securing the Bracket to the Vehicle
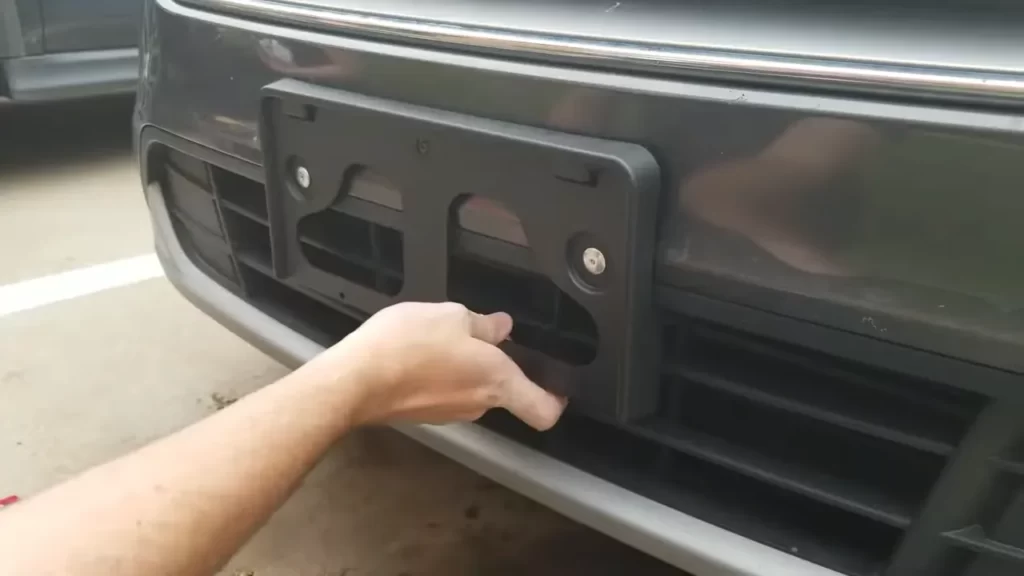
Now that you have positioned and aligned the front license plate bracket, it’s time to secure it to your vehicle.
- Use a drill with an appropriate drill bit to create pilot holes at the marked locations on the bumper. This will prevent the bumper from cracking or splitting during installation.
- Place the front license plate bracket back onto the bumper, aligning the mounting holes with the pilot holes you created.
- Secure the bracket to the bumper by using bolts, screws, or other mounting hardware provided with the bracket. Refer to the manufacturer’s instructions for the specific type and size of hardware to use.
- Tighten the hardware firmly but avoid over-tightening, as this could damage the bracket or the bumper.
Tightening the Fasteners
Once you have secured the front license plate bracket to your vehicle, it is important to ensure that all the fasteners are tightened properly. Follow these steps:
- Using a wrench or screwdriver, tighten each bolt, screw, or fastener on the bracket until they are snug.
- Check for any loose or wobbly fasteners and tighten them further if necessary.
- Make sure all the fasteners are tightened evenly to distribute the pressure and ensure a secure fit.
- Double-check the bracket’s alignment and positioning to ensure it has not shifted during the tightening process.
By following these steps, you can successfully install a front license plate bracket on your vehicle. Remember to consult your local regulations and vehicle manual for any specific guidelines or requirements.
Final Steps And Considerations
Now that you have successfully attached the license plate bracket to your vehicle’s front bumper, it’s time to focus on the final steps and considerations. These steps ensure that your license plate is securely attached, properly aligned, and offers sufficient clearance. By following these instructions, you can ensure that your license plate is both legal and safe.
Attaching the License Plate to the Front License Plate Bracket
Once the front license plate bracket is securely installed, it’s time to attach the license plate itself. Here’s a step-by-step guide:
- Place the license plate onto the bracket, making sure that the mounting holes line up with the bracket’s holes.
- Insert the screws or bolts through the holes in the license plate and thread them into the bracket.
- Tighten the screws or bolts snugly, but be careful not to overtighten and risk damaging the license plate or bracket.
- Double-check that the license plate is straight and not crooked.
By attaching the license plate securely and ensuring it is straight, you’ll not only meet legal requirements but also maintain a visually appealing appearance.
Checking for Proper Alignment and Clearance
Once the license plate is attached to the front license plate bracket, it’s crucial to check for proper alignment and clearance. Follow these steps to ensure accuracy:
- Stand back and visually inspect the license plate from different angles.
- Ensure that the license plate is centered horizontally and vertically within the bracket.
- Confirm that the license plate doesn’t obstruct any exterior lights, such as headlights or turn signals.
- Verify that the license plate offers sufficient clearance from other vehicle components, including the front grille, bumper, and any sensors.
Proper alignment and clearance are vital not only for legal compliance but also for avoiding any potential damage to your vehicle or obstruction of critical safety features.
Verifying the Bracket’s Stability and Security
Before considering the installation complete, it’s essential to verify the stability and security of the front license plate bracket. Follow these steps:
- Gently push and pull on the license plate to ensure it doesn’t wobble or move excessively.
- Inspect the bracket and mounting hardware to confirm they remain securely fastened to the vehicle.
- Ensure that the license plate bracket doesn’t interfere with any moving parts or hinder the vehicle’s airflow.
By completing these final checks, you can rest assured that your front license plate bracket is stable, secure, and capable of withstanding everyday driving conditions.
Following these final steps and considerations will not only help you install a front license plate bracket correctly but also contribute to maintaining the aesthetic appeal and functionality of your vehicle. Take the time to ensure proper attachment, alignment, clearance, and stability – a small investment that goes a long way. Enjoy your newly installed front license plate bracket with confidence!
Regular Cleaning And Inspection
Regular cleaning and inspection of your front license plate bracket is essential to maintain its functionality and appearance. By removing dirt, debris, and corrosion and checking for loose or damaged components, you can ensure that your license plate bracket remains securely in place and free from any issues that may arise over time. In this section, we will discuss how to effectively perform these tasks to keep your front license plate bracket in top condition.
Removing Dirt, Debris, and Corrosion

To start, it is important to regularly remove any accumulated dirt, debris, and corrosion from your front license plate bracket. These substances can not only make your license plate bracket look unsightly but can also affect its performance. Here are some steps to follow:
- Using a soft cloth or sponge, dampen it with water and gently wipe the surface of the license plate bracket to remove any loose dirt and debris.
- If there are stubborn stains or hardened debris, you can use a mild detergent or automotive cleaner diluted in water. Apply the cleaning solution to the cloth or sponge and gently scrub the affected areas.
- After cleaning, rinse the license plate bracket thoroughly with clean water to remove any remaining cleaning solution.
- Finally, dry the bracket completely with a clean towel or allow it to air dry before reattaching your license plate.
By regularly removing dirt, debris, and corrosion, you can help prevent any potential damage to the license plate bracket and ensure that it remains visually appealing.
Checking for Loose or Damaged Components
In addition to cleaning, it is crucial to inspect your front license plate bracket for any loose or damaged components. This will help prevent any issues such as the license plate becoming loose or even falling off while driving. Follow these steps to check the bracket:
- Visually inspect the license plate bracket for any signs of looseness or damage. Look for cracks, breaks, or bent components.
- Ensure that all screws or bolts securing the license plate bracket are tight and snug. Use a suitable tool, such as a wrench or screwdriver, to tighten them if needed.
- If you notice any damaged or missing components, such as screws or brackets, it is crucial to replace them promptly to maintain the proper function of the license plate bracket.
Regularly checking for loose or damaged components will help you catch any issues early on and address them before they escalate and potentially lead to more significant problems.
In conclusion, regular cleaning and inspection of your front license plate bracket is vital to ensure its longevity and functionality. By removing dirt, debris, and corrosion, and checking for loose or damaged components, you can keep your license plate bracket in excellent condition. Remember to perform these tasks at regular intervals as part of your vehicle maintenance routine.
Troubleshooting Common Issues With Front License Plate Brackets
Installing a front license plate bracket on your vehicle is an essential step in ensuring compliance with local laws and regulations. However, just like with any installation, issues may arise that require troubleshooting. In this section, we will explore some of the most common problems that drivers encounter when installing a front license plate bracket and provide simple solutions to help you overcome them.
Loose or Vibrating Bracket
One common issue that vehicle owners face after installing a front license plate bracket is a loose or vibrating bracket. This can not only compromise the aesthetics of your vehicle but also create an annoying noise while driving. To address this problem, follow these steps:
- Inspect the fasteners: Check if the fasteners securing the bracket to the vehicle are securely tightened. Use a wrench or screwdriver to tighten them if necessary. Note that over-tightening may cause damage to the bracket or vehicle.
- Use rubber grommets or washers: To reduce vibrations, place rubber grommets or washers between the bracket and the vehicle’s surface. These will help absorb shocks and prevent the bracket from loosening during everyday driving.
- Consider adhesive solutions: If your license plate bracket continues to vibrate despite tightening the fasteners and using rubber grommets, you may want to explore adhesive solutions. Adhesive-backed foam strips or double-sided mounting tape can further secure the bracket and minimize vibrations.
h3>
Damaged or Lost Fasteners
Another issue that can arise when installing a front license plate bracket is the damage or loss of fasteners. These small components are crucial for securely attaching the bracket to your vehicle. Here are some troubleshooting steps to address this specific problem:
- Check the spare hardware: If you have a spare parts kit that came with the bracket, check if there are any replacement fasteners included. These can be used to replace the damaged or lost ones.
- Visit a local hardware store: If you do not have spare fasteners, visit a nearby hardware store to find suitable replacements. Bring along one of the intact fasteners to ensure you get the correct size and type.
- Consider alternative fasteners: In some cases, the original fasteners may not be readily available. In such situations, consider using alternative options such as zip ties, adjustable straps, or stainless steel screws and nuts. However, always ensure that any alternative fasteners you use are secure and comply with local regulations.
Bracket Interfering with Vehicle Components
In rare cases, the front license plate bracket may interfere with other vehicle components, such as sensors or air vents. This can affect the functionality or aesthetics of your vehicle. To troubleshoot this issue, follow these guidelines:
- Reposition the bracket: Try repositioning the front license plate bracket to find a placement that avoids interfering with any vehicle components. Carefully measure and adjust the position of the bracket until you find a suitable location.
- Seek professional assistance: If repositioning the bracket does not solve the problem or if you are unsure about making adjustments yourself, it is recommended to seek assistance from a professional installer or your vehicle’s dealership. They can provide expert guidance on avoiding interference with vehicle components while still adhering to legal requirements.
By addressing these common issues that may arise during the installation of a front license plate bracket, you can ensure a hassle-free and compliant solution. Following the troubleshooting steps outlined here will help you overcome challenges and enjoy a properly installed front license plate bracket on your vehicle.
Frequently Asked Questions For How To Install A Front License Plate Bracket
How Do You Attach A Front License Plate Without Drilling Holes?
To attach a front license plate without drilling holes, use removable adhesive strips or a license plate holder that attaches to your vehicle’s grille or bumper. These options provide a secure and damage-free solution.
Should I Drill Holes For Front License Plate?
Yes, drilling holes for a front license plate is necessary to ensure legal compliance and proper installation. It is important to follow your local regulations, as some states require front license plates. Installing the license plate securely can prevent fines and ensure visibility for identification purposes.
What If My Car Doesn T Have A Front License Plate Holder In California?
In California, it is mandatory to have a front license plate holder on your car. Failure to install one can result in a fine or penalty. Make sure to follow state regulations to avoid any legal issues on the road.
How To Install Honda Front License Plate Bracket?
To install a Honda front license plate bracket, follow these steps: 1. Gather the necessary tools. 2. Position the bracket on the front of the vehicle. 3. Attach the bracket using screws or clips. 4. Securely fasten the license plate to the bracket.
5. Double-check for proper alignment and tightness.
Conclusion
Installing a front license plate bracket is a simple task that can be done by anyone. By following the step-by-step guide outlined in this blog post, you can ensure that your license plate is secure and properly displayed. Remember to check your local laws and regulations regarding license plate placement.
With the easy-to-follow instructions provided here, you can quickly and effortlessly install the front license plate bracket on your vehicle, giving you the peace of mind knowing you are in compliance with the law.