To install a flip kit on a Chevy truck, follow these steps precisely. This article will provide you with a straightforward guide to seamlessly install a flip kit on your Chevy truck.
Whether you’re a seasoned mechanic or a do-it-yourself enthusiast, this step-by-step guide will ensure a successful installation. By following these instructions, you will have your Chevy truck equipped with a flip kit in no time. So, let’s get started with the installation process and transform your truck’s suspension for a more aggressive look and improved performance.
Understanding The Flip Kit And Its Benefits
Welcome to our comprehensive guide on installing a flip kit on your Chevy truck! In this section, we will explore the flip kit’s purpose and the numerous benefits it can offer to enhance your Chevy truck’s performance. Whether you’re a seasoned truck enthusiast or a beginner looking to upgrade your vehicle, understanding how a flip kit works and the advantages it provides is crucial.
Introduction to the Flip Kit
The flip kit is an aftermarket suspension modification that allows you to raise or lower the rear of your Chevy truck. It consists of several components, including brackets, shackles, and hangers, designed to alter the position of the rear axle. This modification can effectively increase ground clearance or lower the truck’s stance to achieve a desired aesthetic look or improve performance.
Explanation of How the Flip Kit Improves Performance
The flip kit’s primary purpose is to optimize your Chevy truck’s suspension and significantly improve its performance. By altering the center of gravity and suspension geometry, the flip kit provides several performance benefits, including:
- Improved Handling: A properly installed flip kit can enhance your truck’s stability, reducing body roll and improving overall handling. This is especially beneficial when towing heavy loads or navigating tight corners.
- Enhanced Traction: With the rear axle properly aligned and weight distributed more evenly, a flip kit can improve traction, particularly when accelerating or driving on uneven terrains. This added traction ensures that your Chevy truck stays firmly planted on the road.
- Better Weight Distribution: Installing a flip kit alters the suspension dynamics, allowing for better weight distribution between the front and rear axles. This improved balance can minimize rear-end sag, optimize braking performance, and reduce premature wear on tires.
- Increased Ground Clearance: For off-road enthusiasts, raising the rear end of your Chevy truck using a flip kit offers increased ground clearance. This enables your vehicle to conquer rough terrains without bottoming out, protecting vital components from potential damage.
Discussing the Benefits of Installing a Flip Kit
Now that we’ve explored the technical improvements a flip kit can offer, let’s delve into the overall benefits it brings to your Chevy truck:
- Customization: With a flip kit, you have the flexibility to achieve your desired truck height, whether you prefer a lowered, leveled, or lifted appearance. This level of customization allows you to create a personalized and unique look for your Chevy truck.
- Improved Aesthetics: By altering the stance of your truck, a flip kit can significantly enhance its visual appeal. Whether you’re aiming for a sportier look or a more aggressive off-road appearance, the flip kit provides endless possibilities to transform the overall aesthetics of your Chevy truck.
- Budget-Friendly: Compared to other suspension modifications, a flip kit is a cost-effective way to improve your truck’s performance. It often provides a great value for the benefits it offers, allowing you to achieve optimal performance without breaking the bank.
- Easy Installation: Designed with ease of installation in mind, a flip kit can be installed relatively quickly, especially with the help of our step-by-step installation guide. This means you can hit the road in no time and start enjoying the enhanced performance and aesthetics of your Chevy truck.
Now that we’ve covered the fundamentals and benefits of a flip kit, you’re well-equipped to make an informed decision about whether it’s the right modification for your Chevy truck. Stay tuned for the next section, where we will dive into the installation process and provide detailed instructions to guide you through every step.
Gathering The Required Tools And Materials
Before you embark on installing a flip kit on your Chevy truck, it is crucial to gather all the necessary tools and materials. By doing so, you can ensure a smooth and hassle-free installation process. In this section, we will guide you through creating a checklist of tools needed as well as identifying the specific materials required for the flip kit installation.
Creating a checklist of tools needed for the installation process
Having the right tools is essential for a successful flip kit installation. To help you stay organized and prepared, we recommend creating a checklist of the tools you will need. Here’s a breakdown of the key tools required:
| Tool | Description |
|---|---|
| Jack and jack stands | To safely lift and support the truck |
| Socket set | To remove and install bolts and nuts |
| Wrench set | To tighten and loosen various components |
| Torque wrench | To ensure precise tightening of bolts |
| Hammer | To help loosen stubborn parts, if necessary |
| Power drill | If modifications or drilling are required |
| Safety equipment: gloves, goggles, and ear protection | To protect yourself while working |
Identifying the specific materials required for the flip kit
installation
In addition to the essential tools, you will need specific materials for the flip kit installation. Here is a list of the materials:
- Flip kit (varies depending on the specific truck model)
- U-bolts and hardware
- Shackles
- Bushings
- Grease for lubrication
It is important to ensure that the flip kit and other materials you purchase are suitable for your Chevy truck’s make and model. Double-check the compatibility before proceeding with the installation.
Tips for ensuring all necessary tools and materials are readily available
To avoid any delays or interruptions during the installation process, here are a few tips for ensuring all the necessary tools and materials are readily available:
- Create a checklist: Use the above list to create your own checklist and tick off each item as you gather them.
- Double-check compatibility: Before purchasing the flip kit and other materials, ensure they are compatible with your Chevy truck’s specific make and model.
- Organize the workspace: Clear your workspace and organize your tools and materials in a visible and easily accessible manner.
- Prepare backup tools: In case a tool malfunctions or is lost, having backup tools readily available can prevent unnecessary delays.
- Read the installation guide: Familiarize yourself with the installation guide provided with the flip kit to gain a better understanding of the process and any additional tools or materials that may be required.
By following these tips, you can minimize the chances of encountering any setbacks during the installation process and ensure a smoother experience overall.
Preparing The Vehicle For Installation
Before starting the installation of a flip kit on your Chevy truck, it is crucial to adequately prepare the vehicle. This includes taking specific measures to ensure safety, stability, and accessibility. By following these steps, you can make the installation process smoother and reduce the risk of accidents or injuries.
Ensuring the truck is parked on a flat surface
The first step in preparing the vehicle for installation is to ensure that it is parked on a flat surface. This is essential for maintaining stability during the installation process and ensuring the safety of both yourself and the truck. Before starting any work, carefully park your Chevy truck on a level ground, such as a driveway or a garage floor, to avoid any unnecessary complications.
Precautionary measures to protect against potential injuries
Safety should always be a top priority when working on any vehicle. To protect yourself from potential injuries, it is essential to take precautionary measures. Wear the appropriate safety gear, including gloves and protective eyewear, to shield yourself from any harm. Additionally, ensure that you have a first-aid kit readily available in case of any unforeseen accidents. By taking these precautionary measures, you can minimize the risk of injury and complete the installation process safely.
Securing necessary lifting equipment for the vehicle
Lifting the truck is a crucial part of the installation process. To do this properly and safely, you will need to secure the necessary lifting equipment. This may include a floor jack, jack stands, and other lifting tools suitable for your specific Chevy truck model. Before starting the installation, double-check that you have all the required lifting equipment and ensure it is in good working condition. This will ensure that you can safely raise the truck to the appropriate height and provide ample clearance for the installation of the flip kit.
Following these steps to prepare your Chevy truck for the flip kit installation will ensure a smooth and safe process. By ensuring the truck is parked on a flat surface, taking precautionary measures to protect against potential injuries, and securing the necessary lifting equipment, you are well on your way to successfully installing the flip kit on your Chevy truck.
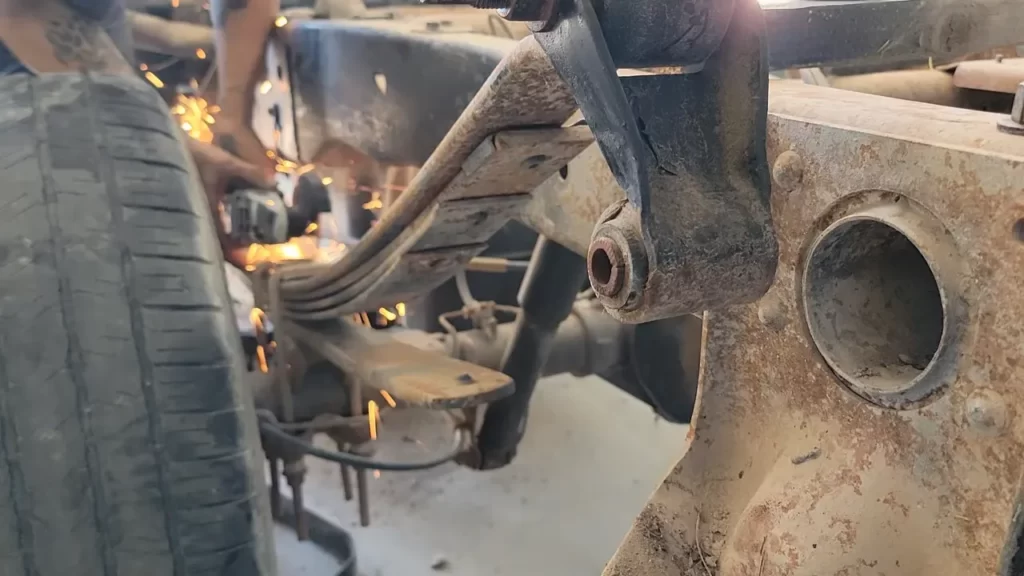
Removing The Old Leaf Springs
Step-by-step instructions for safely removing the existing leaf springs
When it comes to installing a flip kit on your Chevy truck, one of the crucial steps is removing the old leaf springs. This process requires a systematic approach to ensure safety and efficiency. Here are the step-by-step instructions:
- Begin by jacking up the rear end of the truck using a reliable floor jack. Make sure the truck is securely supported by jack stands to prevent any accidents.
- Next, locate the mounting bolts that connect the leaf springs to the truck’s frame. These bolts can be found near the shackles at both ends of the leaf springs.
- Using a suitable socket and ratchet, start removing the mounting bolts. It is recommended to start with the lower, easier-to-reach bolts first.
- As you remove the bolts, ensure proper support for the leaf springs. Use a floor jack or a friend to provide support and prevent any unwanted movement or accidents.
- Once the mounting bolts are removed, carefully lower the floor jack or let your friend support the weight of the leaf springs.
- With the leaf springs removed, inspect them for any signs of damage or wear. This is an excellent opportunity to assess whether they need replacement before proceeding with the flip kit installation.
Tips for handling the removal process efficiently
The process of removing the old leaf springs can be challenging, but with these tips, you can handle it efficiently:
- Ensure you have all the necessary tools, including a reliable floor jack, jack stands, socket set, and ratchet, before starting the removal process. This will save you time and frustration.
- Wearing safety goggles and gloves is essential to protect yourself from any potential hazards during the removal process.
- Applying penetrating oil or rust dissolver to the mounting bolts a day in advance can help loosen any stubborn rust and make the removal process smoother.
- Labeling or taking pictures of the leaf spring components and their placement before removal can simplify the reinstallation process later.
- Working in a well-lit and spacious area will provide better visibility and maneuverability during the leaf spring removal.
Highlighting potential challenges and how to overcome them
While removing the old leaf springs, you may encounter certain challenges. Here are some of the common ones and how to overcome them:
| Challenge | Resolution |
|---|---|
| Tight or corroded mounting bolts | Apply penetrating oil or rust dissolver and use an impact wrench or breaker bar to loosen the bolts. If necessary, heat the bolt with a torch to break the rust seal. |
| Insufficient clearance to remove the leaf springs | Lower the truck’s axle by carefully releasing pressure from the floor jack. This will create enough space to remove the leaf springs without damaging any surrounding components. |
| Difficulty supporting the weight of the leaf springs | Enlist the help of a friend to hold the leaf springs in place or use a floor jack with a piece of wood as support. |
By following these step-by-step instructions, implementing the provided tips, and being prepared for potential challenges, you can safely and efficiently remove the old leaf springs from your Chevy truck in preparation for the installation of a flip kit.
Installing The Flip Kit
When it comes to enhancing the suspension performance of your Chevy truck, installing a flip kit is a popular and effective modification. A flip kit can dramatically improve the truck’s appearance and towing capabilities. In this article, we will guide you through the step-by-step process of installing a flip kit on your Chevy truck. By following these instructions, you’ll be able to give your truck the lift it needs for a more aggressive stance and improved handling.
Outlining the steps for installing the flip kit properly
To ensure a successful installation, it’s crucial to follow the correct steps. Here’s a simplified outline of the process:
- Begin by preparing your truck: Park it on a level surface, engage the parking brake, and place wheel chocks behind the wheels.
- Next, lift the rear of the truck using a jack and secure it on jack stands. Make sure the truck is stable and has enough clearance for you to work comfortably underneath it.
- Begin removing the rear leaf springs one at a time. This can be done by removing the U-bolts, nuts, and other connecting hardware. Take your time and ensure each component is safely detached.
- Once the leaf springs are removed, you can install the flip kit. Align the kit properly, making sure the rear axle is centered and the kit is positioned correctly.
- Tighten all the hardware that comes with the flip kit, using a torque wrench to ensure proper tightness. Double-check all the connections and make adjustments if necessary.
- Finally, lower the truck and test it by driving it around. Pay attention to any unusual noises or handling issues. If everything feels solid and performs as expected, congratulations! You have successfully installed the flip kit on your Chevy truck.
Explaining the key components of the flip kit and their
functions
A flip kit consists of several important components that work together to lift the rear suspension and improve overall performance. Here are the key components and their functions:
| Component | Function |
|---|---|
| Flip brackets | These brackets are designed to flip the leaf springs, effectively lowering the rear end of the truck. |
| U-bolts | U-bolts secure the leaf springs to the axle, providing stability and preventing the springs from shifting during operation. |
| Hardware | The hardware includes nuts, bolts, and washers that are used to secure different components of the flip kit together. |
| Shackles | Shackles connect the leaf springs to the truck’s frame, allowing for controlled movement and articulation. |
Tips for aligning and positioning the flip kit accurately
Proper alignment and positioning of the flip kit are essential for optimal performance and longevity. Here are some tips to help you align and position the flip kit accurately:
- Before installing the flip kit, measure the distance between the axle and the frame to ensure everything is aligned correctly.
- Use a plumb line and a measuring tape to verify that the axle is centered and parallel to the frame before tightening the hardware.
- Double-check all the connections after installing the flip kit and make any necessary adjustments to achieve the desired alignment.
- Consider enlisting the help of a professional or an experienced friend to assist you during the installation process. They can provide valuable guidance and ensure everything is positioned accurately.
By following these tips, you can ensure that the flip kit is aligned and positioned accurately, resulting in a smoother ride and improved handling for your Chevy truck.
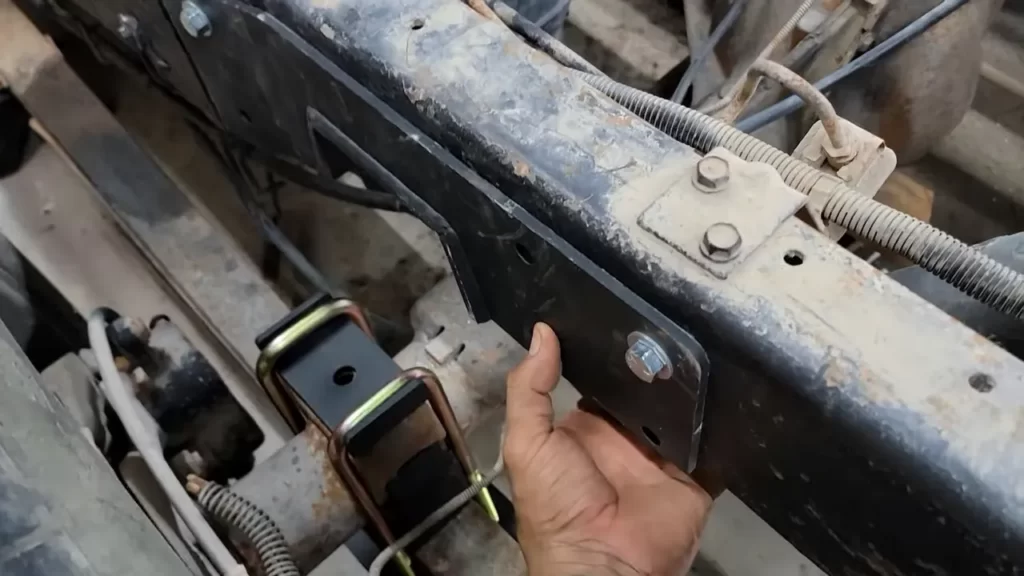
Attaching The New Leaf Springs
After successfully removing the old leaf springs from your Chevy truck, it’s time to move on to attaching the new ones. This step is crucial in ensuring a secure and proper installation of your flip kit. In this section, we will provide you with step-by-step instructions on securely attaching the new leaf springs, discussing the proper techniques for tightening and fastening the components, and highlighting the importance of ensuring proper alignment and positioning.
Step-by-step instructions for securely attaching the new leaf springs
To attach the new leaf springs to your Chevy truck, follow these step-by-step instructions:
- Start by positioning the new leaf springs in the correct location on the chassis of your truck. Ensure that they are aligned properly and positioned symmetrically. This will help maintain the stability and overall performance of your vehicle.
- Next, insert the U-bolts through the holes in the leaf spring bracket. Make sure that the U-bolts are positioned correctly around the axle, securing it firmly in place.
- Once the U-bolts are in position, place the leaf spring plate on top of them. This plate will help distribute the weight and forces evenly across the leaf springs and prevent any damage or stress concentration.
- Now, tighten the nuts onto the U-bolts. Use a torque wrench to ensure that the nuts are tightened to the manufacturer’s recommended torque specification. This will help prevent any loosening or potential failures in the future.
- After tightening the nuts, check the alignment of the leaf springs and ensure that they are in the correct position. Make any necessary adjustments, if required, to ensure a proper fit and alignment.
- Finally, repeat the same process for the other side of the truck, attaching the new leaf springs symmetrically.
Discussing the proper techniques for tightening and fastening the components
When it comes to tightening and fastening the components of your new leaf springs, it is crucial to follow the proper techniques. This ensures a secure and safe attachment, preventing any potential issues or failures down the road. Proper Techniques for Tightening and Fastening:
- Use a torque wrench to tighten the nuts onto the U-bolts. This helps ensure that the nuts are tightened to the manufacturer’s recommended torque specification, avoiding over or under-tightening.
- Tighten the nuts in a diagonal pattern, moving from one side to the other. This technique helps distribute the tension evenly across the components, minimizing the risk of any imbalances or stress concentration.
- Double-check the tightness of the nuts after a few hundred miles of driving. The vibrations and forces experienced on the road may cause some minor loosening initially, so it’s important to re-tighten the nuts as necessary.
Highlighting the importance of ensuring proper alignment and positioning
Ensuring proper alignment and positioning of the new leaf springs is of utmost importance. Proper alignment helps maintain the stability and performance of your Chevy truck, while correct positioning ensures that the weight is evenly distributed across the leaf springs. Importance of Proper Alignment and Positioning:
- Improper alignment can lead to uneven tire wear, compromised handling, and decreased stability.
- Inadequate positioning can cause unnecessary stress concentrations and potential failures in the leaf springs.
- By maintaining proper alignment and positioning, you’re maximizing the lifespan and performance of your flip kit.
By following these step-by-step instructions, using the proper techniques for tightening and fastening, and ensuring proper alignment and positioning, you can securely and successfully attach the new leaf springs to your Chevy truck. Remember to always refer to the manufacturer’s instructions and recommended torque specifications for your specific flip kit model.
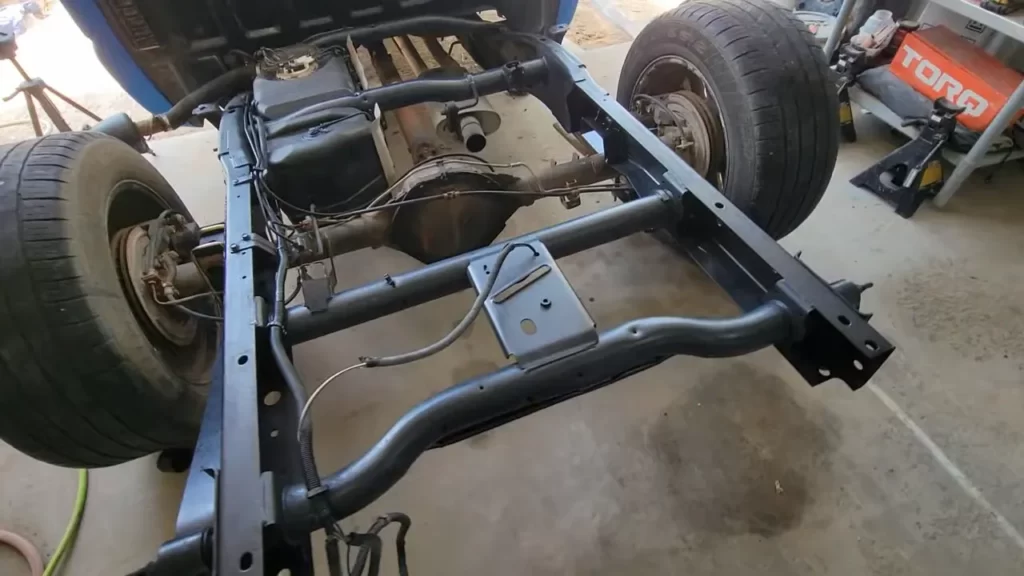
Performing Final Adjustments And Checks
As you near the end of the flip kit installation process on your Chevy Truck, there are a few important final adjustments and checks to perform to ensure the suspension system operates optimally. By properly adjusting the suspension, conducting a thorough inspection, and testing its functionality, you can achieve the desired ride height and ensure the stability of your truck.
Adjusting the suspension to achieve the desired ride height
Once all the components of the flip kit are installed, it’s time to focus on adjusting the suspension to achieve the desired ride height. This step plays a vital role in ensuring your truck maintains optimal ground clearance and that the suspension operates smoothly.
To adjust the suspension, start by measuring the current ride height of your Chevy Truck before the flip kit installation. This baseline measurement will serve as a reference point for adjustments. Using the appropriate tools, carefully adjust the rear axle and suspension components according to the manufacturer’s guidelines. Make small incremental changes and measure the ride height after each adjustment until you achieve the desired height.
Conducting a thorough inspection to ensure all components are properly installed
After adjusting the suspension, it’s crucial to conduct a thorough inspection to ensure all the components of the flip kit are properly installed. This inspection will help identify any loose or improperly secured parts that may affect the functionality of the suspension system.
Start by visually inspecting all the nuts, bolts, and brackets to verify that they are tightened to the recommended torque specifications. Pay close attention to the flip kit components, including the C-notch, leaf springs, and shackles, to ensure they are securely in place and aligned correctly. Additionally, inspect the new U-bolts for proper installation, making sure they are tightened evenly.
Testing the suspension system to confirm its functionality and stability
Once the adjustment and inspection are complete, it’s time to test the suspension system to confirm its functionality and stability. Testing the suspension will help you identify any potential issues or adjustments that may still need to be made.
Start by taking your Chevy Truck for a short test drive, paying attention to the overall ride quality, handling, and stability. Observe if the truck is sitting at the desired ride height and if it feels balanced. Take note of any unusual noises, vibrations, or excessive bouncing that may indicate a problem with the suspension. If any issues are detected during the test drive, revisit adjustment and inspection steps to address them accordingly.
Remember, it’s important to follow the manufacturer’s instructions and guidelines throughout the installation, adjustment, inspection, and testing processes to ensure the proper functioning and safety of your Chevy Truck’s suspension system.
Proper Care And Maintenance Of The Flip Kit
Once you have installed a flip kit on your Chevy truck and achieved the desired lift, it’s crucial to understand the importance of proper care and maintenance to ensure its longevity and optimal performance. By following a regular inspection and maintenance routine, you can prevent potential issues and keep your flip kit functioning flawlessly.
Tips for maintaining the flip kit to ensure longevity and optimal performance:
To ensure your flip kit remains in top condition, consider implementing the following tips:
- Regular cleaning: Keep the flip kit clean and free from debris by regularly washing it with mild soap and water. This will help prevent corrosion and maintain its appearance.
- Inspection of components: Periodically inspect all components of the flip kit, including shackles, hangers, and bolts. Look for signs of wear, loosening, or damage, and address any issues promptly.
- Proper lubrication: Lubricate the flip kit components as recommended by the manufacturer to prevent friction and ensure smooth operation. Pay particular attention to the pivot points and bushings.
- Tightening bolts: Check and tighten all bolts and fasteners regularly. Vibrations from driving can cause them to become loose over time, compromising the stability and performance of the flip kit.
- Alignment check: Periodically have the alignment of your Chevy truck checked, especially after installing a flip kit. This will help prevent uneven tire wear and ensure proper handling.
Recommended frequency for inspection and maintenance tasks:
Performing regular inspections and maintenance tasks is essential to detect and address any issues early on. The frequency of these tasks will vary depending on usage, driving conditions, and the specific instructions provided by the flip kit manufacturer. As a general guideline, consider the following:
| Inspection/Maintenance Task | Recommended Frequency |
|---|---|
| General cleaning | Every 1-2 months or as needed |
| Component inspection | Every 3-6 months or as recommended by the manufacturer |
| Lubrication | Every 6-12 months or as recommended by the manufacturer |
| Bolt tightening | Every 3-6 months or as needed |
| Alignment check | After installation and periodically thereafter |
Discussing common issues that may arise and how to address them:
Despite proper care and maintenance, certain issues may still arise with your flip kit. Understanding these common issues and their solutions can help you address them efficiently:
- Excessive noise: If you notice excessive noise during normal driving, it could indicate loose components. Check for any loose bolts or worn-out bushings and tighten or replace them as necessary.
- Poor handling or uneven tire wear: These issues may suggest a misalignment or incorrect installation of the flip kit. Have a professional mechanic inspect and, if needed, readjust the flip kit to restore optimal handling and prevent tire wear.
By following the recommended care and maintenance routine for your flip kit, you can ensure its longevity, enhance your Chevy truck’s performance, and enjoy a smooth and safe driving experience for years to come.
Troubleshooting Guide For Common Problems
Installing a flip kit on your Chevy Truck can be an exciting upgrade that gives your vehicle improved performance and enhanced aesthetics. However, like any modification, it can sometimes come with its fair share of challenges. In this troubleshooting guide, we will discuss some common issues that may occur after installing a flip kit on your Chevy Truck and provide you with step-by-step instructions to diagnose and resolve these problems. Let’s dive in.
Identifying common issues that may occur after installing a flip kit
After installing a flip kit on your Chevy Truck, it’s important to be aware of potential problems that may arise. By recognizing these issues early on, you can take appropriate steps to address them and avoid further complications. Here are some common problems you might encounter:
| Common Issues |
|---|
| Limited Suspension Travel |
| Excessive Noise or Vibration |
| Poor Ride Quality |
Step-by-step instructions for diagnosing and resolving these problems
To help you diagnose and resolve the common issues that may occur after installing a flip kit on your Chevy Truck, follow these step-by-step instructions:
- Limited Suspension Travel: Check if your bump stops are properly adjusted and not restricting the suspension movement. Adjust or replace them if necessary.
- Excessive Noise or Vibration: Inspect the installation of the flip kit to ensure all bolts and components are tightened securely. Additionally, check for any loose or worn-out parts that may be causing the noise or vibration. Replace or repair as needed.
- Poor Ride Quality: Evaluate the condition of your shocks and leaf springs. If they are worn out or damaged, replace them with high-quality replacements suitable for your Chevy Truck model. Also, consider upgrading to adjustable shocks for better ride control.
Providing additional resources for troubleshooting more complex issues
If you encounter more complex issues or need further assistance with troubleshooting, it’s always helpful to seek additional resources. Here are some valuable sources you can refer to:
- Online forums dedicated to Chevy Truck enthusiasts
- Manufacturer’s official website for the flip kit you installed
- Professional mechanics or suspension specialists who have experience with flip kits on Chevy Trucks
By utilizing these resources, you can gain insights, advice, and solutions from others who have encountered similar problems with their flip kit installations. Remember, it’s important to thoroughly research and understand your Chevy Truck model and the specific flip kit you installed for a successful troubleshooting process.
Addressing common problems after installing a flip kit on your Chevy Truck is essential to ensure optimal performance and longevity of your vehicle. By following the troubleshooting guide outlined above and seeking additional resources when needed, you’ll be well-equipped to resolve any issues that arise and get back on the road with confidence.
Frequently Asked Questions For How To Install A Flip Kit On Chevy Truck
What Does A Flip Kit Do To A Truck?
A flip kit is an aftermarket component that raises the rear end of a truck, resulting in a higher ground clearance. It is commonly used to enhance the truck’s overall appearance, increase towing capacity, and accommodate larger tires.
How Much Drop Is A Flip Kit?
A flip kit typically lowers a vehicle’s rear-end drop by a specific amount, typically around 4 to 6 inches.
Do You Need Ac Notch For A Flip Kit?
No, you do not need an AC notch for a flip kit.
What Does An Axle Flip Kit Do?
An axle flip kit is a device used to raise the ride height of a trailer by flipping the axle. It improves ground clearance, making it easier to navigate uneven terrain and preventing damage to the trailer.
Conclusion
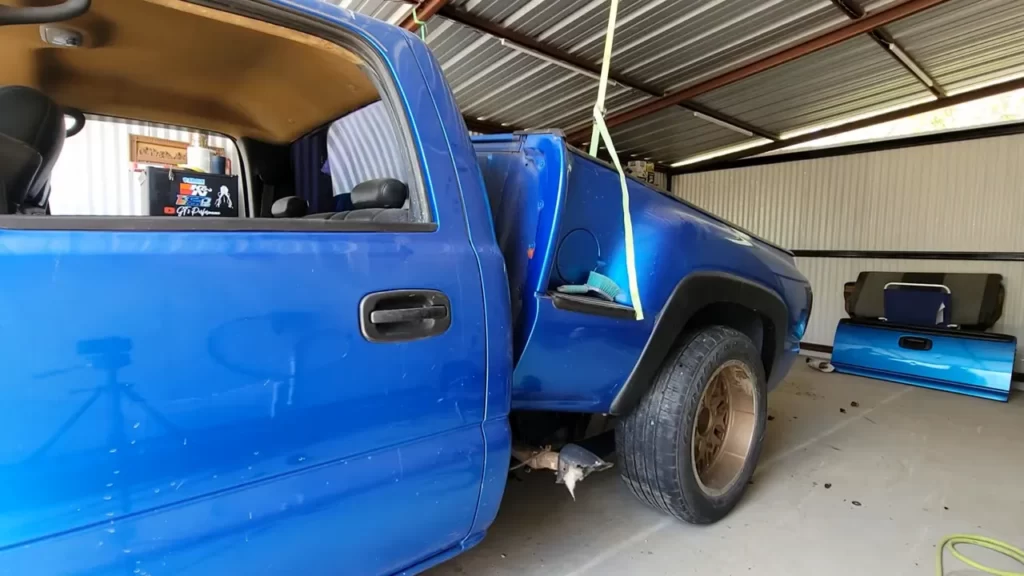
Upgrading your Chevy truck with a flip kit can significantly enhance its performance and aesthetics. With the step-by-step guide provided in this blog post, you now have the knowledge required to seamlessly install a flip kit on your Chevy truck.
By following the outlined instructions, you can achieve a smoother ride, improved towing capacity, and an overall more impressive appearance. Don’t wait any longer to give your Chevy truck the upgrade it deserves. Start installing your flip kit today and enjoy the benefits it brings!