To install a dump bed on a pickup, first, gather the necessary tools and equipment. Then, remove the truck bed, assemble the dump bed, and secure it to the truck frame using the provided hardware.
Why You Need A Dump Bed For Your Pickup Truck
Having a dump bed for your pickup truck can greatly enhance its functionality and versatility. Whether you use your truck for work or for recreational purposes, a dump bed offers a wide range of benefits that can make your life so much easier. In this article, we will explore the various reasons why having a dump bed for your pickup truck is a game-changer.
Benefits of having a dump bed
Versatility
A dump bed offers unmatched versatility for your pickup truck. Whether you need to transport heavy loads of dirt, gravel, or debris, or you want to haul equipment, a dump bed can handle it all. It allows you to conveniently load and unload materials with ease, saving you time and effort.
Not only can you transport materials from one location to another, but you can also use the dump bed to dump them at a specific spot, making it incredibly convenient for construction sites, landscaping projects, or even DIY home renovations. With a dump bed, you have the flexibility to handle a wide range of tasks, making your pickup truck an indispensable tool.
Convenience
Imagine having to manually unload heavy materials from your pickup truck. It’s a daunting task that can be physically demanding and time-consuming. With a dump bed, this hassle is eliminated. You can simply raise the dump bed and let gravity do the work for you. It’s as simple as flipping a switch or pulling a lever, and your materials are unloaded in seconds.
The convenience of a dump bed doesn’t end there. You can also adjust the angle of the dump bed, allowing for controlled and precise unloading. Whether you need to spread materials evenly or dump them in a specific location, a dump bed gives you full control.
In addition to the convenience of unloading, a dump bed also allows for easy access to your cargo. With traditional truck beds, you often need to climb into the back to reach items at the front or back. But with a dump bed, you can easily lower it and have unobstructed access to your entire cargo area. This makes loading and unloading items quicker and safer.
Overall, a dump bed offers unmatched convenience that greatly simplifies the transportation and unloading of materials, saving you time and energy.
The benefits of having a dump bed for your pickup truck are clear. Its versatility and convenience make it a must-have accessory for anyone who wants to maximize the functionality of their truck. Whether you’re a contractor, a landscaper, or simply someone who needs to transport heavy items, a dump bed will undoubtedly make your life easier. So why not invest in a dump bed and transform your pickup truck into a powerful and efficient workhorse?
Understanding Dump Bed Types
When it comes to installing a dump bed on your pickup truck, understanding the different types of dump beds available is crucial. Each type has its own features and benefits, so it’s important to choose the right one for your specific needs. In this section, we will explore the different types of dump beds and the considerations you should keep in mind when selecting the perfect one for your pickup truck.
Different types of dump beds available
There are several types of dump beds available in the market, each designed to suit different applications and requirements. Here are some common dump bed types:
- Electric dump beds: These dump beds are powered by an electric motor, making it easy to control the dumping process. They are typically controlled through a remote control or a control panel inside the cabin. Electric dump beds are popular for their convenience and ease of use.
- Hydraulic dump beds: Hydraulic dump beds use hydraulic cylinders to lift and lower the bed. They are known for their strength and durability, making them perfect for heavy-duty applications. Hydraulic dump beds are usually controlled through a hydraulic pump, which can be operated from inside the cabin or manually.
- Pneumatic dump beds: Pneumatic dump beds utilize compressed air to lift and lower the bed. They are often used in industrial settings where a power source may not be readily available. Pneumatic dump beds are easy to operate and require minimal maintenance.
- Scissor lift dump beds: This type of dump bed uses a scissor-like mechanism to raise and lower the bed. The scissor lift system provides stability and even weight distribution, making it suitable for carrying heavy loads. Scissor lift dump beds are commonly seen in construction and landscaping industries.
Considerations for choosing the right dump bed
When selecting a dump bed for your pickup truck, it’s important to consider various factors to ensure you choose the right one. Here are some considerations to keep in mind:
- Weight capacity: Determine the weight capacity you require for your dump bed. Consider the maximum weight you anticipate carrying to ensure you choose a dump bed that can handle the load.
- Bed size: Consider the size of the dump bed that would fit your pickup truck. Measure the dimensions of your truck bed and compare them with the available options to find the most suitable size.
- Material: Look for dump beds made from high-quality materials that are durable and can withstand heavy use. Consider factors like weather resistance and rust prevention to ensure longevity.
- Operating mechanisms: Think about the type of operating mechanism that suits your needs. Electric dump beds offer convenience, while hydraulic dump beds provide strength and reliability. Pneumatic dump beds are a good option if you don’t have access to a power source.
- Installation requirements: Consider the installation process and any additional equipment or modifications that may be needed to install the dump bed properly. Some dump beds may require professional installation.
By taking these considerations into account, you can choose the right dump bed for your pickup truck, ensuring efficient and hassle-free use.
Assessing Your Vehicle’S Compatibility
Determining if your pickup truck can accommodate a dump bed
Before proceeding with the installation of a dump bed on your pickup truck, it’s crucial to assess the vehicle’s compatibility. Taking the time to evaluate your truck’s capabilities ensures a successful installation and prevents any unnecessary damage or safety hazards. Here are the key factors to consider:
1. Weight capacity
The first step in determining if your pickup truck can accommodate a dump bed is to check its weight capacity. Each truck model has a specific maximum weight it can handle, so it’s essential to confirm this information. Refer to your vehicle’s owner manual or contact the manufacturer to obtain this data accurately.
To calculate the weight capacity, subtract the vehicle’s curb weight (the weight without any cargo or passengers) from the Gross Vehicle Weight Rating (GVWR). The resulting number represents the maximum load your truck can bear. Matching the weight of the dump bed, along with the materials you intend to transport, with your truck’s weight capacity is vital to avoid overloading and potential structural damage.
2. Dimensions
Another critical consideration when installing a dump bed on a pickup truck is ensuring the dimensions of the bed are compatible with your vehicle’s size. Measure the length, width, and height of your truck’s existing bed to compare it with the dimensions of the dump bed you plan to install.
Not only should you focus on the external dimensions, but also consider any internal obstacles, protrusions, or components that might interfere with the installation. These could include gas tanks, exhaust systems, or suspension components that may need to be adjusted or repositioned for compatibility.
Understanding weight capacity and dimensions
Understanding weight capacity and dimensions play a significant role in assessing your vehicle’s compatibility for a dump bed installation. By analyzing these factors, you can make an informed decision and determine if your pickup truck is suitable for this modification.
It is crucial to emphasize that the installation process should be carried out by professionals or individuals with a comprehensive understanding of automotive modifications. Following the manufacturer’s instructions and guidelines is essential to ensure the dump bed is installed correctly and functions safely.
Gathering The Necessary Tools And Materials
Before you begin installing a dump bed on your pickup truck, it’s important to gather all the necessary tools and materials. This ensures a smooth installation process and helps to avoid any delays or complications. In this section, we will outline the tools required and the materials needed to secure the dump bed properly.
Tools required for the installation process
Having the right tools is crucial when it comes to installing a dump bed on your pickup truck. Here are the essential tools you will need:
- Socket and wrench set: This set includes different sizes of sockets and wrenches which will be essential for removing and tightening bolts during the installation process.
- Drill: A drill with the appropriate drill bits will be necessary for making holes in the truck frame to securely attach the dump bed.
- Measuring tape: Accurate measurements are important when positioning and aligning the dump bed. A measuring tape will help you ensure everything is correctly placed.
- Level: A level is necessary to make sure the dump bed is aligned properly on your truck, avoiding any tilts or imbalances.
- Angle grinder: An angle grinder will come in handy for cutting and grinding metal parts during the installation process.
- Pliers: Pliers will be useful for gripping and bending wires or cables that may be required during the installation process.
- Safety equipment: Don’t forget to prioritize safety. Wear gloves, safety glasses, and ear protection to protect yourself from any potential hazards.
Materials needed to secure the dump bed properly
In addition to the tools mentioned above, you will also need specific materials to ensure the dump bed is properly secured to your pickup truck. These materials include:
- Bolts, nuts, and washers: These fasteners are essential for securely attaching the dump bed to the truck frame. Make sure to choose the appropriate size and strength for your specific make and model of truck.
- Support brackets: Support brackets are used to provide additional stability and strength to the dump bed. They are typically made of sturdy metal and help distribute the weight evenly.
- Bed liner: A bed liner is a protective layer that can be applied to the bottom of the dump bed to prevent damage and extend its lifespan. It also helps to reduce noise and vibrations.
- Cable or hydraulic system: Depending on the type of dump bed you choose, you may need a cable or hydraulic system to control the raising and lowering of the bed. Make sure to purchase the appropriate system for your specific dump bed.
- Paint or rust prevention coating: To protect the dump bed from rust and corrosion, consider applying a coat of paint or rust prevention coating. This will help prolong the life of the dump bed.
Once you have gathered all the necessary tools and materials, you will be well-prepared to begin the installation process. Having everything on hand ensures a smoother and more efficient installation, saving you time and frustration along the way.
Making Preparations For The Installation
Before installing a dump bed on your pickup truck, it is crucial to make the necessary preparations. By following these steps, you can ensure a smooth and hassle-free installation process.
Clearing out the truck bed
First and foremost, you’ll need to clear out the truck bed to make room for the dump bed installation. Remove any items, tools, or equipment that may be present. It’s important to have a clean slate to work with, ensuring that there are no obstacles or hindrances during the installation.
Tip: Before removing any items from the truck bed, consider organizing and categorizing them. This will make it easier to put things back after the installation is complete.
Ensuring safety measures are in place
Safety should always be a top priority when working on any type of installation. Before starting the process, be sure to take the necessary safety precautions. This includes wearing appropriate personal protective equipment (PPE), such as goggles and gloves, to minimize the risk of injury.
Tip: If possible, have a friend or family member assist you during the installation process. Two sets of hands are often better than one, and it can make the work go more smoothly and safely.
Additionally, ensure that the area where you will be working is well-lit and free from any potential hazards. Having a clean and organized workspace will not only make the installation process easier but also contribute to a safer working environment.
To further enhance safety, it is recommended to review the installation instructions provided by the dump bed manufacturer. Familiarize yourself with the steps and requirements to ensure that you have all the necessary tools and materials before proceeding with the installation.
Remember: By making preparations and taking safety precautions, you are setting yourself up for a successful and safe installation of a dump bed on your pickup truck.
Removing The Truck Bed
When it comes to installing a dump bed on your pickup truck, the first step is to safely remove the existing truck bed. This process requires careful consideration and attention to detail to ensure a smooth transition. In this section, we will discuss the steps to safely remove the existing truck bed, including detaching electrical connections and fuel tank considerations.
Steps to Safely Remove the Existing Truck Bed
Before removing the truck bed, make sure you have all the necessary tools and equipment on hand. This includes a socket set, wrench, and jack stands. Once you have everything ready, follow these steps:
- Start by disconnecting the battery to ensure your safety. Locate the negative terminal on the battery and use a wrench to loosen the nut. Once the nut is loose, carefully remove the negative cable from the battery.
- Next, remove the tailgate if it is still attached. Simply lift the gate to disengage it from the truck bed and carefully set it aside.
- Now it’s time to detach the truck bed from the frame. Begin by removing any bolts or screws that are securing the bed to the frame. This could vary depending on the make and model of your truck, so consult your owner’s manual for specific instructions.
- Once all the bolts and screws are removed, you will need to lift the truck bed off the frame. It’s important to note that the truck bed can be quite heavy, so enlist the help of a friend or use a hoist to lift it safely.
- Carefully lift the truck bed off the frame, ensuring that there are no obstacles or components that may get in the way. Slowly lower the bed to the ground, making sure to avoid any damage to the truck or yourself during the process.
Detaching Electrical Connections and Fuel Tank Considerations
Now that the truck bed is removed, it’s important to pay attention to the electrical connections and fuel tank before proceeding:
- Locate the electrical connections that are attached to the truck bed. These may include lights, sensors, or other components that need to be disconnected. Carefully unplug each connection and make sure to secure the wiring out of the way to avoid any damage.
- When it comes to the fuel tank, you’ll want to take proper precautions. First, ensure that the fuel tank is not full to reduce the risk of spills or leaks. If the tank is full, consider siphoning off some of the fuel into a safe container before proceeding.
- Next, locate the fuel lines that are connected to the truck bed. Use a pair of pliers or a suitable tool to loosen the connections and carefully detach them. Take care to catch any fuel that may spill out and avoid any open flames or sparks in the area.
- Once the electrical connections and fuel tank considerations are addressed, you can proceed with the dump bed installation. Refer to the instructions provided with your dump bed kit for specific steps on attaching it to the truck frame.
By following these steps to safely remove the existing truck bed and addressing electrical connections and fuel tank considerations, you will be well on your way to installing a dump bed on your pickup truck. Always remember to exercise caution and prioritize safety throughout the process.
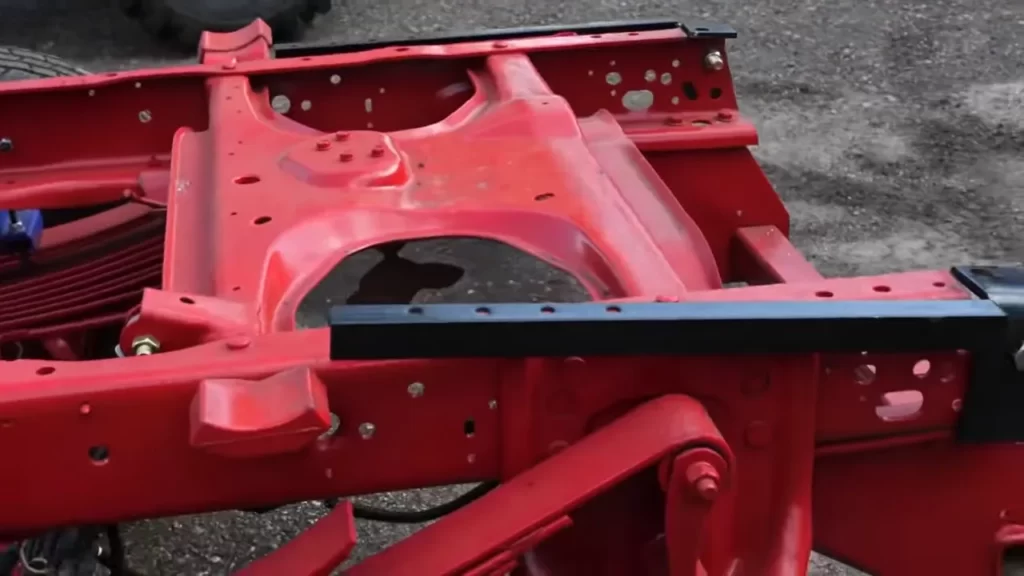
Adjusting The Chassis For The Dump Bed

When it comes to installing a dump bed on a pickup truck, one crucial step is adjusting the chassis to ensure it can support the weight and functionality of the bed. This is important to ensure the long-term stability and safety of the truck. In this section, we will explore two key aspects of adjusting the chassis: strengthening the chassis to support the dump bed and reinforcing the frame for additional stability.
Strengthening the Chassis to Support the Dump Bed
One of the first steps in adjusting the chassis for a dump bed installation is to strengthen it to support the increased weight and load-bearing requirements. This is particularly important if the truck was not originally designed for a dump bed. Strengthening the chassis involves reinforcing key areas and components that will bear the weight of the dump bed, such as the frame rails and cross members.
Here are some key points to consider when strengthening the chassis:
- Inspect the existing chassis for any signs of damage, corrosion, or weakness. Make necessary repairs or replacements before proceeding with the dump bed installation.
- Identify the areas of the chassis that will directly support the dump bed. These are typically the frame rails and cross members located underneath the bed area.
- Consider reinforcing the frame rails with additional steel plates or channels. This will provide extra strength and stability.
- Ensure proper welding techniques are used to securely attach the reinforcement plates or channels to the existing frame.
- Check for any stress points or potential weak spots in the chassis and address them accordingly with appropriate reinforcements.
Reinforcing the Frame for Additional Stability
In addition to strengthening the chassis, reinforcing the frame is essential for ensuring the stability and longevity of the dump bed. The frame plays a critical role in supporting the weight and impact forces generated by the dump bed during operation. Without proper reinforcement, the frame could become prone to bending, flexing, or even cracking under heavy loads.
Consider the following steps when reinforcing the frame:
- Assess the overall condition of the frame and repair any existing damage or corrosion.
- Determine the areas of the frame that require reinforcement based on the dump bed’s mounting points and load distribution.
- Use high-strength steel plates or gussets to reinforce the identified areas of the frame. These should be securely welded to the frame using proper techniques.
- Consider adding additional support structures, such as cross members or braces, to further enhance the stability and structural integrity of the frame.
By properly adjusting and reinforcing the chassis and frame, you can ensure that the dump bed is securely installed and that your pickup truck is ready to handle heavy loads with ease and safety.
Assembling And Attaching The Dump Bed
When it comes to installing a dump bed on a pickup, one of the most important steps is assembling and attaching the dump bed itself. This is a crucial part of the process, as it ensures that the dump bed is secure and properly aligned with the chassis of the pickup. In this section, we will provide step-by-step instructions for assembling the dump bed and securing it to the chassis, so you can confidently complete this installation.
Step-by-step instructions for assembling the dump bed
- Start by laying out all the components of the dump bed in a clear and spacious area. This will allow you to easily identify and access each part as you assemble the bed.
- Boldly begin by assembling the sides and tailgate of the dump bed. Follow the manufacturer’s instructions and make sure to securely fasten all the necessary bolts and screws.
- Next, attach the front panel of the dump bed to the assembled sides and tailgate. Ensure that it is aligned properly and use the provided hardware to secure it firmly.
- Take a moment to double-check all the connections and ensure that everything is tightly secured. This will help prevent any issues with the dump bed’s stability and functionality.
- Moving on, install the hydraulic pump assembly and connect it to the dump bed. This will provide the power needed to raise and lower the bed as required.
- Finally, connect the hydraulic hoses to the pump assembly, making sure to follow the provided instructions to achieve the correct connections. This will allow for proper control and operation of the dump bed.
Securing the dump bed to the chassis
Once the dump bed is fully assembled, it’s time to secure it to the chassis of your pickup. This step is crucial for ensuring that the dump bed remains stable and safe during use. Follow these steps to properly secure the dump bed:
- Using a hydraulic lift or a group of friends, carefully lift the dump bed and align it with the chassis. Ensure that it is positioned correctly, with all the mounting holes aligned with the corresponding holes on the chassis.
- With the dump bed in position, insert the provided bolts through the mounting holes, securing the bed to the chassis. Make sure to tighten the bolts properly, using the recommended torque specifications.
- Once all the bolts are tightened, double-check the dump bed’s alignment and stability. This will guarantee that it is properly attached to the chassis and will function correctly.
In conclusion, assembling and attaching the dump bed to a pickup involves a series of steps that should be followed carefully. By following these step-by-step instructions, you can ensure that the dump bed is properly assembled and securely attached to the chassis, allowing for safe and efficient use of the dump bed.
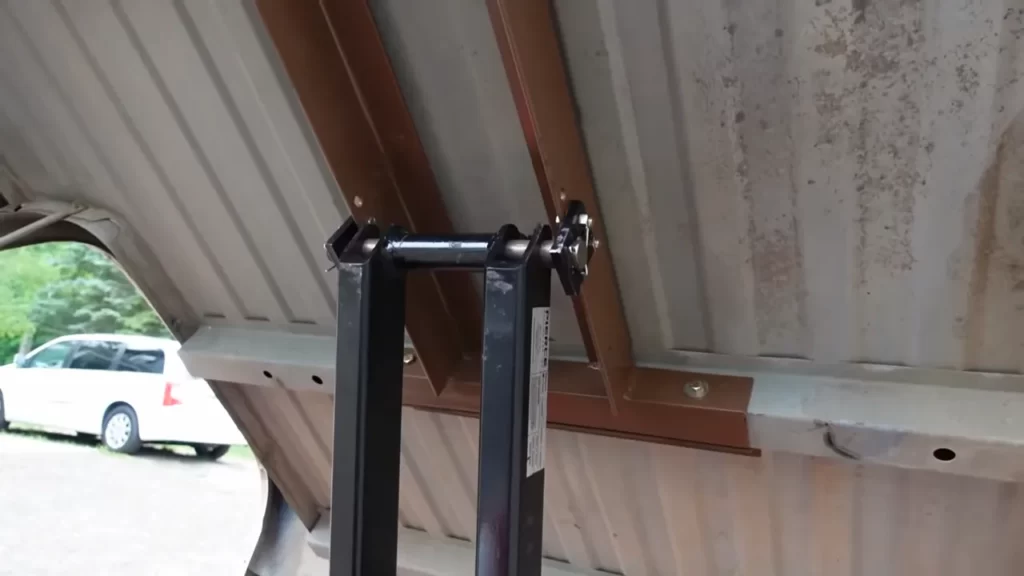
Connecting Hydraulic System And Controls

Installing hydraulic cylinders and connecting to the dump bed
The installation of hydraulic cylinders is a critical step in connecting the hydraulic system to the dump bed of your pickup truck. These cylinders provide the power needed to lift and lower the bed, allowing you to efficiently dump your cargo. To begin the installation process, follow these steps:
- Locate the mounting points for the hydraulic cylinders on the dump bed. Refer to the manufacturer’s instructions for precise placement. Ensure that the mounting points are securely attached to the bed.
- Attach the hydraulic cylinders to the mounting points using the appropriate hardware. Make sure to tighten the bolts securely to avoid any potential leaks or instability during operation.
- Next, connect the hydraulic hoses to both ends of the cylinders. It is important to use high-quality hydraulic hoses and fittings to ensure proper functioning and to prevent any potential fluid leaks.
- Ensure that the hydraulic hoses are properly routed to avoid any interference with other components of your pickup truck. Use clamps or brackets to secure the hoses along the frame or body, keeping them away from any moving parts or sharp edges.
By following these steps, you will successfully install the hydraulic cylinders and connect them to the dump bed of your pickup truck. This will allow for seamless operation and efficient dumping of your cargo.
Wiring the controls for seamless operation
To ensure smooth and effortless operation of your dump bed, proper wiring of the controls is crucial. Follow these steps to wire the controls correctly:
- Identify the control panel or switch that will be used to engage the hydraulic system. This can typically be found near the driver’s seat or on the dashboard of your pickup truck.
- Remove any existing wiring connections from the control panel or switch.
- Connect the positive wire from the hydraulic pump to the appropriate terminal on the control panel or switch. The positive wire is usually labeled as “+”, “BATT”, or “POWER”.
- Connect the negative wire from the hydraulic pump to a suitable ground on your pickup truck. This can be a metal frame or any existing grounding point.
- Ensure that all wiring connections are secure and free from any loose connections or exposed wires.
- Test the operation of the dump bed by engaging the control panel or switch. Ensure that the bed lifts and lowers smoothly without any hesitation or delays.
By correctly wiring the controls, you will be able to operate your dump bed seamlessly, making the dumping process effortless and efficient.
Testing The Dump Bed’S Functionality
Now that you have successfully installed the dump bed on your pickup, it’s time to test its functionality. This step is crucial to ensure that the dump bed is in proper working order and ready to tackle the hauling tasks ahead.
Verifying the dump bed’s lifting and tilting capabilities
Before putting your dump bed to work, it’s important to verify its lifting and tilting capabilities. Follow these steps:
- Position your pickup on a level surface.
- Ensure all safety precautions, such as engaging the parking brake and chocking the wheels, are taken.
- Activate the dump bed controls to lift the bed. Observe the smoothness and stability of the lifting action.
- Once the dump bed is fully raised, check for any unevenness or wobbling. This could indicate a need for adjustment or repair.
- Next, engage the tilt function of the dump bed and observe how smoothly and easily it tilts. Pay attention to any strange noises or resistance that may indicate a mechanical issue.
Making any necessary adjustments for smooth operation
If you encountered any issues during the verification process or noticed any signs of malfunction, it’s essential to make the necessary adjustments for smooth operation. Here’s what you can do:
- Inspect the hydraulic system for any leaks, damaged hoses, or loose connections. These issues can often cause lifting or tilting problems.
- Ensure that the dump bed is properly aligned and securely attached to the pickup’s frame. Loose or misaligned components can hinder smooth operation.
- Check the control mechanism for any loose or damaged parts. Tighten or replace them if needed.
- If the dump bed’s movement is jerky or uneven, consider adjusting the hydraulic pressure or flow rate to achieve a smoother operation.
- Always refer to the manufacturer’s instructions for specific adjustment procedures and safety guidelines.
By meticulously testing the dump bed’s functionality and making any necessary adjustments, you are ensuring a dependable and efficient hauling experience. Don’t skip this step as it significantly contributes to the long-term performance and durability of your dump bed.
Properly Securing The Dump Bed
Ensuring the dump bed is securely attached to the chassis is crucial for the safe operation of your pickup. Proper installation of the dump bed not only prevents accidents but also prolongs the lifespan of your vehicle. In this section, we will go through the key steps to properly secure your dump bed for worry-free hauling.
Ensuring the dump bed is securely attached to the chassis
The first step in ensuring the dump bed is securely attached to the chassis is to carefully follow the manufacturer’s instructions. These instructions provide vital information on the specific requirements and procedures for your particular dump bed and pickup model. Make sure to read them thoroughly and understand each step before proceeding.
Once you are familiar with the instructions, gather the necessary tools and equipment required for the installation, such as wrenches, bolts, and washers. Double-check that you have all the required components before starting the installation process.
Begin by placing the dump bed onto the chassis, aligning it with the designated mounting points. Make sure the bed sits evenly on the chassis with no overhang or misalignment. This is crucial for maintaining a balanced load distribution and preventing any undue stress on the chassis or suspension system.
Next, secure the dump bed to the chassis by using the specified bolts and washers. Tighten them according to the manufacturer’s recommended torque specifications. Ensure that each bolt is tightened evenly, gradually working your way around the bed. This helps to maintain a uniform and secure attachment to the chassis.
Checking for any loose components
Once the dump bed is secured to the chassis, check for any loose components or connections. Give each bolt, nut, and fastening point a gentle tug to ensure they are firmly in place. If you notice any components that are not properly secured, tighten them accordingly.
Take the time to inspect the dump bed for any signs of damage, such as cracks or deformations. If any issues are detected, address them promptly before using the dump bed.
It is also essential to inspect any hydraulic or electrical connections, ensuring they are properly connected and secure. Any loose connections can lead to malfunctioning of the dump bed’s controls or hydraulic system, posing a safety risk during operation.
In conclusion, properly securing the dump bed is essential for the safe and efficient operation of your pickup. By following the manufacturer’s instructions, securely attaching the bed to the chassis, and checking for any loose components, you can enjoy worry-free hauling and extend the lifespan of your vehicle.
Enjoying The Benefits Of A Dump Bed
Versatility and convenience for various tasks
A dump bed on your pickup truck can provide versatility and convenience for various tasks. Whether you are a contractor, farmer, or outdoor enthusiast, having a dump bed allows you to easily transport and unload materials, equipment, and goods. This added functionality transforms your pickup truck into a powerful workhorse that can handle a wide range of tasks.
One of the major benefits of a dump bed is its versatility. With a dump bed installed, you can transport and unload various types of materials such as dirt, gravel, sand, and even heavy machinery. This means you can take on a wide range of projects, whether it’s landscaping your backyard, hauling construction materials, or delivering firewood.
Convenience is another advantage of having a dump bed. When you have a dump bed, you no longer need to manually unload the contents of your truck. Instead, you can simply raise the bed and swiftly dump the materials at your desired location. This saves you time and effort, allowing you to complete your tasks more efficiently.
Additionally, a dump bed maximizes the functionality of your pickup truck. By adding a dump bed, you are expanding the capabilities of your vehicle and making it more useful for a variety of applications. Your pickup truck can now be your go-to vehicle for both transportation and hauling purposes, eliminating the need for multiple vehicles for different tasks.
An integrated dump bed also provides enhanced safety compared to traditional manual unloading methods. With a dump bed, you don’t have to resort to risky maneuvers like manually lifting heavy objects out of your truck. Instead, you can rely on the hydraulic or electric mechanisms of the dump bed to safely unload the contents, reducing the risk of injury.
Overall, a dump bed on your pickup truck offers numerous benefits, including increased versatility, convenience, and safety. You can utilize your truck to its full potential and tackle a wide range of tasks with ease. So why limit your pickup’s capabilities when you can enjoy the benefits of a dump bed? Install one today and unlock a whole new level of functionality.
Frequently Asked Questions Of How To Install A Dump Bed On A Pickup
Can You Put A Dump Bed On A Pickup Truck?
Yes, you can install a dump bed on a pickup truck. It allows for easy dumping of materials.
How Much Does It Cost To Install A Dump Truck Bed?
The cost to install a dump truck bed varies depending on factors like the truck model and bed size. On average, the installation cost ranges from $5,000 to $15,000. It’s best to get quotes from different suppliers to find the right option for your specific truck and budget.
Can You Turn A Flatbed Into A Dump Bed?
Yes, you can convert a flatbed into a dump bed. It involves modifying the bed by adding hydraulic systems to raise and lower it. This allows for efficient dumping of materials.
How Do You Keep Dirt From Sticking To A Dump Bed?
To prevent dirt from sticking to a dump bed, clean the bed regularly with water and a mild detergent. Apply a silicone spray or a bed liner coating to create a non-stick surface. Avoid overloading the bed and drive slowly to minimize dirt accumulation.
Conclusion
Installing a dump bed on a pickup is a straightforward process that can significantly increase the functionality and versatility of your vehicle. By following the step-by-step instructions provided in this blog post, you can transform your pickup into a capable workhorse.
Whether you need to haul heavy loads or streamline your business operations, a dump bed is a valuable addition to any pickup truck. Get ready to tackle your toughest hauling tasks with ease and efficiency.