To install a car horn, locate the existing horn and disconnect the wiring, then attach the new horn and reconnect the wiring. When it comes to car safety and functionality, a functioning horn plays a crucial role.
Whether you want to upgrade your existing horn or replace a faulty one, installing a car horn is a simple process that can be done at home with basic tools. In this guide, we will walk you through the step-by-step process of installing a car horn, so you can ensure that you have a loud and reliable horn to communicate with other drivers on the road.
With a few easy steps, you’ll be on your way to a safer and more efficient driving experience.
Gathering The Necessary Tools And Materials
Before you begin the installation process for your car horn, it is essential to gather all the necessary tools and materials.
Researching and purchasing the appropriate car horn
The first step in gathering the necessary tools and materials for installing a car horn is to research and purchase the appropriate horn for your vehicle. Ensuring compatibility with your car’s make and model is crucial to achieve optimal performance.
| Materials | Description |
|---|---|
| Car horn | Choose a horn that meets your desired sound level and fits your vehicle’s electrical system. |
| Mounting bracket | Some car horns may require a mounting bracket for secure installation. |
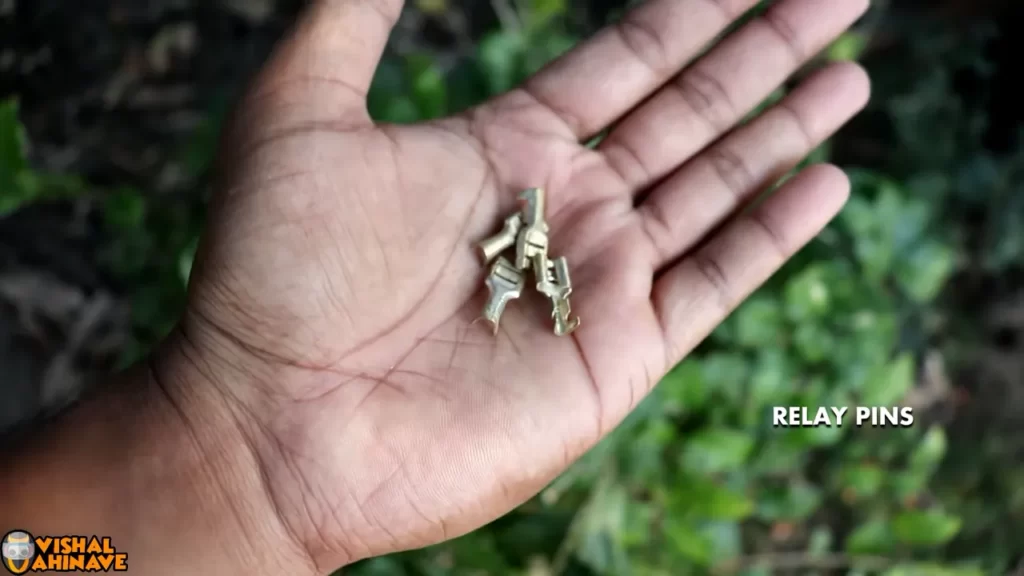
| Electrical connectors | Ensure you have the appropriate connectors to connect the horn to your car’s electrical system. |
| Wiring harness | If your car’s wiring does not support the horn, you may need to purchase a wiring harness to make the necessary connections. |
Gathering basic tools such as a wrench, screwdriver, and wire crimpers
Along with the necessary materials, it is crucial to gather a few basic tools to successfully install your car horn:
- A wrench will be needed to remove and secure bolts during the installation process.
- A screwdriver, both flathead and Phillips, will be necessary for various parts of the installation.
- Wire crimpers are essential for securely connecting wires during the installation process.
Safety precautions to keep in mind during the installation process
While installing a car horn is a relatively simple task, it is essential to prioritize safety. Here are a few safety precautions to keep in mind:
- Disconnect the car battery before starting the installation to avoid any electrical shocks or short circuits.
- Make sure to work in a well-ventilated area to prevent inhaling any fumes or toxic substances.
- Wear protective gloves to protect your hands from potential injuries.
- Read and follow the manufacturer’s instructions carefully to ensure the proper installation of the car horn.
By gathering the appropriate tools and materials and following proper safety precautions, you are now ready to move on to the next step of installing your car horn.
Removing The Old Car Horn
In order to install a new car horn, you need to first remove the old one. This process involves locating the old car horn under the hood, disconnecting the wiring connected to it, and removing any screws or bolts securing it in place.
Locating the old car horn under the hood
The first step in removing the old car horn is to locate it under the hood. Open the hood of your car and visually inspect the area near the front grille or near the radiator. The car horn is usually a small device, typically in the shape of a horn, often located on either side of the engine compartment.
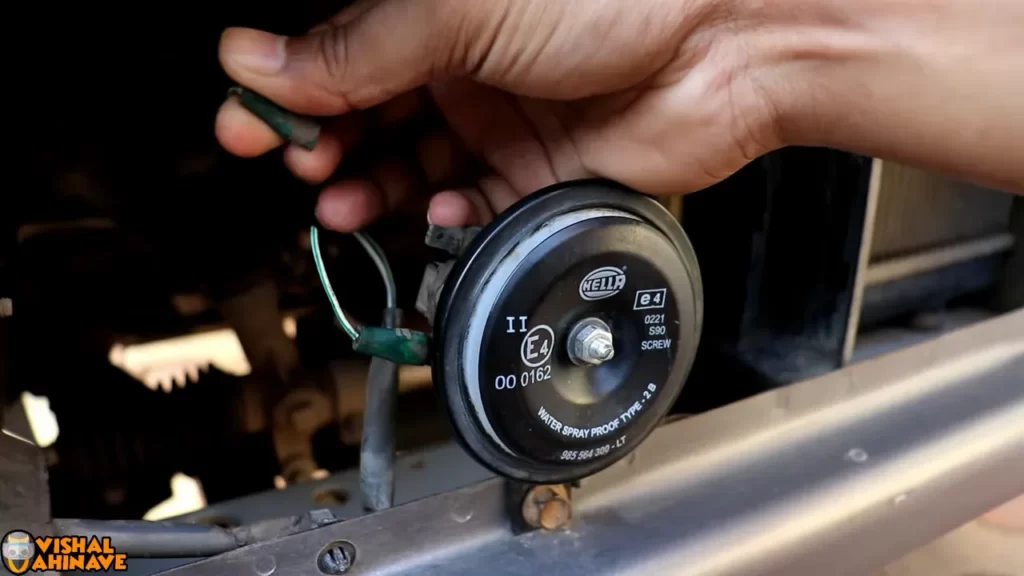
Disconnecting the wiring connected to the old horn
Once you have located the old car horn, the next step is to disconnect the wiring connected to it. To do this, you may need to use a screwdriver or pliers to loosen any screws or bolts securing the wiring. Once the wiring is free, gently pull it away from the old horn. Be cautious not to damage the wiring or any other components nearby.
Removing any screws or bolts securing the old horn in place
After disconnecting the wiring, you can proceed to remove the old horn. Look for any screws or bolts holding the car horn in place. Use the appropriate tool, such as a socket wrench or screwdriver, to carefully loosen and remove these fasteners. Keep them in a safe place as you will need them later to secure the new car horn.
Once all the screws or bolts are removed, you can easily pull out the old horn from its position. Make sure to keep the old horn and components in a safe place, as you may need them if you ever decide to revert back to the original horn.
Now that you have successfully removed the old car horn, you are ready to move on to the next step – installing the new car horn. Stay tuned for our next blog post on how to install a car horn.
Wiring The New Car Horn
Understanding the wiring system in the vehicle
Before we get started on installing the new car horn, it’s important to have a good understanding of the wiring system in your vehicle. The wiring system is responsible for connecting various electrical components in your car, including the horn. It consists of wires, connectors, and fuses that provide power and control signals to different parts of the vehicle. Familiarizing yourself with the wiring system will make the installation process much simpler.
Preparing the wiring harness for the new car horn
Once you have a good understanding of the wiring system in your vehicle, it’s time to prepare the wiring harness for the new car horn. The wiring harness is essentially a set of wires and connectors that will connect the car horn to the vehicle’s electrical system. Follow these steps to prepare the wiring harness:
- Gather the necessary tools and materials, including wire strippers, crimping tools, wire connectors, and electrical tape.
- Start by cutting the existing wires that connect to the old car horn. Make sure to leave enough length on each wire to work with.
- Using the wire strippers, carefully strip off a small portion of insulation from the ends of the cut wires. This will expose the bare wire ends for connecting them to the new horn.
- Take the new wiring harness that came with the car horn and strip off the insulation from the ends of the wires as well. Make sure to strip off the same amount of insulation as you did on the existing wires.
- Using the wire connectors and crimping tools, connect the bare wire ends of the existing wires to the corresponding wire ends of the new wiring harness. Make sure to match the colors or wire markings to ensure a proper connection.
- Once the connections are made, wrap electrical tape around each individual connection to insulate them and protect against moisture and corrosion.
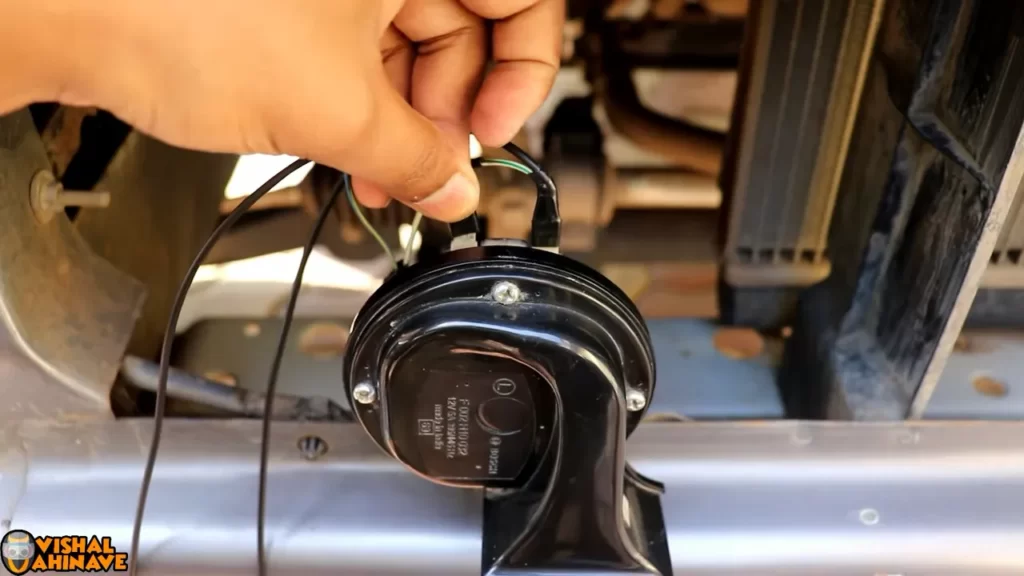
Connecting the wiring harness to the vehicle’s electrical system
With the wiring harness prepared, it’s time to connect it to the vehicle’s electrical system. This step requires a basic understanding of the electrical components in your vehicle, so proceed with caution if you’re not confident in your abilities. Follow these steps to connect the wiring harness:
- Locate the existing wiring for the car horn in your vehicle’s engine bay or under the dashboard. It’s usually connected to a relay or a fuse box.
- Disconnect the old wiring from the existing connection point by loosening the screws or connectors that hold them together.
- Connect the wiring harness from the new car horn to the same connection point. Make sure the connections are secure and tight.
- If necessary, consult your vehicle’s wiring diagram to ensure you’re connecting the wires to the correct terminals or connectors.
- Once the connections are made, double-check everything to ensure there are no loose wires or connections that could cause issues.
And that’s it! By understanding the wiring system in your vehicle, preparing the wiring harness, and connecting it to the vehicle’s electrical system, you should now have successfully installed your new car horn. Remember to take your time, follow the instructions provided with the horn, and ensure all connections are secure before testing the horn.
Mounting The New Car Horn
Mounting the new car horn is a crucial step in installing a car horn system. Choosing the appropriate location, securing it properly, and ensuring future accessibility for maintenance are key factors to consider. In this section, we will guide you through the process of mounting the new car horn.
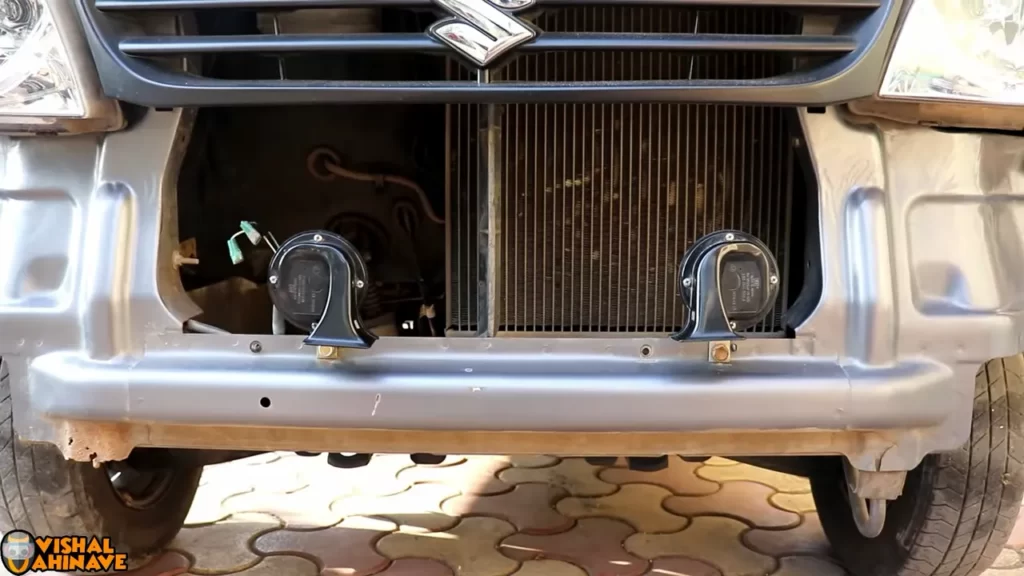
Choosing the appropriate location to mount the new horn
When choosing the location to mount the new car horn, it is important to consider a few factors:
- Visibility: Ensure that the car horn is easily visible to other drivers on the road.
- Accessibility: Select a location that allows easy access for maintenance and potential repairs.
- Compatibility: Check the compatibility of the new horn with the mounting location to avoid any conflicts.
Securing the new horn using screws or bolts
Properly securing the new car horn is essential to ensure stability and longevity. Here are the steps to secure the new horn:
- Place the car horn in the chosen location and mark the placement points for the screws or bolts.
- Drill holes in the marked spots, ensuring that the size of the holes matches the diameter of the screws or bolts you will be using.
- Securely attach the horn to the mounting location using screws or bolts, tightening them evenly to avoid any loose connections.
Ensuring proper alignment and accessibility for future maintenance
Aligning the new car horn correctly and considering future accessibility for maintenance is essential. Follow these guidelines:
- Adjust the position of the horn to ensure it aligns with the front of the vehicle, avoiding any obstructions.
- Make sure the horn does not interfere with any other vehicle components, such as the radiator or engine.
- Leave enough space around the horn for easy maintenance and future repairs if required.
By following these steps, you can mount the new car horn securely, ensuring proper alignment, and future accessibility. Taking the time to choose the appropriate location, secure it properly, and consider maintenance needs will result in a well-functioning car horn system.
Testing And Adjusting The New Car Horn
Testing and adjusting the New Car Horn
After installing a new car horn, it is crucial to test and adjust its functionality for optimal performance. This step is essential to ensure that the horn is functioning correctly and that the sound and tone are to your liking. In this section, we will guide you through the process of testing and adjusting your new car horn. Let’s get started!
<h3>Verifying the new horn’s functionality before final installation</h3>
Before proceeding with the final installation, it’s crucial to verify that the new horn is functioning properly. Here’s a step-by-step guide to help you test its functionality:
- Connect the wiring: Ensure that the wiring connections are secure and properly connected. A loose connection can impact the horn’s performance.
- Test the electrical connection: Press the horn button to check if there is a clicking sound near the relay or fuse box. If you hear a click, it indicates that the electrical connection is working correctly.
- Check for sound: Press the horn button to listen for the sound emitted by the new horn. It should produce a clear, audible sound without any distortions or abnormal noises. If the sound is not satisfactory, adjustments will be needed.
<h3>Adjusting the horn’s sound and tone if necessary</h3>
If you find that the sound produced by the new car horn is not to your liking, you can make adjustments to improve its sound and tone. Follow these steps:
- Locate the adjustment screw: Depending on the horn model, there may be an adjustment screw that allows you to modify the sound and tone. Refer to the manufacturer’s instructions to find the appropriate screw.
- Turning the screw: Use a screwdriver to gently turn the adjustment screw in small increments. This will alter the frequency and pitch of the horn’s sound. Test the horn after each adjustment to determine whether the desired sound is achieved.
- Repeat the process: Continue making small adjustments until you achieve the desired sound and tone. Remember to test the horn after each adjustment to ensure you are satisfied with the results.
<h3>Conducting a final test to ensure the horn works properly</h3>
Once you have adjusted the horn’s sound and tone, it is important to conduct a final test to ensure that the horn works correctly. Follow these steps:
- Check the electrical connection: Verify that the electrical connection is secure and functioning correctly. A loose or faulty connection can affect the horn’s performance.
- Press the horn button: Press the horn button to ensure that the horn sounds as desired without any abnormal noises or distortions.
- Listen for consistency: Test the horn multiple times to ensure it consistently produces the desired sound. If there are any inconsistencies, further adjustments may be required.
By following these steps, you can test and adjust your new car horn to ensure it functions properly and produces the desired sound and tone. Performing a final test will give you peace of mind and ensure your safety on the road.
Troubleshooting Common Issues
While installing a car horn can be a straightforward process, it is not uncommon to encounter a few hiccups along the way. By understanding how to diagnose and troubleshoot potential problems, you can ensure that your car horn installation goes smoothly. Let’s take a look at some common issues that you may face and how to address them.
Diagnosing and troubleshooting potential problems during installation
During the installation process, it’s crucial to identify any potential problems that may arise. By effectively diagnosing these issues, you can prevent them from escalating and ensure a successful installation. Here are some steps to follow:
- Check all the connections and ensure that they are properly secured. Loose connections can result in the car horn not functioning correctly or not working at all.
- Inspect the wiring for any signs of damage or wear. Frayed or exposed wires can cause electrical issues and potentially short out the car horn system.
- Test the car horn by activating it and listening for any unusual sounds or weak horn blasts. This could indicate a problem with the electrical circuit or the horn itself.
- Make sure that the horn is securely mounted in its designated location. A loose or improperly installed horn can cause vibrations and affect its overall performance.
Checking for loose connections or faulty wiring
One of the most common issues encountered during car horn installation is loose connections or faulty wiring. To address this problem:
- Inspect all the connections, including the wires leading to the car horn and the power source. Make sure that they are tightly secured and properly connected.
- If you notice any frayed or damaged wires, replace them immediately to prevent further issues. Cut off the damaged portion and strip the wire carefully before reconnecting.
- Test the horn again to ensure that the issue has been resolved. If the problem persists, it may be necessary to seek professional help.
Seeking professional help if issues persist
If you have followed the troubleshooting steps and the issues with your car horn persist, it may be time to seek professional assistance. A certified mechanic or car alarm specialist will have the expertise needed to pinpoint and resolve any complex electrical or wiring problems that you may be experiencing.
Remember, trying to fix advanced electrical issues without the necessary knowledge and skills can potentially cause further damage to your car’s electrical system. Seeking professional help not only ensures a proper solution but also provides peace of mind knowing that your car horn is in good hands.
Maintaining And Caring For The Car Horn
Proper maintenance and care of your car horn are essential to ensure its reliability and longevity. Regular cleaning, checking the wiring and connections, and following the manufacturer’s instructions are all important aspects of keeping your car horn in top condition. In this section, we will discuss each of these maintenance tasks in detail.
Regularly cleaning the horn to prevent dirt and debris buildup
One of the simplest yet most effective ways to maintain your car horn is by regularly cleaning it. Over time, dirt, dust, and debris can accumulate on the horn, affecting its performance. Cleaning the horn not only improves its functionality but also enhances its appearance.
To clean the horn, follow these simple steps:
- Start by disconnecting the horn from the vehicle’s electrical system for safety.
- Use a mild detergent or automotive cleaning solution mixed with water to wipe the horn clean. Ensure that the solution is non-corrosive and safe for use on the horn’s material.
- Gently scrub the surface of the horn with a soft-bristle brush or sponge to remove any stubborn dirt or grime. Avoid using abrasive materials that could damage the horn.
- Rinse the horn thoroughly with clean water to remove any residue from the cleaning solution.
- Dry the horn completely before reconnecting it to the electrical system to prevent any potential damage.
By incorporating regular cleaning into your car maintenance routine, you can prevent dirt and debris buildup, ensuring your car horn continues to function optimally.
Checking the wiring and connections periodically
In addition to cleaning, it’s crucial to periodically check the wiring and connections of your car horn. Over time, vibrations from the vehicle’s movement can cause the wires to become loose or disconnected, leading to a malfunctioning horn.
To check the wiring and connections, follow these steps:
- Disconnect the car horn from the electrical system.
- Inspect the wires for any signs of wear, damage, or corrosion. Replace or repair any damaged wires.
- Check the horn’s connections to ensure they are secure. Tighten any loose connections.
- If necessary, use electrical contact cleaner to remove any dirt or debris from the connectors.
- Reconnect the horn to the electrical system.
Regularly checking the wiring and connections of your car horn can help prevent any issues related to loose or damaged wires, ensuring it functions reliably when needed.
Following manufacturer’s instructions for maintenance and care
Lastly, it is essential to carefully read and follow the manufacturer’s instructions for the maintenance and care of your car horn. Each horn may have specific requirements or recommendations that should be adhered to in order to maximize its performance and lifespan.
Some general tips to keep in mind include:
- Using the recommended voltage for the horn to avoid damaging it.
- Avoiding excessive honking, as it can overheat the horn and impact its longevity.
- Protecting the horn from extreme temperatures or weather conditions that may cause damage.
- Regularly inspecting the horn for any signs of wear, damage, or malfunction, and taking immediate action if needed.
By following the manufacturer’s instructions and guidelines, you can ensure that maintenance and care for your car horn are carried out correctly, promoting its durability and reliability.
Frequently Asked Questions On How To Install A Car Horn
Can You Replace A Car Horn Yourself?
Yes, you can replace a car horn yourself. It is a simple task that you can do at home. Just make sure to follow the manufacturer’s instructions and use the right tools for the job. It is recommended to consult your vehicle’s manual for specific instructions.
Is Replacing A Car Horn Hard?
Replacing a car horn is not difficult. Just disconnect the old horn, connect the new one, and secure it properly.
How Much Does It Cost To Put A Horn In Your Car?
The cost of installing a horn in your car varies depending on the type and quality of the horn. Generally, the cost ranges from $20 to $200, including the horn itself and any necessary installation fees. It’s recommended to consult with a professional to get an accurate estimate for your specific vehicle.
How Do You Wire A 12V Car Horn?
To wire a 12V car horn, connect the positive terminal of the horn to the positive terminal of the car battery. Then, connect the negative terminal of the horn to the ground or chassis of the car. Make sure to use appropriate electrical connectors for a secure and reliable connection.
Conclusion
Installing a car horn is a relatively simple process that can greatly improve your safety on the road. By following the step-by-step instructions provided in this blog post, you can easily replace your horn and ensure that it is functioning properly.
Remember to always refer to your car’s manual for specific instructions and guidelines. Don’t hesitate to seek professional help if you are unsure about any aspect of the installation. Start honking with confidence knowing that your car horn is in good working condition.