To install a bike seat clamp, first remove the old seat clamp and clean the seat tube and clamp surfaces. Then, position the new clamp around the seatpost, align it with the seat tube, and tighten the clamp’s bolts using an Allen wrench until secure.
Make sure the saddle is level before taking your bike for a ride. Cycling is a popular form of exercise and transportation for people of all ages. Whether you’re an avid cyclist or just starting out, it’s important to have a bike that fits you comfortably.
One crucial component in achieving a comfortable riding experience is the bike seat clamp. The seat clamp secures the saddle to the seatpost, ensuring stability and preventing the seat from slipping or rotating during rides. In this guide, we will provide step-by-step instructions on how to install a bike seat clamp properly. By following these simple steps, you can ensure a secure and comfortable seat for your cycling adventures.
Factors To Consider When Selecting A Bike Seat Clamp
When installing a bike seat clamp, it is important to choose the right one for your specific needs. There are several factors to consider that will ensure a proper fit and a comfortable ride. In this article, we will explore the different types of bike seat clamps available and how to find the right size for your bike seatpost.
Types of bike seat clamps available
There are a few different types of bike seat clamps available, each with its own unique features and advantages:
- Quick Release Seat Clamps: This type of clamp allows for easy adjustment and removal of the bike seat. They are particularly convenient if you frequently switch between different riders or need to adjust your seat height on the go.
- Bolted Seat Clamps: These clamps are secured in place using bolts, providing a more secure and stable fit. They are a popular choice among cyclists who prefer a fixed seat position and prioritize stability over quick adjustments.
It is important to consider your riding style and preferences when selecting a bike seat clamp. If you need frequent adjustments or frequently share your bike with others, a quick release clamp might be the best option. However, if you prioritize stability and prefer a fixed seat position, a bolted seat clamp would be more suitable.
Finding the right size for your bike seatpost
Ensuring the correct size of your bike seat clamp is crucial for a secure and comfortable ride. Here are the steps to follow:
- Measure the diameter of your seatpost: Using a caliper or a measuring tape, determine the diameter of your seatpost. It is essential to get an accurate measurement, as different seat clamps are designed to fit specific seatpost diameters.
- Check the specifications: Once you have determined the diameter of your seatpost, consult the specifications of bike seat clamps you are considering. They will typically indicate the compatible seatpost diameter range.
- Ensure a proper fit: Select a seat clamp that falls within the acceptable range for your seatpost diameter. It is advisable to choose a slightly smaller size over a larger one to avoid any potential slippage or instability.
Remember to double-check your measurements and specifications to ensure a proper fit. A correctly sized seat clamp will not only provide a secure attachment for your bike seat but also enhance your overall riding experience.
Importance Of A Properly Installed Bike Seat Clamp
When it comes to biking, safety should always be a top priority. Every component of your bike should be properly installed and secure, including the bike seat clamp. While it may seem like a small and insignificant part, the bike seat clamp plays a crucial role in keeping your seat in place. In this section, we will dive into the importance of a properly installed bike seat clamp and discuss the benefits of a secure clamp as well as the risks of riding with a loose or improperly installed one.
Benefits of a Secure Bike Seat Clamp
A properly installed bike seat clamp offers several benefits for both comfort and safety:
- Stability: A secure clamp keeps your bike seat in the proper position, preventing any unwelcome movements during your ride. This stability ensures that you maintain balance and control over your bike, especially when navigating rough terrains or performing quick maneuvers.
- Comfort: A loose or improperly installed clamp can cause your bike seat to tilt or shift while you ride, leading to discomfort and even pain. On the other hand, a secure clamp keeps your seat in the desired position, allowing for a comfortable and enjoyable biking experience.
- Prevents accidents: A properly installed bike seat clamp minimizes the risk of accidents caused by a loose seat. Imagine riding at high speed only to have your seat suddenly shift or drop. This can lead to loss of control, falls, or even collisions. By ensuring your seat is securely fastened, you reduce the likelihood of such accidents.
Risks of Riding with a Loose or Improperly Installed Bike Seat Clamp
While it may be tempting to overlook the importance of a secure bike seat clamp, doing so comes with its own risks:
- Instability: One of the most obvious risks of riding with a loose or improperly installed clamp is the instability it creates. A shifting seat can throw off your balance and compromise your ability to control the bike, making it dangerous to ride, particularly in challenging terrains or at higher speeds.
- Discomfort and pain: When your bike seat is not properly secured, it can tilt or move with each pedaling motion. This can lead to discomfort, soreness, or even numbness in your lower body. Moreover, the constant adjustments required to keep your seat in position can be distracting and take away from the overall enjoyment of your ride.
- Risk of injury: Riding with a loose seat clamp increases the risk of unexpected accidents and injuries. A sudden shift or drop of your seat can throw you off balance, causing falls or even collisions with obstacles or other riders. Don’t compromise your safety by neglecting the importance of a properly installed bike seat clamp.
It is essential to regularly check and tighten your bike seat clamp to ensure that it remains secure. Taking a few moments to inspect and adjust your clamp can significantly contribute to a safe and enjoyable biking experience. Now that we have discussed the importance of a properly installed bike seat clamp and the risks associated with riding without one, let’s move on to the steps involved in installing a bike seat clamp.
Essential Tools For Installing A Bike Seat Clamp
When it comes to installing a bike seat clamp, having the right tools is essential. Not only will it make the installation process easier, but it will also ensure that the seat clamp is properly secured, providing a safe and comfortable ride. Below are the essential tools you’ll need:
Allen wrench or bike multi-tool
An Allen wrench or a bike multi-tool is a must-have when installing a bike seat clamp. These tools come in various sizes, so make sure you have the correct size for your seat clamp. The Allen wrench, also known as a hex key, is used to tighten or loosen the bolts on the clamp.
Grease
Grease may seem like an odd tool, but it is vital for properly installing a bike seat clamp. Applying a thin layer of grease to the seat post and inside the clamp will prevent it from seizing or getting stuck. This makes it easier to adjust the seat height in the future.
Torque wrench (optional but recommended)
While not necessary, a torque wrench is highly recommended for installing a bike seat clamp. It allows you to tighten the bolts to the manufacturer’s recommended torque setting, ensuring that the seat clamp is securely fastened without the risk of overtightening and damaging the clamp or seat post.
Using a torque wrench provides peace of mind that your seat will stay in place during your rides, preventing any unwanted movement or potential accidents.
Additional Materials For Installing A Bike Seat Clamp
When it comes to installing a bike seat clamp, having the right tools and materials at hand can make the process much easier and ensure a secure fit. In addition to the basic tools like an Allen wrench or a socket wrench, there are a few additional materials that can come in handy depending on the type of bike frame you have. These materials include bike grease or lubricant, and for those working with carbon frames, an anti-seize compound. Let’s take a closer look at these materials and their importance when installing a bike seat clamp.
Bike Grease or Lubricant
One of the key additional materials you should consider using when installing a bike seat clamp is bike grease or lubricant. This can help prevent any squeaking or creaking noises that may occur when the seat post and clamp come into contact. Applying a thin layer of grease or lubricant to the inside of the clamp and the seat post can also make it easier to adjust the seat height later on. Make sure to use a grease or lubricant that is specifically designed for bicycles, as this will provide optimal performance and protection against corrosion.
Anti-Seize Compound (if working with carbon frames)
If you’re working with a carbon frame, it’s important to take extra precautions to prevent any damage. Carbon frames require special care and attention, as they can be more susceptible to cracking or damage from excessive force or incorrect installation techniques. One additional material that can help protect your carbon frame when installing a bike seat clamp is an anti-seize compound. This compound creates a barrier between the carbon frame and the clamp, reducing the risk of damage caused by friction or corrosion. Apply a thin layer of the anti-seize compound to the inside of the clamp before tightening it to ensure a secure fit without compromising the integrity of the carbon frame.
By using these additional materials, you can ensure a smooth and trouble-free installation of your bike seat clamp, whether you have a standard frame or a carbon frame. Remember to always consult the manufacturer’s instructions for specific recommendations and guidelines. Now that you have all the tools and materials required, let’s move on to the next step of the installation process.
Step 1: Remove The Existing Seat Clamp
Loosening and removing the bolt or quick-release lever
Before you can install a new bike seat clamp, you need to remove the existing one. Start by loosening and removing the bolt or quick-release lever that secures the clamp to the seat tube. This bolt or lever is typically located underneath the seat, near the top of the seat post.
To loosen the bolt, you’ll need an appropriate size tool, such as an Allen wrench or a socket wrench. Insert the tool into the bolt head and turn it counterclockwise to loosen the bolt. You may need to use some force, especially if the bolt is tight. Once the bolt is loose enough, you can continue turning it by hand until it is fully removed. Be careful not to drop or lose the bolt as you remove it.
Detaching the seat clamp from the seat tube
Once the bolt or quick-release lever is removed, you can detach the seat clamp from the seat tube. The seat clamp is the circular or semi-circular component that wraps around the seat tube and holds the seat post in place.
To detach the seat clamp, you may need to gently pry it open using your fingers or a small tool. Be cautious not to damage the seat clamp or the seat tube while doing this. Once the seat clamp is open, you can slide it off the seat tube, allowing the old seat post to be removed.
It’s worth noting that some bikes may have a different type of seat clamp that requires a specific technique to detach it. If you’re unsure about how to remove the seat clamp on your bike, it’s always a good idea to consult the manufacturer’s manual or seek advice from a bike mechanic.
By following these simple steps, you can successfully remove the existing seat clamp and proceed with installing a new one. Remember to tighten the bolt or secure the quick-release lever properly when you install the new seat clamp to ensure a safe and secure fit. Stay tuned for the next step of our bike seat clamp installation guide!
Step 2: Clean And Prepare The Seat Tube
Before installing a bike seat clamp, it’s crucial to properly clean and prepare the seat tube. This will ensure that the clamp can securely hold the seat in place, providing a comfortable and safe riding experience. Follow the steps below to clean and prepare the seat tube effectively.
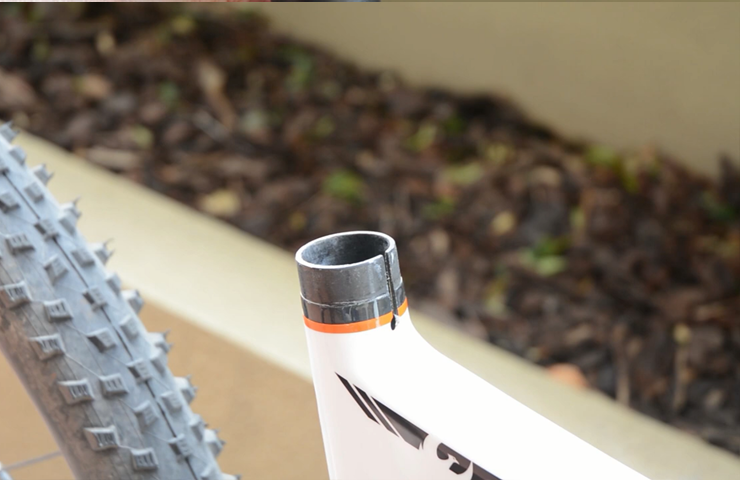
Wiping down the seat tube with a clean cloth
To start, take a clean cloth and gently wipe down the inside of the seat tube. This will help remove any dirt, debris, or old grease that may have accumulated over time. Make sure to reach all areas of the tube, including the bottom and edges.
Pro Tip: If the seat tube is particularly dirty or greasy, you can dampen the cloth with a mild soapy solution. This will aid in removing stubborn dirt and grime.
Applying bike grease or lubricant to the inside of the seat tube
Next, it’s important to apply a thin layer of bike grease or lubricant to the inside of the seat tube. This will help reduce friction and prevent the seat from sticking or getting seized in the future.
Here’s how to apply the grease:
- Using a clean, small brush or your fingers, apply a small amount of grease to the inside walls of the seat tube.
- Ensure that the grease covers the entire area, including the top, bottom, and sides.
- Spread the grease evenly using gentle circular motions, ensuring full coverage without excess buildup.
Pro Tip: Be careful not to apply too much grease, as it can attract more dirt and grime over time. A thin layer is sufficient for proper lubrication.
By cleaning and preparing the seat tube, you’ve created a smooth and clean surface for the bike seat clamp to hold onto. This step ensures a secure and stable seat, allowing you to fully enjoy your cycling adventures.
Step 3: Install The New Bike Seat Clamp
Now that you have removed the old bike seat clamp, it’s time to install the new one. Follow these simple steps to ensure a secure and comfortable fit for your bike seat:
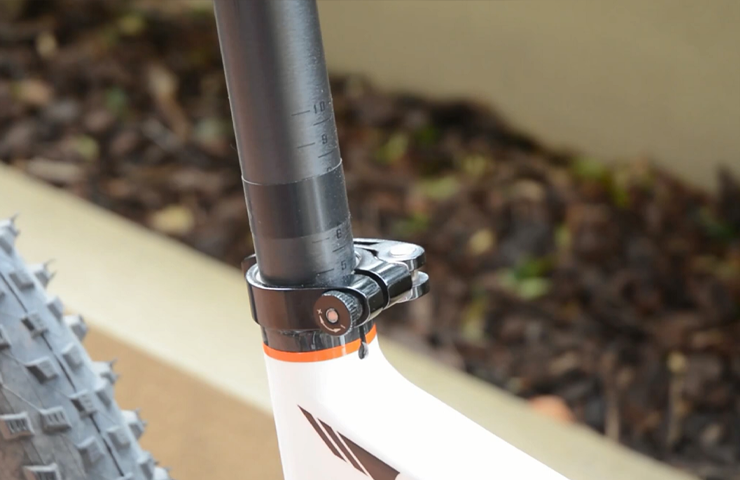
Placing the seat clamp onto the seat tube
To start, place the new bike seat clamp onto the seat tube of your bike frame. The seat tube is the part of the frame that extends upwards and holds the seat post. Make sure the inner diameter of the clamp matches the outer diameter of the seat tube. This will ensure a snug fit and prevent any sliding or wobbling of the bike seat during rides.
If you are unsure about the size of your seat tube or clamp, check the specifications provided by the manufacturer. Alternatively, you can use a caliper or measuring tape to determine the correct size before making a purchase.
Ensuring the clamp is aligned correctly
Once you have placed the clamp onto the seat tube, it’s important to align it correctly before tightening. This will not only help in achieving the desired seat angle but also prevent any discomfort or strain while riding.
Double-check that the front of the clamp is facing towards the front of the bike and the back is facing towards the back. This will ensure the seat is aligned with the bike frame and the handlebars.
Follow these steps to ensure proper alignment:
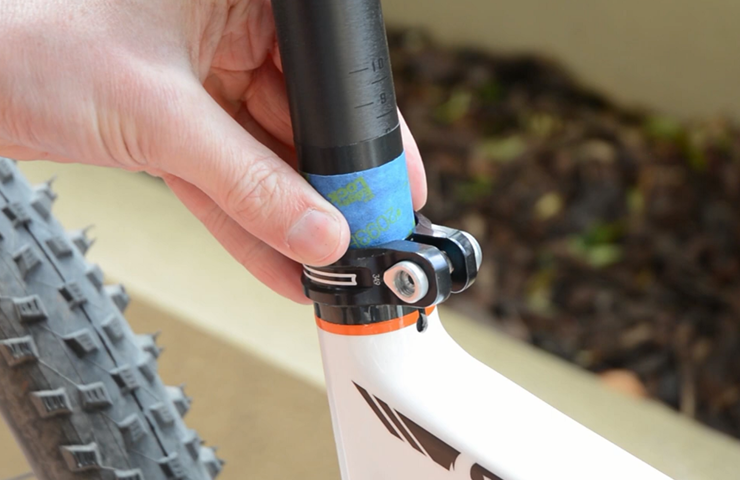
- Loosen the bolt on the clamp so that it is just tight enough to hold the clamp in place.
- Align the seat according to your comfort and riding style. Make sure it is positioned straight and level, taking into account your body posture and the road conditions you usually encounter.
- Once you are satisfied with the seat angle, tighten the bolt on the clamp using an Allen wrench or a suitable tool. Be careful not to overtighten as it may damage the clamp or the seat tube.
Ensure that the clamp is securely fastened and doesn’t move when you try to wiggle or shake the seat. If you notice any movement or instability, double-check the alignment and tighten the bolt a bit more.
Congratulations! You have successfully installed the new bike seat clamp. Now you can enjoy a comfortable and stable ride without worrying about your seat slipping or shifting.
Remember, proper installation of the bike seat clamp is crucial both for your comfort and safety. Taking the time to ensure a secure fit will enhance your biking experience and prevent any unwanted incidents on the road.
Step 4: Tighten The Seat Clamp
Now that you have installed your bike seat clamp, it’s time to tighten it securely for a safe and comfortable ride. This step is crucial to ensure that your seat remains in the desired position and does not slide or wobble while you are on the bike. Below are the steps to follow for tightening the seat clamp:
Gradually tightening the bolt or quick-release lever
Depending on the type of seat clamp you have, you will either need to tighten the bolt or the quick-release lever. Let’s go through each method:
Tightening the bolt:
- Locate the bolt on the seat clamp. It is usually located at the bottom or the rear of the clamp.
- Using an appropriate sized wrench or Allen key, start by turning the bolt clockwise to tighten it.
- Gradually tighten the bolt in small increments, ensuring that you maintain control over the tightness level.
- Continue tightening until the seat clamp is securely holding the seat post without allowing any movement.
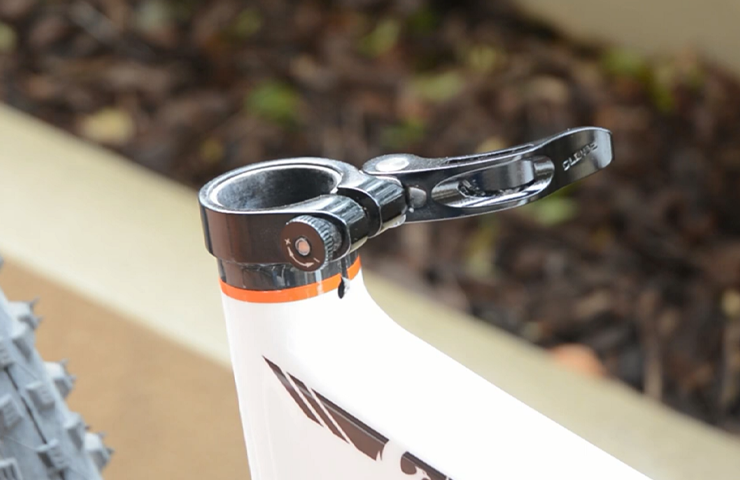
Tightening the quick-release lever:
If your seat clamp has a quick-release lever, follow these steps instead:
- Locate the quick-release lever on the seat clamp. It is usually on the side or the top of the clamp.
- Open the quick-release lever by flipping it to the open position.
- Position the seat post in the desired height and angle.
- Close the quick-release lever by flipping it to the closed position.
- Apply pressure to the lever to ensure it is fully engaged and tightened.
Checking for the appropriate level of tightness
Once you have tightened the seat clamp, it is important to check if the tightness level is appropriate. You want the seat to be securely fastened, but not overly tight which could lead to damage or difficulty in adjusting it later. Here’s how to check for the appropriate tightness:
- Sit on the bike and test the seat by applying pressure and moving your weight around.
- Check for any movement or wobbling. If you notice any, the seat clamp may need further tightening.
- On the other hand, if the seat is too difficult to adjust, it may be too tight and could cause damage to the seat post. Loosen the seat clamp slightly until you can adjust the seat with ease.
- Repeat the process until you find the right balance of tightness.
By gradually tightening the bolt or quick-release lever and checking for the appropriate tightness, you can ensure that your bike seat clamp is securely fastened and ready for your next adventure on two wheels!
Avoid Over-Tightening The Seat Clamp
Understanding the correct torque specifications
When it comes to installing a bike seat clamp, one important aspect to consider is the correct torque specifications. Torque is the measurement of rotational force, and it is crucial to have the seat clamp tightened to the appropriate level. Over-tightening can lead to damage and potential failure of the clamp or seatpost, while under-tightening can cause the seat to shift during rides.
To ensure the seat clamp is tightened properly, it is necessary to understand the correct torque specifications for your specific bike and seatpost. The manufacturer’s guidelines or the bike’s user manual usually provide this information. These specifications are typically given in Newton meters (Nm) and can vary depending on the type of bike and seatpost material.
Using a torque wrench for precision
Using a torque wrench is the best way to achieve precise and accurate tightening of the seat clamp. A torque wrench is a specialized tool that allows you to apply a specific amount of torque to a bolt or nut. This ensures that you neither under-tighten nor over-tighten the seat clamp.
When using a torque wrench, set it to the appropriate torque value specified by the bike’s manufacturer. Attach the appropriate socket or bit to the torque wrench that fits the seat clamp bolt. Apply steady pressure to the wrench in a clockwise direction until the wrench clicks or indicates that the desired torque has been reached. This click signifies that the proper torque has been applied, indicating that the seat clamp is securely fastened.
Here are a few torque values as a reference for common seat clamp materials:
| Material | Torque Specification |
|---|---|
| Aluminum seatpost | 5-6 Nm |
| Carbon fiber seatpost | 4-5 Nm |
| Steel seatpost | 7-8 Nm |
Some additional tips to keep in mind:
- Always wipe the seat clamp area clean before installation to remove any dirt or debris that could affect the clamping force.
- Make sure the seat clamp is aligned properly with the seatpost and frame before tightening.
- If you don’t have a torque wrench, be careful when using a regular wrench or Allen key to tighten the seat clamp. Apply firm pressure but be attentive not to overdo it.
- Periodically check the tightness of the seat clamp to ensure it hasn’t become loose during rides.
By understanding the correct torque specifications and utilizing a torque wrench for precision, you can avoid over-tightening the seat clamp and maintain the integrity and performance of your bike. Take the time to follow these steps correctly, and you’ll enjoy a secure and comfortable seat during your cycling adventures.
Regularly Inspect And Maintain The Bike Seat Clamp
Checking for any signs of wear or damage
Regularly inspecting your bike seat clamp is an essential part of maintenance to ensure optimal performance and safety. By checking for any signs of wear or damage, you can prevent potential issues from escalating and prolong the lifespan of your bike seat clamp.
Start by thoroughly examining the seat clamp for any visible cracks, dents, or deformities. These can indicate structural damage that may compromise the clamp’s ability to hold the seat securely in place. Pay close attention to areas where the clamp is under the most stress, such as the tightening bolts and the contact points between the clamp and the seatpost.
If you notice any signs of wear or damage, it’s important to take immediate action. Replace any worn-out or damaged parts to maintain the integrity of the seat clamp and prevent any accidents or injuries while riding.
Cleaning and re-greasing the seat clamp periodically
In addition to inspecting for wear and damage, cleaning and re-greasing the bike seat clamp on a regular basis is crucial for optimal performance. Over time, dirt, dust, and debris can accumulate in the clamp mechanism, affecting its ability to tighten or loosen properly. By cleaning and re-greasing the clamp, you can ensure smooth operation and prevent any binding or seizing.
When cleaning the seat clamp, start by removing it from the seatpost and using a mild detergent or bike-specific cleaner, thoroughly clean all the components, including the tightening bolts and the inner surfaces of the clamp. Rinse with water and allow it to dry completely before reassembly.
Once the clamp is clean, apply a thin layer of bike-specific grease to the inner surfaces and threads of the bolts. This will help reduce friction and ensure smooth operation when tightening or adjusting the seat clamp.
Conclusion
Regularly inspecting and maintaining your bike seat clamp is essential for ensuring proper function, safety, and longevity. By checking for signs of wear or damage and cleaning and re-greasing periodically, you can keep your seat clamp in optimal condition and enjoy a comfortable and secure ride every time. Don’t overlook this simple yet important maintenance task – it could make a significant difference in your cycling experience.
Seek Professional Help If Unsure
When to Consult a Bike Mechanic or Professional
If you find yourself unsure about how to install your bike seat clamp, it is always best to seek professional help. While installing a bike seat clamp may seem like a simple task, it is crucial to ensure it is done correctly to prevent any accidents or damage to your bike.
Here are a few situations when it is highly recommended to consult a bike mechanic or professional:
- Inexperience: If you are new to bike maintenance or lack experience in bike repairs, it is wise to reach out to a professional for assistance. They have the knowledge and expertise to guide you through the process and ensure everything is done correctly.
- Complex Issues: If you encounter any unexpected issues during the installation, such as damaged parts or intricate mechanisms, it is best to consult a professional. They can properly assess the situation, offer solutions, and carry out the necessary repairs.
- Concern for Safety: If you have concerns about the safety and stability of your bike seat clamp installation, it is crucial to seek professional help. A loose or improperly installed clamp can lead to accidents or damage to your bike, so it’s better to be safe than sorry.
- Time Constraints: If you are pressed for time or unsure about completing the installation within a reasonable timeframe, it is recommended to enlist the help of a professional. They can efficiently handle the task, ensuring it is done quickly and correctly.
- Warranty Considerations: If your bike is under warranty, attempting to install the bike seat clamp yourself may void the warranty. It is important to consult a professional to ensure any necessary repairs or installations are done in accordance with the warranty guidelines.
Remember, seeking professional help is always a smart decision when you are uncertain about any aspect of bike seat clamp installation. It ensures the safety and stability of your bike and provides peace of mind, knowing that the job is done correctly.
Frequently Asked Questions For How To Install A Bike Seat Clamp
How Do You Install A Seatpost Clamp?
To install a seatpost clamp, follow these steps: 1. Loosen the clamp bolt using an Allen wrench. 2. Slide the clamp over the seat tube. 3. Align the clamp with the desired height. 4. Tighten the bolt until secure. 5.
Check for proper tension and adjust if necessary. That’s it! You’ve successfully installed a seatpost clamp.
How Do You Use A Seatpost Clamp?
To use a seatpost clamp, first, loosen the bolt or quick-release lever to open the clamp. Insert the seatpost into the frame’s seat tube to the desired height. Then, close and tighten the clamp securely to hold the seatpost in place.
Finally, check for stability and make adjustments if needed.
Are All Bike Seat Clamps The Same?
No, not all bike seat clamps are the same. Different bikes may require different types of seat clamps depending on their design and specifications. It’s important to choose the right seat clamp that fits your bike to ensure a secure and comfortable ride.
How Do You Install A Seat Post On A Bike?
To install a seat post on a bike, follow these steps: 1. Loosen the seat clamp bolt on the frame. 2. Insert the seat post into the seat tube, aligning it with the desired height. 3. Tighten the seat clamp bolt securely.
4. Ensure the seat is level and adjust if necessary. 5. Test the seat for stability before riding.
Conclusion
Installing a bike seat clamp may seem intimidating at first, but with the right tools and step-by-step instructions, it can be a breeze. By following this guide, you can ensure a secure and comfortable seat for your rides. Remember to choose the right seat clamp and use proper techniques to tighten it.
So, don’t let the fear of installing a bike seat clamp hold you back from enjoying your biking adventures. Happy riding!