To install a bicycle fork, first, remove the front wheel. Then, carefully loosen and remove the old fork from the bicycle frame.
Install the new fork by attaching it to the frame, ensuring it is secure and properly aligned. Finally, reattach the front wheel, making sure it is centered and tight.
Factors To Consider When Selecting A Bicycle Fork
Factors to Consider When Selecting a Bicycle Fork When it comes to selecting a bicycle fork, there are several factors to consider to ensure the optimal performance and ride quality of your bike. Choosing the right fork can greatly affect your overall cycling experience, so it’s important to take the time to evaluate your options. In this blog post, we will explore three essential factors to consider when selecting a bicycle fork: material and weight, suspension type, and wheel size compatibility.
Material and WeightFork
The material and weight of the bicycle fork play a crucial role in determining its performance and durability. The most common materials used in fork manufacturing are aluminum, carbon fiber, and steel. Each material has its own unique characteristics that can influence the overall ride quality and handling of your bike. Aluminum forks are lightweight and stiff, providing excellent power transfer and stability. They are often the preferred choice for road cyclists and those seeking a responsive ride. On the other hand, carbon fiber forks offer a smoother and more comfortable ride due to their ability to dampen vibrations. Additionally, they are lighter than aluminum forks, making them a popular choice for those looking to reduce weight without compromising performance. Steel forks, known for their strength and durability, are commonly found on mountain bikes and touring bikes, offering excellent shock absorption and stability on rough terrains. When selecting a bicycle fork based on material and weight, consider your riding style and the terrain you plan to conquer. If you’re a road cyclist seeking speed and responsiveness, an aluminum or carbon fiber fork might be the best fit. However, if you plan to tackle rugged terrains or prioritize durability, a steel fork could be a better option.
Suspension Type
The suspension type of a bicycle fork plays a crucial role in absorbing shocks and smoothing out the ride. There are two main types of suspension forks: rigid forks and suspension forks. Rigid forks, as the name suggests, do not have any suspension mechanism and are entirely fixed. They are lightweight, efficient, and low-maintenance, making them suitable for road cycling and smooth trails. Rigid forks provide a direct and responsive connection between the rider and the road, allowing for precise handling and control. Suspension forks, on the other hand, feature a suspension mechanism that absorbs impacts and vibrations. This type of fork is commonly found on mountain bikes and is designed to enhance comfort and control on rough terrains. Suspension forks come in two variations: fork with front suspension and a combination of front and rear suspension. Front suspension forks have a suspension mechanism integrated into the fork, while bikes with combined front and rear suspension feature suspension both in the front and rear. To determine the suitable suspension type for your bicycle fork, consider the type of terrain you plan to ride on. If you frequently encounter rough trails and off-road conditions, a suspension fork would be beneficial to absorb shocks and enhance comfort. However, if you primarily ride on smooth roads or prefer a lightweight and responsive ride, a rigid fork might be the better choice.
Wheel Size Compatibility
The compatibility of the bicycle fork with your wheel size is another crucial factor to consider when making a selection. Forks come in various wheel size options, including 26-inch, 27.5-inch, and 29-inch, each offering its own advantages and characteristics. A 26-inch wheel size is commonly found on older mountain bikes and offers agile maneuverability and greater clearance. It is suitable for riders seeking nimble handling and quick acceleration. A 27.5-inch wheel size, also known as a 650b, is a versatile option that strikes a balance between agility and stability. It provides a smoother ride compared to a 26-inch wheel and is suitable for both trail riding and downhill use. A 29-inch wheel size, also referred to as a 29er, provides improved traction and stability, making it popular among cross-country and trail riders. It rolls over obstacles more easily and offers a smoother ride, especially on rough terrains. When selecting a bicycle fork based on wheel size compatibility, ensure that the fork is specifically designed for your wheel size to ensure seamless installation and optimal performance. In conclusion, selecting the right bicycle fork is essential for achieving the best ride quality and overall performance. Consider the material and weight, suspension type, and wheel size compatibility to make an informed decision. Whether you’re a road cyclist seeking speed and responsiveness or an off-road enthusiast looking to conquer rugged terrains, choosing the right bicycle fork will enhance your ride and elevate your cycling experience.
Researching And Comparing Bicycle Fork Options
If you’re a cyclist looking to upgrade or replace your bicycle fork, it’s important to thoroughly research and compare your options before making a decision. With the wide range of bicycle forks available on the market, investing some time in this step will ensure that you find the perfect fit for your needs and preferences. In this section, we will explore three key factors to consider when researching and comparing bicycle fork options: reading reviews and user experiences, comparing fork specifications, and evaluating budget and value for money.
Reading Reviews and User Experiences
Before purchasing a bicycle fork, it’s essential to gain insights from fellow cyclists who have already tested and reviewed different options. Reading reviews and user experiences can provide invaluable information about the performance, durability, and overall satisfaction of various bicycle forks.
When browsing through reviews, keep an eye out for detailed accounts that address specific aspects such as comfort, responsiveness, and ease of installation. Look for patterns and recurring themes in the reviews to get a better understanding of the overall consensus. Remember that everyone’s preferences may vary, so make sure to focus on reviews that align with your specific needs.
Comparing Fork Specifications
Another important aspect to consider when researching and comparing bicycle fork options is the specifications of each fork. These specifications include factors such as material, weight, travel distance, steerer tube diameter, and axle type.
Creating a table or a list can help you easily compare these specifications side by side, allowing you to identify which forks meet your requirements. Consider the type of riding you plan to do and the terrain you will be tackling, as these factors will influence the fork specifications that will best suit your needs.
Evaluating Budget and Value for Money
When shopping for bicycle forks, it’s crucial to evaluate your budget and assess the value for money that each option offers. While it can be tempting to opt for the most affordable fork, it’s important to strike a balance between quality and price.
Consider the reputation of the brand, the materials used, and the overall build quality when determining the value that a particular fork provides. A slightly higher-priced fork may offer better performance, increased durability, and a longer lifespan, making it a worthwhile investment.
Additionally, keep in mind that using a bicycle fork that is not suitable for your intended riding style or terrain can lead to discomfort, reduced performance, and potentially safety issues. Therefore, it’s important to choose a fork that fits your budget while meeting your specific needs.
By thoroughly researching and comparing bicycle fork options, you can ensure that you make an informed decision that will enhance your cycling experience. Take the time to read reviews, compare specifications, and evaluate budget and value for money to find the perfect fork for your bicycle.
Essential Tools For Bicycle Fork Installation
When it comes to installing a bicycle fork, having the right tools is essential. With the correct tools, the installation process becomes smooth and efficient, ensuring the fork is properly installed for a safe and enjoyable ride. In this section, we will discuss the essential tools you will need for a successful bicycle fork installation.
1. Allen Wrench Set
An allen wrench set is a must-have tool for bicycle fork installation. It is used to loosen and tighten the bolts and screws that secure the fork to the frame. Different sizes of allen wrenches may be required depending on your specific fork and frame.
2. Torque Wrench
A torque wrench is essential for achieving the optimal tightening of bolts and screws. It allows you to apply the correct amount of torque, ensuring that the components are properly secured without the risk of overtightening and damaging the fork or frame.
3. Fork Crown Race Setter
The fork crown race setter is used to install the crown race onto the fork crown. It ensures that the crown race is evenly and securely pressed onto the fork, providing a smooth rotation for the headset bearings.
4. Headset Press
A headset press is a tool used to press the headset bearings into the head tube of the frame. It ensures that the bearings are properly aligned and seated, allowing for smooth steering and stability while riding.
5. Grease and Lubricants
Greasen and lubricants are essential for bicycle fork installation. They help reduce friction between the moving parts, ensuring smooth operation and preventing premature wearing of the components. Grease should be applied to the crown race, headset bearings, and any other moving parts that require lubrication.
By having these essential tools on hand, you will be well-equipped to install a bicycle fork with ease and precision. Remember to follow the manufacturer’s instructions and take your time during the installation process to ensure a safe and successful outcome.
Additional Materials For Bicycle Fork Installation
When it comes to installing a bicycle fork, having the right materials is essential. In addition to the fork itself, there are several additional materials you’ll need to ensure a successful installation. These materials include replacement fork bearings and seals, a crown race, and carbon fiber assembly paste. In this section, we will explore each of these materials in more detail.
Replacement Fork Bearings and Seals
One of the most important components of a bicycle fork installation is the bearings and seals. These parts help to reduce friction and ensure smooth steering and suspension performance. Over time, these bearings and seals may wear out and need to be replaced. It’s important to choose high-quality replacement bearings and seals that are compatible with your specific fork model.
Crown Race
The crown race is a crucial part of the bicycle fork installation process. It sits at the bottom of the fork steerer tube and provides a smooth surface for the lower headset bearing to rotate on. Without a properly installed crown race, your fork may not steer correctly and could lead to potential safety hazards.
Carbon Fiber Assembly Paste
Carbon fiber assembly paste is a specialized adhesive designed to create a strong bond between carbon fiber components. When installing a carbon fiber fork, it’s important to use this paste to ensure a secure connection between the fork crown and the steerer tube. The paste fills any gaps between the two surfaces and helps to prevent slippage during riding.
By having the additional materials necessary for bicycle fork installation, you can ensure that your fork is installed correctly and functions optimally. Make sure to choose high-quality replacement fork bearings and seals, install the crown race properly, and use carbon fiber assembly paste when installing a carbon fiber fork. These steps will help to enhance your riding experience and keep you safe on the road or trail.
Removing The Front Wheel And Brakes
When it comes to replacing or upgrading your bicycle fork, it’s essential to know how to properly remove the front wheel and brakes. This guide will walk you through the process step-by-step, ensuring a smooth transition and successful installation. In this section, we will focus on two key steps: loosening the axle nuts or quick-release skewer and detaching the brake calipers.
Loosening the Axle Nuts or Quick-Release Skewer
To begin, you’ll need to loosen the axle nuts or quick-release skewer that secures the front wheel to the bike frame. This step will vary depending on the type of bike you have and the mechanism used to secure the wheel. If your bicycle has axle nuts, you will need a wrench to loosen them. Place the wrench on the nuts and turn counterclockwise until they are sufficiently loosened. It’s important to note that some bikes may have a front wheel quick-release skewer, which can be easily loosened by hand. In this case, simply unscrew the lever in a counterclockwise direction until the skewer is fully open.
Detaching Brake Calipers
Once the axle nuts or quick-release skewer is loosened, you can move on to detaching the brake calipers. The brake calipers are the mechanical devices that grip the rim of the wheel, allowing you to slow down or stop the bike. Detaching them ensures that the wheel can be removed without any interference. To detach the brake calipers, start by locating the brake release lever on each caliper. These levers are typically found near the brake arms. Depress the brake release lever to create additional space between the brake pads and the rim. This will make it easier to remove the wheel without the brake pads rubbing against the rim. With the brake release levers depressed, carefully slide the brake calipers off the rim, moving them upwards and away from the wheel. Keep in mind that some bikes may have a single brake caliper, while others may have dual calipers on both sides of the wheel. Whichever the case, ensure that both calipers are detached from the rim before proceeding.
Removing the Front Wheel
With the axle nuts or quick-release skewer loosened and the brake calipers detached, it’s now time to remove the front wheel. Start by firmly grasping the handlebars with one hand to stabilize the bike. Then, with your other hand, grip the axle, which is located between the fork blades. Gently pull the axle out of the dropouts, ensuring that the wheel is clear of the fork. Slowly lower the wheel to the ground, taking care not to damage the spokes or rim. If you encounter any resistance while removing the wheel, double-check that the axle nuts or quick-release skewer are fully loosened. You have now successfully removed the front wheel and detached the brake calipers, making way for the installation of your new bicycle fork. Make sure to store the wheel and brake calipers in a safe location until you are ready to reinstall them. Now that the front wheel and brakes are removed, you are prepared to move forward with the next steps of installing your new bicycle fork. Stay tuned for our upcoming blog post, where we will cover the installation process in detail.
Disconnecting The Headset And Stem
When it comes to installing a bicycle fork, one of the important steps is disconnecting the headset and stem. This process ensures that you can successfully remove the old fork and replace it with a new one. In this section, we will walk you through the necessary steps to detach the headset and stem smoothly and safely.
Loosening Stem Bolts
The first step in disconnecting the headset and stem is loosening the stem bolts. Locate the stem bolts on the front of the bike, usually found on the top of the stem. Using an Allen wrench or a suitable tool, gently loosen the stem bolts by turning them counter-clockwise. Start by slightly loosening all the bolts to ensure an even release.
Once the bolts are loosened, take a moment to inspect the stem and handlebars for any signs of wear or damage. Make sure the stem bolts are fully disengaged from the stem and are not holding it in place anymore. With the stem bolts loosened, you can proceed to the next step.
Removing the Top Cap and Preload Bolt
Next, it is time to remove the top cap and preload bolt. The top cap is usually located on top of the stem, and it holds everything together while the preload bolt ensures the proper tension on the headset bearings. To remove the top cap, use an Allen wrench to loosen the bolt in the center of the cap.
Once the top cap is loosened, remove it along with the preload bolt, exposing the headset bearings underneath. Set these components aside carefully, as you will need them later when reinstalling the fork.
Taking Apart the Headset Bearings
Now that the top cap and preload bolt are removed, it’s time to take apart the headset bearings. Gently lift the fork out of the head tube, being cautious and mindful of any cables or wires that may be attached. Slowly slide the fork out while keeping an eye on the headset bearings.
You will likely find a top headset bearing and lower headset bearing. Take note of their orientation and how they fit together. Carefully remove each bearing, being cautious not to damage them. It’s a good idea to inspect the bearings for any signs of wear or damage and consider replacing them if necessary.
With the headset bearings removed, you have successfully disconnected the headset and stem. In the next section, we will guide you through the steps to prepare for the installation of the new bicycle fork. Remember to keep the removed components in a safe place to ensure an easy and accurate reassembly process.
Removing The Old Fork And Crown Race
Before installing a new bicycle fork, it is crucial to remove the old fork and crown race. This process consists of three main steps: unscrewing and removing the stem, separating the fork from the frame, and finally, removing the crown race with a crown race setter.
Unscrewing and Removing the Stem
The first step in removing the old fork is unscrewing and removing the stem. The stem is the component that attaches the handlebars to the fork steerer tube. To begin, follow these simple steps:
- Loosen the stem bolt with the appropriate Allen key or wrench. Ensure you have the correct size for a snug fit.
- Once the stem bolt is loose, gently tap the top of the bolt with a soft hammer to loosen it further if necessary.
- Slide the stem off the fork steerer tube and set it aside.
Separating the Fork from the Frame
With the stem removed, it’s time to separate the fork from the frame. This process varies depending on the type of bicycle you have, but here are some general steps to follow:
- Locate the crown of the fork, which is the bottom part that connects to the front wheel.
- Using an appropriate tool, such as a wrench or Allen key, loosen the bolts or quick-release mechanism holding the fork in place. Be careful not to damage any delicate parts.
- Gently lift the fork out of the frame, taking note of any washers or spacers that may be present. Keep these components together for reassembly.
Removing the Crown Race with Crown Race Setter
The crown race is a small, metal ring that sits at the base of the fork steerer tube and provides a smooth surface for the bearing balls. To remove the crown race, you will need a crown race setter tool:
- Place the crown race setter tool onto the crown race, ensuring it sits evenly.
- With a mallet or hammer, gently tap the crown race setter to break the seal between the crown race and the fork steerer tube.
- Once loosened, carefully slide the crown race off the tube, taking care not to damage any surrounding components.
Now that you have successfully removed the old fork and crown race, you are ready to proceed with the installation of the new fork. It is important to follow manufacturer instructions and guidelines throughout the process to ensure proper installation and proper functioning of your bicycle.
Installing A Threaded Fork
Installing a threaded fork on your bicycle is a straightforward process that requires some basic tools and a little bit of patience. In this guide, we will walk you through the steps to properly install a threaded fork, ensuring a safe and secure fit for your bicycle.
Greasing the Threads
The first step in installing a threaded fork is to prepare the threads to ensure smooth and easy installation. Before starting, make sure you have a good quality bicycle grease on hand.
To grease the threads, follow these simple steps:
- Clean the threads on both the fork’s steerer tube and the head tube of your bicycle using a rag or a brush.
- Apply a thin layer of grease to the threads on both the steerer tube and the head tube.
- Ensure that the grease is evenly distributed and covers all the threads.
By greasing the threads, you reduce the risk of cross-threading, make it easier to tighten the fork into the head tube, and prevent damage to the threads.
Screw the Fork into the Head Tube
Once the threads are greased, it’s time to screw the fork into the head tube. Follow these steps:
- Carefully align the fork’s steerer tube with the head tube of your bicycle.
- Gently insert the steerer tube into the head tube, ensuring that it is straight and centered.
- Slowly turn the fork clockwise while applying gentle pressure until it starts to thread into the head tube.
- Continue turning the fork until it is fully threaded into the head tube, making sure it is snug but not overly tight.
It’s important to note that overtightening the fork can cause damage to the threads and compromise the integrity of the installation. Use only the necessary amount of force to secure the fork into place.
Tightening the Locknut
After the fork is fully threaded into the head tube, the final step is to tighten the locknut to secure the fork in place. Here’s how to do it:
- Locate the locknut, which is typically found at the top of the threaded portion of the steerer tube.
- Using a wrench or a spanner, turn the locknut clockwise to tighten it.
- Ensure that the locknut is securely tightened against the top of the head tube.
By properly tightening the locknut, you prevent the fork from loosening and ensure a stable and safe ride.
Following these steps will help you install a threaded fork on your bicycle correctly. Remember to double-check all the connections, ensuring a secure fit. Now you’re ready to hit the road with confidence!
Installing A Threadless Fork
Installing a threadless fork on your bicycle can seem like a daunting task, but with the right tools and a step-by-step approach, you can easily accomplish it. In this guide, we will walk you through the process of installing a threadless fork, ensuring that the headset and bearings are properly prepared, the crown race is correctly placed, and the fork is smoothly slid into the head tube. Let’s get started!
Preparing the Headset and Bearings
Before installing a threadless fork, it is important to ensure that the headset and bearings are properly prepared. Follow these steps to get started:
- Remove the top cap and loosen the stem bolts to separate the stem from the steerer tube.
- Take off the compression ring and spacer from the steerer tube.
- Clean the headset cups and bearings thoroughly to remove any dirt or debris.
- Grease the inside of the headset cups and the bearings to minimize friction.
- Reinstall the bearings and compression ring on the steerer tube, ensuring that they are properly aligned.
- Tighten the stem bolts to secure the stem onto the steerer tube.
- Finally, adjust the headset so that it is snug but not too tight, allowing for smooth steering without any play.
Placing the Crown Race
Now that the headset and bearings are properly prepared, it’s time to place the crown race of the fork. Follow these steps:
- Remove the front wheel from the fork to have better access to the crown race.
- Slide the crown race onto the fork’s crown, ensuring that it fits snugly.
- If necessary, use a crown race setter tool to tap the crown race into place.
Sliding the Fork into the Head Tube
With the crown race in place, it’s time to slide the fork into the head tube. Follow these steps:
- Align the fork’s steerer tube with the head tube of the bicycle frame.
- Slowly push the fork into the head tube, making sure it goes in straight.
- Continue pushing until the fork is fully inserted into the head tube and the crown race sits flush against the frame.
- Tighten the stem bolts to secure the fork in place, ensuring that the stem is aligned with the front wheel.
- Finally, reinstall the front wheel onto the fork, making sure it is properly aligned and tightened.
Congratulations! You have successfully installed a threadless fork on your bicycle. Now, all that’s left to do is to double-check all the bolts and adjustments, and you’ll be ready to hit the road with your newly installed fork!
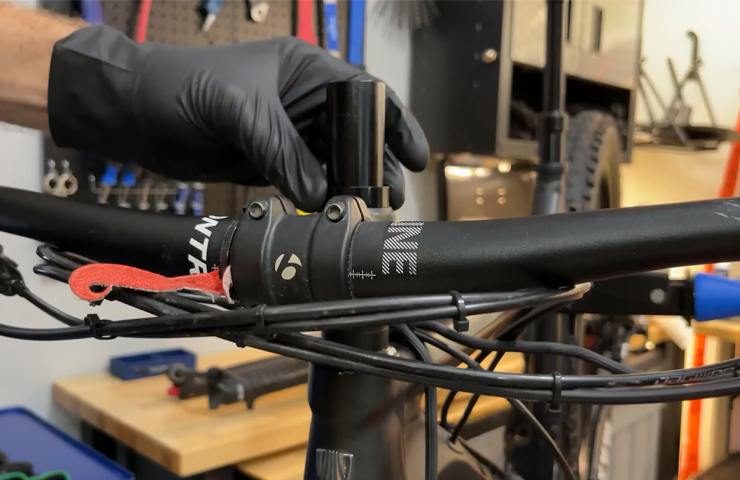
Securing The Stem And Headset
Once you have properly installed the bicycle fork, it’s important to securely fasten the stem and headset. This ensures that the front end of your bike remains stable and safe during rides. In this section, we will cover the steps to adjust the stem position, tighten the stem bolts, and adjust the headset preload.
Adjusting the Stem Position
Before tightening the stem bolts, you may need to adjust the stem position to ensure optimal comfort and control while riding. Follow these steps:
- Loosen the stem bolts using an Allen wrench.
- Adjust the stem to your desired position, ensuring it is aligned with the front wheel.
- Check the handlebar alignment with the front wheel. Make adjustments if necessary by loosening the stem bolts slightly.
- Once the desired position is achieved, tighten the stem bolts gradually and evenly until they are snug. Be careful not to overtighten as this can damage the stem or handlebars.
Tightening the Stem Bolts
Now that the stem is properly positioned, it’s important to tighten the stem bolts securely. Follow these steps:
- Using an Allen wrench, tighten the stem bolts in a crisscross pattern.
- Apply equal pressure to each bolt to ensure a balanced and secure connection.
- Check the tightness of the bolts by gently rocking the handlebars back and forth. If there is any movement, adjust the bolts until the handlebars are secure without restricting movement.
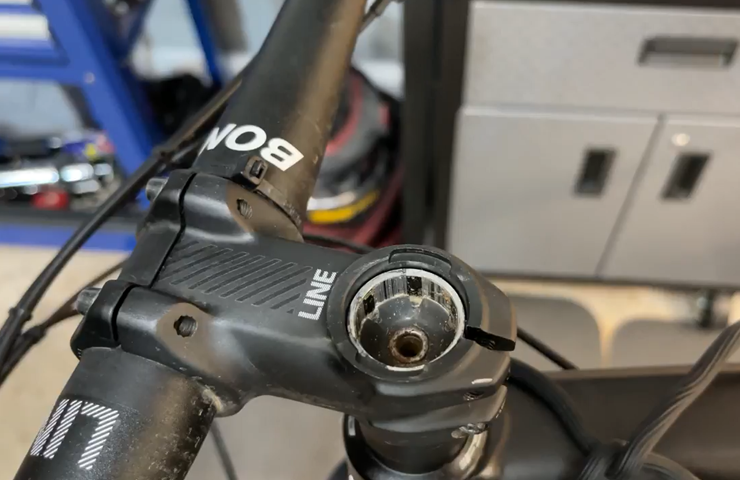
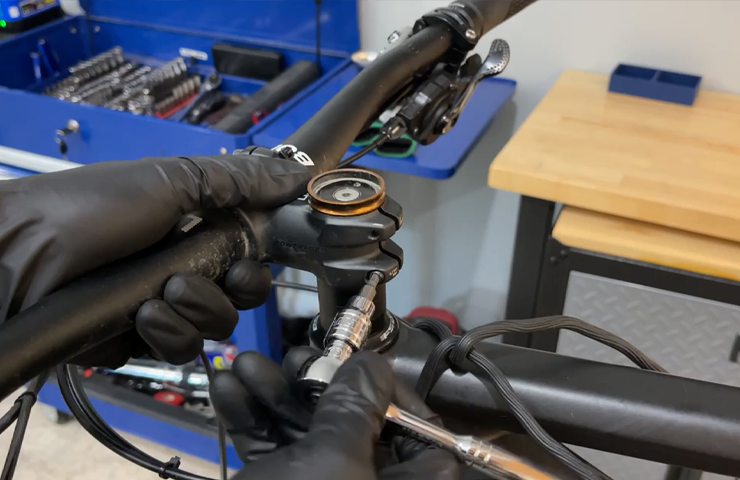
Adjusting the Headset Preload
The headset preload refers to the amount of pressure applied to the headset bearings. Follow these steps to adjust the preload:
- Locate the compression cap on top of the stem.
- Loosen the compression cap using an Allen wrench.
- Turn the top bolt clockwise to increase preload or counterclockwise to decrease preload.
- Adjust the preload until there is no play or wobbling in the fork when you apply the front brake and rock the bike forward and backward.
- Once the preload is properly adjusted, tighten the compression cap securely.
By following these steps, you can secure the stem and headset on your bicycle fork, ensuring a safe and enjoyable riding experience. Remember to periodically check the tightness of the stem bolts and headset preload to maintain optimal performance. Now that you have successfully secured the stem and headset, you’re ready to hit the road on your newly installed bicycle fork!
Reinstalling The Front Wheel
Reinstalling the front wheel on your bicycle fork is a crucial step in putting your bike back together after maintenance or transportation. It’s important to ensure the wheel is secured properly to guarantee a safe and smooth ride. In this section, we will guide you through the process of inserting the wheel into the dropouts and tightening the axle nuts or quick-release skewer.
Inserting the Wheel into the Dropouts
To begin, align the axle of the wheel with the dropouts on the fork. Take note that the wheel should be inserted with the brake rotor or disc on the correct side. Carefully slide the axle into the dropouts, making sure it is fully seated.
Next, make sure the quick-release lever is in the open position. If you are using a traditional axle with nuts, loosen the nuts enough to allow the axle to freely slide into the dropouts.
If you have a front hub that uses a through-axle system, insert the axle through the hub and the dropouts, ensuring it is properly aligned. Then, secure the axle according to the manufacturer’s instructions.
Tightening the Axle Nuts or Quick-Release Skewer
Whether you have an axle with nuts or a quick-release skewer, it’s important to tighten them correctly to ensure the wheel is securely attached to the fork.
If you have an axle with nuts, use a wrench to tighten the nuts evenly on each side. Start by hand-tightening the nuts and then use the wrench to secure them further. Alternate between sides while tightening to ensure even pressure on both nuts.
For a quick-release skewer, close the lever firmly but not excessively tight. The lever should be parallel to the fork leg when properly closed. It’s important to note that over-tightening can put excessive stress on the axle and may cause damage.
Once you have tightened the axle nuts or quick-release skewer, rock the bike back and forth to ensure the wheel is centered and secure. Additionally, check that there is no play or wobbling in the wheel.
Now that you have successfully reinstalled the front wheel, move on to checking the brake alignment and ensuring proper tire inflation before hitting the road for your next cycling adventure!
Reconnecting The Brake Calipers
Once you have successfully installed the bicycle fork, the next step is to reconnect the brake calipers. This is an important part of the installation process as it ensures that your brakes are functioning properly and can provide the necessary stopping power when you need it. In this section, we will walk you through the steps of aligning and installing the brake calipers, as well as adjusting the brake pads and cable tension for optimal performance.
Aligning and Installing the Brake Calipers
The first step in reconnecting the brake calipers is to align them with the brake rotor. Proper alignment is crucial for effective braking. To align the calipers, follow these steps:
- Loosen the bolts that hold the brake caliper in place.
- With the brake lever engaged, position the caliper so that the brake pads are evenly spaced on both sides of the rotor.
- Tighten the bolts to secure the caliper in its new position.
It is important to check the alignment visually and adjust as needed. A misaligned caliper can result in uneven brake pad wear and reduced braking performance.
Adjusting the Brake Pads and Cable Tension
Once the calipers are aligned, the next step is to adjust the brake pads and cable tension. This ensures that the pads are properly positioned and the brakes engage smoothly. Follow these steps to make the necessary adjustments:
- Check the brake pads for even wear. If they are worn unevenly, replace them before proceeding.
- Inspect the brake cables for any signs of damage or fraying. Replace them if necessary.
- Using an Allen wrench, adjust the cable tension by turning the barrel adjuster. This will fine-tune the position of the brake pads.
- Ensure that the brake pads are properly aligned with the rim or rotor. They should make full contact without rubbing against the tire.
- Test the brake lever to ensure that it engages smoothly and the brake pads provide sufficient stopping power.
It is recommended to perform a test ride to ensure that the brake calipers are functioning properly and the brakes are responsive. Make any necessary adjustments until you are satisfied with the performance.
By re-establishing the connection between the brake calipers and adjusting the brake pads and cable tension, you have completed the final steps in installing a bicycle fork. Now your bike is ready to hit the road and provide a safe and enjoyable riding experience.
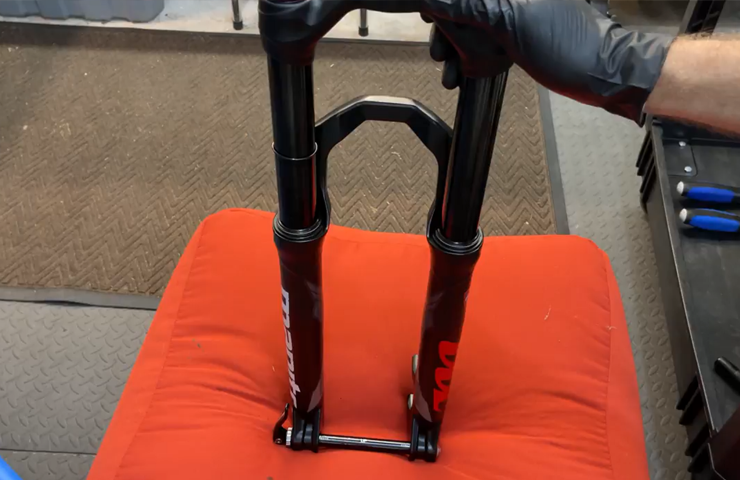
Adjusting The Fork Sag And Rebound
When it comes to optimizing your bike’s performance, adjusting the fork sag and rebound is an essential step. These adjustments play a critical role in ensuring a smooth and comfortable ride. In this section, we will dive into the process of setting the proper suspension sag and adjusting rebound damping.
Setting the Proper Suspension Sag
The suspension sag refers to the amount of compression the fork experiences when you sit on the bike. Adjusting the sag is crucial for achieving the ideal balance between comfort and performance. To set the proper sag, follow these steps:
- Begin by removing any ancillary items like water bottles or bags from your bike.
- Get on the bike in your normal riding position, with your weight evenly distributed.
- Ask a friend to measure the distance between the seal and the crown at the stanchion’s midpoint.
- Calculate the sag percentage by dividing the measured distance by the maximum travel of your fork and multiplying it by 100.
| Desired Sag | Sag Percentage |
|---|---|
| Soft | Below 20% |
| Medium | 20-30% |
| Firm | Above 30% |
Based on your preferred riding style and terrain, adjust the pre-load or air pressure accordingly to achieve the desired sag percentage. Remember, a softer sag is ideal for rough terrains, while a firmer sag provides better performance on smoother surfaces.
Adjusting Rebound Damping
Rebound damping determines how quickly the suspension rebounds after being compressed. Fine-tuning the rebound damping ensures maximum control over your bike and prevents it from bouncing uncontrollably. Follow these steps to adjust the rebound damping:
- Begin by setting the rebound damping to the factory-recommended setting.
- Ride your bike over a variety of terrain to get a feel for how the suspension behaves.
- If the fork rebounds too quickly and feels bouncy, increase the rebound damping.
- Conversely, if the fork rebounds too slowly and feels sluggish, decrease the rebound damping.
Make small adjustments to the rebound damping and test your bike after each change until you find the sweet spot that suits your riding style and preferences. Remember, finding the perfect rebound setting might take some trial and error, so be patient and persistent.
By following these guidelines for adjusting the fork sag and rebound, you can enhance your bike’s performance and enjoy a smoother, more comfortable ride. Take the time to fine-tune these settings, and you’ll immediately feel the difference on your next cycling adventure.
Checking For Proper Fork Installation
When installing a bicycle fork, it is crucial to ensure that it is properly installed to guarantee a safe and smooth ride. Checking for proper fork installation involves two key steps: ensuring the fork is aligned straight and verifying that it is securely attached to the frame. By following these steps, you can have peace of mind knowing that your bicycle is properly equipped for your next adventure.—
Ensuring the Fork is Aligned Straight
Alignment is a crucial aspect of proper fork installation. A misaligned fork can lead to handling issues, loss of control, and potential accidents while riding. To ensure your fork is aligned straight, follow these steps:
- Stand in front of the bicycle and visually check that the fork blades are parallel to the head tube. Use your eyes to align the fork and frame as accurately as possible.
- To confirm the alignment, place a straight edge vertically against the fork blades and check if it runs parallel to the head tube. Adjust the fork if needed by loosening the headset and carefully aligning the fork blades.
- Once the alignment is satisfactory, tighten the headset to the manufacturer’s recommended torque specifications. This will ensure the fork remains aligned during rides.
—
Verifying the Fork is Securely Attached to the Frame
Proper attachment of the fork to the frame is essential for safety and stability. To verify that your fork is securely attached, follow these steps:
- Inspect the fork crown and fork dropouts to ensure they are clean and free from debris or damage. Any irregularities in these areas can affect the attachment and performance of the fork.
- Place the front wheel into the fork dropouts, making sure it sits evenly on both sides. Align the axle properly and ensure it is firmly secured in place.
- Next, tighten the axle nuts or quick-release skewer according to the manufacturer’s recommendations. Ensure that both sides are tightened equally to prevent any imbalance.
- Check the headset and stem to ensure they are properly tightened and secure. Any looseness or play in these areas can affect the stability of the fork and compromise your safety while riding.
By carefully following these steps, you can confirm that your bicycle fork is not only aligned straight but also securely attached to the frame. This will ensure optimal performance, control, and safety during your rides. Now that you have completed the proper fork installation, you can confidently hit the road and enjoy your cycling adventures to the fullest!
Test Riding And Tuning The Bicycle
When it comes to installing a bicycle fork, it’s crucial to not only properly install the fork but also to test ride and tune the bicycle afterwards. This step is essential to ensuring optimum performance, comfort, and safety. In this section, we will explore how to evaluate the fork performance, fine-tune the suspension settings, and double-check the safety measures.
Evaluating the Fork Performance
Once you have installed the bicycle fork, it’s time to take it for a test ride and evaluate its performance. This will help you determine if any adjustments need to be made to improve the overall ride quality. Here are a few factors to consider during the evaluation:
- Smoothness of the suspension: Pay attention to how well the fork absorbs bumps and impacts. A smooth and controlled suspension will enhance your riding experience and improve comfort.
- Stiffness and rigidity: A properly installed fork should feel solid and stable during hard cornering or braking. If you notice excessive flex or wobbling, it may indicate a problem with the installation.
- Steering responsiveness: Evaluate how well the fork responds to steering inputs. It should provide precise and predictable handling, allowing you to maneuver the bike with ease.
Fine-tuning Suspension Settings
After evaluating the fork’s performance, you may need to fine-tune the suspension settings to achieve your desired ride characteristics. Suspension settings largely depend on your weight, riding style, and terrain conditions. Here’s how you can fine-tune the suspension:
- Adjusting sag: Sag refers to the amount the suspension compresses under your weight when sitting on the bike. Follow the manufacturer’s guidelines to set the proper sag, typically around 20-30% of the fork’s travel.
- Rebound damping: Rebound damping controls how quickly the suspension returns to its original position after being compressed. Experiment with different settings to find the right balance between fast recovery and excessive bouncing.
- Compression damping: Compression damping affects how the fork absorbs impacts and compresses. Adjust the compression damping to match the terrain you’ll be riding on – softer for rough trails, stiffer for smooth pavement.
Double-checking Safety Measures
Before you hit the road or trails, it’s crucial to double-check the safety measures to ensure a secure and worry-free ride. Here are some key safety checks:
- Tightness of all bolts and fasteners: Ensure that all bolts and fasteners, including the ones holding the fork in place, are properly tightened. Loose bolts can lead to dangerous situations and compromise your safety.
- Alignment and clearance: Check that the fork is aligned with the front wheel and there is enough clearance between the tire and fork crown. Misalignment or insufficient clearance can result in instability and potential accidents.
- Brake functionality: Test the brakes to ensure they are working properly and provide sufficient stopping power. Align the brake calipers if necessary and check the brake pads for wear.
By thoroughly evaluating the fork performance, fine-tuning the suspension settings, and double-checking safety measures, you can enjoy a smooth, responsive, and safe ride with your newly installed bicycle fork.
Frequently Asked Questions On How To Install A Bicycle Fork
How Do You Put Forks On A Bike?
To put forks on a bike, follow these steps: 1. Loosen the bolts that hold the stem on the bike’s frame. 2. Slide the fork into the head tube of the frame. 3. Align the fork with the handlebars and tighten the stem bolts.
4. Check for proper alignment and adjust if necessary. 5. Finally, make sure all bolts are tightened securely before riding your bike. Note: Make sure to refer to your bike’s manufacturer instructions for specific installation guidelines.
Which Way Does A Bike Fork Go?
The bike fork should face forward when installed. It helps absorb shocks and provides stability while riding.
How Do You Fit A New Suspension Fork?
To fit a new suspension fork, follow these steps: 1. Remove the old fork by loosening the steerer tube clamp. 2. Install the new fork by sliding the steerer tube into the head tube and tightening the clamp. 3. Attach the brake caliper, wheel, and any other components to the new fork.
4. Adjust the suspension settings to your preference. 5. Test the fork to ensure proper functioning and adjust as needed.
How Do You Change Front Forks On A Bike?
To change the front forks on a bike, follow these steps: 1. Remove the front wheel. 2. Unscrew the bolts securing the old forks to the bike frame. 3. Install the new forks and tighten the bolts. 4. Reattach the front wheel.
5. Test the bike’s suspension before riding.
Conclusion
Installing a bicycle fork may seem daunting at first, but with the right tools and steps, it can be a straightforward process. By following this guide, you can ensure a safe and successful installation. Remember to double-check all connections and make necessary adjustments for a proper fit.
With your new bicycle fork properly installed, you’ll be ready to tackle any terrain with confidence. Happy riding!