To install a bicycle chain, first, make sure the chain is the correct size for your bike. Then, line up the ends of the chain with the gears and thread it through the derailleur.
Selecting The Right Bicycle Chain
When it comes to keeping your bicycle in top shape, selecting the right bicycle chain is an essential step. A high-quality chain can ensure smooth and efficient pedaling, while also preventing unnecessary wear and tear on your bike’s drivetrain. In this section, we will discuss the factors you should consider when choosing a bicycle chain, understand the different types of chains available, and determine the correct size for your bike.
Factors to Consider When Choosing a Bicycle Chain
There are several key factors to keep in mind when selecting the right bicycle chain for your bike:
- Durability: Look for a chain made from durable materials such as hardened steel, as it will have a longer lifespan and resist stretching or breaking.
- Type of Riding: Consider the type of riding you will be doing. If you ride off-road or in challenging conditions, you may need a more robust chain that can withstand dirt, mud, and debris.
- Gearing System: Different bikes have different gearing systems, such as single-speed, derailleur, or internally geared. Ensure the chain you choose is compatible with your bike’s specific gearing system.
- Budget: Set a budget for your new chain, keeping in mind that higher-quality chains may come at a slightly higher price. Remember that investing in a durable, reliable chain will save you money in the long run.
Understanding Different Types of Bicycle Chains
Now, let’s delve into the different types of bicycle chains available:
| Chain Type | Description |
|---|---|
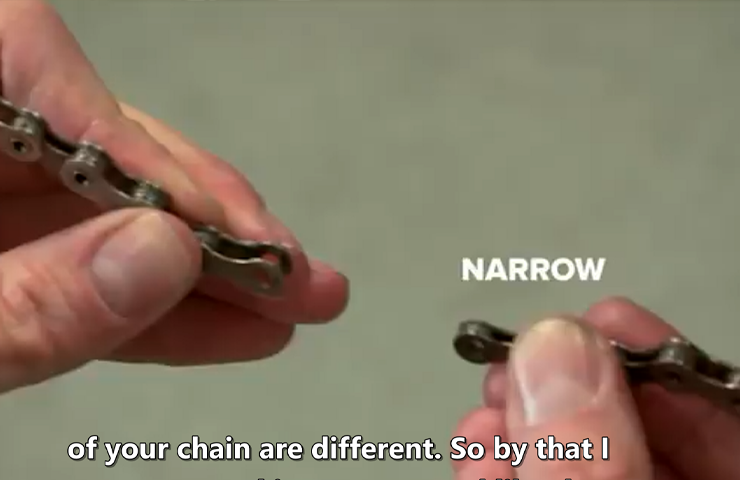
| Single-Speed Chains | Designed for bikes with only one gear, single-speed chains are simple and durable. They are wider and sturdier compared to multi-speed chains. |
| Derailleur Chains | Most common on multi-speed bikes, derailleur chains are built to shift smoothly between gears. They come in different widths to match the number of gears on your bike. |
| Internal Gear Hub Chains | Used on bikes with internally geared hubs, these chains have wider links to accommodate the hub’s unique mechanism. |
Determining the Correct Size of Bicycle Chain
To ensure a proper fit, it’s crucial to determine the correct size of bicycle chain for your bike:
- Count the Gears: Count the number of gears on your bike’s rear cassette or freewheel. This will determine the width of the chain you need.
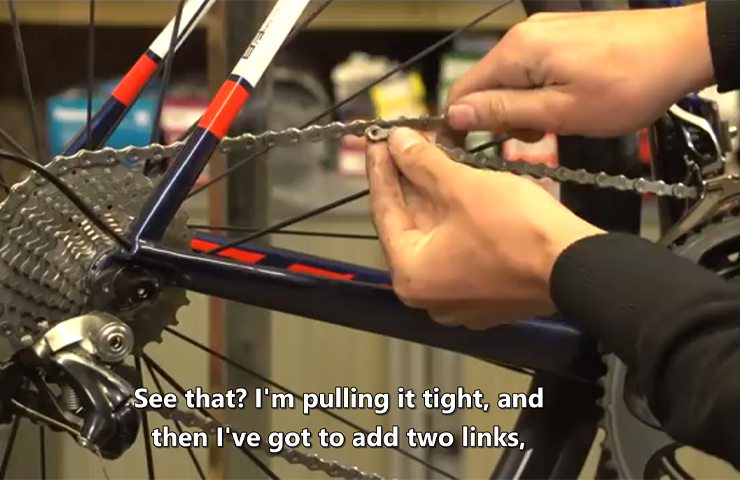
- Measure the Chain Length: Once you know the width, you’ll need to measure the chain length. This can be done by routing the chain through the drivetrain and ensuring it’s long enough to connect the front and rear gears while still allowing some slack.
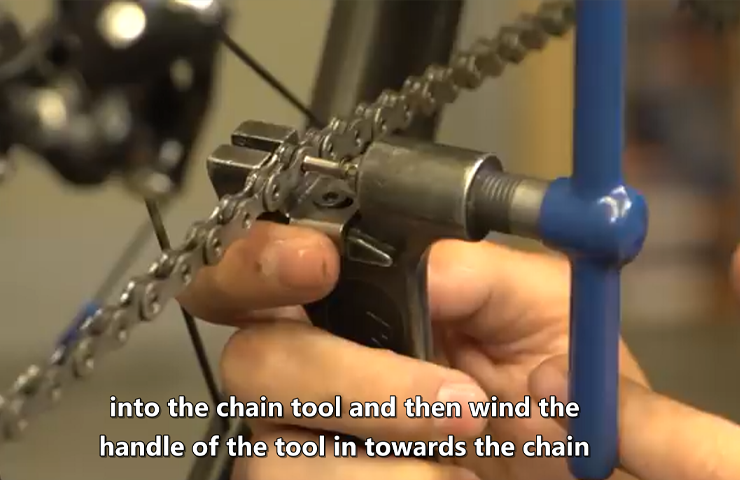
- Cut the Chain: If the chain is too long, you can shorten it using a chain tool. Be sure to follow the manufacturer’s instructions for removing links.
By considering the factors mentioned above, understanding the different types of chains, and determining the correct size, you’ll be well-equipped to select the right bicycle chain for your specific bike. Remember, a well-chosen chain will not only improve your cycling experience but also contribute to the overall longevity of your beloved ride.
Step-By-Step Guide On How To Install A Bicycle Chain
Installing a bicycle chain may seem like a daunting task, but with the right steps, you can easily replace your old chain and have your bike running smoothly. In this step-by-step guide, we will walk you through the process of installing a bicycle chain, ensuring that your bike is ready to hit the road. Let’s get started!
Preparing the Bicycle and Work Area
Before you begin the chain installation process, it’s important to prepare your bicycle and work area. Follow these steps to ensure a smooth installation:
- Ensure that your work area is clean and well-lit, providing enough space for you to move freely around your bike.
- Place your bike on a stable surface, such as a bike stand or a sturdy workbench. This will prevent your bike from toppling over while you work.
Removing the Old Bicycle Chain
The next step involves removing the old bicycle chain. Follow these steps to safely remove the old chain:
- Shift your bike into the smallest chainring at the front and the smallest cog at the back. This will alleviate tension on the chain, making it easier to remove.
- Use a chain tool to break the chain at any link. Ensure that the chain tool is aligned with the pin on the chain.
- Gently push the pin out of the chain until it loosens and is easy to remove. Keep the pin in a safe place, as you may need it for later adjustments or repairs.
- Once the chain is disconnected, carefully remove it from the front and rear derailleurs.
Cleaning and Lubricating the Bicycle Chain
Now that the old chain is off, it’s important to clean and lubricate the bicycle chain before installing the new one. Follow these steps for cleaning and lubricating:
- Fill a small container with a cleaning solvent suitable for bicycle chains.
- Take a clean rag and dip it into the cleaning solvent.
- Gently run the rag along the length of the chain, removing any dirt, grime, or old lubricant.
- Once the chain is clean, allow it to air dry for a few minutes.
- Apply a generous amount of bicycle chain lubricant to the chain while rotating the pedals backward.
Ensuring Proper Chain Tension
Proper chain tension is crucial for smooth and efficient bicycle performance. Follow these steps to ensure proper chain tension:
- With the bike still in the smallest chainring at the front and the smallest cog at the back, connect one end of the new chain to the rear derailleur and the other end to the front derailleur.
- Shift through the gears to ensure that the chain moves smoothly and effortlessly.
- If necessary, use the front and rear derailleur adjustment screws to fine-tune the chain alignment.
Attaching the New Bicycle Chain
Now it’s finally time to install the new bicycle chain. Follow these steps:
- Place the new chain onto the chainring at the front of the bike, ensuring that it rests on the teeth of the chainring.
- Rotate the pedals backward while guiding the chain onto the rear cassette. Take your time and make sure the chain connects with each cog smoothly.
- Once the chain is on, shift through the gears to ensure that it moves effortlessly.
- Check the chain tension again and make any necessary adjustments.
Adjusting the Derailleur
After installing the new chain, it’s important to adjust the derailleur to ensure smooth shifting and optimal performance. Follow these steps to adjust the derailleur:
- Shift your bike into the gear that corresponds to the middle chainring and the middle cog.
- Turn the barrel adjuster on the rear derailleur until the chain is aligned perfectly with the middle cog.
Testing the Bicycle Chain
Your installation is almost complete. Now it’s time to test the bicycle chain. Follow these steps to ensure everything is in working order:
- Shift through all the gears to make sure the chain moves smoothly and precisely.
- Pay attention to any skipping or grinding noises, which could indicate an issue with the chain installation or derailleur adjustment.
- If necessary, make further adjustments to the chain tension or derailleur alignment.
Congratulations! You have successfully installed a new bicycle chain. Your bike is now ready for your next adventure on the open road!
Common Mistakes To Avoid When Installing A Bicycle Chain
Installing a bicycle chain may seem like a simple task, but it’s important to avoid some common mistakes that can lead to poor performance and even damage to your bike. In this section, we will discuss the common mistakes to avoid when installing a bicycle chain and provide you with some practical tips to ensure a smooth and successful installation.
Overlooking Proper Chain Length
One of the most common mistakes when installing a bicycle chain is overlooking the proper chain length. It’s important to ensure that the chain is long enough to span the distance between the front chainring and the rear cassette, but not too long that it becomes slack and easily jumps off the gears. To determine the correct chain length, follow these steps:
- Place your bike on a bike stand or turn it upside down to freely access the chain.
- Wrap the chain around the largest front chainring and the largest rear cassette cog.
- Without overlapping the chain, add two links to the length and mark the spot to break the chain.
- Using a chain tool, remove the excess links while ensuring a clean break.
Failing to Clean and Lubricate the Chain
Another mistake is failing to clean and lubricate the chain before installation. Neglecting to clean the chain can lead to premature wear, poor shifting performance, and increased friction. Follow these steps to clean and lubricate your chain:
- Use a degreaser and a brush to scrub the chain thoroughly, removing any dirt or grime.
- Wipe down the chain with a clean rag to remove excess degreaser.
- Apply a few drops of bicycle-specific chain lubricant to each chain link while rotating the pedals backwards.
- Let the lubricant penetrate the chain for a few minutes, then wipe off any excess lubricant with a clean rag.
Incorrectly Aligning the Chain with the Gears
When installing a bicycle chain, it’s crucial to align it correctly with the gears. Failing to do so can lead to poor shifting performance and excessive noise. Follow these steps to align the chain properly:
- Shift the rear derailleur to the smallest rear cog and the front derailleur to the smallest front chainring.
- Thread the chain through the front derailleur, ensuring it sits on top of the teeth of the smallest chainring.
- Thread the chain through the rear derailleur, ensuring it wraps around the smallest rear cog.
- While turning the pedals, shift through all the gears to ensure smooth and precise shifting.
Not Adjusting the Derailleur Properly
Lastly, not adjusting the derailleur properly can cause issues with shifting and chain alignment. Follow these steps to adjust the derailleur:
- Shift the rear derailleur to the smallest rear cog and the front derailleur to the smallest front chainring.
- Use the barrel adjuster on the rear derailleur to fine-tune the shifting, ensuring the chain moves smoothly up and down the cassette.
- Check the chain alignment with the front derailleur, making any necessary adjustments using the limit screws.
- Shift through all the gears again to ensure precise and reliable shifting.
By avoiding these common mistakes when installing a bicycle chain, you can ensure optimal performance and longevity for your bike. Take the time to measure the proper chain length, clean and lubricate the chain, align it correctly with the gears, and adjust the derailleur properly. These simple steps can make a significant difference in your cycling experience.
Troubleshooting Tips For Installing A Bicycle Chain
When it comes to installing a bicycle chain, there are a few common issues that riders often come across. These issues can be frustrating, but with the right troubleshooting tips, they can be easily resolved. In this section, we will discuss two common problems that riders face when installing a bicycle chain: dealing with stiff links and fixing chain skipping issues.
Dealing with Stiff Links
If you’ve ever installed a bicycle chain, you know how important it is for the links to move smoothly. However, sometimes you may encounter stiff links that refuse to budge. This can affect the overall performance of your bike and cause unnecessary wear on the chain.
Here are some troubleshooting tips for dealing with stiff links:
- Inspect the chain: Before installing the chain, make sure to inspect it for any dirt, debris, or rust. Clean the chain thoroughly using a degreaser and a brush.
- Apply lubrication: Once the chain is clean, apply a high-quality lubricant to the links. This will help reduce friction and make the chain move more smoothly.
- Work the stiff link: If you come across a specific stiff link, use your fingers or a pair of pliers to gently manipulate it back and forth. This can help loosen it up and make it more flexible.
- Repeat the process: If the stiff link persists, repeat the steps above until it becomes more pliable. Patience is key when dealing with stiff links.
Fixing Chain Skipping Issues
Chain skipping is another common problem that riders may face after installing a bicycle chain. This occurs when the chain fails to engage properly with the front or rear sprockets, causing the pedals to slip or jump unexpectedly.
Here are some troubleshooting tips for fixing chain skipping issues:
- Check for worn sprockets: Worn sprockets can cause chain skipping. Inspect both the front and rear sprockets for signs of wear. If necessary, replace them to ensure a proper connection with the chain.
- Adjust the derailleur: The derailleur plays a crucial role in guiding the chain onto the sprockets. Make sure it is properly aligned and adjusted. If needed, refer to the manufacturer’s instructions or seek the assistance of a professional bicycle mechanic.
- Check chain tension: Incorrect chain tension can contribute to chain skipping. Ensure that the chain is properly tensioned by following the recommended guidelines for your specific bicycle model.
- Replace the chain: If all else fails, it may be time to replace the chain. Over time, chains can stretch and wear out, leading to poor engagement with the sprockets. A new chain can often resolve chain skipping issues.
By following these troubleshooting tips, you can overcome the common issues that arise when installing a bicycle chain. Remember to be patient and thorough in your approach, and your bike will be ready to hit the road in no time!
Proper Maintenance For Bicycle Chains

One of the key elements in ensuring a smooth and efficient ride on your bicycle is proper maintenance of the chain. Regular cleaning, lubrication, checking for wear, and avoiding excessive gear shifting are important steps to take. Additionally, proper storage is essential to prevent chain rusting. In this section, we will delve into each aspect of maintaining your bicycle chain.
Regular Cleaning and Lubrication
Regular cleaning and lubrication are crucial for keeping your bicycle chain in optimal condition. Dirt, debris, and grime can accumulate on the chain over time, leading to increased friction and wear. To clean the chain, you can follow these steps:
- Use a brush or a rag soaked in a degreaser to remove any dirt or grease from the chain.
- Rinse the chain with water and let it dry completely.
- Apply a bicycle-specific lubricant to the chain, ensuring all the links are adequately coated.
- Wipe off any excess lubricant with a clean cloth.
Regular cleaning and lubrication should be performed every 100-200 miles or whenever your chain appears dirty or dry. This will help extend the lifespan of your chain and ensure smoother shifting.
Checking Chain Wear and Replacing When Necessary
Regularly checking your chain for wear is essential to prevent further damage to your drivetrain. A stretched or worn-out chain can cause skipping, poor shifting, and damage to the cassette and chainrings. To check for chain wear, follow these steps:
- Hold a ruler against the chain, aligning the zero mark with one of the chain pins.
- If the ruler’s 12-inch mark lines up precisely with another chain pin, your chain is in good condition. However, if it measures slightly longer, the chain has stretched and may need replacement.
When replacing the chain, it is recommended to replace the cassette as well if it shows signs of wear. This ensures smooth shifting and prevents premature wear on the new chain.
Avoiding Excessive Gear Shifting
Excessive gear shifting can put unnecessary strain on your chain. To preserve the lifespan of your chain, avoid frequent shifts between extreme gears, especially when applying excessive force on the pedals. Smooth and deliberate gear changes will help reduce wear and minimize the chances of chain breakage.
Proper Storage to Prevent Chain Rusting
Proper storage is vital to prevent chain rusting, especially if your bicycle is exposed to moisture or humid conditions. Follow these tips to keep your chain rust-free:
- Store your bicycle in a dry, well-ventilated area. Avoid leaving it outside for extended periods.
- Apply a light coat of rust preventative oil or silicone-based lubricant to the chain before long-term storage.
- Regularly inspect your chain for any signs of rust or corrosion and address it promptly.
By following these storage practices, you can prevent rust from forming on your bicycle chain and ensure its longevity.
Frequently Asked Questions On How To Install A Bicycle Chain
How Do You Put A Chain On A Bike?
To put a chain on a bike: 1. Place the bike on a stable surface. 2. Align the chain onto the chainring and rear sprocket. 3. Use a chain tool to push the chain pin back into the link, connecting the chain.
4. Ensure proper tension by adjusting the rear derailleur if needed. 5. Test the chain’s functionality by pedaling the bike.
How Do You Remove And Replace A Bike Chain?
To remove and replace a bike chain: 1. Use a chain tool to break the old chain. 2. Thread the new chain through the derailleurs and cassette. 3. Connect the ends of the chain using a quick link or a chain pin.
4. Ensure proper tension by adjusting the derailleur if necessary. 5. Test the chain’s functionality before riding.
Which Way Does A Bike Chain Go On?
The bike chain should go on according to the manufacturer’s instructions. It typically wraps around the front and rear sprockets in a specific pattern. Proper installation ensures smooth operation and efficient power transfer.
How Do You Reattach A Bike Chain?
To reattach a bike chain, follow these steps: 1. Align the ends of the chain and connect them with the master link or pin. 2. Thread the chain through the derailleurs and gears properly. 3. Use a chain tool or pliers to push the pin back in place if a master link is not present.
4. Test the chain by pedaling to ensure it is securely attached. 5. Make any necessary adjustments to the derailleur if the chain is not shifting smoothly.
Conclusion
Installing a bicycle chain may seem daunting at first, but with the right knowledge and tools, it is a straightforward process. By carefully following the steps outlined in this guide, you can confidently replace your bike’s chain and ensure a smooth and efficient ride.
Remember to regularly maintain your bicycle chain to prolong its lifespan and enhance your cycling experience. Happy riding!