To install a radar detector, mount it securely on your vehicle’s windshield or dashboard using the provided adhesive or suction cup mount.
Gathering The Necessary Tools And Materials
Before you can begin the installation process for your radar detector, it is crucial to gather all the necessary tools and materials. This will ensure a smooth and efficient installation and save you time and frustration in the long run. In this section, we will guide you through the process of choosing the right radar detector model and provide you with an essential list of tools and materials needed for a successful installation.
Choosing the Right Radar Detector Model
Choosing the right radar detector model is key to maximizing its performance and effectiveness. With many options available on the market, it can be overwhelming to make the right choice. Here are a few factors to consider:
- Range: Look for a radar detector with a long-range capability to detect radar signals from a significant distance. This will give you ample time to adjust your speed and avoid potential speeding tickets.
- Features: Decide what features are a priority for you. Some radar detectors offer additional functionalities such as GPS technology and smartphone integration, which can enhance your overall driving experience.
- Price: Set a budget and compare prices to find a radar detector within your price range. Keep in mind that higher-priced models often come with advanced features and better performance.
Essential Tools and Materials Needed for Installation
Once you have chosen the right radar detector model, it’s time to gather the necessary tools and materials for the installation process. Here is a list of essential items you will need:
| Tool/Material | Description |
|---|---|
| Power cable | A power cable is required to connect the radar detector to your vehicle’s power source. Make sure it is compatible with your specific radar detector model. |
| Mounting brackets | Mounting brackets are essential for securely attaching the radar detector to your vehicle’s windshield. Check if the radar detector comes with mounting brackets or if they need to be purchased separately. |
| Dashboard adhesive | In case you prefer to mount your radar detector on the dashboard instead of the windshield, a strong adhesive will be necessary to ensure it stays in place. |
| Wire cutters | Wire cutters will come in handy for any necessary modifications to the power cable or other wiring during the installation process. |
| Electrical tape | Electrical tape is essential for securing and insulating any exposed wires to prevent shorts or other electrical issues. |
| Screwdriver set | A set of screwdrivers will be necessary for removing any panels or parts of your vehicle to access the wiring and install the radar detector. |
| Wire connectors | If you need to splice or connect wires during the installation, wire connectors will ensure a secure and reliable connection. |
By gathering all these tools and materials beforehand, you will be well-prepared to install your radar detector efficiently. This comprehensive list of essentials will save you from any last-minute hassles and streamline the installation process, allowing you to enjoy the benefits of your radar detector quickly and hassle-free.
Preparing Your Vehicle For Installation
Installing a radar detector in your vehicle can help you stay aware of potential speed traps and avoid costly tickets. However, proper preparation is crucial to ensure a successful installation. In this section, we will go over the essential steps to prepare your vehicle for installing a radar detector.
Identifying the Optimal Radar Detector Placement
Before mounting your radar detector, it’s important to identify the optimal placement for effective performance. The ideal location is typically near the center of your vehicle’s windshield, high enough to have an unobstructed view of the road ahead. This position allows the radar detector to detect signals from all directions without interference from your vehicle’s frame.
Moreover, be mindful of any tinted areas or other obstructions on the windshield that might impede the detector’s performance. Avoid mounting the detector behind metalized areas or windshield wipers, as they may block or disrupt radar signals.
Cleaning the Windshield for Mounting
Prior to mounting your radar detector, you should clean the windshield thoroughly to ensure a solid attachment. Use a mild glass cleaner or a mixture of water and vinegar to remove any dirt, dust, or grease from the windshield surface. Wipe it clean with a lint-free cloth to prevent any residue that may interfere with the detector’s adhesive.
In addition, make sure the area where you plan to mount the radar detector is completely dry before proceeding. Any moisture or wetness can compromise the adhesive’s effectiveness and cause the detector to come loose while driving.
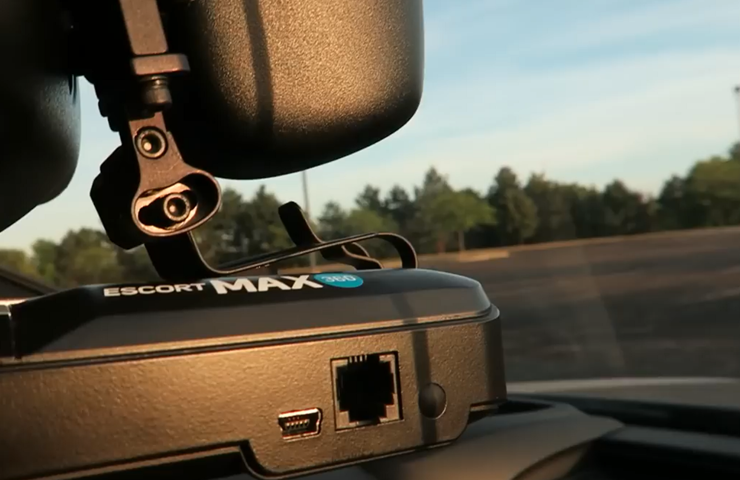
Preparing the Power Connection
Once you have identified the ideal placement and cleaned the windshield, it’s time to prepare the power connection for your radar detector. Most detectors come with a power cord that needs to be connected to your vehicle’s power source. This can be achieved by either using the included wiring harness or tapping into an existing power outlet, such as the cigarette lighter socket.
Before connecting the power cord, ensure that your vehicle’s engine is turned off to avoid any electrical mishaps. Locate a suitable power source and connect the cord securely while following the manufacturer’s instructions. Tuck away any excess wiring neatly to maintain a clean and organized appearance.
It is important to note that some vehicles may require professional installation to ensure a proper power connection. If you are unsure about handling the electrical aspects, consider consulting a professional installer for assistance.
By following these steps, you are now ready to move on to the next phase of the installation process and enjoy the added protection and peace of mind provided by your radar detector.
Wiring And Mounting The Radar Detector
Installing a radar detector in your vehicle can provide you with added peace of mind as you navigate the roads, helping you stay alert to potential speed traps and red light cameras. One crucial step in the installation process is wiring and mounting the radar detector properly. In this section, we will guide you through the steps to wire the power cable to the vehicle’s fuse box, mount the radar detector on the windshield, and conceal the wires for a neat installation.
Wiring the Power Cable to the Vehicle’s Fuse Box
Before you begin wiring the power cable, make sure to familiarize yourself with the vehicle’s fuse box location. This can typically be found in the engine compartment or under the dashboard. Here’s a step-by-step guide:
- Identify a suitable fuse slot in the fuse box to power your radar detector. Look for a fuse that has power when the ignition is turned on but is not essential for the proper operation of your vehicle.
- Turn off the ignition and remove the selected fuse using a fuse puller tool. Make sure to keep the fuse in a safe place.
- Connect the power cable’s red wire to the fuse socket where the original fuse was installed. Ensure a secure connection to avoid any loose connections or potential damage.
- Attach the ground wire to a suitable grounding point in the vehicle. Look for an unpainted metal surface or a grounding point specifically labeled in your vehicle’s manual.
- Once the connections are secure, reinstall the extracted fuse in the designated slot.
- Test the radar detector to ensure it’s receiving power properly. If everything is functioning correctly, you can proceed to mount the radar detector.
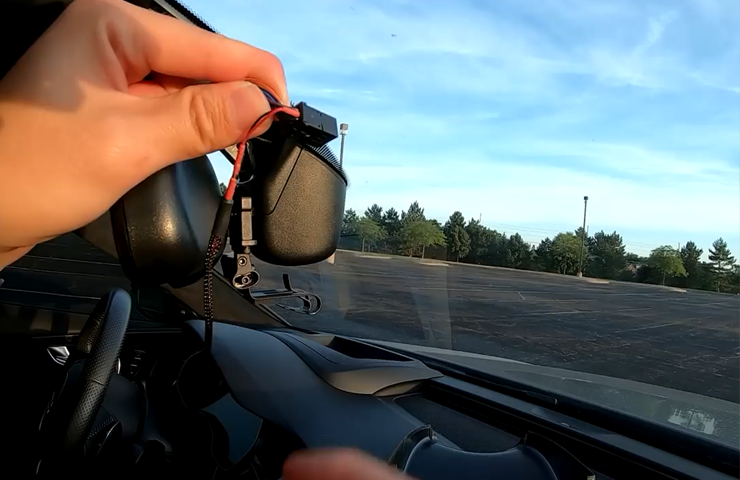
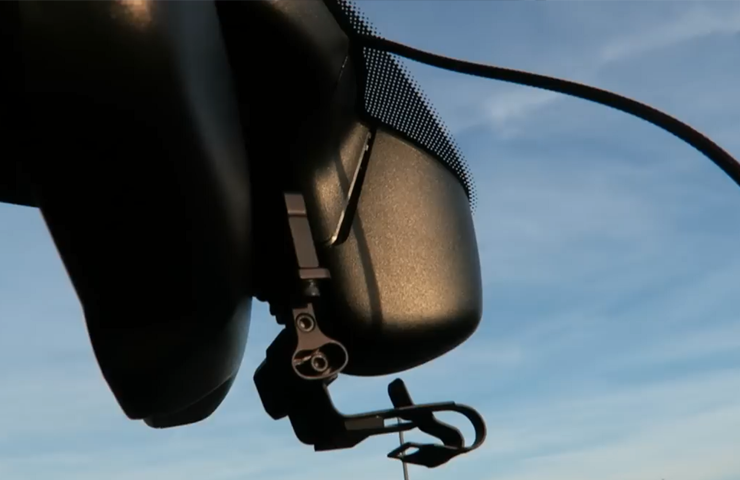
Mounting the Radar Detector on the Windshield
Mounting the radar detector on the windshield allows for optimal visibility and maximum effectiveness. Follow these steps to mount your radar detector securely:
- Choose a suitable location on the windshield that offers a clear line of sight and does not obstruct your view of the road.
- Thoroughly clean the chosen area on the inside of the windshield using a glass cleaner to ensure proper adhesion.
- Remove the protective backing from the suction cup mount and firmly press it onto the desired location.
- Attach the radar detector onto the suction cup mount, ensuring it clicks into place securely.
- Adjust the angle of the radar detector to your preference, allowing for easy viewing and access.
Concealing the Wires for a Neat Installation
To achieve a clean and discreet installation, you’ll want to conceal the wires effectively. Disorganized and visible wires can be distracting and take away from the overall aesthetic of your vehicle’s interior. Here are a few suggestions for concealing the wires:
- Use wire clips or adhesive cable routing channels to secure the power cable along the vehicle’s interior panels.
- Tuck excess cable length behind the dashboard or under carpeting, utilizing existing cable routing channels when possible.
- Make sure to avoid any moving parts or areas that may interfere with the vehicle’s operations.
By properly wiring and mounting your radar detector, as well as concealing the wires for a neat installation, you can enhance both the functionality and appearance of your vehicle. Take the time to follow these steps carefully, and you’ll be well on your way to enjoying a hassle-free and efficient radar detector experience.
Connecting The Radar Detector To Power
One of the crucial steps in installing a radar detector is connecting it to a power source. By doing so, you ensure that your detector has the necessary power to function properly and provide you with accurate information about radar signals. In this guide, we will walk you through the process of connecting your radar detector to power, covering everything from locating the appropriate fuse in the fuse box to ensuring a secure and proper wiring connection.
Locating the Appropriate Fuse in the Fuse Box
Before you can connect the radar detector to power, you need to locate the appropriate fuse in the fuse box of your vehicle. The fuse box is typically located under the dashboard or in the engine compartment. Refer to your vehicle’s manual to find the exact location of the fuse box, as it may vary depending on the make and model of your vehicle.
Once you have located the fuse box, carefully inspect the fuses to identify which one is suitable for powering the radar detector. Look for a fuse labeled “ACC” (Accessory) or “CIG” (Cigarette Lighter). These fuses are often the ones that provide power to auxiliary devices in the vehicle.

Tapping into the Fuse for Power Connection
After identifying the appropriate fuse, the next step is to tap into it for power connection. You will need a fuse tap, which is a device that allows you to connect additional wiring to an existing fuse without affecting the original circuit. Fuse taps can be found at most automotive stores or online.
To tap into the fuse, first, remove the designated fuse from its slot using a fuse puller or a pair of pliers. Insert the fuse tap into the vacant slot, ensuring that it fits securely. Then, insert the original fuse into the top slot of the fuse tap, which will serve as the power source for your radar detector.
Ensuring Proper Wiring for a Secure Connection
Once the fuse tap is securely in place, you need to ensure proper wiring for a secure connection. Begin by connecting the positive (red) wire from the radar detector to the power terminal of the fuse tap. Use a crimp connector or soldering iron to join the two wires securely.
Next, connect the negative (black) wire from the radar detector to a suitable ground point in your vehicle. Look for a metal surface or screw that is securely grounded and use a ring terminal to create a solid connection.
After completing the wiring connections, carefully tuck the wires out of sight, ensuring that they do not interfere with the operation of any vehicle controls or obstruct your view while driving. Use zip ties or clips to secure the wires neatly along the vehicle’s existing wiring harness.
Now that you have successfully connected your radar detector to power, you can proceed with mounting the detector in the desired location, such as your windshield or dashboard. Remember to follow any additional instructions provided by the manufacturer for the best performance and accuracy of your radar detector.
Installing a radar detector can help you stay informed about potential speed traps and avoid costly tickets. By connecting it to power properly and securely, you can ensure its reliable operation while on the road.
Testing And Calibrating The Radar Detector
When it comes to installing a radar detector, testing and calibrating the device plays a crucial role in ensuring its optimal performance. This step ensures that the radar detector is functioning properly and accurately detecting radar signals. In this section, we will cover the methods for activating and testing the radar detector, adjusting the sensitivity and volume settings, and calibrating the device for optimal performance.
Activating and Testing the Radar Detector
Once the radar detector is properly installed, it’s time to activate and test the device. To activate the radar detector, simply power it on by pressing the designated power button. Ensure that it is receiving power and displays the appropriate indicators on its screen, such as the power symbol or a welcome message. Now, it’s time to test the radar detector to make sure it is properly functioning.
Take your vehicle for a short drive in an area with low to moderate traffic. Keep in mind that it is important to avoid areas with known speed traps or law enforcement officers, as testing a radar detector in these areas might lead to unwanted attention or legal consequences. As you drive, keep an eye on the radar detector’s display for any detections.
If the radar detector detects a radar signal, it should emit an audible alert and display relevant information about the signal, such as the frequency or the type of radar used. If the radar detector fails to detect any signals, double-check the installation and positioning of the device. You may need to adjust the settings or reposition the radar detector to ensure it has a clear line of sight.
Adjusting the Sensitivity and Volume Settings
To optimize the radar detector’s performance, you may need to adjust the sensitivity and volume settings. These settings allow you to customize the radar detector’s response based on your driving conditions and personal preferences.
Start by accessing the settings menu of your radar detector. This can usually be done by pressing a specific button or combination of buttons on the device. Once in the settings menu, look for options related to sensitivity and volume. Adjust the sensitivity setting to a level that provides a balance between detecting genuine radar signals and minimizing false alerts. Higher sensitivity levels may result in more false alerts, while lower sensitivity levels may cause you to miss legitimate radar signals.
Next, adjust the volume setting to a level that is easily audible but not overly distracting. Find a balanced volume level that allows you to hear the alerts clearly without overwhelming other sounds in your vehicle.
Calibrating the Radar Detector for Optimal Performance
Calibrating the radar detector is essential to ensure accurate readings and optimal performance. Calibration involves configuring the device for specific radar frequencies commonly used in your area. Most radar detectors feature a built-in calibration mode or auto-learn function.
To calibrate the radar detector, follow the manufacturer’s instructions specific to your device. This typically involves activating the calibration mode and driving in an area with known radar sources. The radar detector will then automatically analyze and store the signals to fine-tune its detection capabilities.
It is also recommended to periodically check for firmware updates from the manufacturer. These updates can provide improved performance and compatibility with new radar technologies.
| Summary: | Testing and Calibrating the Radar Detector |
|---|---|
| Main Points: | Activating and Testing the Radar DetectorAdjusting the Sensitivity and Volume SettingsCalibrating the Radar Detector for Optimal Performance |
| Key Actions: | Power on the radar detectorTest the radar detector in low to moderate traffic areasAdjust the sensitivity and volume settings based on driving conditionsCalibrate the radar detector for specific radar frequenciesCheck for firmware updates from the manufacturer periodically |
Troubleshooting And Maintenance Tips
Installing a radar detector can be a great investment for your vehicle’s safety. However, like any electronic device, it may encounter issues or require regular maintenance to ensure optimal performance. In this section, we will explore some common issues and solutions for radar detector installation, proper cleaning and maintenance techniques, and the importance of regularly updating the radar detector software.
Common Issues and Solutions for Radar Detector Installation
If you have recently installed a radar detector and are facing some difficulties, fret not. Here are some common issues and their corresponding solutions:
| Issue | Solution |
|---|---|
| The radar detector is not turning on | Make sure the power connections are secure and the fuse is not blown. Check the power source and ensure it is functioning. |
| False alerts or inconsistent detection | Adjust the radar detector’s sensitivity settings according to the manufacturer’s instructions. Ensure it is properly mounted and aligned for accurate detection. |
| Interference from other devices | Keep the radar detector away from other electronic devices that emit strong signals, such as portable radios or cell phones. In some cases, using a filter or shield can help reduce interference. |
Proper Cleaning and Maintenance of the Radar Detector
Regular cleaning and maintenance can significantly extend the lifespan of your radar detector. Follow these tips to keep it in top shape:
- Use a soft cloth or microfiber towel to wipe away dust and smudges from the detector’s display and body. Avoid using abrasive materials that may scratch the surface.
- Check the mounting bracket and suction cups for any signs of wear or damage. Replace them if necessary to ensure a secure and stable installation.
- Inspect the power cord and connectors for any fraying or loose connections. Repair or replace them if needed to maintain a reliable power supply.
Regularly Updating the Radar Detector Software
Keeping your radar detector’s software up to date is crucial for optimal performance. Manufacturers often release software updates to enhance detection capabilities and address any potential bugs. Here’s how to update the software:
- Visit the manufacturer’s website and look for the software update section.
- Download the latest software version compatible with your radar detector model.
- Connect your radar detector to your computer using a USB cable.
- Follow the instructions provided by the manufacturer to install the software update onto your radar detector.
- After the update is complete, disconnect the radar detector from your computer and test its functionality to ensure the update was successful.
By troubleshooting any installation issues, regularly cleaning and maintaining your radar detector, and staying up to date with software updates, you can enjoy accurate and reliable performance from your radar detector for years to come.
Frequently Asked Questions Of How To Install A Radar Detector
Where Do You Place A Radar Detector?
Position your radar detector on the windshield, near the rearview mirror. This placement provides optimal visibility and minimizes obstruction. Make sure it doesn’t interfere with your view while driving. Avoid mounting it behind tinted areas or metalized windshields, as they may lessen its effectiveness.
How Can I Hide My Radar Detector In My Car?
To hide your radar detector in your car, consider these tips: 1. Install it behind the rear-view mirror or under the dash to conceal it from the view outside. 2. Use a mounting bracket to securely attach it to the windshield or dashboard.
3. Hide the power cord by routing it along the car’s interior and under the carpet. 4. Opt for a smaller, compact radar detector to make it less noticeable.
How Do Police Know If You Have A Radar Detector?
Police can determine if you have a radar detector by using radar-detector-detectors. These devices can pick up signals emitted by radar detectors.
What States Is It Legal To Have A Radar Detector?
Radar detectors are legal in all states except for Washington D. C. and Virginia.
Conclusion
Installing a radar detector doesn’t have to be a complex process. By following these step-by-step instructions, you can easily set up your radar detector and enhance your driving experience. Remember to choose the right location, connect the device properly, and test it to ensure optimal performance.
With a radar detector in place, you can stay alert and avoid potential speeding tickets. Stay safe on the road with this essential gadget!