To install the 2017 Hyundai Elantra front license plate bracket, first, ensure that you have the necessary tools and equipment. Then, follow these steps: (proceed to describe the installation process).
The 2017 Hyundai Elantra is an impressive vehicle known for its sleek design and cutting-edge features. If you need to install a front license plate bracket on your Elantra, you’ve come to the right place. We will guide you through the process of installing a front license plate bracket on your 2017 Hyundai Elantra.
By following the steps outlined below, you can have your license plate securely attached in no time. It’s a straightforward process that requires a few basic tools and can be done by even the most novice of car owners. So, let’s get started and have your front license plate securely mounted on your 2017 Hyundai Elantra.
Materials Needed
The installation of a front license plate bracket on a 2017 Hyundai Elantra is a simple and straightforward process that can be completed with just a few materials. By following the step-by-step instructions in your vehicle owner’s manual and gathering the necessary materials beforehand, you can easily install the front license plate bracket on your Hyundai Elantra.
Front License Plate Bracket
The first material you will need is the front license plate bracket. This bracket is designed specifically for your 2017 Hyundai Elantra and ensures a secure and proper mounting for your license plate. It is crucial to use the correct front license plate bracket to avoid any damage to your vehicle’s front grille or bumper.
Screwdriver
To securely fasten the front license plate bracket onto your 2017 Hyundai Elantra, you will need a screwdriver. The screwdriver will be used to tighten the screws or bolts that hold the bracket in place. Make sure to choose a screwdriver that fits the size and type of screws or bolts provided with your front license plate bracket.
Mounting Hardware (included in the kit)
When purchasing a front license plate bracket kit for your 2017 Hyundai Elantra, it typically comes with the necessary mounting hardware. This hardware may include screws, bolts, or clips that are specifically designed to attach the bracket to your vehicle’s front grille or bumper. It is important to use the provided mounting hardware to ensure a secure installation.
Vehicle Owner’s Manual
Lastly, you will need to refer to your vehicle owner’s manual for specific instructions on installing the front license plate bracket. The owner’s manual will provide you with detailed step-by-step guidelines, including any recommended tools or techniques to ensure a successful installation. Always consult your vehicle owner’s manual for accurate and vehicle-specific information.
By gathering these materials beforehand, including the front license plate bracket, a screwdriver, mounting hardware (included in the kit), and your vehicle owner’s manual, you will be well-prepared to install the front license plate bracket on your 2017 Hyundai Elantra. Following the guidelines provided by the manufacturer and using the correct materials will ensure a secure and proper installation of your front license plate bracket.
Step 1: Gather The Required Tools And Materials
Ensure you have all the necessary tools and materials before starting the installation process.
Installing a front license plate bracket on your 2017 Hyundai Elantra is a simple yet important task that ensures your vehicle is compliant with the law. Before you begin the installation process, it is crucial to gather all the required tools and materials. By having everything ready, you can save time and make the installation process smoother. In this step-by-step guide, we will walk you through the entire process of installing the front license plate bracket on your 2017 Hyundai Elantra. So let’s get started and ensure you have all the necessary tools and materials at hand!
Tools and Materials
Before you dive into the installation process, check whether you have all the tools and materials listed below. Having everything you need will make the installation process easier and more efficient. Here’s what you’ll need: 1. Front license plate bracket kit: Purchase a front license plate bracket kit for the 2017 Hyundai Elantra model. You can easily find this kit at your nearest Hyundai dealership or an automotive store specializing in Hyundai parts. 2. Screwdriver: A screwdriver is a essential tool for attaching the front license plate bracket to your vehicle. Ensure you have a suitable screwdriver that fits the screws provided in the kit. 3. Tape measure: A tape measure will come in handy when determining the precise placement of the front license plate bracket. It will help you ensure the bracket is centered correctly on the vehicle. 4. Drill and drill bits: In some cases, you may need a drill to create pilot holes for the screws. Check the instructions provided with your front license plate bracket kit to determine if drilling is necessary. 5. Masking tape: Masking tape is useful for marking the spot where you will be installing the front license plate bracket. It will provide a guide to ensure accurate placement. 6. Rag or towel: Keeping a rag or towel nearby will help you clean the area before installing the front license plate bracket. This will ensure proper adhesion and prevent any loose debris from interfering with the installation process. By gathering these tools and materials, you’ll be well-prepared to install the front license plate bracket on your 2017 Hyundai Elantra without any unnecessary delays. So let’s move on to the next step and get ready to complete the installation process flawlessly!
Step 2: Locate The Front License Plate Bracket Mounting Points
Before installing the front license plate bracket on your 2017 Hyundai Elantra, it’s essential to identify the correct mounting points. The owner’s manual provides detailed instructions on where these points are located. Let’s walk through the process step by step.
Refer to the vehicle owner’s manual to identify the correct mounting points for the front license plate bracket
The vehicle owner’s manual serves as a reliable guide to finding the precise locations where the front license plate bracket should be mounted. It contains valuable information specific to your 2017 Hyundai Elantra, ensuring proper installation and adherence to regulations.
Here are the exact steps to follow:
- Retrieve the vehicle owner’s manual. If you don’t have a physical copy, you can often find it online on the Hyundai website.
- Locate the section related to the front license plate bracket installation. Typically, this information can be found in the “Exterior Features” or “License Plate Mounting” section.
- Read through the instructions and study any diagrams or illustrations provided. This will give you a clear understanding of where the mounting points are located.
- Pay close attention to any specific measurements or distances mentioned. These details ensure the bracket is properly aligned and centered on the front of your Elantra.
- Take note of any additional hardware or tools required for the installation. This way, you can gather everything you need before starting the process.
By referring to the vehicle owner’s manual, you can confidently locate the correct mounting points for the front license plate bracket on your 2017 Hyundai Elantra. This step is crucial to ensure a secure and professional installation.
Now that you know where to find the mounting points, let’s move on to the next step – actually attaching the front license plate bracket to your Elantra.
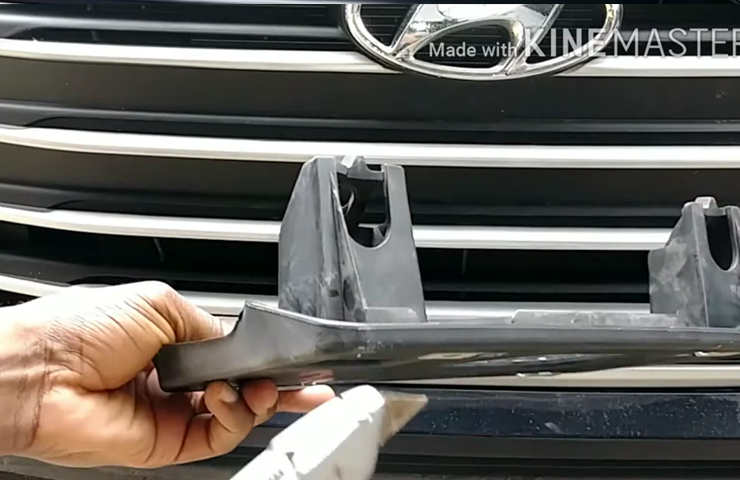
Step 3: Prepare The Front License Plate Bracket
Inspect the front license plate bracket for any defects or damages
Before installing the front license plate bracket on your 2017 Hyundai Elantra, it is important to thoroughly inspect it for any defects or damages. This step is crucial to ensure that the bracket functions properly and securely holds your license plate. Take a close look at the bracket and check for any cracks, dents, or signs of wear. If you notice any issues, it is recommended to replace the bracket to guarantee a secure fit and long-lasting performance.
Ensure that the bracket is compatible with the 2017 Hyundai Elantra
Compatibility is key when it comes to installing a front license plate bracket on your 2017 Hyundai Elantra. To ensure a perfect fit, it is essential to verify that the bracket you have is specifically designed for this particular make and model. Take note of the manufacturer’s specifications and compare them to your vehicle to confirm compatibility. Installing an incompatible bracket can lead to a loose or unstable license plate, which can be a safety hazard. Thus, it’s crucial to double-check and ensure that the bracket is indeed compatible with your 2017 Hyundai Elantra.
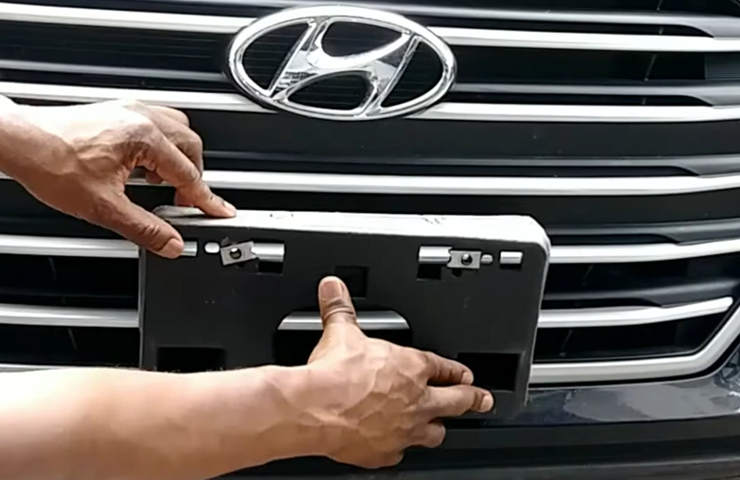
Step 4: Attach The Front License Plate Bracket To The Mounting Points
Now that you have prepared the front license plate bracket and located the mounting points on your 2017 Hyundai Elantra, it’s time to attach the bracket securely. Follow these steps to ensure a proper installation:
Use the provided screwdriver and mounting hardware to secure the front license plate bracket to the designated mounting points.
Grab the screwdriver and the mounting hardware that came with the front license plate bracket. Take a moment to familiarize yourself with the components before proceeding.
Position the bracket over the designated mounting points on the front bumper of your 2017 Hyundai Elantra. Align the holes on the bracket with the mounting points to ensure a proper fit.
Insert the screws into the holes and use the screwdriver to tighten them. Make sure to apply enough force to securely fasten the bracket without damaging the bumper.

Follow the instructions in the owner’s manual for precise installation steps.
While these general steps will guide you through attaching the front license plate bracket, it’s essential to consult your owner’s manual for any specific instructions or precautions outlined by Hyundai. The manual will provide you with precise installation steps tailored to your vehicle.
By following the instructions provided in the owner’s manual, you can ensure proper alignment and avoid any potential damage to your 2017 Hyundai Elantra during the installation process.
Once you have attached the front license plate bracket securely to the mounting points, step back and admire your work. Your Hyundai Elantra is now ready to display its front license plate with confidence!
Step 5: Adjust And Align The Front License Plate Bracket
Once you have successfully installed the 2017 Hyundai Elantra front license plate bracket, it’s time to focus on the crucial step of adjusting and aligning it properly. This step ensures that the bracket fits perfectly with the front of your vehicle, creating a clean and polished look.
Adjust the position of the bracket to ensure that it aligns perfectly with the front of the vehicle.
Start by examining the position of the front license plate bracket. Ensure that it is centered and aligned with the contours of the vehicle’s front bumper. You can achieve this by visually inspecting the bracket’s placement or by using a measuring tool to confirm its positioning. The goal is to achieve a balanced and symmetrical appearance.
If you find that the bracket is misaligned or not centered, don’t worry. Adjusting the position is a straightforward process that can be easily accomplished. Follow these steps to make the necessary corrections:
- Use a screwdriver or a wrench to loosen the screws that hold the bracket in place. This will allow you to make precise adjustments without damaging the bracket or the vehicle’s front bumper.
- Gently move the bracket from side to side, left or right, until you achieve the desired positioning. Be patient and take your time to carefully align the bracket with the front of the vehicle for a professional and clean look.
- Once you have adjusted the position of the bracket, tighten the screws firmly to secure it in place. Ensure that the bracket is stable and does not wobble before moving on to the next step.
Double-check and make necessary adjustments to achieve proper alignment.
Before you consider the installation complete, it’s essential to double-check the alignment of the front license plate bracket. Take a step back and assess if the position appears straight, level, and properly aligned with the vehicle’s front bumper. This step will guarantee a flawless and visually appealing installation.
If you notice any slight misalignment or if the bracket doesn’t look perfectly flush with the front of the vehicle, don’t panic. Here are a few additional adjustments you can make to achieve the best possible alignment:
- Loosen the screws slightly and readjust the position of the bracket as needed. Use small, incremental movements to ensure you don’t overcorrect.
- Keep checking the alignment from different angles, such as the front, side, and top, to ensure it looks uniform and visually pleasing.
- Once you are satisfied with the alignment, tighten the screws firmly to secure the bracket in its final position.
By following these simple steps, you can adjust and align the front license plate bracket on your 2017 Hyundai Elantra like a pro. This final touch will enhance the overall look of your vehicle and ensure that your license plate is securely and stylishly displayed.
Step 6: Tighten The Mounting Hardware
Once you have positioned the front license plate bracket on your 2017 Hyundai Elantra and attached it using the appropriate screws, it’s crucial to ensure that all the mounting hardware is securely tightened. This step is essential in preventing any movement or vibration of the front license plate bracket, which could potentially result in damage or loss of the license plate.
To properly tighten the mounting hardware, follow these simple guidelines:
- Using the appropriate size wrench or screwdriver, securely tighten each screw or bolt that holds the front license plate bracket in place. Make sure to apply sufficient pressure to firmly secure the bracket to the vehicle’s front bumper.
- Check each screw or bolt individually to ensure they are tightened evenly. This will help distribute the pressure evenly across the bracket and prevent any imbalance or wobbling.
- Take the time to double-check the tightness of each screw or bolt after initially tightening them. Sometimes, a slight adjustment might be necessary to achieve optimal tightness.
- If you notice any screws or bolts that seem loose or not fully tightened, tighten them further until they are securely fastened. Avoid overtightening them, as this may lead to damage.
By securely tightening all the mounting hardware, you can have peace of mind knowing that your front license plate bracket is firmly attached and will stay in place even during bumpy rides or harsh weather conditions.
Step 7: Test The Stability And Functionality
Gently tap on the front license plate bracket to ensure that it is securely attached.
Once you have successfully installed the front license plate bracket on your 2017 Hyundai Elantra, it is important to test its stability and functionality. To do this, start by gently tapping on the bracket to ensure that it is securely attached. Give it a few light taps using your hand or a soft object, like a rubber mallet, to see if it wobbles or feels loose. If it does, you might need to tighten the screws or bolts that hold the bracket in place.
Verify that the bracket is stable and does not wobble.
To further test the stability of the front license plate bracket, it is important to verify that it does not wobble. Give the bracket a firm shake or a gentle push to see if it moves or feels unstable. A secure bracket should remain in place without any significant movement. If you notice any wobbling or instability, you should double-check the installation and make necessary adjustments to ensure a snug fit.
Testing the stability and functionality of the front license plate bracket is crucial to ensure its proper installation. By following these steps, you can be confident that your bracket is securely attached and functions as intended.
Step 8: Review And Verify Legal Requirements
Before completing the installation of your 2017 Hyundai Elantra front license plate bracket, it is important to review and verify the legal requirements for displaying a front license plate in your local area. Failure to comply with these regulations can result in fines or penalties. Here are some guidelines to help you ensure that your installation is in accordance with the law.
Consult Local Regulations
The first step in reviewing the legal requirements is to consult your local regulations. Each state or area may have different rules regarding the display of front license plates on vehicles. It is crucial to understand these regulations to avoid any legal issues.
Some areas require vehicles to have front license plates displayed at all times, while others may only require a front license plate to be displayed if the vehicle is parked on a public road. Additionally, certain regions might have specific guidelines for the placement and visibility of the license plate.
Confirm Compliance
Once you have reviewed the local regulations, it is essential to confirm that your installation meets the compliance requirements. Here are a few key points to consider:
- Mounting Location: Ensure that the front license plate bracket is installed in a location that adheres to the regulations of your area. This might include specifications such as height from the ground or distance from the bumper.
- Visibility: Confirm that the license plate is clearly visible and unobstructed by any part of the vehicle. This includes checking for any obstructions such as grilles, bumpers, or accessories that may hinder the readability of the license plate.
- Fastening Method: Double-check that the front license plate bracket is securely fastened to the vehicle. Loose or unstable installations can result in the license plate falling off or becoming damaged.
Preventative Measures
To avoid any future issues, it is beneficial to take preventative measures. This can include periodically checking the license plate bracket to ensure it remains securely fastened. Regularly inspecting the license plate for readability and any potential damage can also help you avoid problems.
By reviewing and adhering to the legal requirements for displaying a front license plate, you can enjoy peace of mind knowing that you are compliant with the law. Remember that it is always better to be proactive and prevent any legal consequences that may arise from non-compliance.
Step 9: Clean Up And Final Inspection
Once you have successfully installed the front license plate bracket for your 2017 Hyundai Elantra, it’s time to clean up and perform a final inspection to ensure everything is in place and meets your satisfaction. This step is crucial as it not only adds the finishing touches to the installation process, but also ensures that the bracket is securely attached and the vehicle’s appearance is not compromised.
Remove any excess debris or fingerprints from the vehicle and the front license plate bracket
Before finalizing the installation, it’s important to clean up any excess debris or fingerprints from both the vehicle and the front license plate bracket. This will not only improve the overall aesthetics but also prevent any potential damage or scratches to the surface of your Hyundai Elantra.
To effectively clean the vehicle and the bracket, follow these steps:
- Begin by using a soft microfiber cloth to gently wipe away any visible debris or dust from the surface of the vehicle. Ensure that you cover all areas, including the area around the front license plate bracket.
- Next, dampen another clean microfiber cloth with a mild detergent solution or automotive cleaner. Be sure to wring out any excess liquid to avoid dripping.
- Gently wipe the vehicle and the bracket, paying close attention to areas where fingerprints or stubborn dirt may be present.
- Once you have thoroughly cleaned the surfaces, use a dry microfiber cloth to remove any moisture or residue.
By following these steps, you’ll not only ensure a clean and professional-looking installation but also protect the integrity of your Hyundai Elantra.

Inspect the installation to ensure that it meets your satisfaction and adheres to all guidelines
After cleaning up, it’s important to conduct a final inspection to ensure that the front license plate bracket is securely installed and meets your satisfaction. Performing this inspection will give you peace of mind that your Hyundai Elantra is ready for the road.
To inspect the installation, consider the following:
- Check for any loose or wobbly parts. Ensure that all screws, bolts, or clips used in the installation are tightened properly.
- Verify that the front license plate bracket is aligned correctly and sits flush against the vehicle’s surface.
- Ensure that there are no visible gaps or misalignment between the bracket and the vehicle.
- Confirm that the bracket does not obstruct any essential features of the vehicle, such as vents or sensors.
If you notice any issues or concerns during the inspection, make the necessary adjustments or seek professional assistance to rectify them. It’s important to adhere to all guidelines and regulations regarding the installation of the front license plate bracket to avoid any legal or safety issues.
By thoroughly cleaning up and conducting a final inspection, you can ensure that the installation of your 2017 Hyundai Elantra front license plate bracket is successful and meets your expectations. Now, you can drive confidently knowing that your license plate is securely affixed and your vehicle looks great.
Step 10: Conclusion
Congratulations! You have successfully installed the 2017 Hyundai Elantra front license plate bracket. Enjoy your newly attached front license plate.
Now that you have completed the installation process of the front license plate bracket for your 2017 Hyundai Elantra, it’s time to step back and admire your handiwork. Your vehicle now has a professional and finished look with the front license plate securely in place. Not only does this enhance the overall appearance of your car, but it also ensures that you are compliant with local laws requiring the display of a front license plate.
Take a moment to appreciate the effort you put into installing the front license plate bracket. By following the step-by-step instructions provided in this blog post, you have successfully completed the installation process without any hassle. With the license plate bracket attached properly, you can now confidently drive your Hyundai Elantra knowing that your license plate is secure and won’t fall off while on the road.
Having a front license plate not only fulfills the legal requirement but also helps in identifying your vehicle easily by law enforcement officials, parking attendants, and others. Plus, the front license plate bracket adds a touch of finesse to your car’s exterior, making it look even more appealing.
Now is the perfect time to take your newly installed front license plate bracket for a spin. Show off your stylish and law-abiding vehicle to your friends and family. Enjoy the peace of mind that comes with knowing you have taken all the necessary steps to ensure your license plate is securely fastened.
Frequently Asked Questions For How To Install 2017 Hyundai Elantra Front License Plate Bracket
How Do You Install A Front Plate Bracket?
To install a front plate bracket, follow these steps: 1. Position the bracket on the front bumper. 2. Use a drill to make holes in the bumper according to the bracket’s guide. 3. Insert screws through the bracket and into the bumper holes.
4. Tighten screws with a screwdriver until secure. 5. Double-check the bracket for stability.
How Do You Put A Front License Plate On Without Holes?
To put a front license plate on without holes, you can use adhesive mounting tape or a license plate bracket that attaches to the grille or bumper. Both options are easy to install and do not require drilling into the vehicle’s front.
How Do You Install A Front Tow Hook License Plate?
To install a front tow hook license plate, follow these steps: 1. Locate the front tow hook on your vehicle. 2. Align the license plate bracket with the tow hook. 3. Insert the bolts and tighten them securely. 4. Attach the license plate to the bracket.
5. Double-check the installation for stability.
How Do You Install A Plastic License Plate Holder?
To install a plastic license plate holder, follow these steps: 1. Clean the car’s bumper surface. 2. Align the holder with the license plate holes. 3. Insert and tighten screws into the holes. 4. Ensure the holder is straight. 5.
Double-check for secure installation.
Conclusion
Installing the front license plate bracket on your 2017 Hyundai Elantra is a quick and simple process that can easily be done at home. By following the step-by-step instructions provided in this blog post, you can ensure a secure and professional installation.
Remember to check your local regulations regarding license plate placement and display. With this easy guide, you’ll have your front license plate bracket installed in no time, adding both style and functionality to your Hyundai Elantra. Happy installing!