To install brake pad clips, remove the old clips, clean the brake caliper, and slide the new clips into place. Are you looking to install brake pad clips on your vehicle?
Brake pad clips are an essential component of the braking system as they ensure the proper positioning and stability of the brake pads. In this guide, we will provide you with a step-by-step process to install brake pad clips. By following these instructions, you can ensure the effective functioning of your vehicle’s braking system and enhance overall safety.
So, let’s get started and learn how to install brake pad clips in a few simple steps.
Understanding Brake Pad Clips
Understanding Brake Pad Clips
When it comes to maintaining your vehicle’s braking system, understanding the different components is crucial. One such component that plays a vital role in ensuring optimal braking performance is the brake pad clip. Brake pad clips are small metal clips that attach the brake pads to the calipers, allowing for smooth and secure movement. These clips are essential as they not only hold the brake pads in place but also help dampen vibrations and reduce noise caused by pad movement. In this article, let’s delve deeper into the world of brake pad clips and their importance in brake system maintenance.
<h3>What are Brake Pad Clips and their importance?</h3>
Brake pad clips, as mentioned earlier, are small metal clips that serve as a connection between the brake pads and the calipers. They are designed to provide stability and allow for proper alignment of the brake pads, ensuring efficient braking performance. These clips are typically made of high-quality steel to withstand the intense heat and pressure generated during braking.
Now, let’s discuss the importance of brake pad clips:
- Secure Brake Pad Placement: Brake pad clips play a crucial role in keeping the brake pads securely in place. Without these clips, the brake pads may dislodge from the calipers, leading to reduced braking efficiency and even potential accidents.
- Vibration Dampening: Brake pad clips act as shock absorbers, effectively dampening vibrations caused by pad movement. This helps in reducing noise and preventing excessive wear and tear on the brake pads and calipers.
- Noise Reduction: By securely fastening the brake pads to the calipers, brake pad clips minimize noise that may occur due to pad vibrations or loose-fitting components.
- Improved Brake Performance: The proper installation of brake pad clips ensures optimal alignment of the brake pads with the calipers. This alignment leads to improved brake performance, enabling efficient stopping power and better overall braking system functioning.
<h3>Different types of Brake Pad Clips available in the market</h3>
The market offers various types of brake pad clips, each catering to different vehicle models and brake systems. Here are some common types:
| Type of Brake Pad Clip | Description |
|---|---|
| Metal Retainer Clip | This type of clip features sturdy metal construction and provides excellent durability. Metal retainer clips are often used in heavy-duty vehicles or vehicles with high-performance braking systems. |
| Anti-Rattle Clip | Anti-rattle clips are designed specifically to minimize noise caused by pad vibrations. These clips feature additional rubber or silicone padding to dampen vibrations effectively. |
| Wire Clips | Wire clips offer a secure hold on the brake pads while allowing for easy installation and removal. They are commonly used in various vehicles due to their versatility. |
When replacing or installing brake pad clips, consult your vehicle’s manufacturer manual or seek professional assistance to ensure selecting the appropriate type for your specific brake system.
Tools And Materials Required
List of tools and materials needed for installing brake pad clips
Before you begin the installation process of brake pad clips, it’s important to gather all the necessary tools and materials. Having everything on hand will make the installation smoother and more efficient. Here is a comprehensive list of what you’ll need:
- Brake pad clips (make sure they are compatible with your vehicle’s make and model)
- Socket wrench
- Ratchet
- Hex key set
- Brake cleaner spray
- Shop towels
- Wire brush
- Anti-seize lubricant
- New brake pads (optional, but recommended if your current pads are worn out)
- Allen wrench
Make sure to have all these tools and materials ready before you start the installation process. This will save you time and eliminate the need for any interruptions during the installation.
Proper safety precautions to be followed before starting the installation process
Safety should always be the top priority when working on any automotive project. Before you dive into installing brake pad clips, it’s crucial to take some safety precautions to protect yourself and ensure a successful installation. Here are a few important measures to adhere to:
- Turn off the engine and engage the parking brake to prevent the vehicle from rolling.
- Wear gloves and safety goggles to protect your hands and eyes from any potential hazards.
- Make sure to work in a well-ventilated area or wear a respirator mask to avoid inhaling any harmful fumes from the brake cleaner spray.
- Avoid smoking or using any open flames near the work area, as brake cleaner is highly flammable.
- Before starting the installation, make sure the vehicle is properly secured on jack stands to prevent it from accidentally falling.
By following these safety precautions, you can minimize the risk of accidents and ensure a safe working environment throughout the installation process.
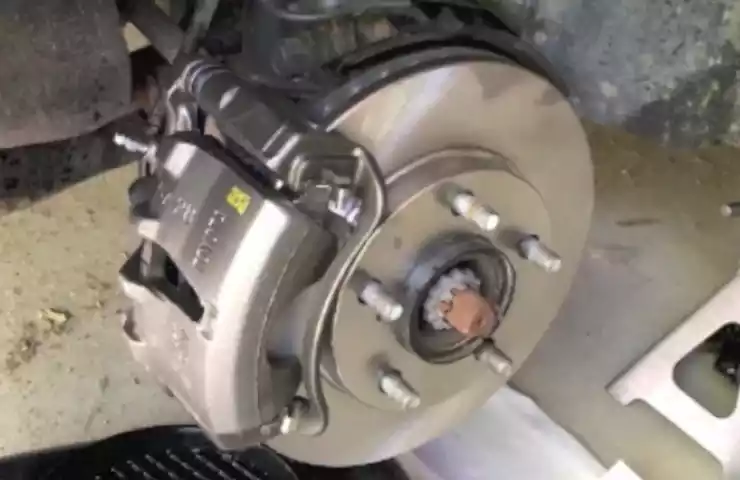
Step 1: Removing The Old Brake Pads
Step 1 in installing brake pad clips is to remove the old brake pads. This essential first step ensures that you have a clean surface to work with and allows for the proper installation of the new brake pad clips. Here, we will guide you through the process with ease.
Removing the wheel and accessing the brake assembly
The first task in removing the old brake pads is to remove the wheel that houses the brake assembly. This can be accomplished by following these simple steps:
- Loosen the lug nuts on the wheel using a lug wrench.
- Use a jack to lift the vehicle off the ground, ensuring proper support and safety.
- Once the vehicle is lifted, remove the lug nuts and the wheel itself.
- With the wheel off, the brake assembly is now exposed and ready for the next steps.
Proper methods to loosen and remove the old brake pads
Now that the wheel has been removed and the brake assembly is accessible, it’s time to focus on loosening and removing the old brake pads. Follow these instructions for a smooth process:
- Inspect the brake assembly to identify the old brake pads, which are typically located on either side of the rotor.
- Using a suitable tool, such as a ratchet or wrench, locate the caliper bolts and loosen them by turning counterclockwise.
- Once the caliper bolts are loosened, carefully slide the caliper away from the rotor, exposing the brake pads.
- Remove the old brake pads from the caliper, ensuring that you note their orientation for future reference.
- Inspect the brake pad clips, which hold the brake pads in place, for any signs of damage or wear. Replace them if necessary.
- Take this opportunity to clean the brake assembly, removing any debris or dirt that may have accumulated.
By following these proper methods to loosen and remove the old brake pads, you are now ready to move on to the next step of installing the new brake pad clips. Stay tuned for Step 2: Installing the New Brake Pad Clips.
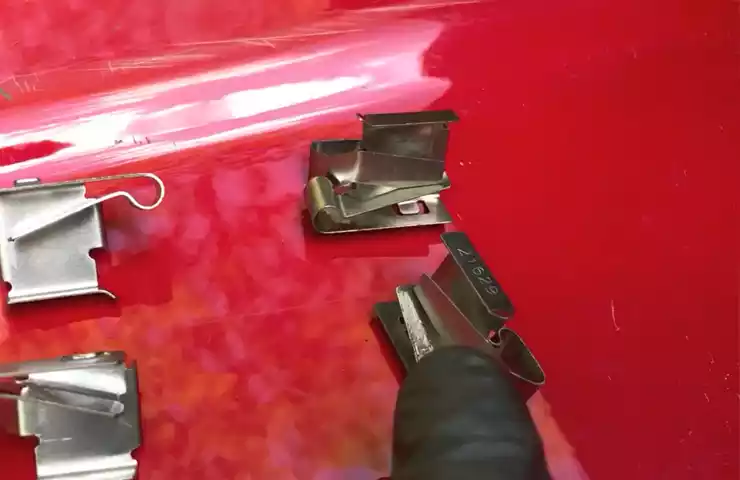
Step 2: Inspecting And Preparing The Brake Pad Clips
Before installing new brake pad clips, it is important to inspect the condition of the existing ones and prepare them properly for a smooth installation. Taking the time to analyze their condition and clean and lubricate them will ensure optimal performance and longevity of your brake system.
Analyzing the condition of the existing brake pad clips
First, carefully examine the brake pad clips to determine their condition. Look for signs of wear, corrosion, or damage that may affect their ability to secure the brake pads effectively. Ensure the clips are not bent or distorted, as this can hamper their functionality. If any issues are found, it is recommended to replace them with new clips.
Cleaning and lubricating the brake pad clips for smoother installation
Once you have assessed the condition of the existing brake pad clips and confirmed they can still be used, the next step is to clean and lubricate them. This will facilitate a smoother installation process and ensure proper functioning of the brake system.
To clean the brake pad clips, follow these steps:
- Remove the clips from the brake caliper or anchor plate.
- Using a wire brush or a suitable cleaning tool, carefully scrub off any dirt, rust, or debris from the clips.
- Rinse the clips thoroughly with water to remove any remaining residue.
- Dry the clips completely using a clean cloth or air compressor.
After cleaning the clips, it is crucial to lubricate them to ensure smooth movement and reduce any potential noise or vibration. Here’s how to lubricate the brake pad clips:
- Apply a thin layer of high-temperature brake grease or lubricant to the contact surfaces of the clips. Focus on the areas where the brake pads make direct contact with the clips.
- Ensure an even distribution of the lubricant to prevent uneven wear on the brake pads.
- Reinstall the brake pad clips onto the brake caliper or anchor plate, making sure they are securely in place.
By analyzing the condition of the existing brake pad clips and properly cleaning and lubricating them, you are taking important steps to ensure a successful brake pad installation. This will contribute to optimal brake performance and enhanced safety while driving.
Step 3: Aligning The Brake Pad Clips
Understanding the Correct Positioning of the Brake Pad Clips
When it comes to installing brake pad clips, it is crucial to understand the correct positioning to ensure optimal performance and safety. Brake pad clips are small metal clips that hold the brake pads securely in place within the brake caliper. They play a vital role in reducing noise and vibrations while ensuring smooth and effective braking. To align the brake pad clips correctly, follow the step-by-step instructions below.
Ensuring the Clips Align with the Brake Caliper and Pad Smoothly
- Start by inspecting the brake caliper and brake pad for any debris, corrosion, or damage. It is essential to have a clean and properly functioning brake system before installing the new brake pad clips.
- Once you have confirmed the caliper and pad condition, take the new brake pad clips and place them in the correct location on the caliper. Refer to your vehicle’s service manual or brake pad manufacturer’s instructions for the specific positioning of the clips.
- Align the clips with the designated slots or holes on the caliper. The clips should fit snugly and securely, ensuring they are seated properly.
- Next, you’ll need to align the brake pad with the brake caliper and clips. Gently slide the brake pad into the caliper while making sure it aligns with the clips. Apply light pressure to ensure the pad settles correctly in its position.
- Repeat the process for the remaining brake pad and clips on the other side of the caliper. Remember, proper alignment is crucial to prevent noise, vibrations, and uneven pad wear.
- Before completing the installation, double-check the alignment of the clips and pads. Ensure they fit smoothly and securely, without any gaps or misalignment.
- Finally, give the brake system a quick visual inspection to confirm everything is in order. It is essential to provide a thorough check to prevent any potential issues that may arise from incorrect installation.
- In conclusion, aligning the brake pad clips correctly is essential for proper brake functionality. By following the step-by-step instructions provided, you can ensure smooth, noise-free braking and increase the longevity of your brake pads. Take the time to align the clips accurately, and you’ll enjoy the benefits of a well-functioning brake system.
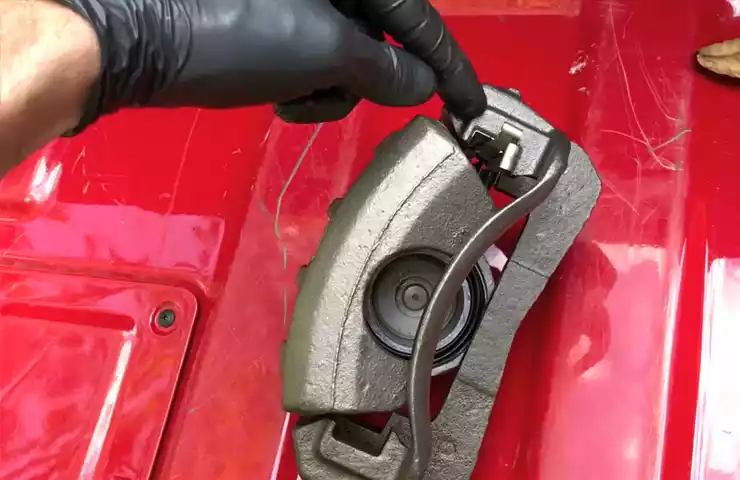
Step 4: Installing The Brake Pad Clips
Properly installing the brake pad clips is crucial for the overall effectiveness and performance of your vehicle’s braking system. The clips serve as a guide and support for the brake pads, ensuring optimal contact with the rotors and preventing any unnecessary noise or movement during braking. In this step-by-step guide, we will walk you through the proper techniques for inserting the brake pad clips into the caliper bracket and securing them to ensure a smooth and silent braking experience.
Proper techniques for inserting the brake pad clips into the caliper bracket
Inserting the brake pad clips may seem like a simple task, but it requires precision and attention to detail. Follow these steps to ensure proper installation:
- Begin by gently removing the old clips from the caliper bracket. Inspect them closely for any signs of wear or damage, as replacing them might be necessary.
- Next, clean the caliper bracket thoroughly to remove any residue or debris that could interfere with the new clip’s installation.
- Take the new brake pad clips and align them with the designated slots on the caliper bracket. Ensure that they fit snugly and are oriented correctly.
- Use a firm but gentle pressure to push the clips into place. Avoid using excessive force, as it could damage the clips or distort the caliper bracket.
- Double-check that the clips are securely seated within the bracket. They should be flush against the surface, with no gaps or misalignment.
Securing the clips to prevent any movement or noise during braking
Once the brake pad clips are correctly inserted into the caliper bracket, it’s essential to secure them properly. Follow these steps to prevent any unwanted movement or noise:
- Apply a thin layer of high-temperature brake lubricant to the back of the brake pad where it comes in contact with the clips. This lubrication will reduce friction and potential noise during operation.
- Ensure that the clips are tightly secured to the brake pads. Double-check that they are fully clipped into place, leaving no room for movement.
- If your brake pad clips have additional features such as retaining springs or anti-rattle clips, make sure they are correctly aligned and engaged to enhance stability and noise reduction.
- Before reinstalling the brake caliper, make sure the brake pads move freely and smoothly within the clips. Any binding or resistance could indicate an improperly installed clip.
By following these proper techniques for installing and securing brake pad clips, you’ll ensure the smooth and reliable operation of your vehicle’s braking system. Remember, precision and attention to detail are key in this step, so take your time and double-check your work. When done correctly, your brakes will perform at their best, providing you with a safe and quiet driving experience.
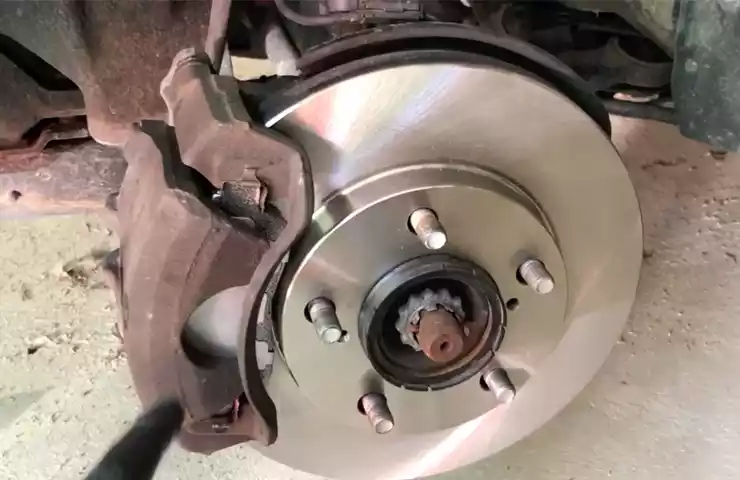
Step 5: Reassembling The Brake System
Once you have successfully replaced the old brake pads with new ones and installed the brake pad clips, it’s time to reassemble the brake system. This step involves placing the new brake pads onto the brake caliper bracket and reattaching the brake caliper and wheel to their original positions.
Placing the new brake pads onto the brake caliper bracket
First, carefully position the new brake pads onto the brake caliper bracket. Make sure the brake pads align with the corresponding slots or grooves on the bracket. This ensures proper placement and effective braking performance.
You might find it helpful to consult the brake pad manufacturer’s instructions or reference diagrams to ensure correct positioning. Slide the brake pads into place, ensuring they are snug within the bracket.
Reattaching the brake caliper and wheel to their original positions
After placing the new brake pads onto the bracket, it’s time to reattach the brake caliper and wheel. Start by aligning the brake caliper with the bracket, making sure it fits securely. Slowly push the caliper towards the bracket until it’s flush against the brake pads.
Next, insert the bolts or pins back into their respective holes and tighten them with the appropriate tools. This step ensures the brake caliper is firmly attached to the bracket, allowing for smooth and reliable braking.
Once the brake caliper is securely in place, it’s time to reattach the wheel. Line up the wheel studs or bolts with the corresponding holes on the brake rotor, ensuring they are properly aligned. Carefully tighten the wheel nuts or bolts using a lug wrench or socket wrench. Make sure they are tightened to the manufacturer’s recommended torque specifications.
Finally, double-check the brake system to ensure everything is properly reassembled. Confirm that the brake pads are securely positioned on the caliper bracket and that the caliper is securely attached to the bracket. Also, ensure that the wheel is securely fastened to the brake rotor.
By carefully following these steps, you can successfully reassemble the brake system after installing brake pad clips and enjoy safe and reliable braking performance.
Step 6: Testing And Final Adjustments
Now that you have successfully installed the brake pad clips, it’s time to make sure everything is working as it should. Step 6 involves performing a test drive to ensure the proper functioning of the brake pad clips and making any necessary adjustments to optimize the installation.
Performing a test drive to ensure the proper functioning of the brake pad clips:
Once the installation is complete, it’s crucial to test the brake pad clips to ensure they are working effectively. Here’s how you can perform a test drive:
- Choose a safe location with minimal traffic to perform your test drive.
- Start your vehicle and allow it to warm up for a few minutes.
- Gradually apply pressure to the brake pedal and observe the responsiveness of the brakes.
- Pay close attention to any unusual noises or vibrations coming from the braking system.
- Test the brakes at different speeds to evaluate their performance under various conditions.
- If you notice any issues such as squeaking, grinding, or reduced braking power, it’s essential to investigate and address the problem before continuing to drive.
Making any necessary adjustments to optimize the brake pad clip installation:
During the test drive, you may identify certain aspects that require adjustments to optimize the brake pad clip installation. Here are a few adjustments you might need to consider:
- Brake pad alignment: Ensure the brake pads are properly aligned with the rotor surface. A misaligned brake pad can result in uneven braking or excessive wear.
- Pad contact area: Check the contact area between the brake pad and the rotor. If you notice uneven contact or inconsistencies, adjustments may be needed to optimize the contact surface.
- Brake pad clearance: Verify that there is adequate clearance between the brake pad and rotor. Insufficient clearance can lead to brake drag and premature wear.
- Brake fluid level and pressure: Evaluate the brake fluid level and ensure it meets the manufacturer’s recommendations. Additionally, verify that the brake fluid pressure is within the appropriate range to ensure reliable braking.
By thoroughly testing the brake pad clips and making necessary adjustments, you can optimize their installation and enhance the overall performance and safety of your vehicle’s braking system.
Additional Tips And Recommendations
Additional Tips and Recommendations
Proper installation and maintenance of brake pad clips are essential for optimal brake performance and safety. In this section, we will discuss some common mistakes to avoid during brake pad clip installation and provide maintenance tips to prolong their lifespan. By following these guidelines, you can ensure the efficient functioning of your brake pad clips and enhance the overall performance of your braking system.
Common Mistakes to Avoid during Brake Pad Clip Installation
During brake pad clip installation, it’s crucial to avoid certain common mistakes that can compromise the effectiveness of your braking system. By steering clear of these errors, you can ensure a smooth installation process and prevent potential issues down the road.
- Not cleaning the brake caliper: Before installing the new brake pad clips, make sure to thoroughly clean the brake caliper to remove any dirt, debris, or old adhesive residue. This will help the new clips adhere properly and ensure optimal brake performance.
- Using incorrect clips: It’s important to use the correct brake pad clips that are compatible with your specific vehicle make and model. Using the wrong clips may result in improper fitment and could affect braking efficiency.
- Overlooking proper lubrication: Applying the appropriate lubricant on the brake pad clips is necessary to reduce friction and prevent noise. Neglecting this step can lead to squeaky brakes and potential damage to the clips.
- Misalignment of clips: When installing the brake pad clips, ensure they are properly aligned with the brake caliper and remain securely in place. Improper alignment can cause uneven wear and noisy braking.
Maintenance Tips for Prolonging the Lifespan of Brake Pad Clips
Maintaining your brake pad clips is essential for their longevity and efficient functioning. By following these simple maintenance tips, you can prolong the lifespan of your clips and minimize the need for frequent replacements.
- Regular cleaning: Periodically clean the brake pad clips with a mild detergent and a soft brush to remove any accumulated brake dust or debris. This will help prevent corrosion and ensure smooth operation.
- Inspecting for wear: Routinely inspect the brake pad clips for signs of wear, such as cracks or excessive bending. If any damage is detected, promptly replace the clips to maintain optimal braking performance.
- Applying anti-seize compound: To prevent corrosion and seizing, consider applying a thin layer of anti-seize compound to the contact points of the brake pad clips during installation. This will help protect against rust formation and ensure easier removal in the future.
- Regular brake maintenance: Properly maintaining your entire braking system, including the brake pads, rotors, and calipers, can indirectly contribute to the longevity of your brake pad clips. Regularly inspect and service these components to ensure balanced wear and optimal braking performance.
Frequently Asked Questions Of How To Install Brake Pad Clips
Which Way Do Brake Pad Clips Go On?
Brake pad clips should be installed with the flat side facing the brake pad and the curved side facing the brake caliper. This ensures proper alignment and helps secure the pads in place for optimal braking performance.
Do I Need To Install Brake Pad Clips?
No, it is not necessary to install brake pad clips.
What Are The Little Black Clips For Brake Pads?
Little black clips for brake pads are called brake pad hardware or brake pad clips. They serve as retention clips that hold the brake pads in place and reduce noise and vibration. These clips are essential for proper brake pad installation and ensure optimal performance and safety of the braking system.
How Do You Put On Brake Pad Brackets?
To put on brake pad brackets, follow these steps: 1. Secure your vehicle on a flat surface. 2. Remove the wheels to access the brake pads. 3. Unbolt the caliper and slide it off the rotor. 4. Take off the old brake pads from the brackets.
5. Insert the new pads into the brackets and reassemble the caliper.
Conclusion
Installing brake pad clips is a straightforward process that anyone can do with the right tools and a little patience. By following the step-by-step instructions provided in this blog post, you can ensure your brake pads are securely held in place, enhancing the overall safety and performance of your vehicle.
Don’t forget to routinely check and replace your brake pad clips as needed to maintain optimal braking efficiency. Happy DIY-ing!