To install a wheel spacer, first, gather the necessary tools and materials. Then, remove the wheels, clean the hub and wheel assembly, and secure the wheel spacer in place using the provided bolts or studs.
Finally, reattach the wheels, tighten the lug nuts, and check for any potential issues such as clearance or alignment problems. Wheel spacers are an important component for improving the performance and aesthetics of your vehicle. Whether you want to widen the stance, create more clearance, or enhance the overall look, installing wheel spacers can be a simple and effective solution.
By pushing the wheels outwards, these spacers create a wider track, resulting in improved handling and a more aggressive appearance. However, it is crucial to install them correctly to avoid any potential safety hazards. In this guide, we will walk you through the step-by-step process of installing wheel spacers, ensuring a smooth and hassle-free installation experience. So, let’s get started and give your car that desired upgrade it deserves.
Understanding The Purpose And Benefits Of Wheel Spacers
What are wheel spacers and why are they used?
Wheel spacers are aftermarket accessories that are installed between the wheel hub and the wheel itself, creating additional space and pushing the wheel away from the vehicle’s body. They are typically made of high-quality aluminum or steel and come in various sizes and thicknesses to accommodate different vehicle types and wheel sizes.
The primary purpose of wheel spacers is to increase the track width of a vehicle, which refers to the distance between the left and right wheels on the same axle. By widening the track width, wheel spacers enhance the stability and handling of the vehicle, especially during sharp turns and high-speed maneuvers.
Moreover, wheel spacers are commonly used to correct the offset of aftermarket wheels. Offset refers to the distance from the wheel’s mounting surface to the centerline of the wheel. In some cases, aftermarket wheels may have a higher or lower offset than the original wheels, resulting in improper wheel alignment. Wheel spacers allow for proper alignment by providing the necessary clearance between the wheel and the suspension components.
Advantages of installing wheel spacers on your vehicle
Installing wheel spacers on your vehicle can offer several advantages:
- Improved vehicle stability: By increasing the track width, wheel spacers enhance the stability of your vehicle. The wider stance reduces body roll and improves cornering performance, making your vehicle feel more planted on the road.
- Better handling: Wheel spacers widen the wheel track, resulting in increased lateral grip. This leads to improved handling and responsiveness, allowing you to have better control over your vehicle, especially in challenging driving conditions.
- Enhanced aesthetics: In addition to the performance benefits, wheel spacers can also enhance the visual appeal of your vehicle. The wider wheel stance provided by wheel spacers gives your vehicle a more aggressive and muscular look, making it stand out from the crowd.
- Clearance for aftermarket wheels: If you are planning to install aftermarket wheels on your vehicle, wheel spacers can help create the necessary clearance for proper fitment. This ensures that the wheels do not interfere with the suspension components or inner fender wells, preventing potential rubbing or scraping issues.
- Improved brake cooling: The increased track width created by wheel spacers allows for better airflow to the brakes, promoting more efficient cooling. This can help prevent brake fade during intense driving situations and ensure consistent braking performance.
Overall, wheel spacers offer various benefits, including improved stability, better handling, enhanced aesthetics, clearance for aftermarket wheels, and improved brake cooling. However, it is essential to choose high-quality wheel spacers that are suitable for your vehicle and ensure proper installation to maximize their advantages.
Necessary Tools And Materials For The Installation Process
Installing wheel spacers can be a straightforward process if you have the right tools and materials at hand. By preparing ahead of time and ensuring you have everything you need, you can make the installation process smoother and more efficient. In this section, we’ll provide you with a comprehensive list of the tools and materials required for installing wheel spacers.
List of tools required for the installation:
- Torque wrench (to tighten the lug nuts)
- Socket set (to remove and install lug nuts)
- Jack and jack stands (to raise and support the vehicle)
- Tire iron or lug wrench (to remove and install the wheels)
- Wheel spacer kit (including the necessary spacers and bolts)
- Threadlocker (to secure the bolts and prevent loosening)
- Wire brush or sandpaper (to clean the hub surface)
- Tire pressure gauge (to check and adjust tire pressure)
- Rubber mallet (to ensure smooth fitting of the spacer)
Checklist of materials you will need:
- Wheel spacers (choose the appropriate size and material for your vehicle)
- Extended wheel bolts or studs (if required)
- Anti-seize lubricant (to prevent corrosion and facilitate future removal)
- Tire shine or wax (optional for enhancing the appearance of tires)
Before starting the installation process, it’s essential to gather all these tools and materials to ensure a hassle-free and successful installation. Having everything prepared will save you time and frustration, allowing you to enjoy the benefits of wheel spacers sooner.
Preparing For The Installation
Ensuring Safety Precautions Before Starting the Installation
Before embarking on any DIY project, safety should always be your top priority. Installing wheel spacers is no exception. Here are some crucial safety precautions you need to follow:
- Always work in a well-ventilated area to prevent inhaling harmful fumes.
- Wear appropriate safety gear, including but not limited to safety goggles and gloves, to protect your eyes and hands from potential injuries.
- Make sure your vehicle is parked on a flat, stable surface to avoid accidents or injuries.
- Engage the parking brake and securely block the wheels that are not being worked on to prevent unintended movement.
- Never attempt to install wheel spacers on a hot vehicle. Allow your car to cool down completely before getting started.
Checking Your Vehicle’s Compatibility with Wheel Spacers
Before diving into the installation process, it’s vital to confirm whether your vehicle is compatible with wheel spacers. Here’s what you need to consider:
- Check the wheel stud size of your vehicle and compare it with the specifications provided by the manufacturer of the wheel spacers you intend to install. It’s crucial that the stud size matches to ensure a proper fit.
- Determine the maximum wheel width and offset that your vehicle can accommodate without interfering with its performance and safety. Check your vehicle’s manual or consult with a mechanic if necessary.
- Measure the clearance between your vehicle’s existing wheels and the fenders to ensure that the added width from the wheel spacers will not cause any clearance issues. Take into account any potential suspension modifications that may affect clearance as well.
- Consider the intended use of your vehicle. Keep in mind that wheel spacers may affect the handling characteristics, tire wear, and overall stability. It’s crucial to choose a suitable wheel spacer thickness based on your intended driving style and preferences.
Taking the time to ensure your vehicle’s compatibility with wheel spacers will save you from encountering any unwanted issues down the road. Now that you are aware of the necessary safety precautions and compatibility considerations, you are ready to move forward with the installation process.
Step 1: Removing The Wheels
Before installing wheel spacers, it is crucial to start by removing the wheels. This is an essential step that must be done with care and precision to ensure a smooth and successful installation process. In this step, we will guide you through the procedure of loosening the lug nuts, safely lifting the vehicle, and finally removing the wheels.
Loosening the Lug Nuts
To begin, you’ll need to loosen the lug nuts that secure the wheels to your vehicle. This can be done using a lug wrench or a socket wrench with the appropriate size socket. Make sure to position the wrench properly on the lug nuts and turn it counterclockwise to loosen them. It’s important to remember not to completely remove the lug nuts at this point, as you want to keep the wheel in place until the vehicle is securely lifted.
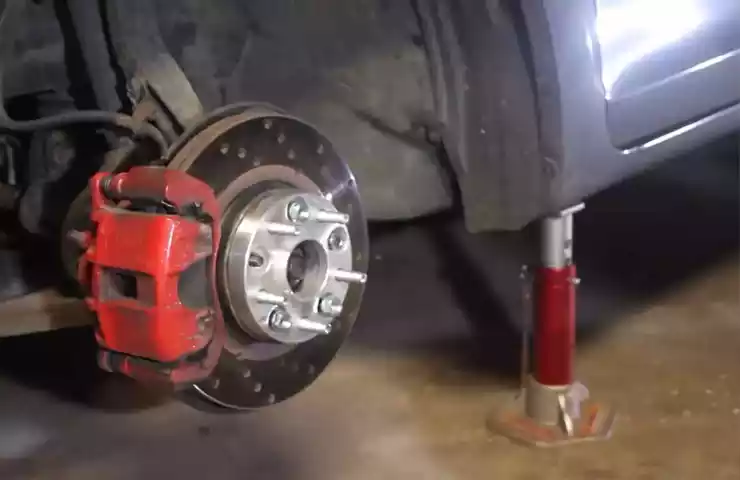
Safely Lifting the Vehicle
Once the lug nuts are loosened, it’s time to safely lift the vehicle off the ground. This step is crucial for ensuring your safety and preventing any damage to the vehicle. You can use a hydraulic jack or a floor jack for lifting the vehicle, but make sure to consult your vehicle’s manual for the proper jacking points. These points are typically located along the vehicle’s frame or specified by the manufacturer.
| Lifting Points | Jacking Procedure |
|---|---|
| Front | Place the jack under the front subframe or front jacking point. |
| Rear | Position the jack under the rear differential or rear jacking point. |
Remember to position the jack carefully and lift the vehicle gradually to ensure stability throughout the process. Once the vehicle is lifted, it’s essential to secure it with jack stands to keep it in place while you work on the wheels.
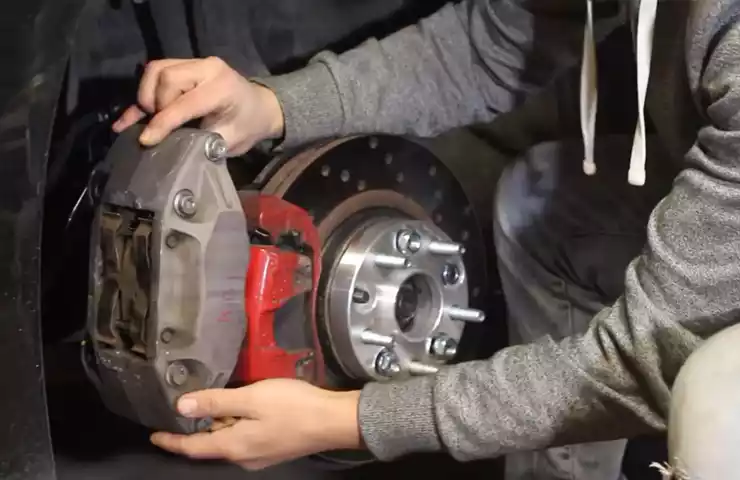
Removing the Wheels
Now that the vehicle is securely lifted, you can proceed to remove the wheels. Start by completely unscrewing the lug nuts and carefully slide the wheel off the wheel hub. If the wheel is stubborn and difficult to remove, you can lightly tap it with a rubber mallet to free it from its position. Once the wheel is removed, set it aside in a safe location, preferably away from your working area.
Remember to repeat this process for each wheel that you intend to install wheel spacers on. Taking your time and being cautious during this step will ensure a successful and efficient installation process.
Now that you have successfully removed the wheels, you are one step closer to installing wheel spacers and unleashing the potential of your vehicle. Stay tuned for our next step in the installation guide.
Step 2: Measuring And Preparing The Wheel Spacers
Determining the Appropriate Size of Wheel Spacers
Before installing wheel spacers, it’s crucial to determine the appropriate size for your vehicle. This step ensures that the spacers fit well, preventing any potential issues while driving. To determine the right size, you’ll need to measure the available space between the mounting surface of the wheel and the brake components.
Start by measuring the distance from the inner edge of your wheel to its mounting surface. Once you’ve obtained this measurement, subtract it from the distance between the outer edge of the tire and the wheel well. The resulting value will give you an idea of the required thickness of the wheel spacers.
Keep in mind that different vehicles have varying specifications, so it’s essential to consult your vehicle’s manual or contact a professional if you’re unsure about the appropriate size.
Cleaning and Inspecting the Wheel Spacers
After determining the appropriate size of wheel spacers, it’s crucial to clean and inspect them before installation. Cleaning ensures that the spacers are free from dirt, dust, and debris that may affect their performance. Follow these simple steps to clean and inspect your wheel spacers:
- Start by removing the wheel spacers from their packaging and place them on a clean surface.
- Use a soft brush or cloth to remove any dirt or debris from the spacers. Pay close attention to the holes and surfaces where they will come into contact with the wheels and hubs.
- Inspect the spacers for any signs of damage or wear. Look for cracks, dents, or excessive corrosion that may affect their structural integrity. If you notice any such issues, it’s crucial to replace the wheel spacers before installation.
- Once cleaned and inspected, set the wheel spacers aside in a safe place until you’re ready to install them.
By adhering to these cleaning and inspection steps, you can ensure that your wheel spacers are in optimal condition and ready for a seamless installation process.
Step 3: Installing The Wheel Spacers
Understanding the right way to install wheel spacers
Installing wheel spacers correctly is crucial to ensure the safety and performance of your vehicle. Before diving into the installation process, it’s important to understand the right way to install wheel spacers. This will help you avoid any potential issues down the road. Here are some key points to keep in mind:
- Choose the right size and type: Before you start the installation, make sure you have the appropriate size and type of wheel spacers for your vehicle. It’s essential to select spacers that are compatible with your vehicle’s make and model. Additionally, consider the desired amount of spacing required based on your specific needs.
- Ensure proper fitment: Wheel spacers should align perfectly with the wheel hub and the wheel itself. This ensures proper fitment and prevents any wobbling or vibrations while driving. An improper fitment can not only compromise the handling of your vehicle but also result in premature wear on your tires and suspension components.
Properly aligning the wheel spacers with the wheel hub
Now that you understand the importance of proper fitment, let’s dive into the process of properly aligning the wheel spacers with the wheel hub. This step is crucial to ensure a secure and stable connection between the spacer and the hub. Follow these steps:
- Jack up the vehicle: Start by safely jacking up the vehicle and placing it on jack stands. This will provide the necessary clearance to work on the wheels and spacers.
- Remove the wheels: Remove the lug nuts and take off the wheels carefully. Place them aside in a secure location to avoid any damage.
- Clean the wheel hub: Thoroughly clean the wheel hub using a brush or a rag to remove any dirt or debris. It’s important to have a clean surface for a proper connection.
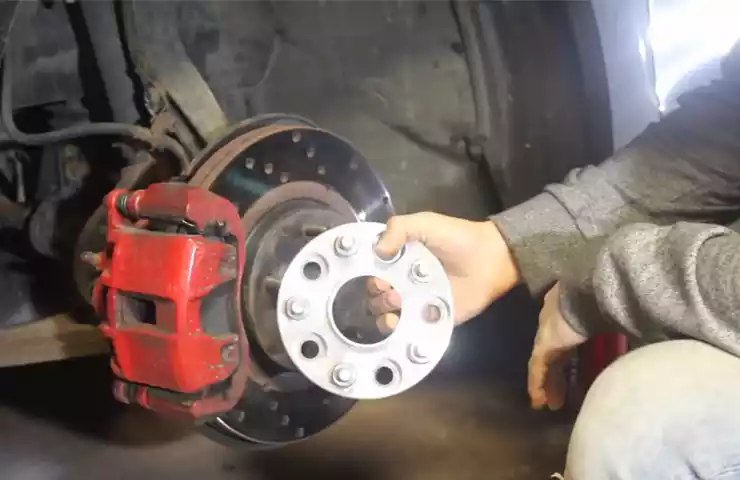
- Align the wheel spacer: Place the wheel spacer onto the wheel hub, ensuring that it aligns perfectly. The spacer should sit flush against the hub, without any gaps or misalignment.
- Secure the spacer: Once the spacer is aligned correctly, secure it in place by hand-tightening the lug nuts onto the wheel studs. This will hold the spacer in position while you reinstall the wheel.
- Torque the lug nuts: Use a torque wrench to tighten the lug nuts to the manufacturer’s recommended torque specification. Be sure to tighten them in a star or criss-cross pattern to evenly distribute the torque.
By following these steps, you’ll ensure a proper and secure installation of wheel spacers. It’s essential to take your time and pay attention to detail during this process. This will not only enhance the look of your vehicle but also improve its stability and handling. Remember to repeat these steps for each wheel spacer installation and enjoy the added benefits they provide.
Step 4: Securing The Wheels With Wheel Spacers
After properly positioning the wheel spacers on the wheel hub, it’s time to secure them in place. This step ensures a tight fit and optimal performance for your vehicle. Following these instructions will help you attach the wheel spacers to the wheel hub and tighten the lug nuts to the recommended torque specifications.
Attaching the wheel spacers to the wheel hub
1. Start by aligning the wheel spacer with the wheel hub. Take note of any alignment marks or grooves present on the spacer and the wheel hub.
2. Gently slide the wheel spacer onto the wheel hub, making sure it sits flush against the hub surface. Ensure that the alignment marks or grooves match for a proper fit.
3. Once the wheel spacer is aligned correctly, insert the provided bolts through the spacer and into the wheel hub. Make sure each bolt is inserted through the correct hole in the spacer.
4. Tighten the bolts gradually in a diagonal pattern to ensure even pressure distribution. This helps prevent any warping or damage to the wheel spacer or wheel hub. Refer to the manufacturer’s instructions for the recommended torque specifications.
Tightening the lug nuts to the recommended torque specifications
1. With the wheel spacer securely attached to the wheel hub, it’s time to tighten the lug nuts. Start by hand-tightening each lug nut to ensure they are properly seated.
2. Using a torque wrench, tighten the lug nuts to the recommended torque specifications specified by the vehicle’s manufacturer. This is important to ensure the safety and integrity of the wheel spacer installation.
3. It is crucial to tighten the lug nuts progressively and in a star or diagonal pattern. This method provides uniform tension across all lug nuts, minimizing the risk of loosening or damaging the wheel spacer.
4. Double-check each lug nut’s torque after completing the tightening process to confirm they are all properly secured. Re-tighten any lug nuts that don’t meet the recommended torque specifications.
Remember: Regularly inspect and re-torque the lug nuts after driving a few miles to ensure they remain properly tightened.
Step 5: Reinstalling The Wheels
Now that the wheel spacer is properly installed onto your vehicle, it’s time to place the wheels back onto the vehicle and complete the installation process. This step will ensure that your wheels are securely attached to the wheel spacer, providing the desired effects on your vehicle’s performance and aesthetics.
Placing the wheels back onto the vehicle
To begin, carefully align the wheel with the wheel studs on the vehicle. Make sure that the wheel is positioned correctly, with the wheel studs fitting snugly into the corresponding holes on the wheels. Take the necessary precautions to avoid damaging the studs or the threads.
Once the wheel is aligned, gently push it onto the wheel studs until it is flush against the wheel spacer. Check that the wheel fits evenly and there are no gaps between the wheel and the wheel spacer. A proper fit ensures that the weight of the vehicle is evenly distributed, reducing the risk of imbalance or instability while driving.
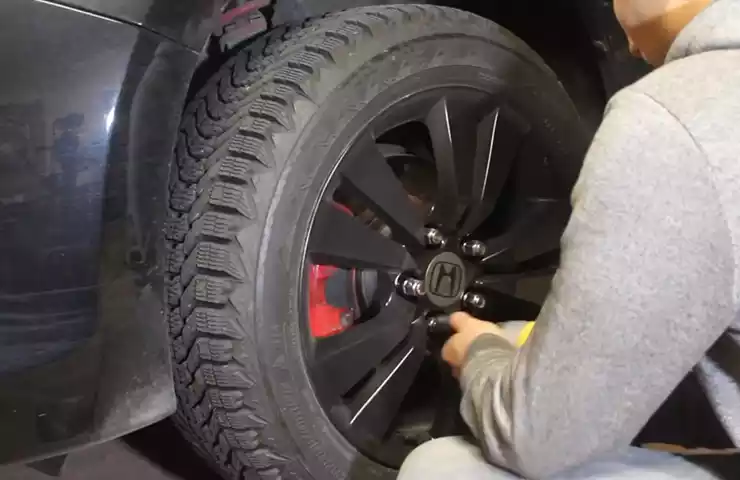
Lowering the vehicle and tightening the lug nuts
After the wheels are securely in place, it’s time to lower the vehicle back onto the ground. Use the jack to carefully lower the vehicle, ensuring a smooth and controlled descent. Once the vehicle is lowered, it’s important to tighten the lug nuts.
Procedure:
- Start by hand-tightening each lug nut to ensure they are snugly in place.
- Next, use a torque wrench to tighten the lug nuts to the manufacturer’s recommended torque specifications. Refer to your vehicle’s manual or the wheel spacer manufacturer’s instructions for the specific torque value.
- Follow a star pattern while tightening the lug nuts. This pattern ensures even pressure distribution and helps prevent warping or damage to the wheel spacer or the wheel.
- Go over each lug nut once more to double-check that they are all properly tightened. It’s essential to have each lug nut firmly secured to avoid any potential safety issues.
By following these steps, you have successfully reinstalled the wheels onto your vehicle after installing wheel spacers. This final step completes the installation process, and your vehicle is now ready to hit the road with the enhanced performance and visual appeal provided by wheel spacers.
Post-Installation Considerations And Maintenance
Once you have successfully installed wheel spacers on your vehicle, it is essential to consider some post-installation considerations and perform regular maintenance to ensure their proper functioning and longevity. In this section, we will discuss two crucial aspects of post-installation care: performing a test drive to check for any issues and regularly inspecting and maintaining wheel spacers.
Performing a Test Drive to Check for Any Issues
After installing wheel spacers, it is important to perform a test drive to ensure that everything is in working order. This step will help identify any potential issues that may have been overlooked during the installation process. Here are some key points to consider:
- Steering Stability: Pay close attention to your vehicle’s steering stability during the test drive. Any vibrations or wobbling might indicate a problem with the wheel spacers.
- Wheel Alignment: Check if the wheels are properly aligned. Improper alignment may lead to uneven tire wear and affect your vehicle’s handling.
- Clearance: Ensure that the wheel spacers provide adequate clearance between the wheels and other components of the vehicle, such as fenders or suspension parts.
- Noise: Listen for any unusual noises while driving, such as grinding or rubbing sounds, which may indicate incorrect installation or improper fitment of the wheel spacers.
Performing a thorough test drive allows you to identify and address any issues promptly, ensuring the safety and performance of your vehicle with the newly installed wheel spacers.
Regularly Inspecting and Maintaining Wheel Spacers
To ensure the long-term performance of your wheel spacers, regular inspections and maintenance are necessary. Here are some maintenance guidelines to keep in mind:
- Visual Inspection: Periodically inspect the wheel spacers visually for any signs of damage, such as cracks or corrosion. Any visible defects should be addressed immediately.
- Bolt Torque: Check the torque of the wheel spacer bolts according to the manufacturer’s recommendations. Loose bolts can compromise the integrity and safety of the spacers.
- Cleanliness: Keep the wheel spacers clean from dirt, grime, and debris. Regular cleaning helps prevent any build-up that could hinder their proper functioning.
- Rust Prevention: Apply a rust inhibitor or protective coating to the wheel spacers to guard against corrosion, especially in areas with harsh weather conditions or exposure to road salt.
By following these maintenance practices, you can extend the lifespan of your wheel spacers and ensure optimal performance throughout their usage.
Additional Tips And Recommendations
When it comes to installing wheel spacers on your vehicle, there are a few additional tips and recommendations that can make the process smoother and ensure optimal results. In this section, we will discuss some important factors to consider when choosing the right type of wheel spacers, as well as common mistakes to avoid during the installation process.
Tips for choosing the right type of wheel spacers
Choosing the right type of wheel spacers is crucial for the proper fitment and safety of your vehicle. Here are some tips to help you make the right choice:
- Measure your current wheel gap: Before selecting a wheel spacer, it’s important to measure the gap between your wheel and the fender. This will help you determine the thickness of the wheel spacer you need.
- Consider the hub centric design: Hub centric wheel spacers are designed to center the wheel on the hub, providing better stability and reducing vibrations. It’s recommended to choose hub centric wheel spacers whenever possible.
- Ensure proper bolt pattern and stud size: Wheel spacers need to have the correct bolt pattern and stud size to match your vehicle’s wheels. Double-check the specifications of the spacers to ensure compatibility.
- Choose the right material: Wheel spacers are commonly made from aluminum or steel. Aluminum spacers are lightweight and resistant to corrosion, while steel spacers are more durable and provide better strength. Consider your specific needs and preferences when selecting the material.
Common mistakes to avoid during installation
During the installation process, it’s important to be aware of common mistakes that can compromise the effectiveness and safety of your wheel spacers. Here are some mistakes to avoid:
- Incorrect torque settings: Failing to properly tighten the wheel spacer bolts can lead to loose or unevenly torqued wheels, which can result in wheel wobbling and potential accidents. Always follow the manufacturer’s recommended torque specifications.
- Skipping the cleaning and lubrication step: Before installing wheel spacers, it’s crucial to thoroughly clean the hub and wheel mating surfaces. Applying a thin layer of anti-seize lubricant can help prevent corrosion and ensure easy removal in the future.
- Using incorrect hardware: Using the wrong size or type of bolts or nuts can lead to improper fitment and potential wheel separation. Always use the hardware specifically designed for your wheel spacers.
- Failure to re-torque after driving: After installing your wheel spacers and driving for a short distance, it’s important to re-torque the spacer bolts. This will help ensure that they are properly seated and tightened.
By following these tips and avoiding common mistakes, you can confidently install wheel spacers on your vehicle and enjoy the benefits of improved stance and handling. Always refer to the specific instructions provided by the manufacturer of your wheel spacers for the best results. Remember, proper installation and regular maintenance are essential for the safe and successful use of any aftermarket products on your vehicle.
Frequently Asked Questions On How To Install Wheel Spacer
Can I Install Wheel Spacers Myself?
Yes, you can install wheel spacers yourself as long as you follow the proper instructions. It is important to ensure that you have the necessary tools and knowledge to do it correctly. If you are unsure, it is recommended to consult a professional for assistance.
Are Wheel Spacers Safe To Use?
Yes, wheel spacers can be safe to use if installed correctly. They widen the wheel track, improving stability and appearance. However, it’s important to choose high-quality spacers, follow manufacturer instructions, and ensure proper wheel alignment to minimize risks. Regular inspection and maintenance are also recommended to ensure safety.
Do You Need An Alignment After Installing Wheel Spacers?
Yes, it is recommended to get an alignment after installing wheel spacers.
Should I Use Loctite When Installing Wheel Spacers?
Yes, it is advisable to use Loctite when installing wheel spacers. Loctite helps secure the spacers in place, preventing them from loosening over time. This ensures proper alignment and reduces the risk of accidents or damage. Remember to follow the manufacturer’s instructions for the specific Loctite product you choose.
Conclusion
Installing wheel spacers can significantly transform your vehicle’s look and performance. By increasing the track width and pushing the wheels outwards, these spacers provide better stability and handling. Whether you’re a car enthusiast or simply looking to enhance the appearance of your vehicle, adding wheel spacers can be an easy and cost-effective solution.
Remember to follow the correct installation procedure and consult an expert if needed. Safely enjoy the benefits of wheel spacers and take your driving experience to the next level.