To install a magnetic engine block heater, position the heater on the engine block and plug it into an electrical outlet. An engine block heater can be easily installed by following these steps.
Factors To Consider When Selecting A Magnetic Engine Block Heater
Installing a magnetic engine block heater can be a great way to ensure your vehicle starts smoothly even in the coldest of winters. However, before you rush into purchasing one, there are a few important factors to consider. By taking these factors into account, you can make sure that the block heater you choose is the perfect fit for your vehicle and provides effective heating during those chilly winter months.
Type of engine block heater
The first factor to consider when selecting a magnetic engine block heater is the type of heater that is compatible with your vehicle. There are two main types of block heaters commonly available:
- Freezer plug type: These block heaters replace a plug in your engine block and are typically designed to be left in place permanently. They offer a direct heat transfer to the block, ensuring efficient heating.
- Magnetic type: Magnetic block heaters, as the name suggests, use magnets to attach to the exterior metal surface of your engine block. They are easier to install and remove compared to freezer plug type heaters.
When choosing the type, consider your preferences, ease of installation, and the specific requirements of your vehicle.
Compatibility with your vehicle
Not all magnetic engine block heaters are compatible with every vehicle. It’s crucial to ensure that the heater you choose is specifically designed to fit your vehicle’s make and model. This information can usually be found in the product description or the manufacturer’s website. Using an incompatible block heater may lead to ineffective heating and potential damage to your vehicle.
Power requirements and options
Another important factor to consider is the power requirements and options of the magnetic engine block heater. Most heaters come with different power ratings, typically measured in watts. The power rating determines the heating efficiency, so it’s essential to choose a heater that is sufficient to warm your vehicle’s engine block.
Additionally, consider the available power options for the block heater. Some heaters can be connected to a standard electrical outlet, while others may require a dedicated circuit or a specific power source. Ensure that your vehicle has the necessary power supply available for the heater to function properly.
By evaluating these factors – the type of engine block heater, compatibility with your vehicle, and power requirements and options – you can confidently choose the perfect magnetic block heater for effective winter warming. Remember to always refer to the manufacturer’s guidelines and installation instructions to ensure proper installation and optimal performance.
Benefits Of A Magnetic Engine Block Heater
A magnetic engine block heater is an incredibly useful tool for those who live in cold weather climates. Not only does it help improve cold weather starting, but it also reduces wear and tear on engine components and increases fuel efficiency. Let’s dive deeper into each of these benefits:
Improved cold weather starting
When temperatures drop to freezing or below, starting a car can become a challenging task. The cold weather can wreak havoc on the engine, causing it to struggle and potentially fail to start altogether. This is where a magnetic engine block heater comes in. By attaching the heater to the engine block, it warms up the engine’s coolant, oil, and other fluids. This heat transfer helps prevent cold oil thickening and reduces the strain on the battery, making for much easier and smoother cold weather starting.
Reduced wear and tear on engine components
Cold starts can be harsh on the engine. The friction between moving parts increases due to the lack of proper lubrication, and the engine takes longer to reach its optimal operating temperature. This puts stress on various engine components, such as the pistons, cylinders, and valves. By using a magnetic engine block heater, the heat generated helps to warm up these components and ensure proper lubrication right from the start. This reduces wear and tear on the engine, prolonging its lifespan and minimizing the risk of costly repairs.
Increased fuel efficiency
When an engine is cold, it requires more fuel to reach its optimal temperature. This means that during those initial few minutes of driving, fuel efficiency can significantly decrease. However, with a magnetic engine block heater, the engine is already warm before you start it. This allows for a more efficient combustion process, as the fuel can ignite quickly and burn cleaner. As a result, you can expect improved fuel efficiency, saving you money on gas in the long run.
Installing a magnetic engine block heater can provide these benefits and more. Whether you live in an extremely cold climate or need your vehicle to start reliably in any weather conditions, this simple addition can make a world of difference. By improving cold weather starting, reducing wear and tear on engine components, and increasing fuel efficiency, you can ensure your engine remains in top shape and ready to go at a moment’s notice.
Gathering The Necessary Tools And Materials
Before you start the installation process of a magnetic engine block heater, it’s important to gather all the tools and materials you’ll need. This will ensure a smooth and hassle-free installation experience. In this section, we will provide you with a comprehensive list of required tools as well as recommended materials that will help you complete the installation successfully.
List of required tools:
- Ratchet set with various sizes of sockets
- Screwdrivers (both flathead and Phillips)
- Wire cutters/strippers
- Electrical tape
- Heat gun (or a hairdryer)
- Electrical connectors
- Plastic zip ties
- Utility knife
- Shop towels or rags
- Work gloves
These tools are essential for the installation process and having them readily available before you start will save you time and prevent frustration later on.
Recommended materials for installation:
While the magnetic engine block heater usually comes with everything you need for installation, having some additional materials can be helpful in ensuring a tighter and more secure installation.
| Material | Usage |
|---|---|
| High-temperature silicone sealant | To seal any gaps or leaks |
| Electrical tape | To insulate and protect electrical connections |
| Dielectric grease | To prevent corrosion and enhance electrical connections |
| Threadlocker | To secure bolts and prevent loosening |
These materials are not mandatory but highly recommended to ensure a reliable and long-lasting installation. It’s always better to be prepared and have them on hand.
Now that you have a complete list of required tools and recommended materials, you are ready to proceed to the next step of the installation process, which is preparing the engine block for the heater installation. Stay tuned for our upcoming blog post where we will guide you through the entire installation process step by step.
Locating The Optimal Position For The Heater
Factors to Consider When Choosing the Position
Choosing the right position for installing a magnetic engine block heater is crucial to ensure its effectiveness and longevity. Several factors need to be taken into consideration when deciding on the optimal position:
Ensuring Accessibility and Proper Fit
Accessibility and proper fit are crucial when determining the ideal position for your magnetic engine block heater. Here is a guide to ensuring these aspects: – Start by examining your engine block and identifying a suitable location where the heater can be easily attached. Look for a clean and smooth surface that can securely hold the heater. – Keep in mind that the heater needs to be positioned close to the coolant passages of the engine to ensure efficient heat transfer. Pay attention to the manufacturer’s instructions and any guidelines specific to your engine model. – Ensure that the chosen location allows enough clearance for easy installation and removal of the heater. This is important for future maintenance or replacement, if necessary. – Take into account any existing engine components or obstructions that may interfere with the installation process or obstruct the heat transfer. It is crucial to choose a position that does not compromise the functionality of other engine parts. – Consider the distance between the heater and the power source, typically an electrical outlet. Ensure that the power cord can be easily routed to the heater without any stretching or kinks. It’s important to maintain the integrity of the power cord to prevent any electrical hazards. – Double-check that the magnetic surface of the heater will securely adhere to the engine block. A loose fit may lead to poor heat transfer or even dislodgement, rendering the heater ineffective. – If you are unsure about the optimal position for your specific engine, consult the vehicle’s manual or reach out to a professional for guidance. They will have the expertise to guide you towards the best location for your magnetic engine block heater. Remember, proper positioning of the magnetic engine block heater enhances its efficiency and ensures that your engine stays warm during cold weather. Take the time to carefully consider these factors and choose a position that guarantees easy accessibility, proper fit, and maximum effectiveness.
Preparing The Engine Block
Before installing a magnetic engine block heater, it is essential to properly prepare the engine block to ensure optimal adhesion and a successful installation. This process involves cleaning the surface for optimal adhesion and removing any obstacles or debris that may hinder the heater’s effectiveness.
Cleaning the Surface for Optimal Adhesion
First and foremost, it is crucial to clean the engine block surface thoroughly. This step ensures that the magnetic engine block heater adheres securely and provides consistent heat distribution. Here’s how you can clean the surface effectively:
- Begin by removing any dirt or grease using a degreaser or solvent. These substances can prevent the heater from adhering properly.
- Next, wipe the surface clean with a lint-free cloth or paper towel. Make sure to remove any remaining residue from the degreaser or solvent. A clean surface guarantees a strong bond between the heater and the engine block.
- You may also want to consider using sandpaper to lightly roughen the surface. This step promotes better adhesion by creating a slightly textured surface for the heater to grip onto. Make sure to clean away any debris generated by the sanding process to prevent contamination.
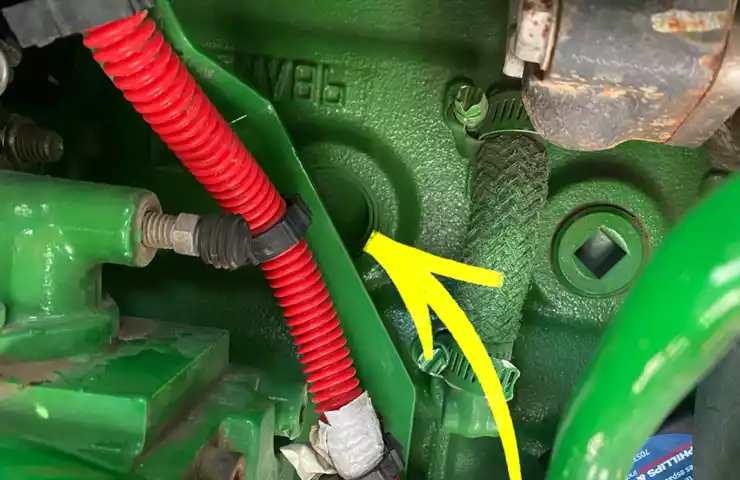
Removing any Obstacles or Debris

In addition to cleaning, it is vital to remove any obstacles or debris that may interfere with the proper installation and functioning of the magnetic engine block heater. Follow these steps to ensure a clear surface:
- Inspect the engine block carefully for any loose wires, hoses, or other components that may obstruct the placement of the heater. Gently secure or move these elements out of the way to create a smooth and obstruction-free surface.
- Remove any loose debris, such as leaves or twigs, from the surrounding area. These objects can potentially interfere with the heater’s magnetic bond or cause damage to the unit.
- Check for any signs of corrosion or rust on the engine block. If present, it is crucial to clean or treat the affected areas before installing the heater. Rust and corrosion can create barriers that hinder the adhesion and performance of the magnetic heater.
By cleaning the surface for optimal adhesion and removing any obstacles or debris, you ensure that your magnetic engine block heater adheres securely and functions effectively. Next, we will discuss the step-by-step process of installing the heater for maximum efficiency.
Applying The Adhesive Base
Preparing the Adhesive
Before applying the adhesive base to the engine block, it’s important to properly prepare the adhesive. Follow these steps:
- Clean the surface of the engine block: Ensure that the surface where you plan to apply the adhesive is clean and free from any dust, dirt, or grease. Wipe it down with a clean cloth and if necessary, use a mild detergent to remove any stubborn grime.
- Dry the surface: Once the engine block is clean, allow it to air dry completely. Use a clean cloth or compressed air to speed up the drying process.
- Check the adhesive base: Examine the adhesive base to make sure it is in good condition and without any defects. If any issues are found, contact the manufacturer for a replacement.
Applying the Adhesive Base to the Engine Block
Now that the adhesive is prepared, follow these steps to apply it to the engine block:
- Peel off the protective backing: Carefully remove the protective backing from the adhesive base to expose the sticky surface.
- Position the adhesive base: Place the adhesive base on the desired location of the engine block. Ensure that it is properly aligned and securely affixed.
- Press firmly: Apply pressure to the adhesive base to ensure a strong bond. Firmly press down on the entire surface using your hands or a suitable tool. This will help the adhesive adhere properly to the engine block.
- Allow it to cure: Give the adhesive sufficient time to cure and bond with the engine block. Refer to the manufacturer’s instructions for the recommended curing time.
- Check for proper adhesion: Once the curing process is complete, check if the adhesive base has securely adhered to the engine block. Gently tug on it to ensure it doesn’t come loose.
By following these steps, you can successfully apply the adhesive base to your engine block, ensuring the magnetic engine block heater stays securely in place.
Securing The Magnet Assembly
One crucial step in the installation process of a magnetic engine block heater is securing the magnet assembly. This ensures that the heater stays firmly in place and functions efficiently. In this section, we will discuss two important steps to secure the magnet assembly with the adhesive base: aligning the magnet assembly and applying pressure to ensure a secure attachment.
Aligning the magnet assembly with the adhesive base
Before attaching the magnet assembly to the engine block, it is essential to align it correctly with the adhesive base. This ensures that the magnet does not detach or shift after installation. To align the magnet assembly, follow these steps:
- Clean the surface of the engine block where the adhesive base will be attached. Remove any dirt, grease, or oil that may affect the adhesive’s effectiveness.
- Hold the magnet assembly against the adhesive base, ensuring that both components are properly aligned. It’s crucial to make sure that the magnet sits flush with the base.
With these steps, you can ensure that the magnet assembly is aligned accurately, providing a solid foundation for the installation.
Applying pressure to ensure secure attachment
After aligning the magnet assembly with the adhesive base, the next step is to apply pressure to ensure a secure attachment. This step ensures that the magnet assembly adheres tightly to the engine block, preventing any potential movement. Follow these instructions to apply pressure:
- Once aligned, firmly press down on the magnet assembly with steady and even pressure. Apply enough force to ensure a solid connection but avoid excessive pressure that may damage the adhesive or the engine block.
- Hold the magnet assembly in place for a few seconds, allowing the adhesive to bond securely with the engine block. This helps in creating a robust and reliable attachment.
- Check and ensure that the magnet assembly is securely attached by gently pulling or wiggling it. If it doesn’t move or detach easily, you have successfully applied enough pressure for a secure attachment.
By following these instructions and applying the right amount of pressure, you can ensure that the magnet assembly is securely attached, providing an effective engine block heating solution. Quick and accurate alignment, along with suitable pressure application, guarantees that the heater remains firmly in place even in harsh weather conditions.
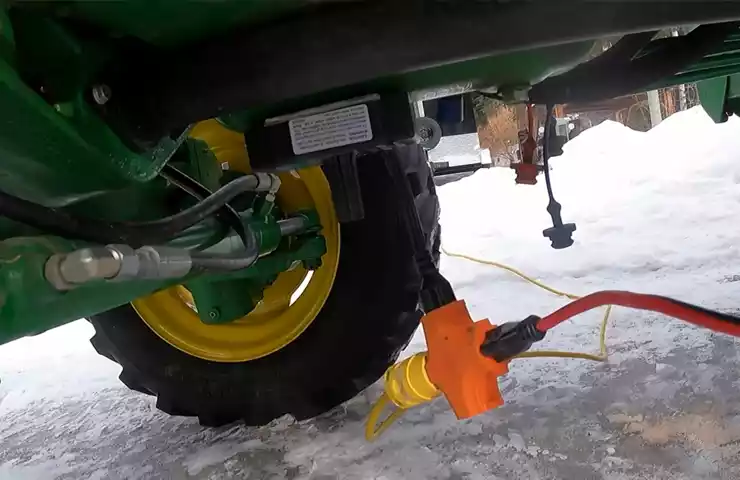
Connecting The Power Source
Connecting the power source is a crucial step when installing a magnetic engine block heater. This step ensures that the heater receives the necessary power to warm up your engine during cold winter months. In this section, we will discuss how to route the power cord and connect it to a convenient power outlet, ensuring a hassle-free installation process.
Routing the Power Cord
Before connecting the power cord, it is essential to route it in a safe and efficient manner. Here are some steps to guide you:
- Start by identifying the ideal route for the power cord. Keep in mind that it should be away from any moving parts, sharp edges, or heat sources.
- Secure the cord using zip ties or clamps at regular intervals. This will prevent it from dangling or becoming tangled.
- If needed, use electrical conduit or wire loom to protect the cord from potential damage.
- Ensure that the cord is long enough to reach the power outlet without stretching or straining.
By following these steps, you can ensure that the power cord is routed safely and neatly, minimizing the risk of any damage or interference.
Connecting the Power Cord to a Convenient Power Outlet
Once you have routed the power cord, it’s time to connect it to a convenient power outlet. Here’s how:
- Locate a power outlet near your vehicle. It should be easily accessible and have the capacity to handle the power requirements of the engine block heater.
- Ensure that the outlet is functioning correctly by testing it with another device.
- Plug one end of the power cord into the engine block heater’s power inlet. Make sure it fits securely and there are no loose connections.
- Connect the other end of the power cord to the power outlet, ensuring a snug fit.
Confirm that the power is flowing to the engine block heater by checking the power indicator light, if applicable. This will provide assurance that the heater is ready to warm up your engine effectively.
By following these steps, you can easily and safely connect the power cord of your magnetic engine block heater to a convenient power source. Remember to adhere to all safety precautions and guidelines provided by the manufacturer to ensure a successful installation process.
Verifying Proper Installation
Once you have successfully installed a magnetic engine block heater, it is crucial to verify that the installation has been done correctly. Proper installation ensures effective functioning and longevity of the heater. This section will guide you on how to check for proper attachment and alignment of the heater, as well as ensuring that the power cord is securely connected.
Checking for Proper Attachment and Alignment
To ensure that your magnetic engine block heater is properly attached and aligned, follow these steps:
- Inspect the installation area: Begin by visually examining the engine block to make sure it is clean and free from any dirt or debris. This ensures proper adhesion of the heater.
- Locate the heater placement: Refer to the manufacturer’s instructions to identify the correct placement location for the heater on the engine block.
- Verify the magnetic bond: Place the heater on the designated area and ensure that it securely adheres to the engine block. The magnet should have a strong hold, without any wobbling or loose fitting.
- Check the alignment: Take a step back and visually inspect the alignment of the heater. It should be parallel and flush with the engine block surface.
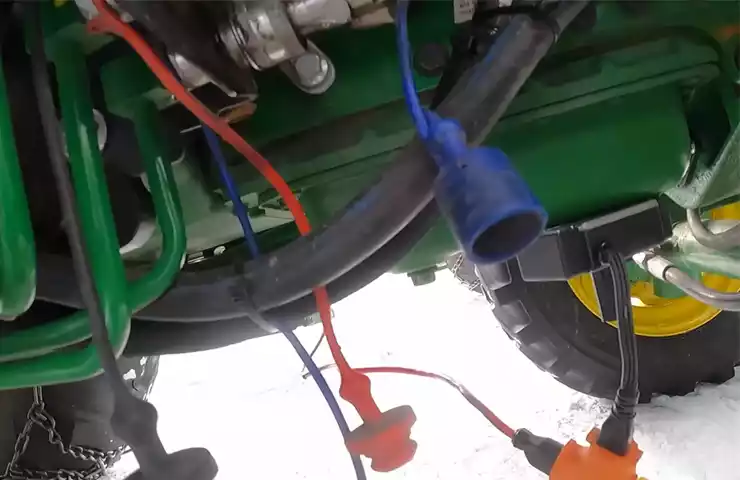
Ensuring the Power Cord is Securely Connected
Proper connection of the power cord is vital for the magnetic engine block heater to function correctly. Follow these steps to ensure a secure connection:
- Inspect the power cord: Check the power cord for any visible signs of damage, such as frayed wires or exposed insulation. If any damage is found, replace the power cord before proceeding.
- Locate the power cord entry point: Identify the designated entry point on the engine block or nearby component for the power cord.
- Insert the power cord: Insert the plug into the designated entry point, ensuring a snug fit. The plug should go in smoothly without any resistance.
- Perform a pull test: Gently tug on the power cord to verify that it is securely connected. It should not come out easily, indicating a proper and firm connection.
By following these steps, you can verify the proper installation of a magnetic engine block heater. Remember that a correctly installed heater helps in efficient engine warm-up during cold weather, enhancing performance and reducing wear and tear. Regularly check the attachment, alignment, and power cord connection to ensure the heater continues to work effectively.
Testing The Heater
Testing the Heater Once you have successfully installed your magnetic engine block heater, it’s essential to test its functionality to ensure it is working effectively. This step is crucial as it confirms that the heater is not just installed correctly, but also capable of providing the necessary heat to warm up your engine block. Testing the heater involves two key aspects: activating the heater and monitoring its performance. Activating the Heater To activate the magnetic engine block heater, plug it into a power source and switch it on. Most magnetic heaters come with a built-in thermostat that automatically regulates the heat output. Once activated, the heater will begin to warm up the engine block, preparing it for easier starts in cold weather conditions. It’s important to note that the heater may take a few minutes to reach the desired temperature, so be patient during this initial phase. Monitoring Performance After activating the heater, closely monitor its performance to ensure that it is warming up the engine block adequately. Here are a few indicators to look for: 1. Touch Test: Carefully touch the engine block in various places to feel for any warmth. A warm engine block indicates that the heater is functioning correctly and providing sufficient heat. However, exercise caution as the engine block may still be hot from recent use, so be sure to use appropriate protective gear for your hands. 2. Temperature Gauge: If your vehicle is equipped with a temperature gauge, observe its readings. As the heater warms up the engine block, the temperature gauge should gradually rise, indicating that the heat is transferring effectively. 3. Engine Start: Attempt to start your vehicle after the heater has been running for a sufficient amount of time. A well-functioning heater will make the engine start more smoothly, as the warmth from the engine block aids in fuel combustion. If the engine starts effortlessly, it’s a positive sign that the heater is doing its job. 4. Observation: Pay close attention to any visible signs of heat emission from the engine block. If you notice steam or vapor, it may be an indication that the heater is generating excessive heat, and you may need to adjust the thermostat settings or seek professional assistance. By monitoring these factors closely, you can confidently verify that your magnetic engine block heater is providing the necessary warmth to your engine block, ensuring smoother starts during colder weather conditions. Regularly testing your heater can help identify any issues or malfunctions early on, allowing for timely maintenance and repairs. Remember, a well-tested and properly functioning magnetic engine block heater not only improves the performance and longevity of your engine but also ensures a more comfortable and stress-free driving experience, even in the harshest of winters. So take the time to test your heater and enjoy the benefits it brings.
Finalizing The Installation
Once you have successfully installed the magnetic engine block heater, there are a few steps you need to take in order to finalize the installation and ensure everything is in place for optimal performance. These final touches will help secure any loose cables or connections and tidy up your work area. Follow the steps below to complete the installation process.
Securing any loose cables or connections
Before you wrap up the installation, it is crucial to double-check that all cables and connections are securely fastened. This step will prevent any potential damage or accidents caused by loose parts. Take a moment to inspect the cables and connections throughout the installation.
- Tug gently on each cable to ensure it is firmly attached.
- Check that all connectors are properly seated and tight.
- Secure any loose cables using zip ties or clamps to prevent them from dangling or getting caught on other components.
By securing any loose cables or connections, you can have peace of mind knowing that your magnetic engine block heater is installed correctly and ready to operate efficiently.
Cleaning up the work area and storing tools
Now that the installation is complete, it’s time to clean up your work area and store your tools properly. Cleaning up not only ensures a clutter-free workspace but also helps maintain the longevity of your engine block heater. Follow these steps to tidy up:
- Remove any debris or leftover materials from the installation process.
- Wipe down the surrounding area to remove any dirt or grime.
- Organize and store your tools in a safe place, making sure they are readily accessible for future use.
By cleaning up the work area and storing your tools properly, you create a clean and organized space for future maintenance or repairs.
Finalizing the installation of your magnetic engine block heater involves securing any loose cables or connections and cleaning up the work area. Following these steps will ensure that your installation is completed accurately and that your engine block heater is ready to provide reliable warmth during those cold winter months.
Frequently Asked Questions For How To Install A Magnetic Engine Block Heater
Where Do You Put A Magnetic Engine Block Heater?
Place a magnetic engine block heater on the engine block. Attach it securely, ensuring proper contact for heat transfer. Make sure to follow the manufacturer’s instructions. The heater uses magnets to attach and heat the engine block, providing easier cold starts and better fuel efficiency in cold weather.
How Long Can You Leave A Magnetic Block Heater Plugged In?
You can leave a magnetic block heater plugged in as long as needed. However, it is important to follow the manufacturer’s instructions and not exceed the recommended usage time to avoid any potential damage or accidents.
Can You Install An Engine Block Heater Yourself?
Yes, you can install an engine block heater yourself. It’s a simple process that involves following the instructions provided with the heater. Make sure to take necessary safety precautions and have the right tools on hand.
How Hot Does A Magnetic Block Heater Get?
A magnetic block heater can get very hot, reaching temperatures up to 200 degrees Fahrenheit.
Conclusion
Installing a magnetic engine block heater is a simple and effective way to ensure your vehicle starts smoothly during cold weather. By following the step-by-step instructions outlined in this guide, you can easily install the heater and experience the benefits of quick engine warm-up.
Remember, regular maintenance and preparation are crucial for the optimal performance of your vehicle. Stay ahead of freezing temperatures and keep your engine running smoothly all winter long with a magnetic engine block heater.